2021 AUDI E-TRON display
[x] Cancel search: displayPage 25 of 308

4KE012721BF
Touch displays
Accepting suggested words or selecting
entries from the results list
> To accept a suggested word (2) or select an en-
try from the results list @), press on it.
> To display more content in the results list, drag
your finger upward or downward on the screen.
Setting the input language or keyboard
layout
> Applies to MMI: Select on the home screen:
SETTINGS > Language & keyboard > Keyboard.
> To define additional input languages, press the
© button.
> To change the keyboard layout for an input lan-
guage, press >. For example, you can select be-
tween QWERTZ and QWERTY.
23
Page 26 of 308

Head-up display
Head-up display
Description
Applies to: vehicles with head-up display
The head-up display projects certain warnings or
selected information from the assist systems on
the windshield. The display appears within the
driver's field of vision.
Switching on and off
The Y button is located in the function bar on
the lower display > page 18.
> To switch the head-up display on or off, press
and hold the Y button.
Settings in the Infotainment system
> Applies to MMI: Select on the home screen:
SETTINGS > Display & brightness > Head-up
display, or
> Press the Y button.
Possible settings:
— Display rotation
— Brightness
— Display height: you can adjust the height of the
display. Sit in the correct seating position
=> page 59 and adjust the head-up display.
— Display contents: you can set which informa-
tion should be displayed. The display of certain
information and some of the red indicator
lights cannot be hidden.
® Note
To reduce the risk of scratches on the glass
covering the head-up display, do not place any
objects in the projection opening.
@ Tips
— Sunglasses with polarization filters and un-
favorable lighting conditions can impair visi-
bility of the display.
— An optimal display depends on the seat po-
sition and the height adjustment of the
head-up display.
— A special windshield is needed for the head-
up display function.
24
— For information on cleaning, see > table In-
terior cleaning on page 263.
Page 27 of 308

4KE012721BF
Voice recognition system
Voice recognition system
General information
Applies to: vehicles with voice recognition system
You can operate many functions in the vehicle
easily using voice commands.
Using the voice recognition system optimally
> Speak clearly and distinctly at a normal volume.
Speak louder when driving faster.
» Emphasize the words in the commands evenly
and do not leave long pauses.
> Close the doors, the windows, and the sunroof*
to reduce background noise. Make sure that
passengers are not speaking when you are giv-
ing a voice command.
> Do not direct the vents toward the hands-free
microphone, which is in the roof headliner near
the front interior lights.
> Only the driver should speak to the system, be-
cause the handsfree microphone is aimed to-
ward this seating position.
ZA\ WARNING
— Direct your full attention to driving. As the
driver, you have complete responsibility for
safety in traffic. Only use the functions in
such a way that you always maintain com-
plete control over your vehicle in all traffic
situations.
— Do not use the voice recognition system in
emergencies because your voice may change
in stressful situations. The system may take
longer to dial the number or may not be
able to dial it at all. Dial the emergency
number manually.
G) Tips
There are no voice guidance* prompts when a
dialog is active.
Description
eye aU mame ees eR
Applies to: vehicles with voice recognition system
Se
Drive me to
Where is a a
Connect
Pre)
Play
Eg
Maes
coy
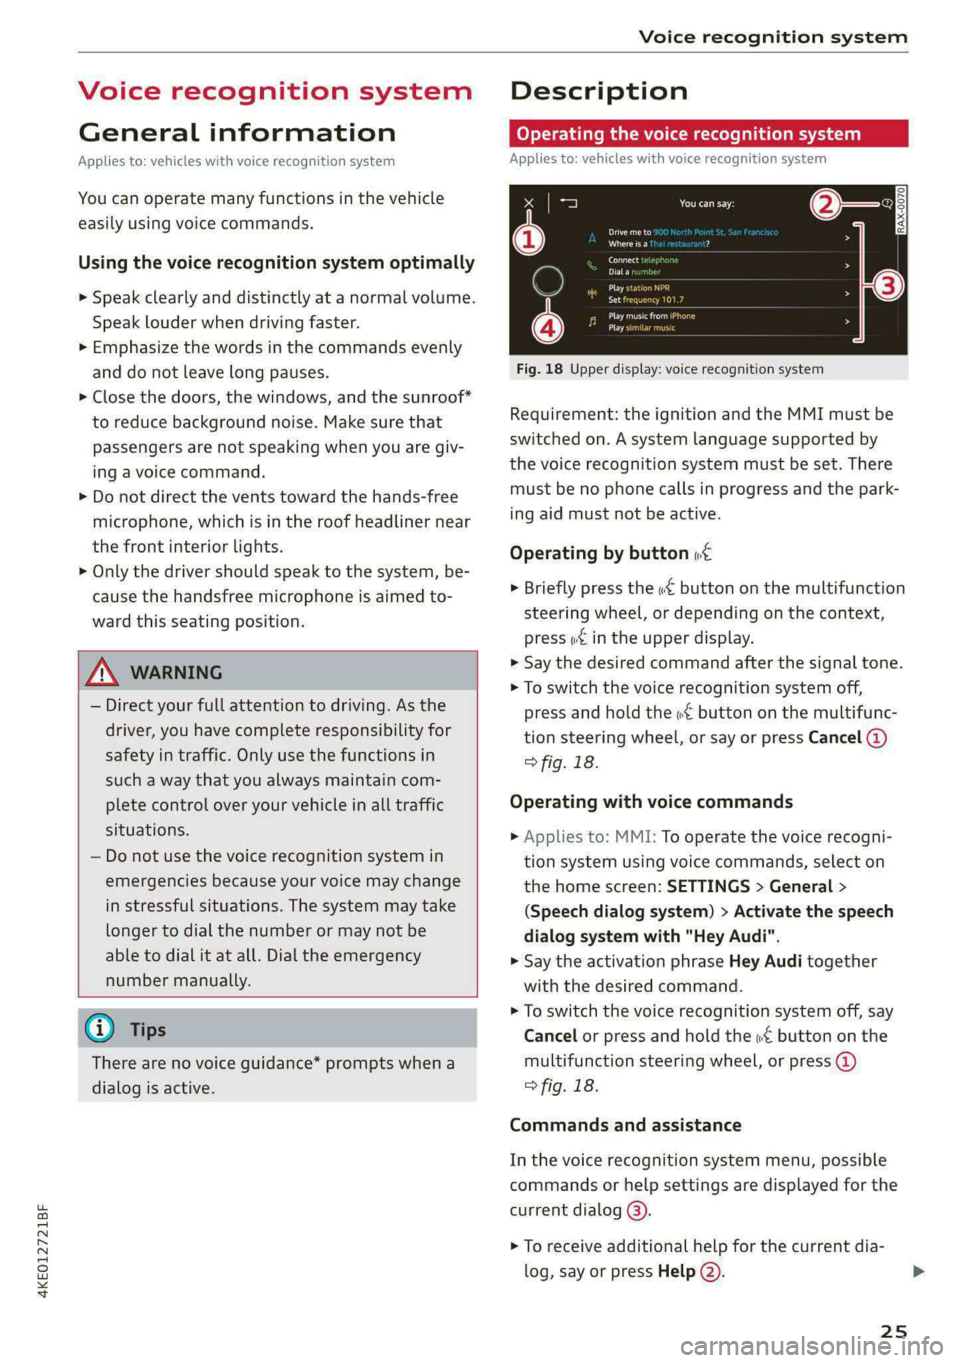
Fig. 18 Upper display: voice recognition system
Requirement: the ignition and the MMI must be
switched on. A system language supported by
the voice recognition system must be set. There
must be no phone calls in progress and the park-
ing aid must not be active.
Operating by button «£
> Briefly press the «€ button on the multifunction
steering wheel, or depending on the context,
press we in the upper display.
> Say the desired command after the signal tone.
> To switch the voice recognition system off,
press and hold the «€ button on the multifunc-
tion steering wheel, or say or press Cancel (@)
> fig. 18.
Operating with voice commands
> Applies to: MMI: To operate the voice recogni-
tion system using voice commands, select on
the home screen: SETTINGS > General >
(Speech dialog system) > Activate the speech
dialog system with "Hey Audi".
> Say the activation phrase Hey Audi together
with the desired command.
> To switch the voice recognition system off, say
Cancel or press and hold the «£ button on the
multifunction steering wheel, or press @)
> fig. 18.
Commands and assistance
In the voice recognition system menu, possible
commands or help settings are displayed for the
current dialog @).
> To receive additional help for the current dia-
log, say or press Help (2).
25
Page 28 of 308

Voice recognition system
> To pause voice recognition, say or press Pause
@. To reactivate voice recognition, press @)
again or briefly press the «€ button on the mul-
tifunction steering wheel.
Additional functions
Applies to: vehicles with voice recognition system
Command during voice output
If the function is switched on, you can simply say
a new command during a prompt.
> Applies to: MMI: Select on the home screen:
SETTINGS > General > Speech dialog system >
Allow commands during voice output.
Online recognizer
Applies to: vehicles with online recognizer
You can activate the online recognizer for addi-
tional functions and to improve the results of
voice recognition. A supported menu language
must be selected. When there is an active Inter-
net connection, the spoken command is evaluat-
ed in the vehicle and online.
> When you switch on the voice recognition sys-
tem for the first time, a menu for the online
recognizer will open, or
> Applies to MMI: Select on the home screen:
SETTINGS > General > Speech dialog system >
Consent to online speech recognizer.
> Read the licensing agreements and accept
them.
Amazon Alexa
Applies to: vehicles with Amazon Alexa Integration
You can activate Amazon Alexa to access certain
functions. A reduced number of commands for
Amazon Alexa are available during this.
Requirement: you must be logged in to your
myAudi account in the vehicle. The online recog-
nizer must be activated. A system language that
is supported by both the voice recognition system
and Amazon Alexa must be selected.
> Applies to: MMI: Select on the home screen:
USER > Connect to Amazon Alexa.
> Follow the instructions in the display.
> Applies to: MMI: To operate Amazon Alexa us-
ing voice commands, select on the home
26
screen: SETTINGS > General > (Speech dialog
system) > Activate the speech dialog system
with "Hey Audi".
>» Say the activation phrase “Alexa” together with
the desired command.
() Note
Read the information about Audi connect, and
be sure to note the connectivity costs section
=@ in General information on page 186.
Gi) Tips
Audi provides access to services from third
party providers. Permanent availability cannot
be guaranteed, because that depends on the
third party provider.
External voice operation
Applies to: vehicles with external speech dialog system
You can access and control the voice operation on
a connected mobile device through your vehicle.
Switching external voice operation on or off
Requirement: the ignition and the MMI must be
switched on. A cell phone must be connected to
the MMI with the Handsfree profile > page 175.
The mobile device being connected must have
voice control that can be controlled externally.
There must be no phone calls in progress and the
parking aid must not be active.
> To switch on the external voice operation, press
and hold the «€ button longer on the multifunc-
tion steering wheel.
> To switch off the external voice operation, press
and hold the «€ button longer on the multifunc-
tion steering wheel or press Cancel.
Using external voice operation
>» Say the desired command after the signal tone.
> To reactivate voice recognition when it is
paused, press the w€ button briefly on the mul-
tifunction steering wheel or press Resume.
G) Tips
Audi simply provides access to control your
cell phone with voice operation and does not >
Page 31 of 308

4KE012721BF
Personalization
Personalization
Users
General information
Applies to: vehicles with personalized user settings
Depending on vehicle equipment and your coun-
try, your vehicle may be able to manage various
users in the MMI. Each user will be assigned the
settings that they last used.
Before you begin driving, you can select a user in
the MMI and load personalized Infotainment and
vehicle settings.
Possible users in the MMI:
— myAudi user: as a myAudi user, you can use
Audi connect services that require a myAudi ac-
count. Certain settings are transferred online to
your myAudi account. If you log into your
myAudi account in another vehicle, you can
load your settings in the other vehicle.
— Local user: as a local user, you can only store
settings in the current vehicle. Your settings
cannot be transferred to other vehicles. Audi
connect services that can only be used with a
myAudi account will not be available.
— Guest user: as a guest user, you can store set-
tings in the vehicle without changing the set-
tings for other users. Audi recommends only
using the guest user temporarily, because set-
tings can be overwritten by other users.
Depending on vehicle equipment, the following
options may be used to detect the active user so
that the user settings can be loaded automatical-
ly before you start driving.
— Vehicle key
Requirement: the driver's door has been opened.
The detected user must be shown in the MMI.
Confirm the user shown, select another user
= page 29, or add another user > page 29.
ZA WARNING
It may not be possible to load Infotainment
and vehicle settings, or they may only load
partially. The driver is always responsible for
the Infotainment and vehicle settings in order
to reduce the risk of an accident.
@) Tips
— Certain Infotainment and vehicle settings
(such as mirrors, last radio stations) may be
stored, depending on vehicle equipment.
You can find additional information in the
MMI. Select on the home screen: SETTINGS
> General > Legal notes > About Audi con-
nect.
— Applies to: myAudi users: The stored set-
tings can only be transferred to vehicles
that are capable of receiving the transmit-
ted information. There may be restrictions
that prevent this, particularly in other coun-
tries.
— Applies to: myAudi users: The settings can
only be transferred and loaded when there
is coverage from the applicable mobile
phone service provider.
— Applies to: myAudi users with PIN protec-
tion switched on: If the MMI displays a de-
tected user but you simply start driving or
wait without entering the 4-digit PIN, then
the guest user will be selected. Some set-
tings for the detected myAudi user will be
transferred to the guest user.
OTe e le (ta 4
Applies to: vehicles with user management
Opening user management
Applies to: MMI
> Press USER on the home screen.
Selecting a user
Applies to: MMI
> Press on the desired user.
> Enter the 4-digit myAudi PIN, if necessary.
Adding myAudi users
Applies to MMI and Audi connect
Requirement: you must have successfully regis-
tered at my.audi.com and have created a 4-digit
myAudi PIN.
> Press Add user.
> Press Log in now to log in with your myAudi
credentials.
> Follow the system instructions.
29
Page 45 of 308

4KE012721BF
Opening and closing
» Make sure the child safety lock is working by
checking the function on the rear power win-
dow switch and door handle.
> Applies to: vehicles with controls for the cli-
mate control system in the rear and MMI: To al-
so restrict the operation of the climate control
system in the rear, select on the home screen:
SETTINGS > Display & brightness > Operation
in rear
When the child safety lock is switched on, the
following functions are disabled:
—The rear inner door handles
— The rear power windows
— The control panel* for the climate control sys-
tem in the rear
Message in the instrument cluster display
@/ Child safety lock: malfunction! Please
contact Service
There is a malfunction in the child safety lock.
Press the @ button again.
If the message stays on, drive immediately to an
authorized Audi dealer or authorized Audi Service
Facility to have the malfunction repaired.
ZA\ WARNING
— Observe the safety precautions > page 32.
—A malfunction in the child safety lock could
allow
the rear doors to be opened from the
inside, which increases the risk of an acci-
dent.
Power windows
o) Xe Mlle Ma ceiiare amuses
RAZ-0723
Fig. 32 Driver's door: power window switch
Power window switches:
©@ Left front door
@ Right front door
® Left rear door
@ Right rear door
Opening and closing the windows
The driver can control all power windows. All
power window switches are equipped with a two-
stage function:
> To open or close the window completely, press
the switch down or pull the switch up briefly to
the second level. The operation will stop if the
switch is pressed or pulled again.
> To select a position in between opened and
closed, press or pull the switch to the first level
until the desired window position is reached.
Correcting a malfunction in the one-touch
up/down function
If necessary, you can reactivate the one-touch
up/down function if it malfunctions.
> Pull the power window switch up until the win-
dow is completely raised.
>» Release the switch and pull it up again for at
least one second.
ZA WARNING
— Observe the safety precautions > page 32.
— Never close the windows carelessly or in an
uncontrolled manner, because this increases
the risk of injury.
G) Tips
— You can still open and close the windows for
several minutes after turning the ignition
off. The power window switch is not disa-
bled until the driver's door or front passeng-
er's door is opened.
— The power windows are equipped with pinch
protection. The automatic window may stop
closing and will open all the way again even
if no obstacle is detected. Pull the power
window switch up until the window is com-
pletely raised.
43
Page 47 of 308

4KE012721BF
Opening and closing
> Push the 2S switch back briefly to the second
level 2) twice in a row.
Roof emergency closing
If an object is detected when closing, the roof
will open again automatically. In this case, you
can then close it with the power emergency clos-
ing function.
> Within five seconds after the sunroof opens au-
tomatically, pull the applicable button until the
roof is closed.
Z\ WARNING
To reduce the risk of injury, always pay atten-
tion when closing the roof. Always switch the
ignition off and take the key with you when
leaving the vehicle.
@) Note
Always close the roof when you leave the vehi-
cle and when there is precipitation to reduce
the risk of damage to the interior equipment,
particularly the electronic equipment.
G) Tips
— After switching off the ignition, the roof and
sunshades can still be operated for several
minutes as long as neither of the front
doors have been opened.
— It is not possible to open the roof when
temperatures are too low.
Garage door opener
Applies to: vehicles with garage door opener
With the garage door opener, you can activate
systems such as the garage doors, security sys-
tems or house lights from inside your vehicle.
These functions are operated in the MMI. Multi-
ple receivers can be programmed, which can con-
trol the functions of up to eight!) hand-held
transmitters.
)) The possible number of hand-held transmitters depends
on the equipment.
ZA\ WARNING
— When operating or programming the garage
door opener, make sure that no people or
objects are in the area immediately sur-
rounding the equipment. People can be in-
jured or property can be damaged if struck
when closing.
— Do not allow yourself to be distracted from
traffic by the viewing and operating the dis-
plays.
Gi) Tips
— If you sell your vehicle, reset all settings to
the factory default settings > page 229.
— The system complies with United States FCC
regulations and ISED regulations
=> page 288.
G) Tips
Before you program your system to the ga-
rage door opener, first check the compatibili-
ty:
— Ask an authorized Audi dealer or authorized
Audi Service Facility or check at www.
homelink.com. You can also find more infor-
mation about HomeLink there.
— You can display information about Home-
Link (compatibility level/status/country
code/HomeLink generation) in the MMI:
— Select on the home screen: VEHICLE > Set-
tings & Service > Garage door opener > @.
Applies to: vehicles with garage door opener
Requirements: the remote control transmitter
must be programmed > page 46, Program-
ming, the vehicle must be within range of the
system, and the ignition must be switched on.
There are multiple options to open or close the
system (such as the garage door).
45
Page 48 of 308

Opening and closing
> If you have only programmed one remote con-
trol transmitter, press the rd button on the
lower display. Or
> If you have programmed multiple remote con-
trol transmitters, press the r button on the
lower display and then press the respective sys-
tem button. Or
> Applies to: vehicles with programmable steer-
ing wheel button: If you have configured the
programmable steering wheel button, press
the *K button > page 28. Or
» Applies to: vehicles with location pairing: If you
have programmed Location pairing, press the
button for this in the upper display (notification
center > page 20). As you approach the system,
the button is displayed on the MMI.
If transmission was successful, the message:
Send to: XXX will appear.
Applies to: vehicles with garage door opener
You can program both fixed code and rolling code
systems in the MMI using the procedure that is
described.
Requirement: the ignition must be switched on.
Programming the system
Applies to: MMI
Requirement: the hand transmitter must be
present and the vehicle must be within range of
the system (such as the garage door) that you
would like to program.
> If you are programming the garage door opener
for the first time, press the - button on the
lower display. Follow the instructions in the up-
per
display. Or
> If you would like to program other systems, se-
lect on the home screen: VEHICLE > Settings &
Service > Garage door opener. Select the de-
sired button: @). Follow the instructions in the
MMI.
> If you would like to reprogram systems that are
already programmed, select on the home
screen: VEHICLE > Settings & Service > Garage
D_ Only applies to rolling code systems
46
door opener. Press the Z button and select 7
for the system to be reprogrammed. Select:
Program. Follow the instructions in the MMI.
With some systems, the garage door opener will
be immediately available after programming.
With other systems, the garage door opener
must also be synchronized.
Synchronizing)
Requirement: the hand transmitter must already
be programmed and the vehicle must be within
range of the system (such as the garage door).
If the system synchronization is performed di-
rectly after the programming procedure, follow
the instructions on the MMI.
If you would like to sync at a later time:
> Applies to: MMI: Select on the home screen:
VEHICLE > Settings & Service > Garage door
opener.
> Press the button for the system that you would
like to synchronize.
> Follow the instructions in the MMI.
Location pairing
Applies to: vehicles with location pairing
For easier operation, you can program your sys-
tem's location.
Requirements: the respective hand transmitter
must be programmed © page 46 and the vehicle
must be located in front of the system.
> If you have programmed your system, follow
the instructions in the MMI. Or
If you would like to set up location pairing at an-
other time:
> Applies to: MMI: Select on the home screen:
VEHICLE > Settings & Service > Garage door
opener.
> Press the Z button.
> Press the button for the system your vehicle
is facing.
> Select: Location pairing.
> Follow the instructions in the MMI.