2021 AUDI A6 steering wheel
[x] Cancel search: steering wheelPage 202 of 332
Navigation
Navigation
Opening navigation
Applies to: vehicles with navigation system
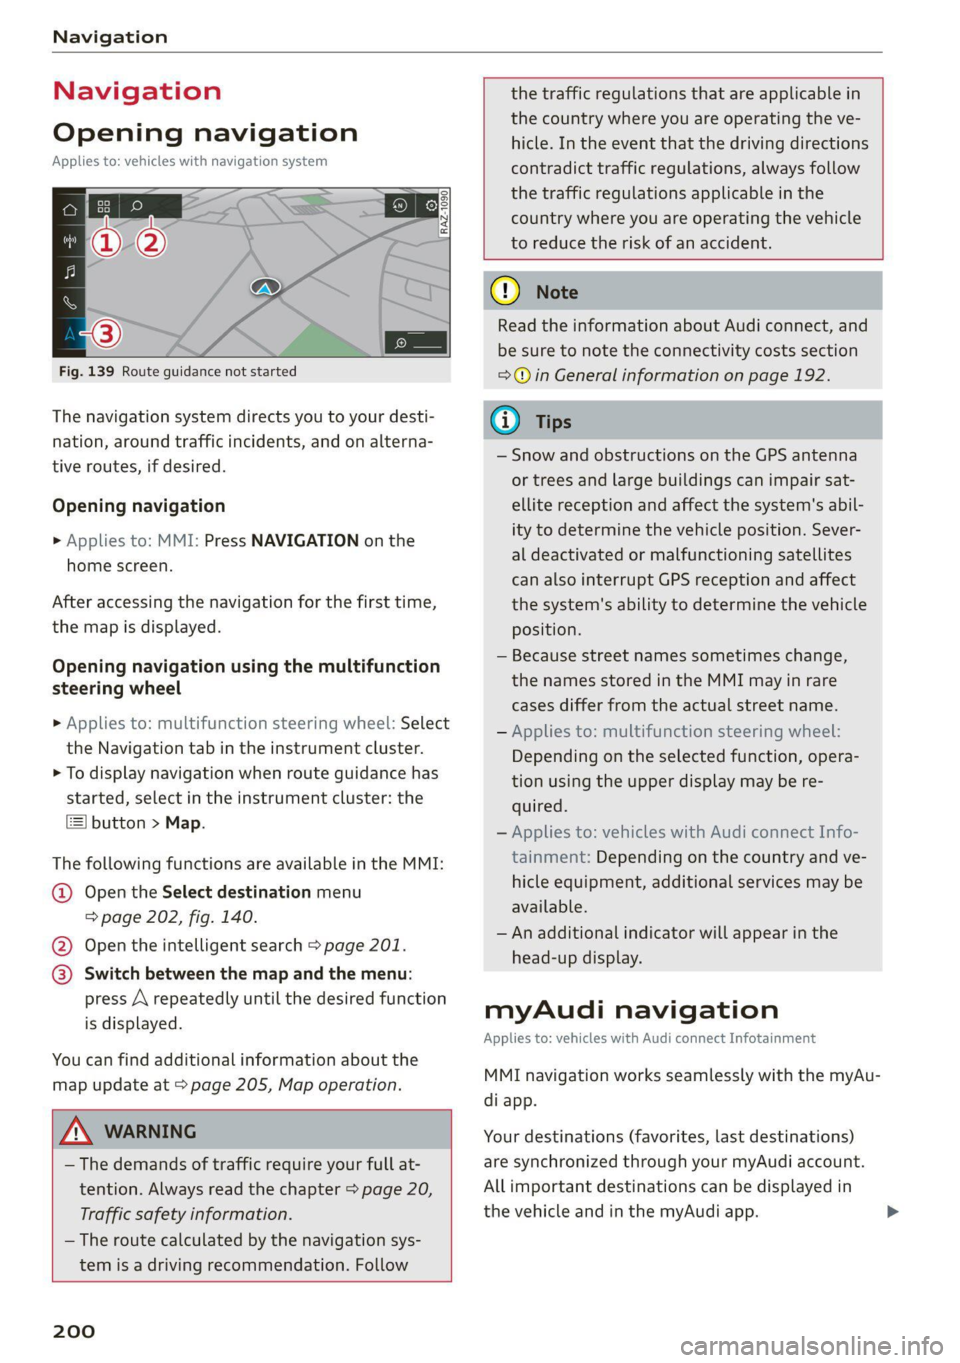
Fig. 139 Route guidance not started
The navigation system directs you to your desti-
nation, around traffic incidents, and on alterna-
tive routes, if desired.
Opening navigation
>» Applies to: MMI: Press NAVIGATION on the
home screen.
After accessing the navigation for the first time,
the map is displayed.
Opening navigation using the multifunction
steering wheel
> Applies to: multifunction steering wheel: Select
the Navigation tab in the instrument cluster.
> To display navigation when route guidance has
started, select in the instrument cluster: the
button > Map.
The following functions are available in the MMI:
@ Open the Select destination menu
= page 202, fig. 140.
@ Open the intelligent search > page 201.
@ Switch between the map and the menu:
press A repeatedly until the desired function
is displayed.
You can find additional information about the
map update at > page 205, Map operation.
ZA\ WARNING
— The demands of traffic require your full at-
tention. Always read the chapter > page 20,
Traffic safety information.
— The route calculated by the navigation sys-
tem is a driving recommendation. Follow
200
the traffic regulations that are applicable in
the country where you are operating the ve-
hicle. In the event that the driving directions
contradict traffic regulations, always follow
the traffic regulations applicable in the
country where you are operating the vehicle
to reduce the risk of an accident.
() Note
Read the information about Audi connect, and
be sure to note the connectivity costs section
=@ in General information on page 192.
(i) Tips
— Snow and obstructions on the GPS antenna
or trees and large buildings can impair sat-
ellite reception and affect the system's abil-
ity to determine the vehicle position. Sever-
al deactivated or malfunctioning satellites
can also interrupt GPS reception and affect
the system's ability to determine the vehicle
position.
— Because street names sometimes change,
the names stored in the MMI may in rare
cases differ from the actual street name.
— Applies to: multifunction steering wheel:
Depending on the selected function, opera-
tion using the upper display may be re-
quired.
— Applies to: vehicles with Audi connect Info-
tainment: Depending on the country and ve-
hicle equipment, additional services may be
available.
— An additional indicator will appear in the
head-up display.
myAudi navigation
Applies to: vehicles with Audi connect Infotainment
MMI navigation works seamlessly with the myAu-
di app.
Your destinations (favorites, last destinations)
are synchronized through your myAudi account.
All important destinations can be displayed in
the vehicle and in the myAudi app.
Page 204 of 332
Navigation
Check the spelling of the term that was
searched or check the search area
=> page 201.
— Distances to points of interest are displayed
as a straight-line distance from your current
location. The actual distance from your cur-
rent location to the point of interest is up-
dated automatically. The list of points of in-
terest that were found is not resorted when
this happens.
Select destinati
Applies to: vehicles with navigation system
eer er
RAX-0146 cr) m
& wv
A Last
need Cee
a)
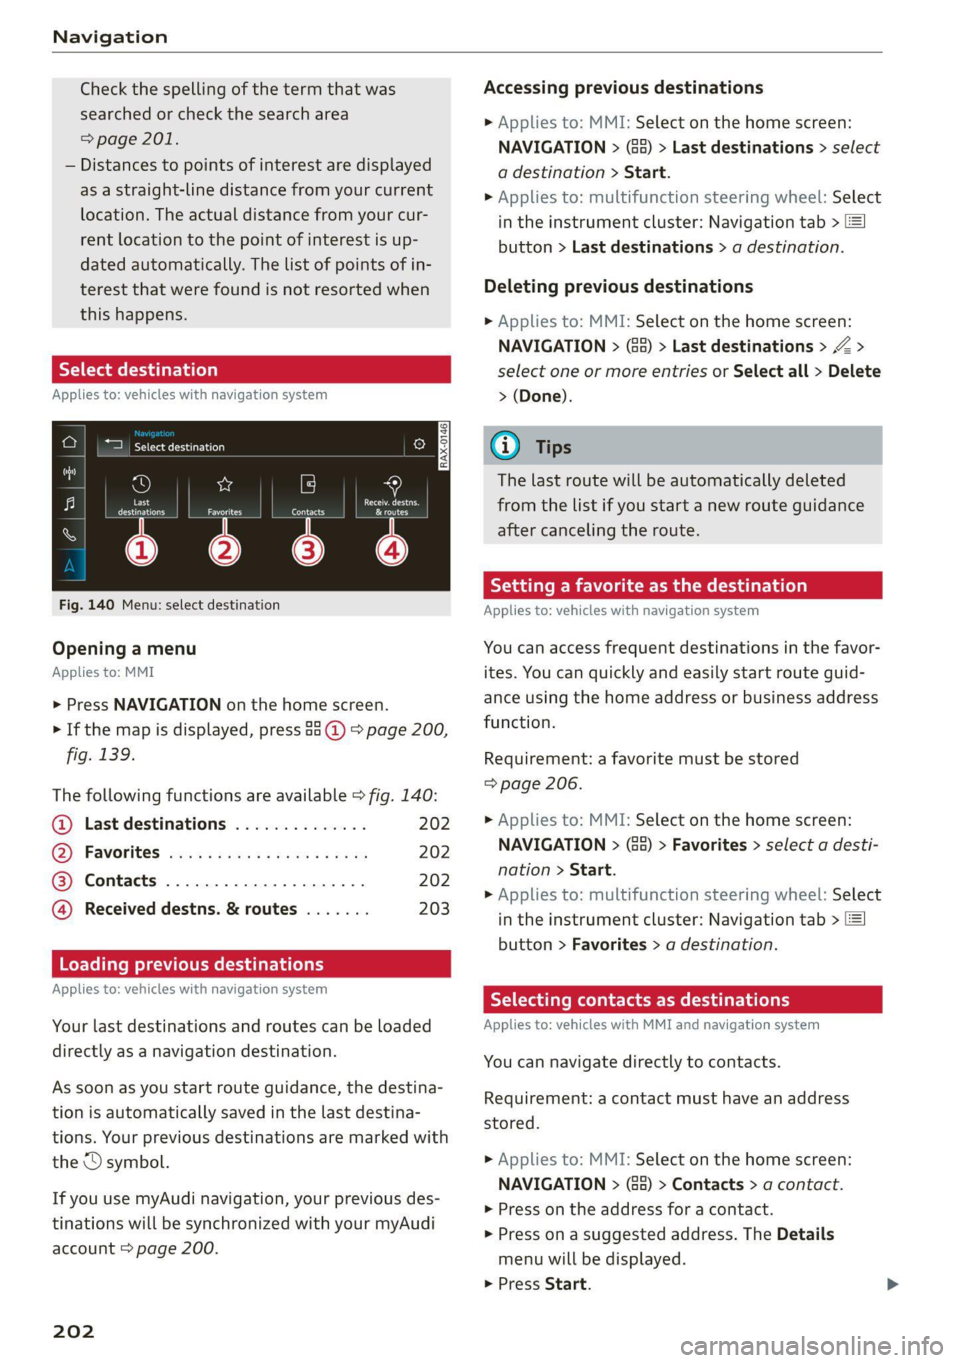
Fig. 140 Menu: select destination
Opening a menu
Applies to: MMI
> Press NAVIGATION on the home screen.
> If the map is displayed, press aa (1) > page 200,
fig. 139.
The following functions are available > fig. 140:
© Last destinations 202
@® Favorites ...............000008 202
@® Contacts ..................0., 202
@ Received destns. & routes ....... 203
Loading previous destinations
Applies to: vehicles with navigation system
Your last destinations and routes can be loaded
directly as a navigation destination.
As soon as you start route guidance, the destina-
tion is automatically saved in the last destina-
tions. Your previous destinations are marked with
the © symbol.
If you use myAudi navigation, your previous des-
tinations will be synchronized with your myAudi
account > page 200.
202
Accessing previous destinations
> Applies to: MMI: Select on the home screen:
NAVIGATION > (Ga) > Last destinations > select
a destination > Start.
> Applies to: multifunction steering wheel: Select
in the instrument cluster: Navigation tab > [=]
button > Last destinations > a destination.
Deleting previous destinations
> Applies to: MMI: Select on the home screen:
NAVIGATION > (88) > Last destinations > Z >
select one or more entries or Select all > Delete
> (Done).
Gi) Tips
The last route will be automatically deleted
from the list if you start a new route guidance
after canceling the route.
Setting a favorite as the destination
Applies to: vehicles with navigation system
You can access frequent destinations in the favor-
ites. You can quickly and easily start route guid-
ance using the home address or business address
function.
Requirement: a favorite must be stored
=> page 206.
> Applies to: MMI: Select on the home screen:
NAVIGATION > (G8) > Favorites > select a desti-
nation > Start.
> Applies to: multifunction steering wheel: Select
in the instrument cluster: Navigation tab >
button > Favorites > a destination.
Yaad deme aee eRe dir tliry
Applies to: vehicles with MMI and navigation system
You can navigate directly to contacts.
Requirement: a contact must have an address
stored.
> Applies to: MMI: Select on the home screen:
NAVIGATION > (8) > Contacts > a contact.
> Press on the address for a contact.
> Press on a suggested address. The Details
menu will be displayed.
> Press Start.
Page 206 of 332
Navigation
Selecting map content (such as POIs) as the
destination
Requirement: map content must be displayed
=> page 210.
> Press on map content on the map (for example,
ii).
Selecting the destination
> Select: F2 > Start.
Route guidance will be activated and the map will
be displayed > page 204, fig. 142.
Stopovers and route plan
Applies to: vehicles with navigation system
You can enter additional destinations during ac-
tive route guidance.
Entering a stopover
Requirement: route guidance must be active.
> Enter a destination > page 201.
Displaying stopovers or the route plan
All destinations are listed in the route plan.
> Press on fin the side menu on the map
=> page 204, fig. 142.
Editing stopovers
> Press on Pin the side menu on the map
=> page 204, fig. 142.
> Adding a stopover: Select: Add destination >
select a destination > Add to route.
> Moving a stopover: press Z. Touch the > sym-
bol and move the entry to the desired position.
Press Done.
> Deleting a stopover: Select: Z > one or more
entries or Select all > Delete > (Done).
Stopping route guidance
Applies to: vehicles with navigation system
Requirement: route guidance must be active and
the map must be displayed.
> Applies to: MMI: Press B( > page 204, fig. 142.
> Applies to: multifunction steering wheel: Select
in the instrument cluster: Navigation tab >
button > Cancel route guidance.
204
Map
Map functions
Applies to: vehicles with navigation system
yn >] 13:51 | E53 Dreshertown Rd
py pe Dee aay a ae LE
- oF ‘a € “epio
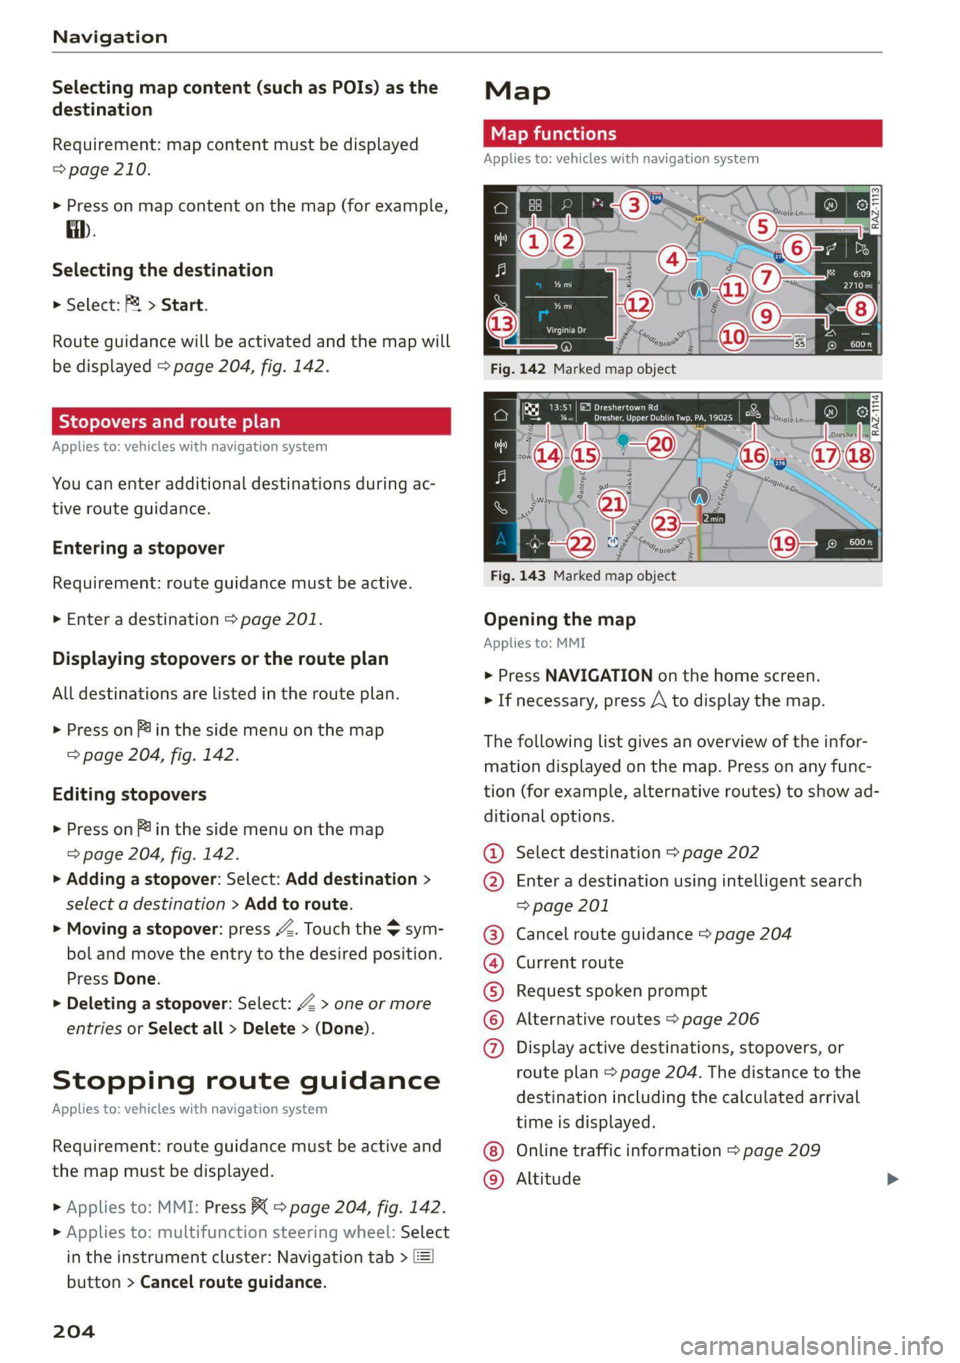
Fig. 143 Marked map object
Opening the map
Applies to: MMI
> Press NAVIGATION on the home screen.
> If necessary, press A to display the map.
The following list gives an overview of the infor-
mation displayed on the map. Press on any func-
tion (for example, alternative routes) to show ad-
ditional options.
Select destination > page 202
Enter a destination using intelligent search
=> page 201
Cancel route guidance > page 204
Current route
Request spoken prompt
Alternative routes > page 206
COOH
OO
Display active destinations, stopovers, or
route plan > page 204. The distance to the
destination including the calculated arrival
time is displayed.
Online traffic information > page 209
Altitude ©®
Page 212 of 332

Navigation
Online traffic information
Applies to: vehicles with navigation system and online traffic
information
The MMI can receive real-time online traffic infor-
mation about congestion, accidents, road
construction, and other incidents.
Requirement: the MMI must be connected to the
Internet > page 192, Audi connect. Traffic infor-
mation must be switched on in the MMI
=> page 210.
Traffic information will be displayed on the
standard map > page 204, fig. 142.
Online traffic information is also displayed on the
standard map > page 207.
G) Tips
— Having the online traffic information func-
tion switched on provides the most accurate
reports of traffic situations and traffic fore-
casting. Your vehicle transmits and process-
es its anonymous, encrypted position infor-
mation at regular intervals to the traffic da-
ta provider. You can switch off data transfer
at any time > page 305.
— The online traffic information network is
not available in all countries, and the cover-
age is not nationwide.
Settings
Applies to: vehicles with navigation system
You can adjust the navigation system settings in
the instrument cluster and in the MMI display
separately. The settings depend on the country
and vehicle equipment.
Accessing settings
» Applies to: MMI: Select on the home screen:
NAVIGATION > ©}.
Accessing settings using the multifunction
steering wheel
> Applies to: multifunction steering wheel: Select
in the instrument cluster: Navigation tab >
button.
210
Please note that a setting applied to the multi-
function steering wheel is only valid for the in-
strument cluster map.
Map settings
Satellite map: see > page 207.
Traffic: you can display current traffic informa-
tion on the map.
— Free flowing traffic
— Traffic obstructions
— Traffic incidents
Map colors
— Automatic: the map display adapts to the light-
ing conditions (for example, by changing from
day to night when driving through a tunnel).
— Day or Night
Map orientation
— 2D heading-up map/2D north-up map: the
current vehicle position is displayed. The map is
oriented in the direction of travel or to the
north.
— 3D heading-up map: the current vehicle posi-
tion is shown on a three-dimensional map and
is aligned to the direction of travel.
— Overview: the entire route from the vehicle po-
sition to the destination or the next stopover is
displayed on the map. The map is oriented to
the north.
Automatic zoom
— On: the map scale is adapted automatically de-
pending on the type of road being traveled (ex-
pressway, highway, other roads) so that you al-
ways have an optimal overview of the road
ahead. When route guidance is active, the scale
is adjusted automatically for a better detailed
view when there are upcoming maneuvers.
— Intersection: when route guidance is active, the
scale is adjusted automatically for a better de-
tailed view when there are upcoming maneu-
vers.
— Off
MMI map contents/Map content: you can switch
the display of additional information (such as
POIs) on the map in the upper display on or off. >
Page 214 of 332

Radio
Radio
General information
Selecting the radio
ie) | ey
See) os 2 )
\S ™
3 Pa): 4
(ones
ro
* a 106.7 ana
mao
RADIO —@
Saray
22 Lim)
i
4 Qi:
aa
Fig. 148 Upper display: SiriusXM channel list
Depending on the vehicle equipment, the radio
may support the FM, AM, and SiriusXM (satellite
radio) frequency bands. Using the HD Radio re-
ceiver* also allows you to receive radio stations
on the FM and AM bands in digital format.
Depending on the vehicle equipment and the se-
lected station list, the following information will
be displayed:
@ Station list
Shows the stations that are currently availa-
ble. The station list updates automatically.
Stations @
For example, the station name may be dis-
played depending on availability.
HD Radio technology
FM/AM stations that can be received by digi-
tal radio are marked with the HD Radio tech-
nology symbol H).
If reception quality declines, the radio auto-
matically switches to the analog FM/AM sta-
tion depending on availability.
@ Additional audio programs
Digital HD Radio stations may contain multi-
ple additional audio programs. If you lose re-
ception, the additional audio programs will
212
be muted since they can no longer be re-
ceived.
Radio ID
Your radio ID and contact data for your satel-
lite radio provider are displayed.
Channel number
® No reception e®
The station cannot be received.
In addition to the symbols for the usual frequen-
cy bands, the following information may also be
available depending on vehicle equipment:
Symbol | Description
The station provides information in
the background for an online station
alternative. Online station tracking
must be switched on for this
> page 218.
The station is received through the In-
ternet.
The system attempts to receive the
station/podcast through the Internet.
G) Tips
— Contact the SiriusXM* provider if you would
like to receive satellite programming.
— Buildings, tunnels, bridges, open areas, oth-
er vehicles or objects on the vehicle roof can
affect reception.
— Satellite radio* is not available in all re-
gions.
Adjusting the radio using the MMI
> Applies to: MMI: To set a frequency band, select
on the home screen: RADIO > Source a catego-
ry.
> Applies to: MMI: To set a station, select on the
home screen: RADIO > Source > a category >a
station/podcast*.
> To select a frequency, follow the instructions
under > page 214, Free text search.
Adjusting the radio using the multifunction
steering wheel
Requirement: radio mode must be on. >
Page 215 of 332

4K0012721BE
Radio
> Select the radio/media tab in the instrument > To select a station or a source, turn and press
cluster. the left thumbwheel.
> To switch between radio and media, select the
button > Switch to radio/Switch to media. @) Tips
> Turn the left thumbwheel to display the station Applies to: multifunction steering wheel: De-
list. : ‘ f
. . = pending on the selected function, operation
> fo switch to a different source, press the [=] through the MMI may be required.
utton.
Radio functions
Lea TN]
[RAX-0191
Fig. 149 Upper display: left side: playback view of radio functions, right side: sources
Operating The following functions may be available depend-
ing on the selected radio station/podcast* and > Applies to: MMI: To open the playback view @,
the vehicle equipment: select on the home screen: RADIO > Source > a
category > a station/podcast*.
> Applies to: MMI: To open the sources (2), select
on the home screen: RADIO > Source.
Symbol/Description |Description
® ao Displaying categories in a frequency band.
@ Source Displays sources in the Radio menu.
© Frequency band Shows the current station frequency band.
Indicates that on demand content is playing. The MMI must be con-
© ON nected to the Internet and a data plan must be available for this
=> page 196.
@ wie See > page 215.
& Settings > page 218.
Depending on availability, you can switch between the image views:
press on the station logo. Use one finger to swipe to the right or left
to switch between the Station logo and Cover art (album cover). Al-
so see > page 218, Online additional data.
© Station logo
213
Page 225 of 332
4K0012721BE
Media
Never leave mobile devices in the vehicle in
extremely high or low temperatures.
@ Tips
— Always follow the information found in
=> page 84.
— When you switch the ignition off, the USB
ports are still supplied with power until the
energy management intervenes.
— Do not use an additional adapter cable or
USB extension cable to connect mobile devi-
ces to the Audi music interface that already
have a cable or that must be connected with
a USB adapter cable (> page 222, fig. 151).
Using an additional adapter or US extension
cable may impair functionality.
— Functionality is not guaranteed for mobile
devices that do not conform to the USB 2.0
specification.
— USB hubs are not supported.
— Video playback through the Audi music in-
terface is not supported on Apple devices
and MTP devices (such as smartphones).
— iPod touch or iPhone malfunctions also af-
fect the operation of the MMI. Reset your
mobile device in these situations.
— Audi recommends updating the iPod touch
or iPhone software to the latest version. Re-
fer to your mobile device owner's manual
for more information.
— The USB adapter on the Audi music inter-
face will support iPod touch or iPhone devi-
ces from the 5th generation or newer with
the lightning connector.
—Aselection of supported devices can be
found in the database for tested mobile de-
vices at www.audi.com/mp3.
Playing media
The following sources can be selected depending
on the vehicle equipment:
— Amazon Alexa > page 221.
— USB device > page 222.
— DVD & page 221.
— External device: you can connect external devi-
ces via Bluetooth and use the Bluetooth audio
player > page 221, or you can connect an exter-
nal device directly to the Audi music interface
=> page 222.
Accessing media
Playing media files using the MMI
> Applies to: MMI: Select on the home screen:
MEDIA > Source > a source. Depending on the
connected device, the symbol for a source may
change. The device name may be displayed (for
example: myPhone).
> Select a track from the categories in the media
center > page 224.
Playing media files using the multifunction
steering wheel
Requirement: a media source must contain me-
dia files > page 223.
> Select the radio/media tab in the instrument
cluster.
> Turn the left thumbwheel to display the play-
list.
> To switch to a different source, press the
button.
> To select a media file or a source, turn and
press the left thumbwheel.
> To switch between radio and media, select in
the instrument cluster: the LE] button > Switch
to radio/Switch to media.
G) Tips
— For safety reasons, the video image is only
displayed when the vehicle is stationary. On-
ly the sound from the video plays while driv-
ing.
— Applies to: multifunction steering wheel:
Depending on the selected function, opera-
tion through the MMI may be required.
223
Page 238 of 332
Additional settings
> Press and hold an element until the Options
menu is displayed.
> Press Delete.
If a device is listed multiple times, it will be de-
leted from all menu items.
Additional options
Depending on the selected function, additional
options
may be available.
Requirement: the connected devices menu must
be displayed > page 235.
> Press ona menu item, such as Telephone 1.
> Press and hold an element until the Options
menu is displayed.
Bluetooth profile
You can switch desired profiles on or off sepa-
rately in the MMI.
Favorite
To set a paired mobile device as the default
phone, activate this function in the MMI.
When the mobile device is in range and the Blue-
tooth function on the mobile device and in the
MMI is switched on, the default phone will be
given priority over the other Bluetooth devices
and will be connected directly to the MMI.
Legal information
erreur)
Information on the software licenses can be
found online at www.audi.com/softwareinfo.
Item elem tarts)
> Applies to: MMI: Select on the home screen:
SETTINGS > General.
Subscriptions
Version information
Legal notes
Possible options:
— Software information
236
— About Audi connect
— About the data memory
Audi smartphone interface
Applies to: vehicles with Audi smartphone interface
Requirement: a smartphone must be connected
to the MMI > page 231.
» Applies to: MMI: Select on the home screen:
SETTINGS > Connected devices > Audi smart-
phone interface.
> Press and hold an element until the Options
menu is displayed.
> Press Legal notes.
Requirement: the vehicle must be stationary and
the ignition must be switched on.
> Select in the instrument cluster: vehicle func-
tions tab > page 13.
> Press and hold the =] button on the multifunc-
tion steering wheel until the display appears.
Possible options:
— Engine code
— Software information
— Version information
Head-up display
Applies to: vehicles with head-up display
Requirement: the vehicle must be stationary and
the ignition must be switched on. The head-up
display is switched on.
> Applies to: MMI: Select on the home screen:
SETTINGS > Display & brightness > Head-up
display > Display contents > Show the license
text in the head-up display.