2021 ALFA ROMEO GIULIA wheel
[x] Cancel search: wheelPage 176 of 284

SAFETY
174
Maintaining Your Air Bag System Event Data Recorder (EDR)
This vehicle is equipped with an event data
recorder (EDR). The main purpose of an EDR is
to record, in certain crash or near crash-like
situations, such as an air bag deployment or
hitting a road obstacle, data that will assist in
understanding how a vehicle’s systems
performed. The EDR is designed to record data
related to vehicle dynamics and safety
systems for a short period of time, typically 30
seconds or less. The EDR in this vehicle is
designed to record such data as:
How various systems in your vehicle were
operating;
Whether or not the driver and passenger
safety belts were buckled/fastened;
How far (if at all) the driver was depressing
the accelerator and/or brake pedal; and,
How fast the vehicle was traveling.
These data can help provide a better under -
standing of the circumstances in which
crashes and injuries occur.
NOTE:
EDR data are recorded by your vehicle only if a
non-trivial crash situation occurs; no data are
recorded by the EDR under normal driving
conditions and no personal data (e.g., name,
gender, age, and crash location) are recorded. However, other parties, such as law enforce
-
ment, could combine the EDR data with the
type of personally identifying data routinely
acquired during a crash investigation.
To read data recorded by an EDR, special
equipment is required, and access to the
vehicle or the EDR is needed. In addition to the
vehicle manufacturer, other parties, such as
law enforcement, that have the special equip -
ment, can read the information if they have
access to the vehicle or the EDR.
Child Restraints
Everyone in your vehicle needs to be buckled
up at all times, including babies and children.
Every state in the United States, and every
Canadian province, requires that small chil -
dren ride in proper restraint systems. This is
the law, and you can be prosecuted for
ignoring it.
Children 12 years or younger should ride prop -
erly buckled up in a rear seat, if available.
According to crash statistics, children are
safer when properly restrained in the rear
seats rather than in the front.
WARNING!
Modifications to any part of the air bag
system could cause it to fail when you need
it. You could be injured if the air bag system
is not there to protect you. Do not modify the
components or wiring, including adding any
kind of badges or stickers to the steering
wheel hub trim cover or the upper passenger
side of the instrument panel. Do not modify
the front fascia/bumper, vehicle body struc -
ture, or add aftermarket side steps or
running boards.
It is dangerous to try to repair any part of
the air bag system yourself. Be sure to tell
anyone who works on your vehicle that it
has an air bag system.
Do not attempt to modify any part of your
air bag system. The air bag may inflate
accidentally or may not function properly if
modifications are made. Take your vehicle
to an authorized dealer for any air bag
system service. If your seat, including your
trim cover and cushion, needs to be
serviced in any way (including removal or
loosening/tightening of seat attachment
bolts), take the vehicle to an authorized
dealer. Only manufacturer approved seat
accessories may be used. If it is necessary
to modify the air bag system for persons
with disabilities, contact an authorized
dealer.
21_GA_OM_EN_USC_t.book Page 174
Page 190 of 284

SAFETY
188
(Continued)
Periodic Safety Checks You Should Make
Outside The Vehicle
Tires
Examine tires for excessive tread wear and
uneven wear patterns. Check for stones, nails,
glass, or other objects lodged in the tread or
sidewall. Inspect the tread for cuts and cracks.
Inspect sidewalls for cuts, cracks, and bulges.
Check the wheel nuts for tightness. Check the
tires (including spare) for proper cold inflation
pressure.
Lights
Have someone observe the operation of brake
lights and exterior lights while you work the
controls. Check turn signal and high beam
indicator lights on the instrument panel.
Door Latches
Check for proper closing, latching, and locking.
Fluid Leaks
Check area under the vehicle after overnight
parking for fuel, coolant, oil, or other fluid
leaks. Also, if gasoline fumes are detected or if
fuel or brake fluid leaks are suspected the
cause should be located and corrected imme-
diately.
ALWAYS REMOVE THE EXISTING FLOOR
MAT FROM THE VEHICLE before
installing any other floor mat. NEVER
install or stack an additional floor mat on
top of an existing floor mat.
ONLY install floor mats designed to fit your
vehicle. NEVER install a floor mat that
cannot be properly attached and secured
to your vehicle. If a floor mat needs to be
replaced, only use a FCA approved floor
mat for the specific make, model, and
year of your vehicle.
ONLY use the driver’s side floor mat on the
driver’s side floor area. To check for inter -
ference, with the vehicle properly parked
with the engine off, fully depress the
accelerator, the brake, and the clutch
pedal (if present) to check for interfer -
ence. If your floor mat interferes with the
operation of any pedal, or is not secure to
the floor, remove the floor mat from the
vehicle and place the floor mat in your
trunk.
ONLY use the passenger’s side floor mat
on the passenger’s side floor area.
WARNING! (Continued)
ALWAYS make sure objects cannot fall or
slide into the driver’s side floor area when
the vehicle is moving. Objects can become
trapped under accelerator, brake, or
clutch pedals and could cause a loss of
vehicle control.
NEVER place any objects under the floor
mat (e.g., towels, keys, etc.). These
objects could change the position of the
floor mat and may cause interference with
the accelerator, brake, or clutch pedals.
If the vehicle carpet has been removed
and re-installed, always properly attach
carpet to the floor and check the floor mat
fasteners are secure to the vehicle carpet.
Fully depress each pedal to check for
interference with the accelerator, brake,
or clutch pedals then re-install the floor
mats.
It is recommended to only use mild soap
and water to clean your floor mats. After
cleaning, always check your floor mat has
been properly installed and is secured to
your vehicle using the floor mat fasteners
by lightly pulling mat.
WARNING! (Continued)
21_GA_OM_EN_USC_t.book Page 188
Page 196 of 284

IN CASE OF EMERGENCY
194
TIRE SERVICE KIT
Description
If a tire is punctured, you can make an emer-
gency repair using the Tire Service Kit located
in the trunk beneath the load floor.
Tire Service Kit Location
The Tire Service Kit includes:
Sealant cartridge containing the sealing
fluid.
Filler tube.
Adhesive label with the writing "Max.
50 mph (80 km/h)”, to be attached in a
position easily visible to the driver (e.g. on
the dashboard) after repairing the tire.
Air compressor, complete with pressure
gauge and connectors.
An instruction pamphlet for reference in
prompt and correct use of the Tire Service
Kit, which must be then given to the
personnel dealing with the sealant-treated
tire.
A pair of protective gloves.
Adaptors for inflating different elements.
Tire Service Kit Components
NOTE:
The sealant is effective with external tempera -
tures of between -40°F (-40°C) and 122°F
(50°C). The sealant has an expiration date. To use the Tire Service Kit, proceed as follows:
1. Stop the vehicle in a position where you
can repair the tire safely. You should be as
far as possible from the side of the road,
and in a position that is not dangerous for
oncoming traffic. Activate the Hazard
Warning Flashers, remove the safety
triangle from the trunk, and place it at a
suitable distance from the vehicle to make
other drivers aware of your presence.
2. Verify that the valve stem (on the wheel with the deflated tire) is in a position that
is near to the ground. This will allow the tire
service kit hoses to reach the valve stem
and keep the tire repair kit flat on the
ground.
3. Place the gear selector to PARK (P).
4. Apply the Electric Park Brake and cycle the engine OFF.
1 — Sealant Cartridge
2 — Filler Tube
3 — Adhesive Label
4 — Air Compressor
21_GA_OM_EN_USC_t.book Page 194
Page 197 of 284
195
(Continued)
Inflation ProcedureTo use your Tire Service Kit, proceed as
follows:
1. Apply the Electric Park Brake.
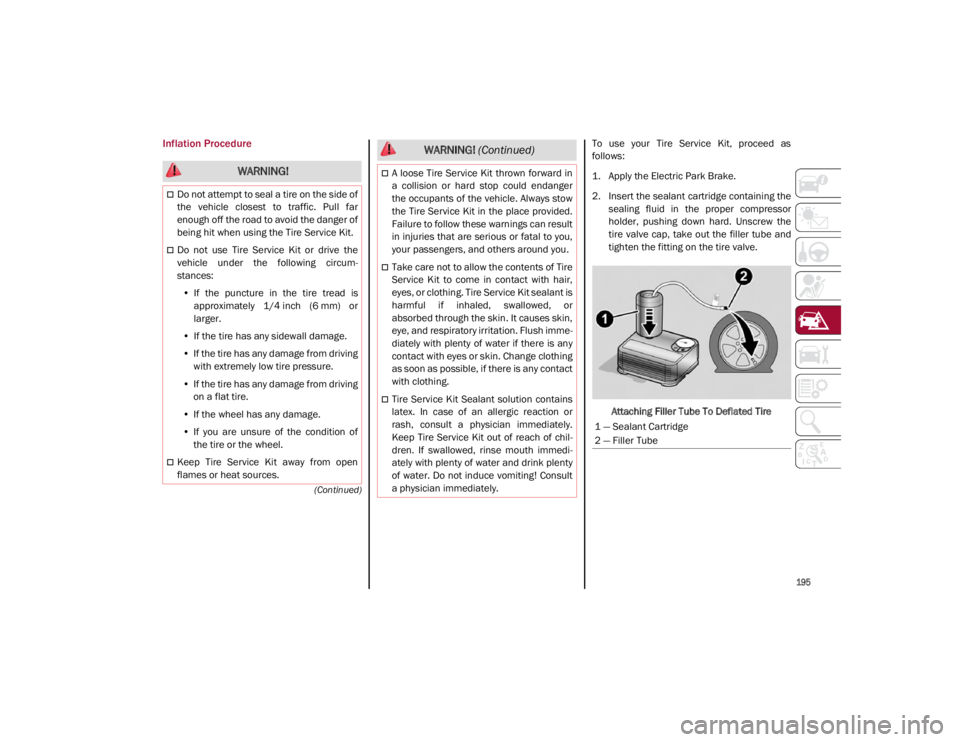
2. Insert the sealant cartridge containing thesealing fluid in the proper compressor
holder, pushing down hard. Unscrew the
tire valve cap, take out the filler tube and
tighten the fitting on the tire valve.
Attaching Filler Tube To Deflated Tire
WARNING!
Do not attempt to seal a tire on the side of
the vehicle closest to traffic. Pull far
enough off the road to avoid the danger of
being hit when using the Tire Service Kit.
Do not use Tire Service Kit or drive the
vehicle under the following circum -
stances:
• If the puncture in the tire tread is
approximately 1/4 inch (6 mm) or
larger.
• If the tire has any sidewall damage.
• If the tire has any damage from driving
with extremely low tire pressure.
• If the tire has any damage from driving
on a flat tire.
• If the wheel has any damage.
• If you are unsure of the condition of
the tire or the wheel.
Keep Tire Service Kit away from open
flames or heat sources.
A loose Tire Service Kit thrown forward in
a collision or hard stop could endanger
the occupants of the vehicle. Always stow
the Tire Service Kit in the place provided.
Failure to follow these warnings can result
in injuries that are serious or fatal to you,
your passengers, and others around you.
Take care not to allow the contents of Tire
Service Kit to come in contact with hair,
eyes, or clothing. Tire Service Kit sealant is
harmful if inhaled, swallowed, or
absorbed through the skin. It causes skin,
eye, and respiratory irritation. Flush imme -
diately with plenty of water if there is any
contact with eyes or skin. Change clothing
as soon as possible, if there is any contact
with clothing.
Tire Service Kit Sealant solution contains
latex. In case of an allergic reaction or
rash, consult a physician immediately.
Keep Tire Service Kit out of reach of chil -
dren. If swallowed, rinse mouth immedi -
ately with plenty of water and drink plenty
of water. Do not induce vomiting! Consult
a physician immediately.
WARNING! (Continued)
1 — Sealant Cartridge
2 — Filler Tube
21_GA_OM_EN_USC_t.book Page 195
Page 199 of 284
197
12. Apply the adhesive label from the sealantbottle where it can be easily seen by the
driver as a reminder that the tire has been
treated with a Tire Service Kit, as well as
not to exceed the speed restriction for the
treated tire.Checking And Restoring Tire Pressure
The compressor can also be used to check
and, if necessary, restore the tire pressure.
Proceed as follows:
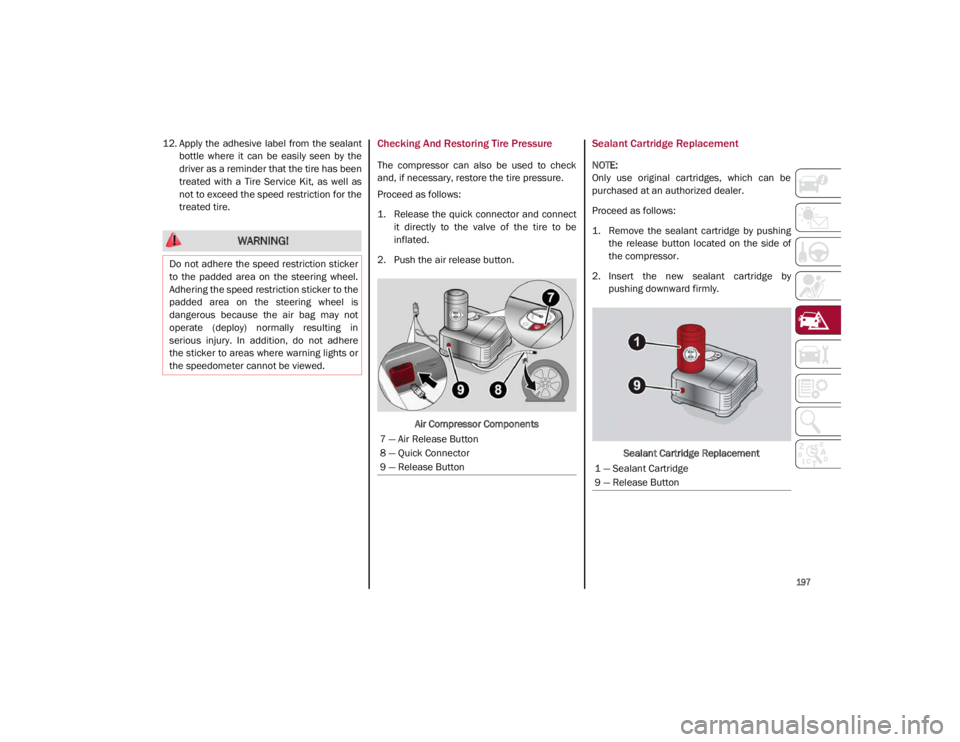
1. Release the quick connector and connectit directly to the valve of the tire to be
inflated.
2. Push the air release button.
Air Compressor Components
Sealant Cartridge Replacement
NOTE:
Only use original cartridges, which can be
purchased at an authorized dealer.
Proceed as follows:
1. Remove the sealant cartridge by pushingthe release button located on the side of
the compressor.
2. Insert the new sealant cartridge by pushing downward firmly.
Sealant Cartridge Replacement
WARNING!
Do not adhere the speed restriction sticker
to the padded area on the steering wheel.
Adhering the speed restriction sticker to the
padded area on the steering wheel is
dangerous because the air bag may not
operate (deploy) normally resulting in
serious injury. In addition, do not adhere
the sticker to areas where warning lights or
the speedometer cannot be viewed.
7 — Air Release Button
8 — Quick Connector
9 — Release Button
1 — Sealant Cartridge
9 — Release Button
21_GA_OM_EN_USC_t.book Page 197
Page 203 of 284
201
If Steam Is Coming From The Engine Compart-
ment
Do not go near the front of the vehicle. Stop
the engine. Wait until the steam dissipates.
Then, open the hood and start the engine.
If Neither Coolant Nor Steam Is Escaping
Open the hood and idle the engine until it
cools.
NOTE:
If the cooling fan does not operate while the
engine is running, the engine temperature
will increase. Stop the engine and contact
an authorized dealer.
If the engine continues to overheat or
frequently overheats, have the cooling
system inspected. The engine could be seri -
ously damaged unless repairs are made.
Contact an authorized dealer.
MANUAL PARK RELEASE
See an authorized dealer to disengage the
manual park release lever.
TOWING A DISABLED VEHICLE
This section describes procedures for towing a
disabled vehicle using a commercial towing
service. The operators of the assistance vehicle must
be informed with regard to the vehicle's
minimum height from ground in order to avoid
contact between the ends of the fascia/
bumper with the equipment of the breakdown
truck.
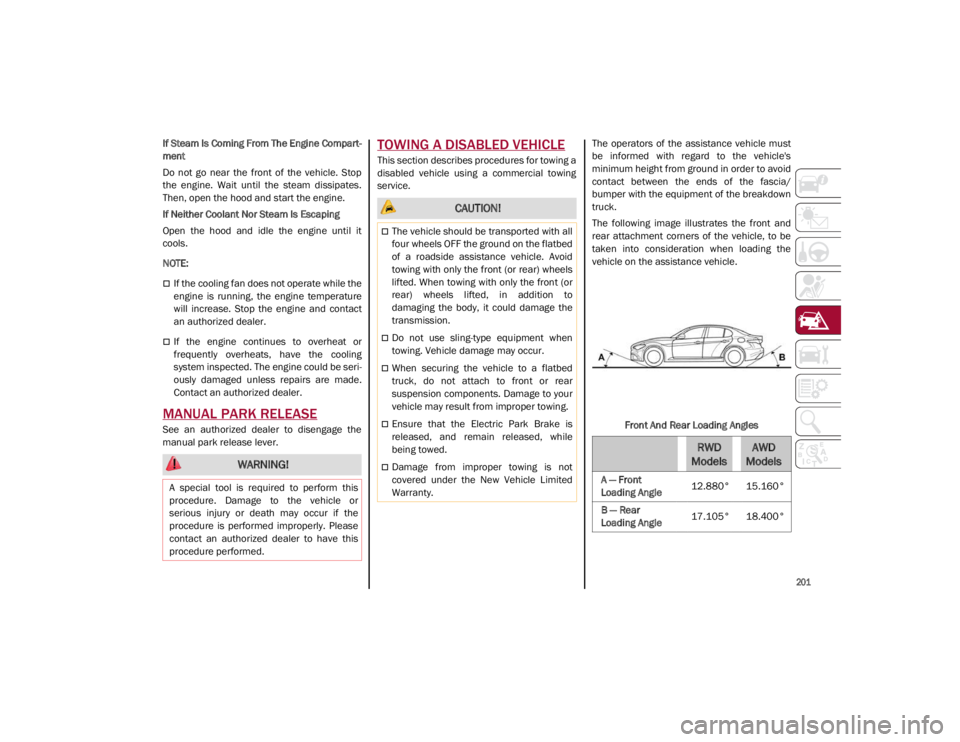
The following image illustrates the front and
rear attachment corners of the vehicle, to be
taken into consideration when loading the
vehicle on the assistance vehicle.
Front And Rear Loading Angles
WARNING!
A special tool is required to perform this
procedure. Damage to the vehicle or
serious injury or death may occur if the
procedure is performed improperly. Please
contact an authorized dealer to have this
procedure performed.
CAUTION!
The vehicle should be transported with all
four wheels OFF the ground on the flatbed
of a roadside assistance vehicle. Avoid
towing with only the front (or rear) wheels
lifted. When towing with only the front (or
rear) wheels lifted, in addition to
damaging the body, it could damage the
transmission.
Do not use sling-type equipment when
towing. Vehicle damage may occur.
When securing the vehicle to a flatbed
truck, do not attach to front or rear
suspension components. Damage to your
vehicle may result from improper towing.
Ensure that the Electric Park Brake is
released, and remain released, while
being towed.
Damage from improper towing is not
covered under the New Vehicle Limited
Warranty.
RWD
ModelsAWD
Models
A — Front
Loading Angle 12.880° 15.160°
B — Rear
Loading Angle 17.105° 18.400°
21_GA_OM_EN_USC_t.book Page 201
Page 204 of 284
IN CASE OF EMERGENCY
202
Rear Wheel Drive (RWD) Models
It is recommended to tow the vehicle with all
four wheels OFF the ground on the flatbed of a
roadside assistance vehicle.
If an assistance vehicle with a flatbed is not
available, the vehicle must be towed with the
rear wheels lifted from the ground using a
trailer or special equipment allowing lifting of
the rear wheels.
All Wheel Drive (AWD) Models
It is recommended to tow the vehicle with all
four wheels OFF the ground on the flatbed of a
roadside assistance vehicle.
TOW EYES
If the vehicle has been in an accident or has
broken down, a tow eye is provided in the tools
container located inside the luggage compart-
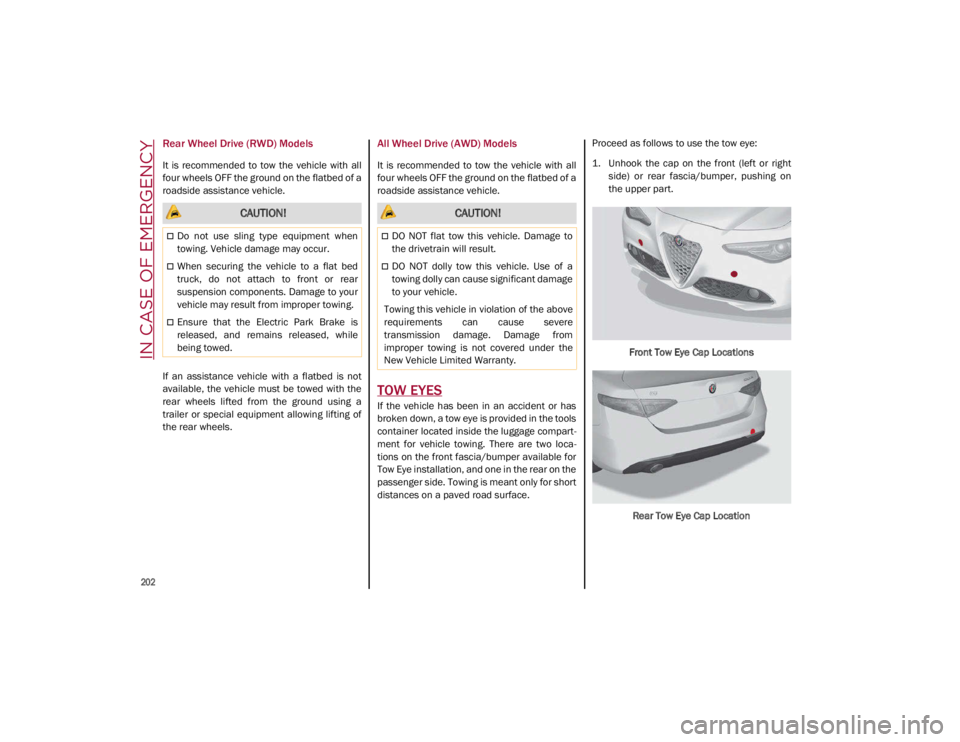
ment for vehicle towing. There are two loca -
tions on the front fascia/bumper available for
Tow Eye installation, and one in the rear on the
passenger side. Towing is meant only for short
distances on a paved road surface. Proceed as follows to use the tow eye:
1. Unhook the cap on the front (left or right
side) or rear fascia/bumper, pushing on
the upper part.
Front Tow Eye Cap LocationsRear Tow Eye Cap Location
CAUTION!
Do not use sling type equipment when
towing. Vehicle damage may occur.
When securing the vehicle to a flat bed
truck, do not attach to front or rear
suspension components. Damage to your
vehicle may result from improper towing.
Ensure that the Electric Park Brake is
released, and remains released, while
being towed.
CAUTION!
DO NOT flat tow this vehicle. Damage to
the drivetrain will result.
DO NOT dolly tow this vehicle. Use of a
towing dolly can cause significant damage
to your vehicle.
Towing this vehicle in violation of the above
requirements can cause severe
transmission damage. Damage from
improper towing is not covered under the
New Vehicle Limited Warranty.
21_GA_OM_EN_USC_t.book Page 202
Page 217 of 284
215
(Continued)
NOTE:
After the battery is disconnected, the steering
must be initialized. The warning light on the
instrument panel switches on to indicate this.
To carry out this procedure, simply turn the
steering wheel all the way from one end to the
other, and then turn it back to the central posi-
tion.
Battery
The battery does not require the electrolyte to
be topped up with distilled water. A periodic
check carried out at an authorized dealer,
however, is necessary to check efficiency.
Follow the battery manufacturer's instructions
for maintenance.
Replacing The Battery
If necessary, replace the battery with another
original battery with the same specifications.
Follow the battery manufacturer’s instructions
for maintenance.
NOTE:
It will not be possible to open the trunk with a
key or by pushing the button in the passenger
compartment when the battery is discon
-
nected. So, always position the manual trunk
opening strap on the trunk lock before discon -
necting the battery
Ú
page 250.
Pressure Washing
Cleaning the engine compartment with a high
pressure washer is not recommended.
BATTERY RECHARGING
Important Notes
NOTE:
Before using the charging device, always
make sure that it is appropriate for the
installed battery, with constant voltage
(below 14.8 Volts) and low amperage
(maximum 15 Amps).
Recharge the battery in a well ventilated
environment.
Before using any devices to charge or to
maintain the charge of the battery, carefully
follow the instructions provided with the
device in order to properly and safely
connect it to the car battery.
WARNING!
Battery acid is a corrosive solution and
can burn or even blind you. Do not allow
battery acid to contact your eyes, skin, or
clothing. Do not lean over a battery when
attaching clamps
Ú
page 199. If acid
splashes in eyes or on skin, flush the area
immediately with large amounts of water.
Battery gas is flammable and explosive.
Keep flame or sparks away from the
battery. Do not use a booster battery or
any other booster source with an output
greater than 12 Volts. Do not allow cable
clamps to touch each other.
Battery posts, terminals, and related
accessories contain lead and lead
compounds. Wash hands after handling.
CAUTION!
Precautions have been taken to safeguard
all parts and connections however, the
pressures generated by these machines is
such that complete protection against
water ingress cannot be guaranteed.
WARNING! (Continued)
WARNING!
Never charge or recharge a frozen battery:
it may explode because of the nitrogen
trapped inside the ice crystals.
At all times while charging or recharging
the battery, make sure that any sparks or
open flames are kept sufficiently far away
from the battery.
21_GA_OM_EN_USC_t.book Page 215