2021 ALFA ROMEO GIULIA light
[x] Cancel search: lightPage 234 of 284
SERVICING AND MAINTENANCE
232
Replacing Interior Bulbs
Courtesy Mirror Light
See below steps to replace:
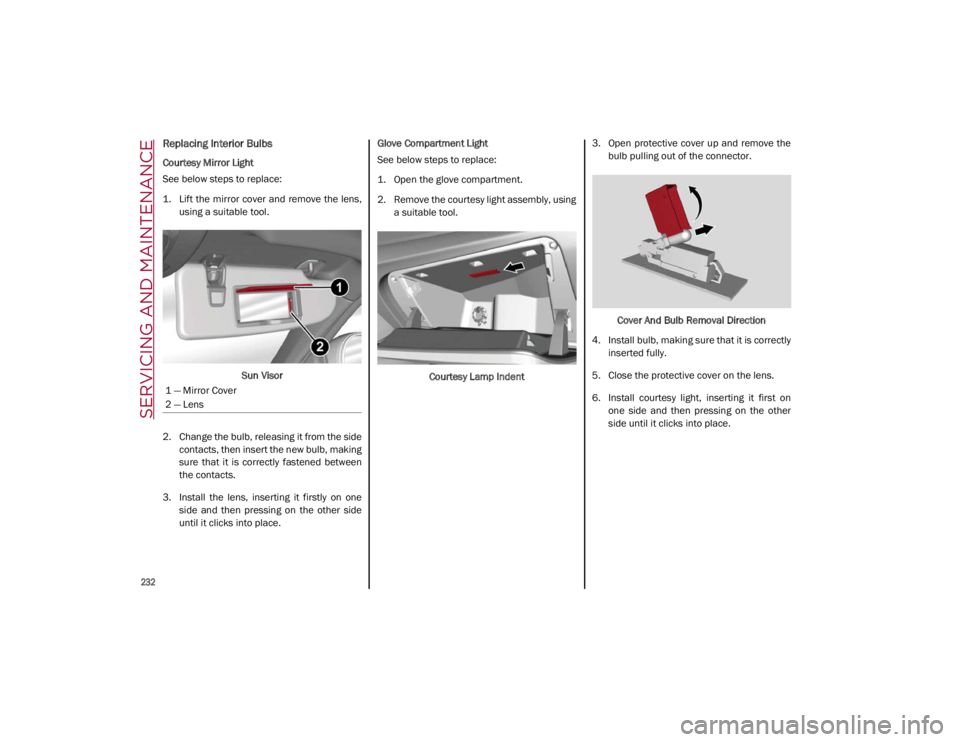
1. Lift the mirror cover and remove the lens,using a suitable tool.
Sun Visor
2. Change the bulb, releasing it from the side contacts, then insert the new bulb, making
sure that it is correctly fastened between
the contacts.
3. Install the lens, inserting it firstly on one side and then pressing on the other side
until it clicks into place. Glove Compartment Light
See below steps to replace:
1. Open the glove compartment.
2. Remove the courtesy light assembly, using
a suitable tool.
Courtesy Lamp Indent 3. Open protective cover up and remove the
bulb pulling out of the connector.
Cover And Bulb Removal Direction
4. Install bulb, making sure that it is correctly inserted fully.
5. Close the protective cover on the lens.
6. Install courtesy light, inserting it first on one side and then pressing on the other
side until it clicks into place.
1 — Mirror Cover
2 — Lens
21_GA_OM_EN_USC_t.book Page 232
Page 235 of 284
233
Luggage Compartment Courtesy Lights
See below steps to replace:
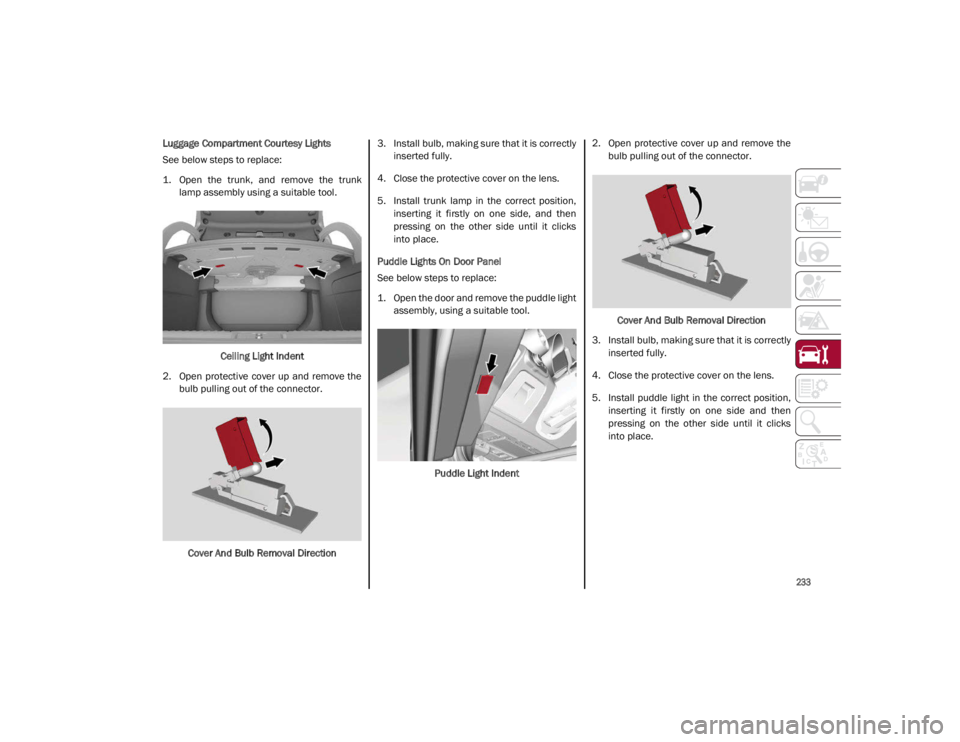
1. Open the trunk, and remove the trunklamp assembly using a suitable tool.
Ceiling Light Indent
2. Open protective cover up and remove the bulb pulling out of the connector.
Cover And Bulb Removal Direction 3. Install bulb, making sure that it is correctly
inserted fully.
4. Close the protective cover on the lens.
5. Install trunk lamp in the correct position, inserting it firstly on one side, and then
pressing on the other side until it clicks
into place.
Puddle Lights On Door Panel
See below steps to replace:
1. Open the door and remove the puddle light assembly, using a suitable tool.
Puddle Light Indent 2. Open protective cover up and remove the
bulb pulling out of the connector.
Cover And Bulb Removal Direction
3. Install bulb, making sure that it is correctly inserted fully.
4. Close the protective cover on the lens.
5. Install puddle light in the correct position, inserting it firstly on one side and then
pressing on the other side until it clicks
into place.
21_GA_OM_EN_USC_t.book Page 233
Page 236 of 284
SERVICING AND MAINTENANCE
234
TIRES
Tire Safety Information
Tire safety information will cover aspects of
the following information: Tire Markings, Tire
Identification Numbers, Tire Terminology and
Definitions, Tire Pressures, and Tire Loading.
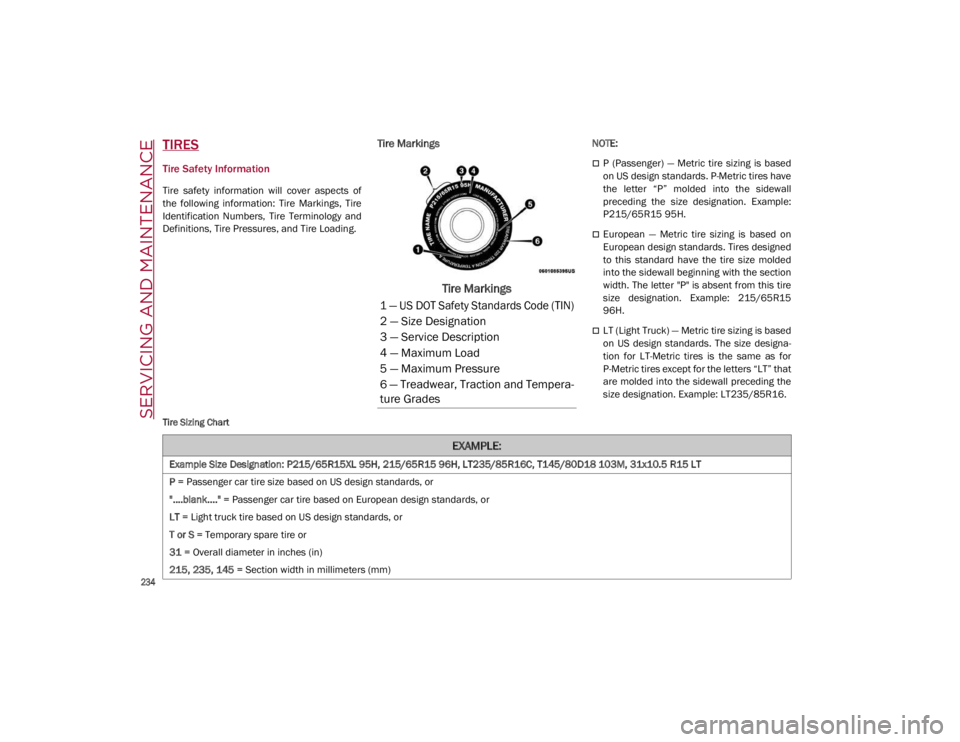
Tire Markings
Tire Markings
NOTE:
P (Passenger) — Metric tire sizing is based
on US design standards. P-Metric tires have
the letter “P” molded into the sidewall
preceding the size designation. Example:
P215/65R15 95H.
European — Metric tire sizing is based on
European design standards. Tires designed
to this standard have the tire size molded
into the sidewall beginning with the section
width. The letter "P" is absent from this tire
size designation. Example: 215/65R15
96H.
LT (Light Truck) — Metric tire sizing is based
on US design standards. The size designa-
tion for LT-Metric tires is the same as for
P-Metric tires except for the letters “LT” that
are molded into the sidewall preceding the
size designation. Example: LT235/85R16.
Tire Sizing Chart
1 — US DOT Safety Standards Code (TIN)
2 — Size Designation
3 — Service Description
4 — Maximum Load
5 — Maximum Pressure
6 — Treadwear, Traction and Tempera -
ture Grades
EXAMPLE:
Example Size Designation: P215/65R15XL 95H, 215/65R15 96H, LT235/85R16C, T145/80D18 103M, 31x10.5 R15 LT
P = Passenger car tire size based on US design standards, or
"....blank...." = Passenger car tire based on European design standards, or
LT = Light truck tire based on US design standards, or
T or S = Temporary spare tire or
31 = Overall diameter in inches (in)
215, 235, 145 = Section width in millimeters (mm)
21_GA_OM_EN_USC_t.book Page 234
Page 237 of 284
235
65, 85, 80 = Aspect ratio in percent (%)
Ratio of section height to section width of tire, or
10.5 = Section width in inches (in)
R = Construction code
"R" means radial construction, or
"D" means diagonal or bias construction
15, 16, 18 = Rim diameter in inches (in)
Service Description:
95 = Load Index
A numerical code associated with the maximum load a tire can carry
H = Speed Symbol
A symbol indicating the range of speeds at which a tire can carry a load corresponding to its load index under certain operating conditions
The maximum speed corresponding to the speed symbol should only be achieved under specified operating conditions (i.e., tire pressure,
vehicle loading, road conditions, and posted speed limits)
Load Identification:
Absence of the following load identification symbols on the sidewall of the tire indicates a Standard Load (SL) tire:
XL = Extra load (or reinforced) tire, or
LL = Light load tire or
C, D, E, F, G = Load range associated with the maximum load a tire can carry at a specified pressure
Maximum Load – Maximum load indicates the maximum load this tire is designed to carry
Maximum Pressure – Maximum pressure indicates the maximum permissible cold tire inflation pressure for this tire
EXAMPLE:
21_GA_OM_EN_USC_t.book Page 235
Page 247 of 284
245
(Continued)
These indicators are molded into the bottom
of the tread grooves. They will appear as
bands when the tread depth becomes a 1/16
of an inch (1.6 mm). When the tread is worn to
the tread wear indicators, the tire should be
replaced.
For further information
Ú
page 245.
Life Of Tire
The service life of a tire is dependent upon
varying factors including, but not limited to:
Driving style.
Tire pressure - Improper cold tire inflation
pressures can cause uneven wear patterns
to develop across the tire tread. These
abnormal wear patterns will reduce tread
life, resulting in the need for earlier tire
replacement.
Distance driven.
Performance tires, tires with a speed rating
of V or higher, and Summer tires typically
have a reduced tread life. Rotation of these
tires per the vehicle scheduled mainte -
nance is highly recommended.
NOTE:
Wheel valve stem must be replaced as well
when installing new tires due to wear and tear
in existing tires.
Keep dismounted tires in a cool, dry place with
as little exposure to light as possible. Protect
tires from contact with oil, grease, and gaso
-
line.
Replacement Tires
The tires on your new vehicle provide a
balance of many characteristics. They should
be inspected regularly for wear and correct
cold tire inflation pressures. FCA US LLC
strongly recommends that you use tires equiv -
alent to the originals in size, quality and perfor -
mance when replacement is needed
Ú
page 244. Refer to the Tire and Loading
Information placard or the Vehicle Certifica -
tion Label for the size designation of your tire.
The Load Index and Speed Symbol for your tire
will be found on the original equipment tire
sidewall. For more information relating to the Load
Index and Speed Symbol of a tire
Ú
page 234.
It is recommended to replace the two front
tires or two rear tires as a pair. Replacing just
one tire can seriously affect your vehicle’s
handling. If you ever replace a wheel, make
sure that the wheel’s specifications match
those of the original wheels.
It is recommended you contact an authorized
tire dealer or original equipment dealer with
any questions you may have on tire specifica -
tions or capability. Failure to use equivalent
replacement tires may adversely affect the
safety, handling, and ride of your vehicle.
WARNING!
Tires and the spare tire should be replaced
after six years, regardless of the remaining
tread. Failure to follow this warning can
result in sudden tire failure. You could lose
control and have a collision resulting in
serious injury or death.
WARNING!
Do not use a tire, wheel size, load rating,
or speed rating other than that specified
for your vehicle. Some combinations of
unapproved tires and wheels may change
suspension dimensions and performance
characteristics, resulting in changes to
steering, handling, and braking of your
vehicle. This can cause unpredictable
handling and stress to steering and
suspension components. You could lose
control and have a collision resulting in
serious injury or death. Use only the tire
and wheel sizes with load ratings
approved for your vehicle.
21_GA_OM_EN_USC_t.book Page 245
Page 252 of 284

SERVICING AND MAINTENANCE
250
DEPARTMENT OF
TRANSPORTATION UNIFORM
TIRE QUALITY GRADES
The following tire grading categories
were established by the National
Highway Traffic Safety Administration.
The specific grade rating assigned by
the tire's manufacturer in each cate-
gory is shown on the sidewall of the
tires on your vehicle.
All passenger vehicle tires must
conform to Federal safety require -
ments in addition to these grades.
Treadwear
The Treadwear grade is a comparative
rating, based on the wear rate of the
tire when tested under controlled
conditions on a specified government
test course. For example, a tire graded
150 would wear one and one-half times
as well on the government course as a
tire graded 100. The relative perfor -
mance of tires depends upon the
actual conditions of their use, however,
and may depart significantly from the
norm due to variations in driving habits,
service practices, and differences in
road characteristics and climate.
Traction Grades
The Traction grades, from highest to
lowest, are AA, A, B, and C. These
grades represent the tire's ability to
stop on wet pavement, as measured
under controlled conditions on speci -
fied government test surfaces of
asphalt and concrete. A tire marked C
may have poor traction performance.
Temperature Grades
The temperature grades are A (the
highest), B, and C, representing the
tire's resistance to the generation of
heat and its ability to dissipate heat,
when tested under controlled condi -
tions on a specified indoor laboratory
test wheel. Sustained high temperature
can cause the material of the tire to
degenerate and reduce tire life, and
excessive temperature can lead to
sudden tire failure. The grade C corre -
sponds to a level of performance, which all passenger vehicle tires must meet
under the Federal Motor Vehicle Safety
Standard No. 109. Grades B and A
represent higher levels of performance
on the laboratory test wheel, than the
minimum required by law.
STORING THE VEHICLE
If the vehicle is left inactive for longer than a
month, the following precautions should be
observed:
Park the vehicle in an area that is covered
and dry, and well-ventilated if possible.
Slightly open the windows.
Check that the Electric Park Brake is not
activated.
Carry out the procedure: “manual trunk
opening device” procedure described in this
paragraph.
Disconnect the negative battery terminal
and check the battery charge. Repeat this
check once every three months during
storage.
WARNING!
The traction grade assigned to this tire is
based on straight-ahead braking traction
tests, and does not include acceleration,
cornering, hydroplaning, or peak traction
characteristics.
WARNING!
The temperature grade for this tire is
established for a tire that is properly inflated
and not overloaded. Excessive speed,
under-inflation, or excessive loading, either
separately or in combination, can cause
heat buildup and possible tire failure.
21_GA_OM_EN_USC_t.book Page 250
Page 254 of 284

SERVICING AND MAINTENANCE
252
2. Make sure the free end of the cordremains outside the trunk when closing
the trunk lid.
Manual Release Cord Shown With Trunk Closed
3. The trunk can now be opened manually by pulling the cord.
4. After releasing the trunk, rewind the strap around the plug, put it back into its
housing and turn it clockwise.BODYWORK
Protection Against Atmospheric Agents
The vehicle is equipped with the best available
technological solutions to protect the body -
work against corrosion.
These include:
Painting products and systems which give
the vehicle resistance to corrosion and
abrasion.
Use of galvanized (or pre-treated) steel
sheets, with high resistance to corrosion.
Spraying of plastic parts, with a protective
function in the more exposed points: under
door, inner wing, edges, etc.
Use of “open” boxed sections to prevent
condensation and pockets of moisture
which could favor the formation of rust
inside.
Use of special films to protect against abra -
sion in exposed areas (e.g. rear wing, doors,
etc.).
Corrosion Warranty
Your vehicle is covered by Corrosion Warranty
against perforation due to rust of any original
element of the structure or bodywork. For the
general terms of this warranty, refer to the
Warranty Booklet.
Preserving The Bodywork
Paint
Touch up abrasions and scratches immedi -
ately to prevent the formation of rust.
Maintenance of paintwork consists of washing
the car: the frequency depends on the condi -
tions and environment where the car is used.
For example, it is advisable to wash the vehicle
more often in areas with high levels of atmo -
spheric pollution or salted roads.
Some parts of the vehicle may be covered with
a matte paint which, in order to be maintained
intact, requires special care.
To correctly wash the vehicle, follow these
instructions:
If high pressure jets or cleaners are used to
wash the vehicle, keep a distance of at least
15 inches (40 cm) from the bodywork to
avoid damage or alteration. Build up of
water could cause damage to the vehicle in
the long term.
To make it easier to remove any dirt deposits in
the area where the blades are normally located it
is recommended to position the windshield
wipers vertically (service position).
Wash the bodywork using a low pressure jet
of water if possible.
Wipe a sponge with a slightly soapy solution over
the bodywork, frequently rinsing the sponge.
Rinse well with water and dry with a leather
chamois.
CAUTION!
The Manual Trunk Opening Device allows
the trunk to be opened without a key, even
if the vehicle is locked. Do not use this
Device unless the vehicle is parked in a
secure area.
21_GA_OM_EN_USC_t.book Page 252
Page 255 of 284
253
Dry the less visible parts (e.g. door frames,
hood, headlight frames, etc.) with special care,
as water may stagnate more easily in these
areas. Do not wash the car after it has been
left in the sun or with the hood hot: this may
alter the shine of the paintwork.
Exterior plastic parts must be cleaned in the
same way as the rest of the vehicle.
If washing the car in a service that moves the
car, for cars with automatic transmissions,
PARK (P) must be cut out. You have to shut off
the engine in the following conditions: car
stopped, transmission in NEUTRAL (N), push
the starter button for at least three seconds.
NOTE:
Avoid parking under trees; the resin dropped
by trees makes the paintwork go opaque and
increases the possibility of corrosion.
Windows
Use specific detergents and clean cloths to
prevent scratching or altering the transpar -
ency. Front Headlights
Use a soft cloth soaked in water and detergent
for washing cars.
NOTE:
Never use aromatic substances (e.g. gaso -
line) or ketones (e.g. acetone) for cleaning
the plastic lenses of the headlights.
When cleaning with a pressure washer,
keep the pressure washer at least eight
inches (20 cm) away from the headlights.
Engine Compartment
At the end of every Winter, wash the engine
compartment thoroughly, taking care not to
aim the jet of water directly at the electronic
control units or at the windshield wiper
motors. Have this operation performed at a
specialized workshop. For further information
Ú
page 215.
NOTE:
The washing should take place with the engine
cold and the ignition device in the STOP posi -
tion. After the washing operation, make sure
that the various protections (e.g. rubber caps
and guards) have not been removed or
damaged.
INTERIORS
Periodically check the cleanliness of the inte -
rior, beneath the mats, which could cause
oxidation of the sheet metal.
Seats And Fabric Parts
Remove dust with a soft brush or a vacuum
cleaner. Rub the seats with a sponge moist -
ened with a solution of water and neutral
detergent.
Cleaning heat press images on seats — if
equipped:
Due to the color, opacity and wear-resistant
protection with which the heat press images
on some seats are made, they may be subject
to temporary scratching if they are touched by
finger nails, keys, or other hard objects. In
such cases, the visible signs do not impair the
profiled images, and can easily be removed by
wiping the affected area with a microfiber
cloth moistened with water (not dry) to restore
the seat to its original condition. The micro -
fiber cloth must not have been previously
soaked in other substances or detergents.
CAUTION!
Wipe the rear window inside gently with a
cloth following the direction of the filaments
to avoid damaging the heating device.
21_GA_OM_EN_USC_t.book Page 253