2021 ALFA ROMEO GIULIA weight
[x] Cancel search: weightPage 14 of 284

12
Exhaust System ...................................220
Engine Cooling System ........................ 220
Braking System ....................................222
Automatic Transmission ......................222
Replacing The Battery ......................... 223
FUSES ..................................................223
BULB REPLACEMENT ..........................228
TIRES ...................................................... 234
Tire Safety Information ....................... 234
Tires — General Information ...............241
Spare Tires — If Equipped .................. 246
Wheel And Wheel Trim Care ...............246
Tire Types ............................................. 247
Snow Traction Devices ........................ 248
Tire Rotation Recommendations ........249
DEPARTMENT OF TRANSPORTATION
UNIFORM TIRE QUALITY GRADES ........ 250
Treadwear ............................................ 250
Traction Grades ...................................250
Temperature Grades ...........................250
STORING THE VEHICLE ........................ 250
BODYWORK ........................................... 252
Protection Against Atmospheric
Agents ................................................... 252 Corrosion Warranty .............................. 252
Preserving The Bodywork ....................252
INTERIORS ............................................. 253
Seats And Fabric Parts ........................ 253
Leather Seats....................................... 254
Plastic And Coated Parts .....................254
Alcantara Parts — If Equipped.............254
Genuine Leather Surfaces —
If Equipped ...........................................254 Carbon Fiber Parts ............................... 254
TECHNICAL SPECIFICATIONS
VEHICLE IDENTIFICATION
NUMBER (VIN)........................................ 255
Vehicle Identification Number (VIN)
Plate ..................................................... 255
ENGINE ................................................... 256
POWER SUPPLY ..................................... 257
TRANSMISSION...................................... 258 BRAKES .................................................. 258SUSPENSION.......................................... 259
STEERING SYSTEM ................................ 259
DIMENSIONS — 2.0L ENGINE ............... 260
DIMENSIONS — 2.9L Engine ................. 261
WEIGHTS — 2.0L ENGINE ...................... 262
WEIGHTS — 2.9L ENGINE ...................... 262
FUEL REQUIREMENTS ........................... 263
Reformulated Gasoline ...................... 263
Gasoline/Oxygenate Blends ............... 263
CNG And LP Fuel System
Modifications ....................................... 263 Methylcyclopentadienyl Manganese
Tricarbonyl (MMT) In Gasoline ............ 263 Materials Added To Fuel ..................... 264
Fuel System Cautions ......................... 264
FLUID CAPACITIES.................................. 265
2.0L Engine.......................................... 265
2.9L V6 Engine .................................... 266
ENGINE FLUIDS AND LUBRICANTS ....... 267CHASSIS FLUIDS AND LUBRICANTS ..... 268
PERFORMANCE — 2.0L ENGINE ........... 269
PERFORMANCE — 2.9L ENGINE ........... 269 CUSTOMER ASSISTANCE
SUGGESTIONS FOR OBTAINING SERVICE
FOR YOUR VEHICLE .............................. 270
Prepare For The Appointment ............ 270
Prepare A List ...................................... 270
Be Reasonable With Requests........... 270
IF YOU NEED ASSISTANCE ................... 270
Alfa Romeo Customer Center............. 270
Alfa Romeo Customer Care
(Canada) .............................................. 270 Customer Assistance For The Hearing
Or Speech Impaired (TDD/TTY) .......... 271 Service Contract ................................. 271
WARRANTY INFORMATION .................. 272
REPORTING SAFETY DEFECTS ............. 272
In The 50 United States And
Washington, D.C. ................................. 272 In Canada ............................................ 272
PUBLICATION ORDER FORMS .............. 272General Information .............................. 273
21_GA_OM_EN_USC_t.book Page 12
Page 138 of 284

STARTING AND OPERATING
136
(Continued)
4. When the fuel nozzle “clicks” or shuts off,before removing the nozzle, wait for at
least 10 seconds in order for the fuel to
flow inside the tank.
5. Remove the fuel filler nozzle, tighten the gas cap about a quarter turn until you hear
one click. This is an indication that cap is
properly tightened.
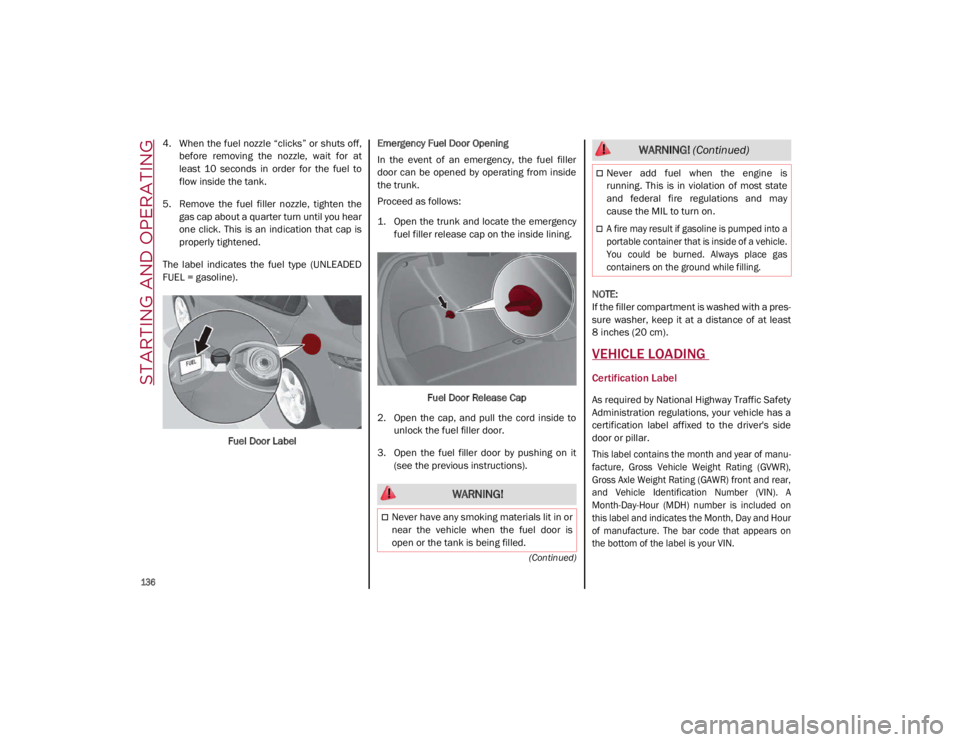
The label indicates the fuel type (UNLEADED
FUEL = gasoline).
Fuel Door Label Emergency Fuel Door Opening
In the event of an emergency, the fuel filler
door can be opened by operating from inside
the trunk.
Proceed as follows:
1. Open the trunk and locate the emergency
fuel filler release cap on the inside lining.
Fuel Door Release Cap
2. Open the cap, and pull the cord inside to unlock the fuel filler door.
3. Open the fuel filler door by pushing on it (see the previous instructions).
NOTE:
If the filler compartment is washed with a pres
-
sure washer, keep it at a distance of at least
8 inches (20 cm).
VEHICLE LOADING
Certification Label
As required by National Highway Traffic Safety
Administration regulations, your vehicle has a
certification label affixed to the driver's side
door or pillar.
This label contains the month and year of manu -
facture, Gross Vehicle Weight Rating (GVWR),
Gross Axle Weight Rating (GAWR) front and rear,
and Vehicle Identification Number (VIN). A
Month-Day-Hour (MDH) number is included on
this label and indicates the Month, Day and Hour
of manufacture. The bar code that appears on
the bottom of the label is your VIN.
WARNING!
Never have any smoking materials lit in or
near the vehicle when the fuel door is
open or the tank is being filled.
Never add fuel when the engine is
running. This is in violation of most state
and federal fire regulations and may
cause the MIL to turn on.
A fire may result if gasoline is pumped into a
portable container that is inside of a vehicle.
You could be burned. Always place gas
containers on the ground while filling.
WARNING! (Continued)
21_GA_OM_EN_USC_t.book Page 136
Page 139 of 284

137
Gross Vehicle Weight Rating (GVWR)
The GVWR is the total permissible weight of
your vehicle including driver, passengers,
vehicle, options and cargo. The label also
specifies maximum capacities of front and
rear axle systems (GAWR). Total load must be
limited so GVWR and front and rear GAWR are
not exceeded.
Payload
The payload of a vehicle is defined as the
allowable load weight a truck can carry,
including the weight of the driver, all passen-
gers, options and cargo.
Gross Axle Weight Rating (GAWR)
The GAWR is the maximum permissible load
on the front and rear axles. The load must be
distributed in the cargo area so that the GAWR
of each axle is not exceeded.
Each axle GAWR is determined by the compo -
nents in the system with the lowest load
carrying capacity (axle, springs, tires or
wheels). Heavier axles or suspension compo -
nents sometimes specified by purchasers for
increased durability do not necessarily
increase the vehicle's GVWR.
Tire Size
The tire size on the Vehicle Certification Label
represents the actual tire size on your vehicle.
Replacement tires must be equal to the load
capacity of this tire size.
Rim Size
This is the rim size that is appropriate for the
tire size listed.
Inflation Pressure
This is the cold tire inflation pressure for your
vehicle for all loading conditions up to full
GAWR.
Curb Weight
The curb weight of a vehicle is defined as the
total weight of the vehicle with all fluids,
including vehicle fuel, at full capacity condi -
tions, and with no occupants or cargo loaded
into the vehicle. The front and rear curb weight
values are determined by weighing your
vehicle on a commercial scale before any
occupants or cargo are added.
Loading
The actual total weight and the weight of the
front and rear of your vehicle at the ground can
best be determined by weighing it when it is
loaded and ready for operation. The entire vehicle should first be weighed on a
commercial scale to ensure that the GVWR
has not been exceeded. The weight on the
front and rear of the vehicle should then be
determined separately to be sure that the load
is properly distributed over the front and rear
axle. Weighing the vehicle may show that the
GAWR of either the front or rear axles has
been exceeded but the total load is within the
specified GVWR. If so, weight must be shifted
from front to rear or rear to front as appro
-
priate until the specified weight limitations are
met. Store the heavier items down low and be
sure that the weight is distributed equally.
Stow all loose items securely before driving.
Improper weight distributions can have an
adverse effect on the way your vehicle steers
and handles and the way the brakes operate.
CAUTION!
Do not load your vehicle any heavier than
the GVWR or the maximum front and rear
GAWR. If you do, parts on your vehicle can
break, or it can change the way your vehicle
handles. This could cause you to lose
control. Also overloading can shorten the
life of your vehicle.
21_GA_OM_EN_USC_t.book Page 137
Page 140 of 284

STARTING AND OPERATING
138
TRAILER TOWING
Trailer towing is not recommended for this
vehicle.
SUGGESTIONS FOR DRIVING
Saving Fuel
Below are some suggestions which may help
you save fuel and lower the amount of harmful
emissions released into the atmosphere.
Vehicle Maintenance
Checks and operations should be carried out
in accordance with the Maintenance Plan
Ú
page 204.
Tires
Check the tire pressures at least once every
four weeks: if the pressure is too low,
consumption levels increase as resistance to
rolling is higher.
Unnecessary Loads
Do not travel with an overloaded trunk. The
weight of the vehicle and its arrangement
greatly affect fuel consumption and stability.
Electric Devices
Use electrical systems only for the amount of
time needed. The rear window defroster, addi -
tional headlights, windshield wipers and
heater blower fan require a considerable
amount of energy; increasing the current
uptake increases fuel consumption (by up to
+25% when city driving). Climate Control System
Using the climate control system will increase
consumption: use standard ventilation when
the temperature outside permits.
Devices for Aerodynamic Control
The use of non-certified devices for aerody
-
namic control may adversely affect air drag
and consumption levels.
Driving Style
Starting
Do not warm up the engine at low or high revs
when the vehicle is stationary; this causes the
engine to warm up more slowly, thereby
increasing fuel consumption and emissions. It
is therefore advisable to drive off immediately,
slowly, avoiding high speeds: by doing this the
engine will warm up more quickly.
Unnecessary Actions
Avoid revving up when starting at traffic lights
or before stopping the engine. This action is
unnecessary and causes increased fuel
consumption and pollution.
Gear Selection
Use a high gear when traffic and road condi -
tions allow it. Using a low gear for faster accel -
eration will increase fuel consumption.
Improper use of a high gear increases
consumption, emissions and engine wear. Max. Speed
Fuel consumption considerably increases as
speed increases. Maintain a constant speed,
avoiding unnecessary braking and accelera
-
tion, which cost in terms of both fuel consump -
tion and emissions.
Acceleration
Accelerating violently severely affects consump -
tion and emissions: acceleration should be
gradual and should not exceed the maximum
torque.
Conditions Of Use
Cold Starting
Short trips and frequent cold starts will not
allow the engine to reach optimum operating
temperature. This results in a significant
increase in consumption levels (from +15 to
+30% in city driving) and emissions.
Traffic And Road Conditions
High fuel consumption is caused by heavy
traffic, for instance when traveling in traffic
with frequent use of low gears or in cities with
many traffic lights. Winding mountain roads
and rough road surfaces also adversely affect
consumption.
Stops In Traffic
During prolonged stops (e.g. railway cross -
ings), turn off the engine.
21_GA_OM_EN_USC_t.book Page 138
Page 142 of 284

STARTING AND OPERATING
140
Brakes
The car braking system may be available with
four carbon-ceramic material brake discs, one
on each wheel.
In order to guarantee the maximum braking
capacity for the first use, Alfa Romeo performs
a “run-in” procedure for discs and pads
directly at the factory.
The use of carbon-ceramic material brake
discs guarantees braking features (better
deceleration/pedal load ratio, braking
distances, fading resistance) proportional to
the dynamic features of the car in addition to
considerably decreasing the unsprung compo-
nent weight.
The materials used and the structural features
of the system could generate unusual noises
which have absolutely no adverse effect on
correct operation and reliability of the braking
system.
Greater pressure may need to be applied to
the brake pedal the first time to keep the same
braking capacities in presence of condensa -
tion or salt on the braking surfaces, for
example after washing or if the car is not used
for a long time.
NOTE:
Given the high technological level of this
system, any servicing on it must be performed
by an authorized dealer which exclusively has
the skills needed for the repair and mainte -
nance operations. In case of intensive, high-performance use of
the car, have the efficiency of the
carbon-ceramic material braking system
inspected as shown on the Maintenance Plan
at an authorized dealer.
Driving On Race Tracks
Before driving on a track using a racing style, it
is necessary to:
Attend a race track driving course.
Check all liquid levels in the engine
compartment.
Have the car inspected at an authorized
dealer.
Remember that the car was not designed to be
driven exclusively on the race track and that
this use increases stress and component
wear.
NOTE:
Quadrifoglio front brakes are equipped with
NAO type pads (Non-Asbestos Organic). These
pads are NOT suitable for high thermal loads
(for example track use). If you want to use
vehicle on a track it is recommended to use
the optional CCM Brakes (Carbon Ceramic
Brake disc). Preheating The Carbon Ceramic Material
Brake Discs (If Equipped)
The brake discs must be warmed up to make
them fully efficient. You are advised to perform
the following procedure to achieve optimal
efficiency:
Brake nine times from 80 mph to 18 mph
(130 km/h to 30 km/h) with deceleration
equal to 0.7g (the longitudinal acceleration
value is shown on the instrument panel
display by setting RACE mode and selecting
the “Performance” page) with 20 second
intervals between brake applications; keep
the car at a speed comprised between
37 mph and 62 mph (60 km/h and
100 km/h) and do not brake for 4 minutes to allow the brakes to cool down.
Brake three times from 124 mph to 18 mph
(200 km/h to 30 km/h) with deceleration
equal to 1.1g (ABS operation) with 30
second intervals between brake applica -
tions; keep the car at a speed comprised
between 37 mph and 62 mph (60 km/h
and 100 km/h) and do not brake for
5 minutes to allow the brakes to cool down.
21_GA_OM_EN_USC_t.book Page 140
Page 177 of 284

175
There are different sizes and types of
restraints for children from newborn size to
the child almost large enough for an adult
safety belt. Always check the child seat
Owner’s Manual to make sure you have the
correct seat for your child. Carefully read and
follow all the instructions and warnings in the
child restraint Owner’s Manual and on all the
labels attached to the child restraint.
Before buying any restraint system, make sure
that it has a label certifying that it meets all
applicable Safety Standards. You should alsomake sure that you can install it in the vehicle
where you will use it.
NOTE:
For additional information, refer to
http://
www.nhtsa.gov/parents-and-caregivers
or
call: 1–888–327–4236
Canadian residents should refer to Trans -
port Canada’s website for additional infor -
mation:
http://www.tc.gc.ca/en/services/
road/child-car-seat-safety.html
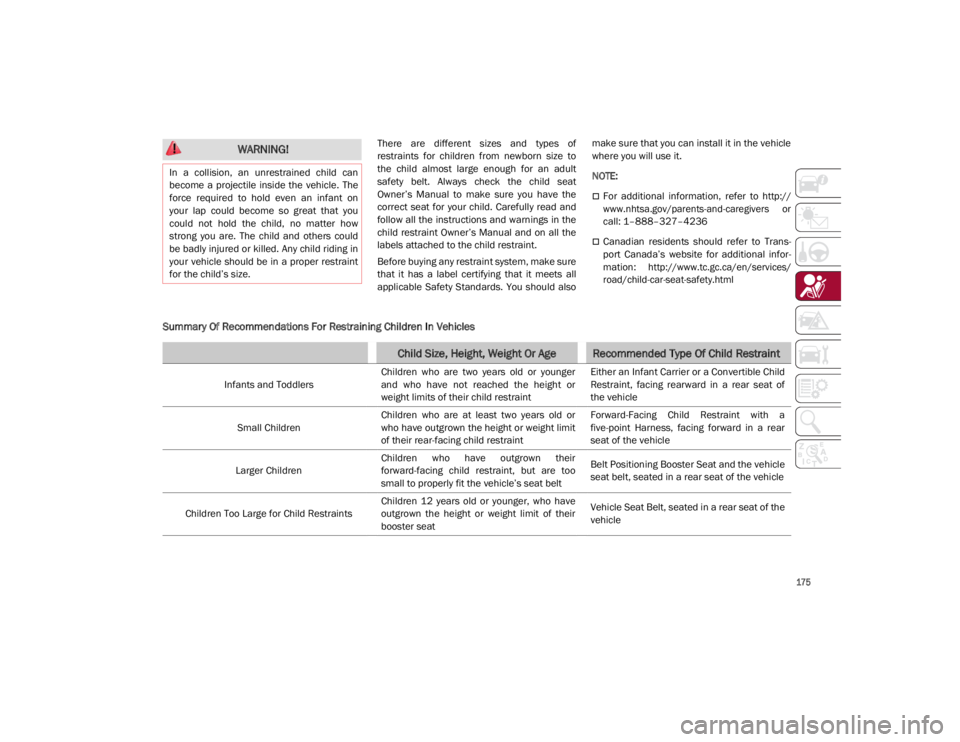
Summary Of Recommendations For Restraining Children In Vehicles
WARNING!
In a collision, an unrestrained child can
become a projectile inside the vehicle. The
force required to hold even an infant on
your lap could become so great that you
could not hold the child, no matter how
strong you are. The child and others could
be badly injured or killed. Any child riding in
your vehicle should be in a proper restraint
for the child’s size.
Child Size, Height, Weight Or AgeRecommended Type Of Child Restraint
Infants and Toddlers Children who are two years old or younger
and who have not reached the height or
weight limits of their child restraint Either an Infant Carrier or a Convertible Child
Restraint, facing rearward in a rear seat of
the vehicle
Small Children Children who are at least two years old or
who have outgrown the height or weight limit
of their rear-facing child restraint Forward-Facing Child Restraint with a
five-point Harness, facing forward in a rear
seat of the vehicle
Larger Children Children who have outgrown their
forward-facing child restraint, but are too
small to properly fit the vehicle’s seat belt Belt Positioning Booster Seat and the vehicle
seat belt, seated in a rear seat of the vehicle
Children Too Large for Child Restraints Children 12 years old or younger, who have
outgrown the height or weight limit of their
booster seat Vehicle Seat Belt, seated in a rear seat of the
vehicle
21_GA_OM_EN_USC_t.book Page 175
Page 178 of 284

SAFETY
176
(Continued)
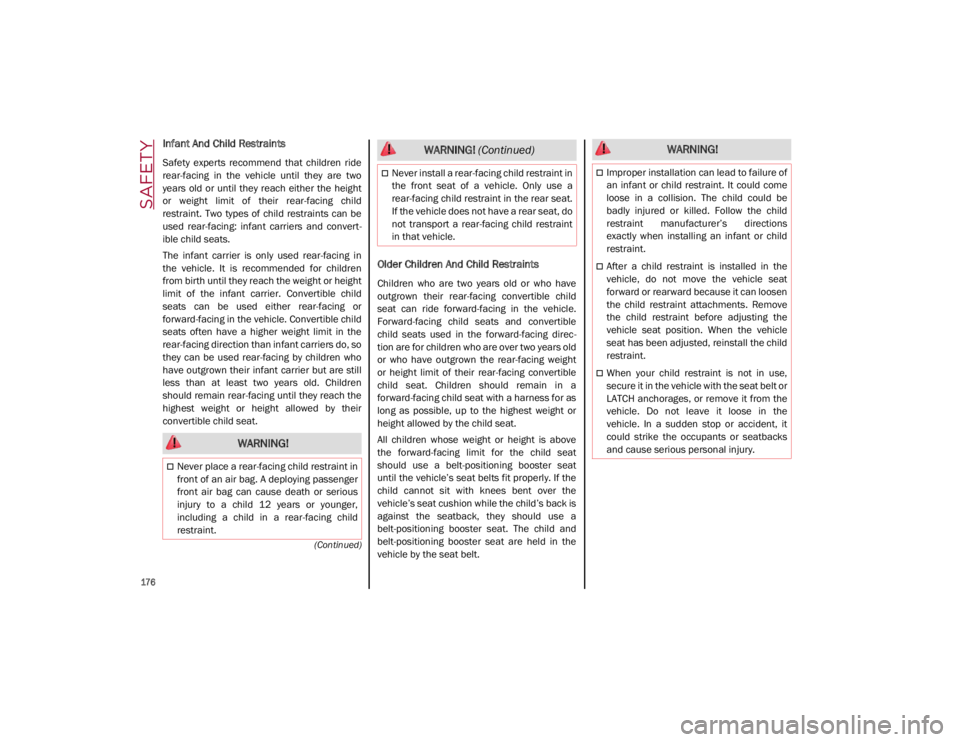
Infant And Child Restraints
Safety experts recommend that children ride
rear-facing in the vehicle until they are two
years old or until they reach either the height
or weight limit of their rear-facing child
restraint. Two types of child restraints can be
used rear-facing: infant carriers and convert-
ible child seats.
The infant carrier is only used rear-facing in
the vehicle. It is recommended for children
from birth until they reach the weight or height
limit of the infant carrier. Convertible child
seats can be used either rear-facing or
forward-facing in the vehicle. Convertible child
seats often have a higher weight limit in the
rear-facing direction than infant carriers do, so
they can be used rear-facing by children who
have outgrown their infant carrier but are still
less than at least two years old. Children
should remain rear-facing until they reach the
highest weight or height allowed by their
convertible child seat.
Older Children And Child Restraints
Children who are two years old or who have
outgrown their rear-facing convertible child
seat can ride forward-facing in the vehicle.
Forward-facing child seats and convertible
child seats used in the forward-facing direc -
tion are for children who are over two years old
or who have outgrown the rear-facing weight
or height limit of their rear-facing convertible
child seat. Children should remain in a
forward-facing child seat with a harness for as
long as possible, up to the highest weight or
height allowed by the child seat.
All children whose weight or height is above
the forward-facing limit for the child seat
should use a belt-positioning booster seat
until the vehicle’s seat belts fit properly. If the
child cannot sit with knees bent over the
vehicle’s seat cushion while the child’s back is
against the seatback, they should use a
belt-positioning booster seat. The child and
belt-positioning booster seat are held in the
vehicle by the seat belt.
WARNING!
Never place a rear-facing child restraint in
front of an air bag. A deploying passenger
front air bag can cause death or serious
injury to a child 12 years or younger,
including a child in a rear-facing child
restraint.
Never install a rear-facing child restraint in
the front seat of a vehicle. Only use a
rear-facing child restraint in the rear seat.
If the vehicle does not have a rear seat, do
not transport a rear-facing child restraint
in that vehicle.
WARNING! (Continued) WARNING!
Improper installation can lead to failure of
an infant or child restraint. It could come
loose in a collision. The child could be
badly injured or killed. Follow the child
restraint manufacturer’s directions
exactly when installing an infant or child
restraint.
After a child restraint is installed in the
vehicle, do not move the vehicle seat
forward or rearward because it can loosen
the child restraint attachments. Remove
the child restraint before adjusting the
vehicle seat position. When the vehicle
seat has been adjusted, reinstall the child
restraint.
When your child restraint is not in use,
secure it in the vehicle with the seat belt or
LATCH anchorages, or remove it from the
vehicle. Do not leave it loose in the
vehicle. In a sudden stop or accident, it
could strike the occupants or seatbacks
and cause serious personal injury.
21_GA_OM_EN_USC_t.book Page 176
Page 180 of 284

SAFETY
178
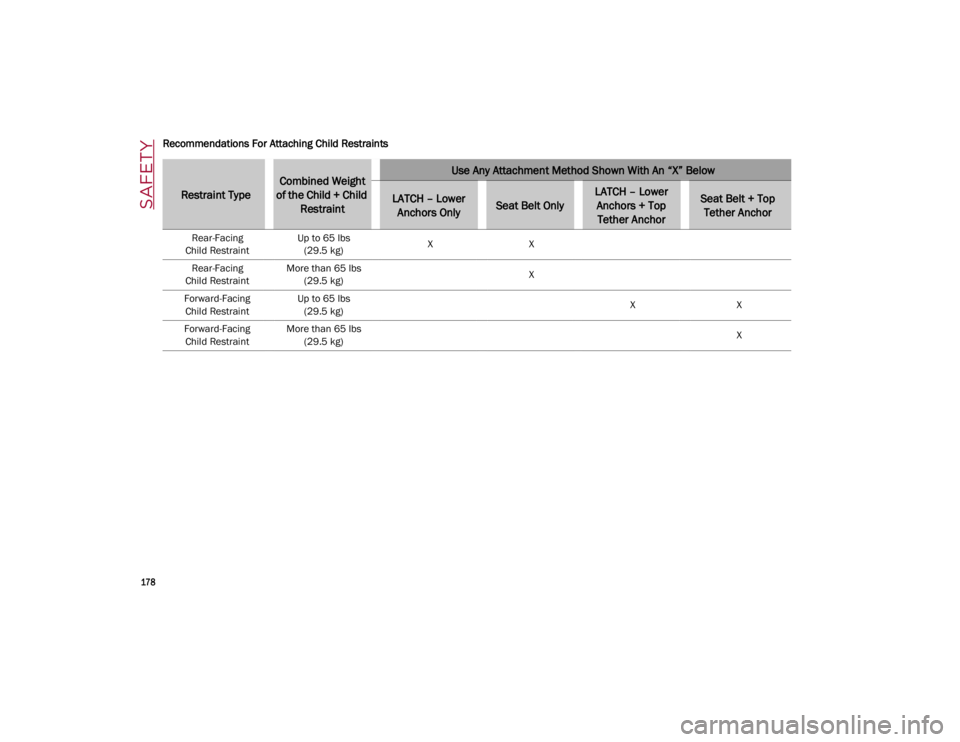
Recommendations For Attaching Child Restraints
Restraint Type
Combined Weight
of the Child + Child RestraintUse Any Attachment Method Shown With An “X” Below
LATCH – Lower Anchors OnlySeat Belt Only
LATCH – Lower Anchors + Top Tether AnchorSeat Belt + Top Tether Anchor
Rear-Facing
Child Restraint Up to 65 lbs
(29.5 kg) X
X
Rear-Facing
Child Restraint More than 65 lbs
(29.5 kg) X
Forward-Facing Child Restraint Up to 65 lbs
(29.5 kg) X
X
Forward-Facing Child Restraint More than 65 lbs
(29.5 kg) X
21_GA_OM_EN_USC_t.book Page 178