Page 89 of 126

8-12
8
2. Start the engine, warm it up for several minu-
tes, and then turn it off.
3. Place an oil pan under the engine to collect the used oil.
4. Remove the engine oil filler cap, and then re- move the engine oil drain bolt to drain the oil
from the crankcase. NOTICE: When remov-
ing the engine oil drain bolt, the compres-
sion spring, oil strainer and O-ring will fall
out. Take care not to lose these parts.
[ECB00312]
5. Clean the oil strainer with solvent.
6. Discard the old engine oil drain bolt O-ring, and then apply a thin coat of clean engine oil
to the new O-ring.
7. Install the oil strainer, the compression spring, the new O-ring and the engine oil
drain bolt. Tighten the engine oil drain bolt to
the specified torque. NOTICE: Before in-
stalling the engine oil drain bolt, be sure to
install the O-ring, compression spring and
oil strainer.
[ECB00322]
8. Refill with the specified amount of the recom- mended engine oil.
1. Engine oil drain bolt
2. O-ring
3. Compression spring
4. Oil strainer
4321
Tightening torque:Engine oil drain bolt:15 N·m (1.5 kgf·m, 11 lb·ft)
Recommended oil: See page 10-1.
Oil quantity: 0.80 L (0.85 US qt, 0.70 Imp.qt)
UBD364E0.book Page 12 Monday, January 28, 2019 9:30 AM
Page 90 of 126

8-13
8
TIPBe sure to wipe off spilled oil on any parts after the
engine and exhaust system have cooled down. NOTICEECB00331Do not use oils with a diesel specification of
“CD” or oils of a higher quality than speci-
fied. In addition, do not use oils labeled “EN-
ERGY CONSERVING II” or higher.
Make sure that no foreign material enters the
crankcase. 9. Check the engine oil filler cap O-ring for dam-
age, and then install and tighten the engine oil
filler cap.
10. Start the engine, and then let it idle for several minutes while checking it for oil leakage. If oil
is leaking, immediately turn the engine off and
check for the cause.
11. Turn the engine off, wait at least ten minutes, and then check the oil level and correct it if
necessary.
EBU38620Why YamalubeYAMALUBE oil is a Genuine YAMAHA Part born ofthe engineers’ passion and belief that engine oil is
an important liquid engine component. We form
teams of specialists in the fields of mechanical en-
gineering, chemistry, electronics and track test-
ing, and have them develop the engine together
with the oil it will use. Yamalube oils take full ad-
vantage of the base oil’s qualities and blend in the
ideal balance of additives to make sure the final oil
clears our performance standards. Thus,
Yamalube mineral, semi synthetic and synthetic
oils have their own distinct characters and value.
Yamaha’s experience gained over many years of research and development into oil since the
1960’s helps make Yamalube the best choice for
your Yamaha engine.
UBD364E0.book Page 13 Monday, January 28, 2019 9:30 AM
Page 91 of 126
8-14
8
EBU34472Transmission oilThe transmission case must be checked for oil
leakage before each ride. If any leakage is found,
have a Yamaha dealer check and repair the ATV.
In addition, the transmission oil must be changed
at the intervals specified in the periodic mainte-
nance and lubrication chart.
To change the transmission oil1. Place the ATV on a level surface.
2. Place an oil pan under the transmission case to collect the used oil.
3. Remove the transmission oil filler cap and its O-ring from the transmission case. 4. Remove the transmission oil drain bolt and its
gasket to drain the oil from the transmission
case.
1. Transmission oil filler cap
2. O-ring12
UBD364E0.book Page 14 Monday, January 28, 2019 9:30 AM
Page 92 of 126

8-15
85. Install the transmission oil drain bolt and its
new gasket, and then tighten the bolt to the
specified torque.
6. Refill with the specified amount of the recom- mended oil. NOTICE: Make sure that no
foreign material enters the transmission
case.
[ECB03380]
7. Check the oil filler cap O-ring for damage, and replace it if necessary.
8. Install and tighten the oil filler cap.
9. Check the transmission case for oil leakage. If oil is leaking, check for the cause.EBU34110Cleaning the air filter elementThe air filter element should be serviced at the in-
tervals specified in the periodic maintenance and
lubrication chart. Clean or, if necessary, replace
the air filter element more frequently if you are rid-
ing in unusually wet or dusty areas.TIPThere is a check hose at the bottom of the air filter
case. If dust or water collects in this hose, empty
the hose and clean the air filter element and air fil-
ter case.
1. Transmission oil drain bolt
2. GasketTightening torque:Transmission oil drain bolt:22 N·m (2.2 kgf·m, 16 lb·ft)
12
Recommended oil:See page 10-1.
Oil quantity: 0.35 L (0.37 US qt, 0.31 Imp.qt)
UBD364E0.book Page 15 Monday, January 28, 2019 9:30 AM
Page 93 of 126
8-16
8
1. Park the ATV on a level surface.
2. Remove the seat. (See page 4-13.)
3. Remove the air filter case cover by unhooking
the air filter case cover holders. 4. Remove the air filter element, and clean it with
solvent. WARNING! Always use parts
cleaning solvent to clean the air filter ele-
ment. Never use low-flash-point solvents
or gasoline to clean the air filter element
because the engine could catch fire or ex-
plode.
[EWB03540]
1. Air filter case check hose
1
1. Air filter case cover
2. Air filter case cover holder
1
2
UBD364E0.book Page 16 Monday, January 28, 2019 9:30 AM
Page 94 of 126
8-17
85. Squeeze the excess solvent out of the air filter
element and let it dry. NOTICE: Do not twist
the air filter element when squeezing it.
[ECB02310]
6. Check the air filter element and replace it if damaged.
7. Apply Yamaha foam air filter oil or other qual- ity foam air filter oil to the element.TIPThe air filter element should be wet but not drip-
ping. 8. Insert the air filter element into the air filtercase.
9. Install the air filter case cover by hooking the holders onto the air filter case. NOTICE:
Make sure that the air filter element is
properly seated in the air filter case. Never
operate the engine with the air filter ele-
1. Air filter element
1
UBD364E0.book Page 17 Monday, January 28, 2019 9:30 AM
Page 95 of 126
8-18
8
ment removed. This will allow unfiltered air
to enter the engine, causing rapid engine
wear and possible engine damage. Addi-
tionally, operation without the air filter ele-
ment will affect carburetor jetting with
subsequent poor performance and possi-
ble engine overheating.
[ECB00462]
10. Install the seat.TIPThe air filter element should be cleaned every 20–
40 hours. It should be cleaned and lubricated
more often if the ATV is operated in extremely dusty areas. When servicing the air filter element,
be sure to check the air inlet of the air filter case
for obstructions.
EBU33942Cleaning the spark arresterBe sure the exhaust pipe and muffler are cool be-
fore cleaning the spark arrester.
1. Remove the tailpipe bolt and nut.
2. Remove the spark arrester by pulling it out of the muffler.1. Spark arrester
2. Tailpipe bolt
3. Nut
1
2
3
UBD364E0.book Page 18 Monday, January 28, 2019 9:30 AM
Page 96 of 126

8-19
83. Tap the spark arrester lightly, and then use a
wire brush to remove any carbon deposits.
4. Insert the spark arrester into the muffler and align the bolt hole.
5. Install the tailpipe bolt and nut, and then tight- en the nut to the specified torque.
WARNING
EWB02342Always let the exhaust system cool prior to
touching exhaust components.
Do not start the engine with the spark arrester
removed. Sparks or exhaust particulate can
cause eye injury, burns, or start a fire. EBU23941Adjusting the carburetorThe carburetor should be checked and, if neces-
sary, adjusted at the intervals specified in the pe-
riodic maintenance and lubrication chart. The
carburetor is an important part of the engine and
requires very sophisticated adjustment. There-
fore, most carburetor adjustments should be left to a Yamaha dealer, who has the necessary pro-
fessional knowledge and experience. The adjust-
ment described in the following section, however,
may be performed by the owner as part of routine
maintenance.
NOTICEECB00481The carburetor has been set and extensively
tested at the Yamaha factory. Changing these
settings without sufficient technical knowl-
edge may result in poor performance of or
damage to the engine. EBU24001Adjusting the engine idling speedThe engine idling speed must be checked and, if
necessary, adjusted as follows at the intervals
specified in the periodic maintenance and lubrica-
tion chart.TIPA diagnostic tachometer is needed to make this
adjustment. 1. Start the engine and warm it up.
Tightening torque:
Tailpipe nut:10 N·m (1.0 kgf·m, 7.4 lb·ft)
UBD364E0.book Page 19 Monday, January 28, 2019 9:30 AM
 1
1 2
2 3
3 4
4 5
5 6
6 7
7 8
8 9
9 10
10 11
11 12
12 13
13 14
14 15
15 16
16 17
17 18
18 19
19 20
20 21
21 22
22 23
23 24
24 25
25 26
26 27
27 28
28 29
29 30
30 31
31 32
32 33
33 34
34 35
35 36
36 37
37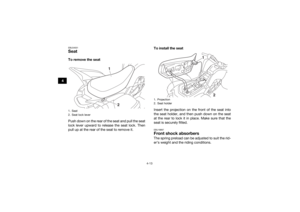 38
38 39
39 40
40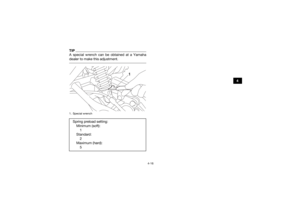 41
41 42
42 43
43 44
44 45
45 46
46 47
47 48
48 49
49 50
50 51
51 52
52 53
53 54
54 55
55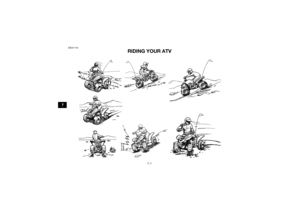 56
56 57
57 58
58 59
59 60
60 61
61 62
62 63
63 64
64 65
65 66
66 67
67 68
68 69
69 70
70 71
71 72
72 73
73 74
74 75
75 76
76 77
77 78
78 79
79 80
80 81
81 82
82 83
83 84
84 85
85 86
86 87
87 88
88 89
89 90
90 91
91 92
92 93
93 94
94 95
95 96
96 97
97 98
98 99
99 100
100 101
101 102
102 103
103 104
104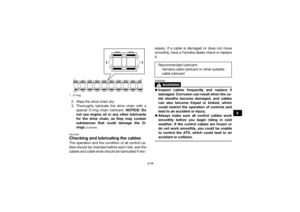 105
105 106
106 107
107 108
108 109
109 110
110 111
111 112
112 113
113 114
114 115
115 116
116 117
117 118
118 119
119 120
120 121
121 122
122 123
123 124
124 125
125

3. Remove the air filter case cover by unhooking
the air filter case cover holders. 4. Remove the air filter element, an")
![YAMAHA YFM90R 2020 Owners Manual 8-17
85. Squeeze the excess solvent out of the air filter
element and let it dry. NOTICE: Do not twist
the air filter element when squeezing it.
[ECB02310]
6. Check the air filter element and replace](/manual-img/51/53803/w960_53803-93.png "YAMAHA YFM90R 2020 Owners Manual 8-17
85. Squeeze the excess solvent out of the air filter
element and let it dry. NOTICE: Do not twist
the air filter element when squeezing it.
[ECB02310]
6. Check the air filter element and replace")
