Page 89 of 110
 Run the engine at idling speed for about
3 minutes watching the engine condition.
If the engine stops while flushing, turn")
Care and storage
82
ter flows out continually from the jet
thrust nozzle.
(7) Run the engine at idling speed for about
3 minutes watching the engine condition.
If the engine stops while flushing, turn
the water supply off immediately and
perform the procedure again from step 6.
NOTICE: Do not supply water to the
cooling water passages when the en-
gine is not running. The water could
flow back through the muffler into the
engine, causing severe engine dam-
age.
[ECJ00123]
(8) Turn the water supply off.
(9) Discharge the remaining water out of the
cooling water passages by alternately
squeezing and releasing the throttle lever
quickly for 10 to 15 seconds.
(10) Stop the engine.
(11) Remove the garden hose adapter, and
then securely install the flushing hose
connector cap by tightening it until it
stops.
(12) Securely install the removable watertight
storage compartment and seats in their
original positions.
EJU43840Cleaning the watercraft
(1) Remove the seats. (See page 43 for seat
removal and installation procedures.)
(2) If the watercraft will be stored for a week
or more, rustproof the internal enginecomponents to help prevent corrosion.
(See page 85 for information on rust-
proofing the internal engine compo-
nents.)
(3) Rinse the engine and engine compart-
ment with a small amount of water.
NOTICE: Do not use high-pressure
water when rinsing the engine or en-
gine compartment as severe engine
damage could result.
[ECJ00572]
(4) Drain the water from the engine com-
partment. (See page 55 for information
on draining the bilge water.)
(5) Wipe the engine and engine compart-
ment with a dry cloth.
(6) Wash down the hull, deck, and jet pump
with fresh water.
(7) Wipe the hull, deck, and jet pump with a
dry cloth.
(8) Wipe all vinyl and rubber components,
such as the seats and engine compart-
ment seals, with a vinyl protectant.
(9) To minimize corrosion, spray metallic
parts of the hull, deck, and engine with a
rust inhibitor.
(10) Allow the engine compartment to air dry
completely before installing the seats.
(11) Securely install the seats in their original
positions.
EJU33688Battery care
If the watercraft will not be used for more than
a month, remove the battery from the water-
craft, check it, and then store it in a cool, dry
place.
WARNING
EWJ00792
Battery electrolyte is poisonous and dan-
gerous, causing severe burns, etc. Elec-
trolyte contains sulfuric acid. Avoid
contact with skin, eyes, or clothing.
Antidotes
UF4G74E0.book Page 82 Tuesday, July 16, 2019 10:27 AM
Page 90 of 110

Care and storage
83
External: Flush with water.
Internal: Drink large quantities of water or
milk. Follow with milk of magnesia, beaten
egg, or vegetable oil. Call a physician im-
mediately.
Eyes: Flush with water for 15 minutes and
get prompt medical attention.
Batteries produce explosive gases. Keep
sparks, flames, cigarettes, etc., well away.
If using or charging the battery in an en-
closed space, make sure that it is well
ventilated. Always shield your eyes when
working near batteries.
Keep out of the reach of children.
To remove the battery:
(1) Disconnect the negative (–) battery lead.
(2) Disconnect the positive (+) battery lead.
(3) Disconnect the breather hose.
(4) Unhook the battery bands, and then re-
move the battery from the watercraft.
Checking the battery
Make sure that the battery case is not dam-
aged.
Make sure that the battery terminals are
not corroded or damaged.
Make sure that the breather hose is not
clogged or damaged.Checking the electrolyte level
Make sure that the electrolyte level is be-
tween the maximum and minimum level
marks.
If the electrolyte level is low, add distilled wa-
ter to raise it to the specified level. NOTICE:
Use only distilled water for replenishing
the battery, otherwise battery life could be
shortened.
[ECJ00242]
If distilled water was added, check the bat-
tery voltage.
It is recommended to have a Yamaha dealer
check the battery voltage and charge the bat-
tery. If you charge the battery yourself, be
sure to read and follow the instructions pro-
vided with the battery tester and charger you
use. NOTICE: Do not attempt to charge a
battery hastily. Battery life could be short-
ened.
[ECJ00252]1Negative (–) battery terminal: Black lead
2Battery band
3Positive (+) battery terminal: Red lead
4Breather hose
12
3
4
1Maximum level mark
2Minimum level mark
UF4G74E0.book Page 83 Tuesday, July 16, 2019 10:27 AM
Page 91 of 110
 Clean the battery case using fresh water.
(2) If the battery terminals are di")
Care and storage
84
Checking the battery bands
Make sure that the battery bands are not
damaged.
To store the battery:
(1) Clean the battery case using fresh water.
(2) If the battery terminals are dirty or cor-
roded, clean them using a wire brush.
(3) Apply water-resistant grease to the bat-
tery terminals.
(4) Store the battery in a cool, dry place.
NOTICE: Storing the battery in an un-
charged condition can cause perma-
nent battery damage. Check the
battery periodically.
[ECJ00103]
To install the battery:
(1) Place the battery in the battery compart-
ment and hook the battery bands onto
the holders.
(2) Connect the positive (+) battery lead (red)
to the positive (+) battery terminal.
NOTICE: Reversal of the battery leads
will damage the electrical parts.
[ECJ00262]
(3) Connect the negative (–) battery lead
(black) to the negative (–) battery termi-
nal.
(4) Connect the breather hose to the bat-
tery. WARNING! Fire or explosion
could result if the breather hose is
damaged, obstructed, or not connect-
ed properly.
[EWJ00452]
(5) Make sure that the battery is securely
held in place.
1Battery band
1Battery terminal
Recommended water-resistant grease:
YAMALUBE MARINE
GREASE/Yamaha Grease A
UF4G74E0.book Page 84 Tuesday, July 16, 2019 10:27 AM
Page 92 of 110

Care and storage
85
EJU33493
Long-term storage
WARNING
EWJ00331
Always place the watercraft upright in a
horizontal position when storing it, other-
wise fuel could leak out into the engine or
engine compartment, which could create
a fire hazard.
Storage for long periods of time, such as win-
ter storage, requires preventive maintenance
to ensure against deterioration. It is advisable
to have the watercraft serviced by a Yamaha
dealer prior to storage.
However, the following procedures can be
performed easily by the owner.
EJU40763Cleaning
(1) Flush the cooling water passages. (See
page 81 for information on flushing the
cooling water passages.)
TIP:
If you will be storing the watercraft for a pro-
longed period, such as winter storage, top off
the fuel tank with fresh gasoline and add fuel
stabilizer and conditioner to the fuel tank ac-
cording to the manufacturer’s instruction be-
fore starting the engine.
(2) Clean the watercraft. (See page 82 for in-
formation on cleaning the watercraft.)
Wax the hull with a non-abrasive wax.
EJU43663Lubrication
To keep moving parts sliding or rotating
smoothly, lubricate them with water-resistant
grease.
Steering cable (jet thrust nozzle end)
VX / VX Deluxe / VX Cruiser / VX Limited:
Shift rod (reverse gate end) and ball joint
TIP:
Disconnect the shift rod from the ball joint be-
fore lubricating.
EJU44140Rustproofing
Rustproofing the hull, deck, and engine
Spray metallic parts of the hull, deck, and en-
gine with a rust inhibitor.
Rustproofing the internal engine compo-
nents
Rustproof the internal engine components
with a rust inhibitor.
To rustproof the internal engine components:
(1) Remove the seats. (See page 43 for seat
removal and installation procedures.)
(2) Release the hooks on the port side of the
air filter case, and then lift up the air filter
case cover. NOTICE: Do not lift up the
air filter case cover forcefully. Other- Recommended water-resistant grease:
YAMALUBE MARINE GREASE /
Ya m a h a G r e a s e A
UF4G74E0.book Page 85 Tuesday, July 16, 2019 10:27 AM
Page 93 of 110
Care and storage
86
wise, the fuel hose that is secured to
the air filter case cover could be dam-
aged.
[ECJ02620]
(3) Spray a rust inhibitor into the intake
opening for 3 seconds. WARNING! Do
not spray flammable rust inhibitor
products on engine surfaces while the
engine is hot. The sprayed substance
or propellants could catch fire.
[EWJ00262]
(4) Place the air filter case cover in its origi-
nal position, and then fit the hooks onto
the cover.
TIP:
Make sure that the air filter case cover is se-
curely installed.
(5) Make sure that the area around the wa-
tercraft is clear, and then start the engine
in a well-ventilated area and let it run atidle for 15 seconds. (See page 27 for in-
formation on starting the engine.)
(6) Stop the engine.
(7) Securely install the seats in their original
positions.
1Hook
2Air filter case cover
1Intake opening
2
1
1
UF4G74E0.book Page 86 Tuesday, July 16, 2019 10:27 AM
Page 94 of 110

Maintenance
87
EJU33769
Maintenance
Periodic checks and lubrication will keep
your watercraft in the safest and most effi-
cient condition possible. Therefore, make
sure to carry out the periodic maintenance.
Safety is an obligation of the watercraft own-
er. Proper maintenance must be carried out
to keep the exhaust emission and sound lev-
els within the regulated limits. The most im-
portant points of watercraft inspection and
lubrication are explained on the following pa-
ges.
See a Yamaha dealer for genuine Yamaha re-
placement parts and optional accessories
designed for your watercraft.
Remember, failures that are the result of the
installation of parts or accessories which are
not qualitatively equivalent to genuine
Yamaha parts are not covered by the limited
warranty.
Maintenance, replacement, or repair of
the emission control devices and system
may be performed by any marine SI engine
repair establishment or individual. War-
ranty repair, however, must be performed
at an authorized Yamaha marine dealer-
ship.
WARNING
EWJ00312
Be sure to turn off the engine when you
perform maintenance unless otherwise
specified. If you are not familiar with ma-
chine servicing, this work should be done
by a Yamaha dealer or other qualified me-
chanic.
UF4G74E0.book Page 87 Tuesday, July 16, 2019 10:27 AM
Page 95 of 110

Maintenance
88
EJU43101Periodic maintenance chart
The periodic maintenance chart gives general guidelines for periodic maintenance. Have a
Yamaha dealer perform the checks in the following chart. However, maintenance may need
to be performed more frequently depending on your operating conditions. If you have any
questions, consult a Yamaha dealer.
This “√” mark indicates items to be checked and serviced by a Yamaha dealer.
Item OperationInitial Thereafter every
Page
10 hours50 hours
or 12
months
*1100
hours or
12
months
*1200
hours or
24
months
*1
Fuel lineCheck fuel hoses and
clamps√—
Fuel filler cap/Wa-
ter separatorCheck O-rings for cracks
and deformation√—
Fuel tankCheck installation and
straps√—
Water inlet strainerCheck for clogs and dam-
age√—
Cooling water hos-
esCheck for damage and
leakage, and check
clamps√—
Engine oilReplace√√90
Oil filterReplace√90
Intermediate hous-
ingLubricate√—
Spark plugsCheck√√—
BatteryCheck state of charge,
terminals, bands, and
breather hose√—
Battery leadsCheck terminals√—
Steering masterCheck operation and for
looseness√√—
Steering cableCheck exterior and con-
nections, and lubricate√—
Shift rod and re-
verse gate (VX /
VX Deluxe /
VX Cruiser / VX
Limited)Check exterior and con-
nections, and lubricate√—
Air filter elementCheck for damage and
dirt√—
Air intake hosesCheck for damage, and
check clamps√—
UF4G74E0.book Page 88 Tuesday, July 16, 2019 10:27 AM
Page 96 of 110
Maintenance
89
*1: Whichever comes first.
*2: Check every 200 hours.
Perform the pre-operation checks and post-operation checks before performing periodic
maintenance.
Throttle bodyLubricate throttle valve√—
Exhaust systemCheck for exhaust leak-
age, and check hoses and
clamps√—
Breather hoseCheck breather hose and
clamps√—
ImpellerCheck for bends, dam-
age, and foreign material√—
Jet thrust nozzleCheck movement, and lu-
bricate√—
Jet vacuum bilgeCheck hoses for clogs
and damage, check
clamps, and clean bilge
strainer√—
Stern drain plugsCheck O-rings√—
AnodeCheck for corrosion, and
clean√ *2 —
Valve clearanceCheck and adjust√ *2 —
Rubber couplingCheck for cracks, inden-
tations, looseness, and
noise√—
Engine mountCheck for damage and
peeling√— Item OperationInitial Thereafter every
Page
10 hours50 hours
or 12
months
*1100
hours or
12
months
*1200
hours or
24
months
*1
UF4G74E0.book Page 89 Tuesday, July 16, 2019 10:27 AM
 1
1 2
2 3
3 4
4 5
5 6
6 7
7 8
8 9
9 10
10 11
11 12
12 13
13 14
14 15
15 16
16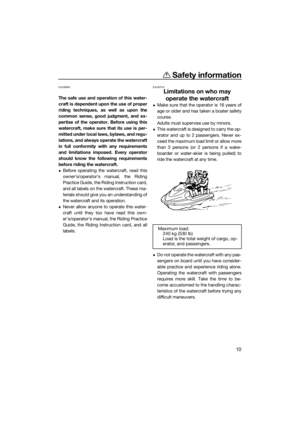 17
17 18
18 19
19 20
20 21
21 22
22 23
23 24
24 25
25 26
26 27
27 28
28 29
29 30
30 31
31 32
32 33
33 34
34 35
35 36
36 37
37 38
38 39
39 40
40 41
41 42
42 43
43 44
44 45
45 46
46 47
47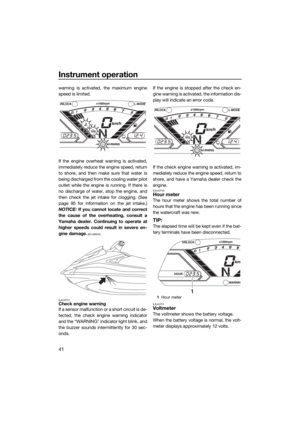 48
48 49
49 50
50 51
51 52
52 53
53 54
54 55
55 56
56 57
57 58
58 59
59 60
60 61
61 62
62 63
63 64
64 65
65 66
66 67
67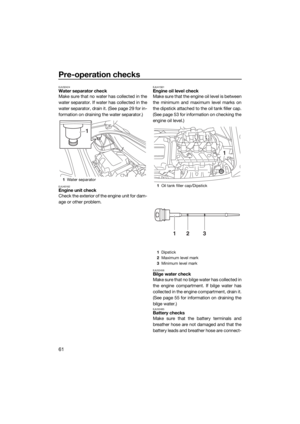 68
68 69
69 70
70 71
71 72
72 73
73 74
74 75
75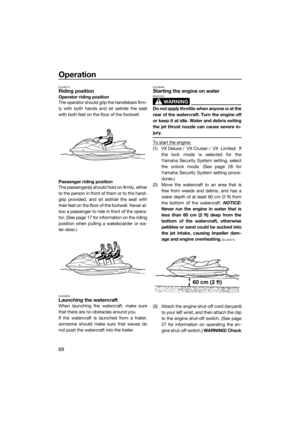 76
76 77
77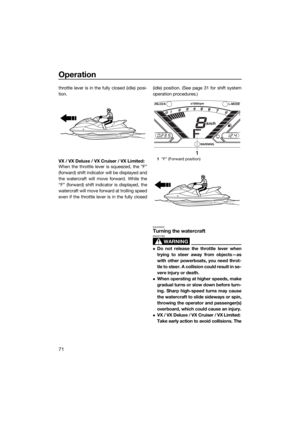 78
78 79
79 80
80 81
81 82
82 83
83 84
84 85
85 86
86 87
87 88
88 89
89 90
90 91
91 92
92 93
93 94
94 95
95 96
96 97
97 98
98 99
99 100
100 101
101 102
102 103
103 104
104 105
105 106
106 107
107 108
108 109
109![YAMAHA VX-C 2020 Owners Manual Care and storage
86
wise, the fuel hose that is secured to
the air filter case cover could be dam-
aged.
[ECJ02620]
(3) Spray a rust inhibitor into the intake
opening for 3 seconds. WARNING! Do
not s](/manual-img/51/52053/w960_52053-92.png "YAMAHA VX-C 2020 Owners Manual Care and storage
86
wise, the fuel hose that is secured to
the air filter case cover could be dam-
aged.
[ECJ02620]
(3) Spray a rust inhibitor into the intake
opening for 3 seconds. WARNING! Do
not s")
