2020 YAMAHA TRICITY 300 trouble
[x] Cancel search: troublePage 5 of 114

Introduction
EAU60580
Welcome to the Yamaha world of motorcycling!
As the owner of the MWD300, you are benefiting from Yamaha’s vast experience and newest technology regarding the de-
sign and manufacture of high-quality products, which have earned Yamaha a reputation for dependability.
Please take the time to read this manual thoroughly, so as to enjoy all advantages of your MWD300. The Owner’s Manual
does not only instruct you in how to operate, inspect and maintain your vehicle, but also in how to safeguard yourself and
others from trouble and injury.
In addition, the many tips given in this manual will help keep your vehicle in the best possible condition. If you have any
further questions, do not hesitate to contact your Yamaha dealer.
The Yamaha team wishes you many safe and pleasant rides. So, remember to put safety first!
Yamaha continually seeks advancements in product design and quality. Therefore, while this manual contains the most cur- rent product information available at the time of printing, there may be minor discrepancies between your vehicle and this
manual. If there is any question concerning this manual, please consult a Yamaha dealer.
WARNING
EWA17780
Please rea d this manual carefully an d completely before operatin g this vehicle.
UBX9E0E0.book Page 1 Monday, January 20, 2020 10:54 AM
Page 9 of 114

Table of contents
Checking and lubricating the
throttle grip and cable ................8-28
Lubricating the front and rear brake levers................................8-28
Checking and lubricating the
brake pedal ................................8-29
Checking and lubricating the centerstand and sidestand ........8-29
Checking the front fork..................8-30
Checking the steering ...................8-31
Lubricating the steering bearings .....................................8-31
Checking the wheel bearings ........8-31
Battery ...........................................8-32
Replacing the fuses .......................8-33
Vehicle lights .................................8-35
Replacing a turn signal light bulb ............................................8-35
Replacing the license plate light bulb ............................................8-36
Troubleshooting ............................8-36
Troubleshooting chart ...................8-38
Emergency mode .........................8-40
Vehicle care an d stora ge .................9-1
Matte color caution .........................9-1
Care .................................................9-1
Storage ............................................9-3 Specifications
................................. 10-1
Consumer information ................... 11-1
Identification numbers .................. 11-1
Diagnostic connector.................... 11-2
Vehicle data recording .................. 11-2
In dex ................................................ 12-1
UBX9E0E0.book Page 2 Monday, January 20, 2020 10:54 AM
Page 32 of 114

Instrument and control functions
5-1
5
EAU4939M
In dicator li ghts an d warnin g
li g hts
EAU88900
Turn si gnal in dicator li ghts “ ”
an d“”
Each indicator light will flash when its
corresponding turn signal lights are
flashing.
EAU88910
Hi gh beam in dicator li ght “ ”
This indicator light comes on when the
high beam of the headlight is switched
on.
EAU89121
Parkin g b rake in dicator li ght “ ”
This indicator light comes on when the
parking brake is applied.
EAU88880
Coolant temperature warnin g
li g ht “ ”
This warning light comes on when the
engine is overheating. If this occurs,
stop the engine immediately and allow
the engine to cool. (See page 8-39.)
For vehicles with a radiator fan, the ra-
diator fan(s) automatically switch on or
off according to the coolant tempera-
ture.
TIPWhen the vehicle is turned on, the light
will come on for a few seconds, and
then go off. If the light does not come
on, or if the light remains on, have a
Yamaha dealer check the vehicle.NOTICE
ECA10022
Do not continue to operate the en-
g ine if it is overheatin g.
EAU88920
En gine trou ble warnin g lig ht “ ”
This warning light comes on if a prob-
lem is detected in the engine or other
vehicle control system. If this occurs,
have a Yamaha dealer check the on-
board diagnostic system.TIPWhen the vehicle is turned on, this light
should come on for a few seconds and
then go off. Otherwise, have a Yamaha
dealer check vehicle.
1. ABS warning light “ ”
2. Smart key system indicator light “ ”
3. Left turn signal indicator light “ ”
4. Coolant temperature warning light “ ”
5. Parking brake indicator light “ ”
6. Standing assist indicator light “ ”
7. High beam indicator light “ ”
8. Standing assist warning light “ ”
9. Right turn signal indicator light “ ”
10.Traction control system indicator light “ ”
11.Engine trouble warning light “ ”1
11
2
3
4
5
6
7
8
9
10
UBX9E0E0.book Page 1 Monday, January 20, 2020 10:54 AM
Page 45 of 114

Instrument and control functions
5-14
5
Settin
g the traction control system
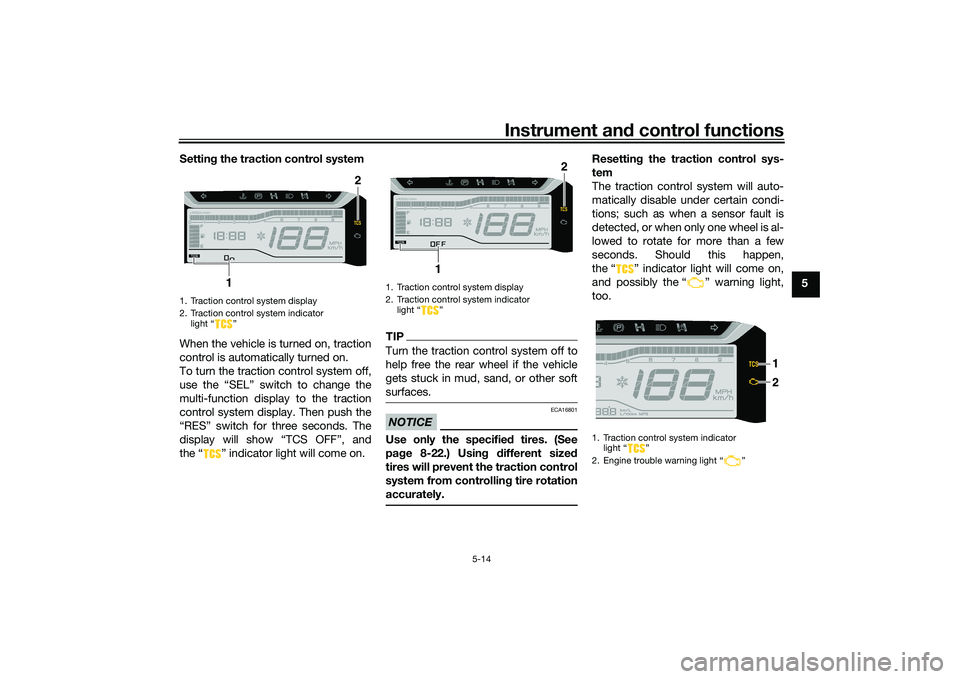
When the vehicle is turned on, traction
control is automatically turned on.
To turn the traction control system off,
use the “SEL” switch to change the
multi-function display to the traction
control system display. Then push the
“RES” switch for three seconds. The
display will show “TCS OFF”, and
the “ ” indicator light will come on.
TIPTurn the traction control system off to
help free the rear wheel if the vehicle
gets stuck in mud, sand, or other soft
surfaces.NOTICE
ECA16801
Use only the specifie d tires. (See
pa ge 8-22.) Usin g different sized
tires will prevent the traction control
system from controllin g tire rotation
accurately.
Resettin g the traction control sys-
tem
The traction control system will auto-
matically disable under certain condi-
tions; such as when a sensor fault is
detected, or when only one wheel is al-
lowed to rotate for more than a few
seconds. Should this happen,
the “ ” indicator light will come on,
and possibly the “ ” warning light,
too.
1. Traction control system display
2. Traction control system indicator light “ ”
2
1
1. Traction control system display
2. Traction control system indicator light “ ”
2
1
1. Traction control system indicator light “ ”
2. Engine trouble warning light “ ”
2 1
UBX9E0E0.book Page 14 Monday, January 20, 2020 10:54 AM
Page 58 of 114

Operation and important rid ing points
7-2
7
EAU86720
Startin g the eng ineThe ignition circuit cut-off system will
enable starting when the sidestand is
be up.
To start the engine1. Turn the main switch on and set
the engine stop switch to the run
position.
2. Confirm the indicator and warning light(s) come on for a few sec-
onds, and the go off. (See page
5-1.)TIPDo not start the engine if the en-
gine trouble warning light remains
on.
The ABS warning light should
come on and stay on until the ve-
hicle reaches a speed of 10 km/h
(6 mi/h).NOTICE
ECA24110
If a warnin g or in dicator li ght does
not work as d escribed a bove, have a
Yamaha dealer check the vehicle.3. Close the throttle completely. 4. While applying the front or rear
brake, push the start switch.
5. Release the start switch when the engine starts, or after 5 seconds.
Wait 10 seconds before pressing
the switch again to allow battery
voltage to restore.
NOTICE
ECA11043
For maximum en gine life, never ac-
celerate har d when the en gine is
col d!
EAU78221
TIPThis model is equipped with a lean an-
gle sensor to stop the engine in case of
a turnover. In this case, the engine
trouble warning light will come on but
this is not a malfunction. Before re-
starting the engine, turn the main
switch off and then back on to reset the
engine trouble warning light. Failing to
do so will prevent the engine from
starting even though the engine will
crank when pushing the start switch.
UBX9E0E0.book Page 2 Monday, January 20, 2020 10:54 AM
Page 96 of 114

Periodic maintenance an d a djustment
8-36
8
EAU89380
Replacin g the license plate
li g ht bul b1. Remove the license plate light
cover by removing the screws.
2. Remove the license plate light bulb socket (together with the
bulb) by pulling it out. 3. Remove the burnt-out bulb by
pulling it out from the socket.
4. Insert a new bulb into the socket.
5. Install the socket (together with the bulb) by pushing it in.
6. Install the license plate light cover by installing the screws.
EAU60701
Trou bleshootin gAlthough Yamaha vehicles receive a
thorough inspection before shipment
from the factory, trouble may occur
during operation. Any problem in the
fuel, compression, or ignition systems,
for example, can cause poor starting
and loss of power.
The following troubleshooting charts
represent quick and easy procedures
for checking these vital systems your-
self. However, should your vehicle re-
quire any repair, take it to a Yamaha
dealer, whose skilled technicians have
the necessary tools, experience, and
know-how to service the vehicle prop-
erly.
Use only genuine Yamaha replace-
ment parts. Imitation parts may look
like Yamaha parts, but they are often
inferior, have a shorter service life and
can lead to expensive repair bills.
WARNING
EWA15142
When checkin g the fuel system, do
not smoke, an d make sure there are
no open flames or sparks in the ar-
ea, inclu din g pilot li ghts from water
1. License plate light cover
2. Screw
2
1
1. License plate light bulb socket
1. License plate light bulb
1
1
UBX9E0E0.book Page 36 Monday, January 20, 2020 10:54 AM
Page 111 of 114

12-1
12
Index
AABS....................................................... 5-12
ABS warning light ................................... 5-2
Acceleration and deceleration ................ 7-3
Air filter and V-belt case air filter
elements ............................................. 8-17
Air temperature display .......................... 5-8
Auxiliary DC jack .................................. 5-20BBattery .................................................. 8-32
Brake fluid, changing............................ 8-27
Brake fluid level, checking.................... 8-26
Brake lever, front .................................. 5-10
Brake lever, rear ................................... 5-11
Brake levers, lubricating ....................... 8-28
Brake pedal .......................................... 5-10
Brake pedal, checking and lubricating........................................... 8-29
Braking ................................................... 7-3CCables, checking and lubricating ......... 8-28
Canister ................................................ 8-11
Care ........................................................ 9-1
Catalytic converter ............................... 5-18
Centerstand and sidestand, checking and lubricating ................................... 8-29
Clock ...................................................... 5-4
Coolant ................................................. 8-15
Coolant temperature warning light ......... 5-1DData recording, vehicle......................... 11-2
Diagnostic connector ........................... 11-2
Dimmer/Pass switch............................... 5-9
Display units, switching .......................... 5-3
EEmergency mode ................................. 8-40
Engine break-in ...................................... 7-1
Engine oil and oil filter element ............ 8-12
Engine overheating .............................. 8-39
Engine serial number ........................... 11-1
Engine trouble warning light .................. 5-1FFinal transmission oil............................ 8-14
Front and rear brake pads, checking ... 8-25
Front brake lever free play, checking ... 8-24
Front fork, checking ............................. 8-30
Fuel ...................................................... 5-16
Fuel consumption, tips for reducing ...... 7-4
Fuel meter .............................................. 5-4
Fuel tank cap........................................ 5-15
Fuel tank overflow hose ....................... 5-18
Fuses, replacing ................................... 8-33HHandlebar switches ............................... 5-8
Hazard switch ........................................ 5-9
High beam indicator light ....................... 5-1
Horn switch ............................................ 5-9IIdentification numbers ......................... 11-1
Ignition circuit cut-off system .............. 5-22
Indicator lights and warning lights ......... 5-1KKey, handling of smart and mechanical keys...................................................... 3-3LLicense plate light bulb, replacing ....... 8-36MMain switch ............................................ 3-7 Maintenance and lubrication, periodic ... 8-4
Maintenance, emission control
system .................................................. 8-3
Matte color, caution................................ 9-1
Model label ........................................... 11-1
Multi-function display ............................. 5-5
Multi-function meter unit ........................ 5-3
OOperating range of the smart key system .................................................. 3-2PPanel, removing and installing ................ 8-9
Parking.................................................... 7-4
Parking brake, checking ....................... 8-25
Parking brake indicator light ................... 5-1
Parking brake lever ............................... 5-12
Part locations.......................................... 2-1RRear brake lever free play, checking .... 8-24SSafe-riding points ................................... 1-5
Safety information................................... 1-1
SEL/RES switch ...................................... 5-9
Shock absorber assemblies, adjusting ............................................. 5-20
Sidestand.............................................. 5-21
Smart key................................................ 3-4
Smart key battery, replacing................... 3-6
Smart key system ................................... 3-1
Smart key system indicator light ............ 5-2
Smart key system, troubleshooting ...... 8-37
Spark plug, checking ............................ 8-10
Specifications ....................................... 10-1
Speedometer .......................................... 5-3
UBX9E0E0.book Page 1 Monday, January 20, 2020 10:54 AM
Page 112 of 114

Index
12-2
12
Standing assist ....................................... 4-1
Standing assist indicator light ................ 5-2
Standing assist switch ............................ 5-9
Standing assist warning light .................. 5-2
Starting off .............................................. 7-3
Starting the engine.................................. 7-2
Steering bearings, lubricating ............... 8-31
Steering, checking ................................ 8-31
Stop/Run/Start switch ............................ 5-9
Storage ................................................... 9-3
Storage compartment ........................... 5-18TTachometer ............................................. 5-4
Throttle grip and cable, checking and
lubricating ........................................... 8-28
Throttle grip free play, checking ........... 8-21
Tires ...................................................... 8-22
Tool kit .................................................... 8-2
Traction control system ........................ 5-13
Traction control system display .............. 5-7
Traction control system indicator light ... 5-2
Troubleshooting .................................... 8-36
Troubleshooting chart........................... 8-38
Turn signal indicator lights ...................... 5-1
Turn signal light bulb, replacing............ 8-35
Turn signal switch ................................... 5-9VValve clearance..................................... 8-21
V-belt, checking .................................... 8-27
Vehicle identification number ............... 11-1
Vehicle lights ......................................... 8-35WWheel bearings, checking..................... 8-31
Wheels .................................................. 8-23
YYamalube ............................................. 8-14
UBX9E0E0.book Page 2 Monday, January 20, 2020 10:54 AM