Page 41 of 114

Instrument and control functions
6-7
6
EAU86900
Tripmeters
The tripmeters show the distance trav-
eled since they were last reset.
To reset a tripmeter, set the display to
the tripmeter you want to reset, and
then push the “MENU” switch until it is
reset.TIPThe tripmeters will reset and continue
counting after 9999.9 is reached.
EAU86910
Fuel reserve tripmeter
If the last segment of the fuel meter
starts flashing, the display automati-
cally changes to the fuel reserve trip-
meter “TRIP F” and starts counting the
distance traveled from that point.
To reset the fuel reserve tripmeter,
push the “MENU” switch until it is re-
set.TIPIf you do not reset the fuel reserve trip-
meter manually, it will reset automati-
cally and disappear from the display
after refueling and traveling 5 km (3 mi).
EAUN3060
Oil change tripmeter
This tripmeter shows the distance trav-
eled since the last engine oil change.
The oil change indicator “OIL” will flash
at the initial 1000 km (600 mi), the next
5000 km (3100 mi), and then every
6000 km (3700 mi) thereafter.
To reset the oil change tripmeter and
oil change indicator, select the oil
change tripmeter, and then push the
“MENU” switch until “OIL” and the trip-
meter start flashing. While “OIL” and
the tripmeter are flashing, push the
“MENU” switch until the tripmeter is
reset.
1. Tripmeter
1
1. Fuel reserve tripmeter
1
1.
2. Oil change tripmeter
2
1
UBALE0E0.book Page 7 Wednesday, September 30, 2020 1:37 PM
Page 42 of 114

Instrument and control functions
6-8
6
TIPWhen the engine oil has been
changed, the oil change tripmeter and
the oil change indicator must be reset.
Otherwise, the oil change indicator will
not come on at the correct time.
EAUN3070
V-belt replacement tripmeter
This tripmeter shows the distance trav-
eled since the V-belt was last replaced.
The V-belt replacement indicator “V-
BELT” will flash every 18000 km
(11200 mi) to indicate that the V-belt
should be replaced.To reset both the tripmeter and the in-
dicator, select the V-belt replacement
tripmeter, and then push the “MENU”
switch until “V-BELT” and the tripme-
ter start flashing. While “V-BELT” and
the tripmeter are flashing, push the
“MENU” switch until the tripmeter is
reset.
TIPWhen the V-belt is replaced, the trip-
meter and indicator must be reset.
Otherwise, the V-belt replacement in-
dicator will not come on at the correct
time.
EAU86940
Instantaneous fuel consumption
displayThis display shows fuel consumption
under current riding conditions. It can
be set to either “km/L” or “L/100 km”,
or “MPG” when using miles.
“km/L”: the distance that can be
traveled on 1.0 L of fuel.
“L/100 km”: the amount of fuel
necessary to travel 100 km.
“MPG”: the distance that can be
traveled on 1.0 Imp.gal of fuel.
TIPWhen traveling under 10 km/h (6 mi/h),
EAU86950
Average fuel consumption display
1. V-belt replacement indicator “V-BELT”
2. V-belt replacement tripmeter
21
1. Instantaneous fuel consumption display
1
1. Average fuel consumption display
1
UBALE0E0.book Page 8 Wednesday, September 30, 2020 1:37 PM
Page 43 of 114
Instrument and control functions
6-9
6 This display shows the average fuel
consumption since it was last reset.
The average fuel consumption display
can be set to either “km/L” or “L/100
km”, or “MPG” when using miles.
“km/L”: the average distance that
can be traveled on 1.0 L of fuel.
“L/100 km”: the average amount
of fuel necessary to travel 100 km.
“MPG”: the average distance that
can be traveled on 1.0 Imp.gal of
fuel.
TIPTo reset the display, push the
“MENU” switch until it resets.
After resetting, “_ _._” is shown
until the vehicle has traveled some
distance.
EAU86960
Battery voltage display
This display shows the current charge
state of the battery.
Over 12.8 V = Full charge.
Under 12.7 V = Charging is re-
quired.TIPIf the battery voltage is less than 9.0 V,
EAU1234R
Handlebar switchesLeft
1. Battery voltage meter
1
1.
2. Dimmer switch / Ž
3. Turn signal switch / Ž
4. Horn switch Ž
1
3 42
UBALE0E0.book Page 9 Wednesday, September 30, 2020 1:37 PM
Page 44 of 114

Instrument and control functions
6-10
6Right
EAU89570
Dimmer switch “ / ”
Set this switch to “ ” for the high
beam and to “ ” for the low beam.TIPWhen the switch is set to low beam,
both upper headlights come on.
When the switch is set to high beam,
both lower headlights also come on.
EAU12461
Turn signal switch “ / ”
To signal a right-hand turn, push this
switch to “ ”. To signal a left-hand
turn, push this switch to “ ”. Whenreleased, the switch returns to the cen-
ter position. To cancel the turn signal
lights, push the switch in after it has re-
turned to the center position.
EAU12501
Horn switch “ ”
Press this switch to sound the horn.
EAU12722
Start switch “ ”
With the sidestand up, push this switch
while applying the front or rear brake to
crank the engine with the starter. See
page 8-2 for starting instructions prior
to starting the engine.
EAU79500
Hazard switch “ ”
With the main switch in the “ON” posi-
tion, use this switch to turn on the haz-
ard lights (simultaneous flashing of all
turn signal lights).
The hazard lights are used in case of an
emergency or to warn other drivers
when your vehicle is stopped where it
might be a traffic hazard.
NOTICE
ECA10062
Do not use the hazard lights for an
extended length of time with the en-
gine not running, otherwise the bat-
tery may discharge.
EAU59011
Menu switch “MENU”
This switch is used to perform selec-
tions in the setting mode display of the
multi-function meter unit.
See Multi-function meter unit on page
6-3 for detailed information.
EAU76391
Stop and Start System
switch “ / ”
To turn on the Stop and Start System,
set the switch to “ ”. To turn off the
Stop and Start System, set this switch
to “ ”.
1. Stop and Start System switch “ / ”
2. Hazard lights switch “ ”
3. Start switch “ ”
AA
1
2
3
A
A
/
A
A
A
A
UBALE0E0.book Page 10 Wednesday, September 30, 2020 1:37 PM
Page 45 of 114

Instrument and control functions
6-11
6
EAU12902
Front brake leverThe front brake lever is located on the
right side of the handlebar. To apply
the front brake, pull this lever toward
the throttle grip.
EAU12952
Rear brake leverThe rear brake lever is located on the
left side of the handlebar. To apply the
rear brake, pull this lever toward the
handlebar grip.
EAU53142
ABSThe Yamaha ABS (Anti-lock Brake
System) features a dual electronic con-
trol system, which acts on the front and
rear brakes independently.
Operate the brakes with ABS as you
would conventional brakes. If the ABS
is activated, a pulsating sensation may
be felt at the brake levers. In this situa-
tion, continue to apply the brakes and
let the ABS work; do not “pump” the
brakes as this will reduce braking ef-
fectiveness.
WARNING
EWA16051
Always keep a sufficient distance
from the vehicle ahead to match the
riding speed even with ABS.
The ABS performs best with
long braking distances.
On certain surfaces, such as
rough or gravel roads, the brak-
ing distance may be longer with
the ABS than without.The ABS is monitored by an ECU,
which will revert the system to conven-
tional braking if a malfunction occurs.
1. Front brake lever
1
1. Rear brake lever1
UBALE0E0.book Page 11 Wednesday, September 30, 2020 1:37 PM
Page 46 of 114

Instrument and control functions
6-12
6
TIPThe ABS performs a self-diagno-
sis test each time the vehicle first
starts off after the key is turned to
“ON” and the vehicle has traveled
at a speed of 10 km/h (6 mi/h) or
higher. During this test, a “click-
ing” noise can be heard from the
front of the vehicle, and if either
brake lever is even slightly ap-
plied, a vibration can be felt at the
lever, but these do not indicate a
malfunction.
This ABS has a test mode which
allows the owner to experience
the pulsation at the brake levers
when the ABS is operating. How-
ever, special tools are required, so
please consult your Yamaha deal-
er.NOTICE
ECA20100
Be careful not to damage the wheel
sensor or wheel sensor rotor; other-
wise, improper performance of the
ABS will result.
EAUN2810
Traction control systemThe traction control system (TCS)
helps maintain traction when acceler-
ating on slippery surfaces, such as un-
paved or wet roads. If sensors detect
that the rear wheel is starting to slip
(uncontrolled spinning), the traction
control system assists by regulating
engine power until traction is restored.
When traction control has engaged,
the “ ” indicator light will flash. You
may notice changes in engine re-
sponse or exhaust sound.
WARNING
EWA18860
The traction control system is not a
substitute for riding appropriately
for the conditions. Traction control
cannot prevent loss of traction due
to excessive speed when entering
turns, when accelerating hard at a
sharp lean angle, or while braking,
and cannot prevent front wheel slip-
ping. As with any vehicle, approach
surfaces that may be slippery with
caution and avoid especially slip-
pery surfaces.
1. Front wheel sensor
2. Front wheel sensor rotor
1. Rear wheel sensor
2. Rear wheel sensor rotor
2
1
1
2
UBALE0E0.book Page 12 Wednesday, September 30, 2020 1:37 PM
Page 47 of 114

Instrument and control functions
6-13
6 Setting the traction control system
When the vehicle is turned on, traction
control is automatically turned on.
To turn the traction control system off,
use the “MENU” switch to change the
multi-function display to the traction
control system display. Then push the
“MENU” switch for three seconds. The
display will show “TCS OFF”, and
the “ ” indicator light will come on.
TIPTurn the traction control system off to
help free the rear wheel if the vehicle
gets stuck in mud, sand, or other soft
surfaces.NOTICE
ECA16801
Use only the specified tires. (See
page 9-19.) Using different sized
tires will prevent the traction control
system from controlling tire rotation
accurately.
Resetting the traction control sys-
tem
The traction control system will auto-
matically disable under certain condi-
tions; such as when a sensor fault is
detected, or when only one wheel is al-
lowed to rotate for more than a few
seconds. Should this happen,
the “ ” indicator light will come on,
and possibly the “ ” warning light,
too.
1. Traction control system indicator
light “ ”
2. Traction control system display
1
2
1. Traction control system indicator
light Ž
2. Traction control system display
1
2
1. Traction control system indicator
light Ž
2. Engine trouble warning light Ž
1
2
UBALE0E0.book Page 13 Wednesday, September 30, 2020 1:37 PM
Page 48 of 114

Instrument and control functions
6-14
6
TIPWhen the vehicle is on the centerstand,
do not rev the engine for an extended
period of time. Otherwise, the traction
control system will automatically dis-
able and need to be reset.If the traction control system automat-
ically disables, try resetting it as fol-
lows.
1. Stop the vehicle and turn it off
completely.
2. Wait a few seconds and then turn
the vehicle power on.
3. The “ ” indicator light should
turn off and the system be en-
abled.TIPIf the Ž indicator light remains on
after resetting, the vehicle may still be
ridden; however, have a Yamaha deal-
er check the vehicle as soon as possi-
ble.4. Have a Yamaha dealer check the
vehicle and turn off the Ž
warning light.
EAUN2571
Fuel tank capTo open the fuel tank cap lid, turn the
main switch to “OPEN” position and
push the “FUEL” button.
To open the the fuel tank cap, turn it
counterclockwise and pull it off.To install the fuel tank cap, turn it
clockwise until the “ ” mark is facing
forward. Close the fuel tank cap lid.
WARNING
EWA10132
Make sure that the fuel tank cap is
properly installed before riding.
Leaking fuel is a fire hazard.
1. “FUEL” button
1. Fuel tank cap lid
2. Fuel tank cap
1
1
2
1. “ ” mark
2. Fuel tank cap
12
UBALE0E0.book Page 14 Wednesday, September 30, 2020 1:37 PM
 1
1 2
2 3
3 4
4 5
5 6
6 7
7 8
8 9
9 10
10 11
11 12
12 13
13 14
14 15
15 16
16 17
17 18
18 19
19 20
20 21
21 22
22 23
23 24
24 25
25 26
26 27
27 28
28 29
29 30
30 31
31 32
32 33
33 34
34 35
35 36
36 37
37 38
38 39
39 40
40 41
41 42
42 43
43 44
44 45
45 46
46 47
47 48
48 49
49 50
50 51
51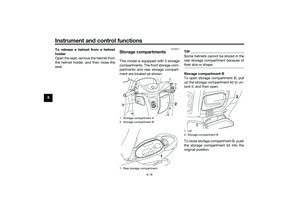 52
52 53
53 54
54 55
55 56
56 57
57 58
58 59
59 60
60 61
61 62
62 63
63 64
64 65
65 66
66 67
67 68
68 69
69 70
70 71
71 72
72 73
73 74
74 75
75 76
76 77
77 78
78 79
79 80
80 81
81 82
82 83
83 84
84 85
85 86
86 87
87 88
88 89
89 90
90 91
91 92
92 93
93 94
94 95
95 96
96 97
97 98
98 99
99 100
100 101
101 102
102 103
103 104
104 105
105 106
106 107
107 108
108 109
109 110
110 111
111 112
112 113
113