2020 YAMAHA FJR1300AS check engine light
[x] Cancel search: check engine lightPage 5 of 122

Table of contents
Safety information ............................1-1
Description ........................................2-1
Left view ..........................................2-1
Right view........................................2-2
Controls and instruments ................2-3
Instrument an d control functions ....3-1
Immobilizer system .........................3-1
Main switch/steering lock ...............3-2
Indicator lights and warning lights ............................................3-3
Cruise control system .....................3-6
Multi-function meter unit .................3-9
D-mode (drive mode) ....................3-22
Handlebar switches.......................3-22
YCC-S system...............................3-24
Shift pedal .....................................3-25
Hand shift lever .............................3-26
Brake lever ....................................3-26
Brake pedal ...................................3-27
ABS ...............................................3-27
Traction control system.................3-28
Fuel tank cap.................................3-30
Fuel................................................3-30
Fuel tank overflow hose ................3-32
Catalytic converter ........................3-32
Seats .............................................3-33
Adjusting the rider seat height ......3-34
Storage compartment ...................3-36
Accessory box...............................3-37
Adjusting the headlight beams......3-38
Handlebar position ........................3-39
Opening and closing the cowling vents ..........................................3-39
Rear view mirrors ..........................3-41
Adjusting the front and rear suspension.................................3-41
Auxiliary DC jack ..........................3-46
Sidestand ......................................3-47
Ignition circuit cut-off system........3-47
Cornering lights .............................3-49 For your safety – pre-operation
checks
............................................... 4-1
Operation an d important ri din g
points ................................................. 5-1
Engine break-in ............................... 5-1
Starting the engine.......................... 5-2
Shifting ............................................ 5-4
Tips for reducing fuel consumption................................ 5-6
Parking ............................................ 5-6
Perio dic maintenance an d
a d justment ........................................ 6-1
Tool kit ............................................ 6-2
Periodic maintenance charts .......... 6-3
Periodic maintenance chart for the emission control system.............. 6-3
General maintenance and lubrication chart........................... 6-4
Removing and installing panels ...... 6-7
Checking the spark plugs ............. 6-10
Canister......................................... 6-11
Engine oil and oil filter cartridge ... 6-11
Why Yamalube .............................. 6-14
Final gear oil.................................. 6-15
Coolant ......................................... 6-16
Air filter element ............................ 6-18
Checking the engine idling speed......................................... 6-18
Checking the throttle grip free play ............................................ 6-19
Valve clearance ............................. 6-19
Tires .............................................. 6-20
Cast wheels .................................. 6-22
YCC-S clutch ................................ 6-23
Checking the brake lever free play ............................................ 6-23
Brake light switches ...................... 6-24
Checking the front and rear brake pads........................................... 6-24
Checking the brake and YCC-S clutch fluid levels ....................... 6-25
Changing the brake and YCC-S clutch fluids ............................... 6-27
UB95E2E0.book Page 1 Tuesday, December 17, 2019 10:29 AM
Page 11 of 122

Safety information
1-5
1
operator and may limit control
ability, therefore, such accesso-
ries are not recommended.
Use caution when adding electri-
cal accessories. If electrical ac-
cessories exceed the capacity of
the motorcycle’s electrical sys-
tem, an electric failure could re-
sult, which could cause a
dangerous loss of lights or engine
power.
Aftermarket Tires an d Rims
The tires and rims that came with your
motorcycle were designed to match
the performance capabilities and to
provide the best combination of han-
dling, braking, and comfort. Other
tires, rims, sizes, and combinations
may not be appropriate. See page 6-20
for tire specifications and for informa-
tion on servicing and replacing your
tires.
Transportin g the Motorcycle
Be sure to observe following instruc-
tions before transporting the motorcy-
cle in another vehicle. Remove all loose items from the
motorcycle.
Check that the fuel cock (if
equipped) is in the off position and
that there are no fuel leaks.
Shift the transmission into gear
(for models with a manual trans-
mission).
Secure the motorcycle with tie-
downs or suitable straps that are
attached to solid parts of the mo-
torcycle, such as the frame or up-
per front fork triple clamp (and not,
for example, to rubber-mounted handlebars or turn signals, or
parts that could break). Choose
the location for the straps carefully
so the straps will not rub against
painted surfaces during transport.
The suspension should be com-
pressed somewhat by the tie-
downs, if possible, so that the mo-
torcycle will not bounce exces-
sively during transport.
UB95E2E0.book Page 5 Tuesday, December 17, 2019 10:29 AM
Page 18 of 122

Instrument and control functions
3-4
3
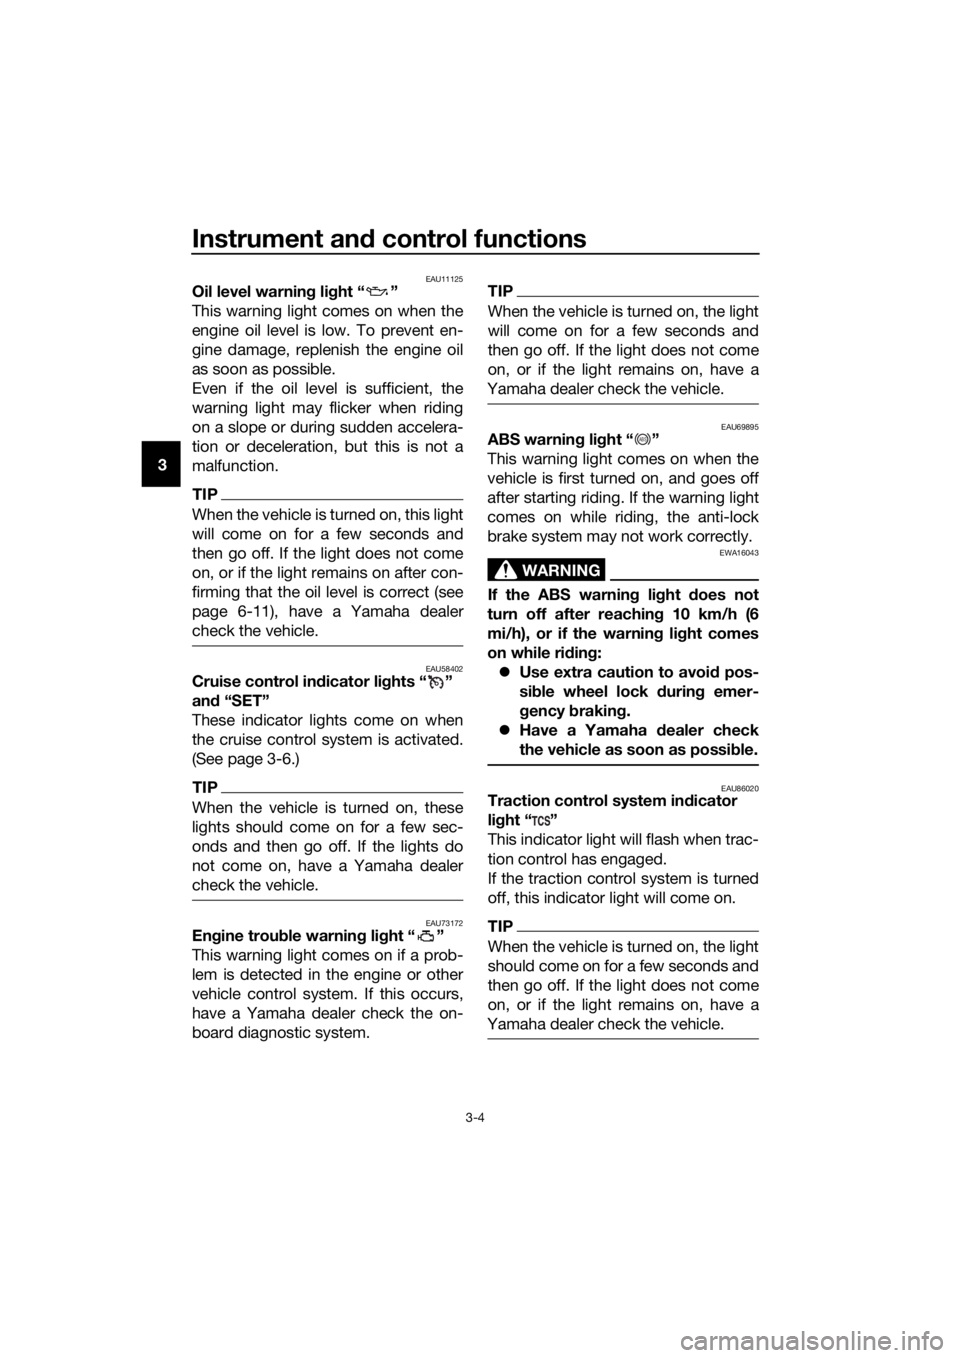
EAU11125Oil level warnin g li ght “ ”
This warning light comes on when the
engine oil level is low. To prevent en-
gine damage, replenish the engine oil
as soon as possible.
Even if the oil level is sufficient, the
warning light may flicker when riding
on a slope or during sudden accelera-
tion or deceleration, but this is not a
malfunction.
TIP
When the vehicle is turned on, this light
will come on for a few seconds and
then go off. If the light does not come
on, or if the light remains on after con-
firming that the oil level is correct (see
page 6-11), have a Yamaha dealer
check the vehicle.
EAU58402Cruise control in dicator li ghts “ ”
an d “SET”
These indicator lights come on when
the cruise control system is activated.
(See page 3-6.)
TIP
When the vehicle is turned on, these
lights should come on for a few sec-
onds and then go off. If the lights do
not come on, have a Yamaha dealer
check the vehicle.
EAU73172En gine trou ble warnin g lig ht “ ”
This warning light comes on if a prob-
lem is detected in the engine or other
vehicle control system. If this occurs,
have a Yamaha dealer check the on-
board diagnostic system.
TIP
When the vehicle is turned on, the light
will come on for a few seconds and
then go off. If the light does not come
on, or if the light remains on, have a
Yamaha dealer check the vehicle.
EAU69895ABS warnin g li ght “ ”
This warning light comes on when the
vehicle is first turned on, and goes off
after starting riding. If the warning light
comes on while riding, the anti-lock
brake system may not work correctly.
WARNING
EWA16043
If the ABS warnin g li ght does not
turn off after reachin g 10 km/h (6
mi/h), or if the warnin g li ght comes
on while rid ing:
Use extra caution to avoi d pos-
si ble wheel lock durin g emer-
g ency brakin g.
Have a Yamaha dealer check
the vehicle as soon as possi ble.
EAU86020Traction control system in dicator
li g ht “ ”
This indicator light will flash when trac-
tion control has engaged.
If the traction control system is turned
off, this indicator light will come on.
TIP
When the vehicle is turned on, the light
should come on for a few seconds and
then go off. If the light does not come
on, or if the light remains on, have a
Yamaha dealer check the vehicle.
ABS
UB95E2E0.book Page 4 Tuesday, December 17, 2019 10:29 AM
Page 20 of 122

Instrument and control functions
3-6
3 immobilizer system is enabled. After 24
hours have passed, the indicator light
will stop flashing, however the immobi-
lizer system is still enabled.
TIP
When the vehicle is turned on, this light
should come on for a few seconds and
then go off. If the light does not come
on, or if the light remains on, have a
Yamaha dealer check the vehicle.
Transpon der interference
If the immobilizer system indicator light
flashes in the pattern, slowly 5 times
then quickly 2 times, this could be
caused by transponder interference. If
this occurs, try the following. 1. Make sure there are no other im- mobilizer keys close to the main
switch.
2. Use the code re-registering key to start the engine.
3. If the engine starts, turn it off, and try starting the engine with the
standard keys.
4. If one or both of the standard keys do not start the engine, take the
vehicle and all 3 keys to a Yamaha
dealer to have the standard keys
re-registered.
EAU55382
Cruise control system
This model is equipped with a cruise
control system designed to maintain a
set cruising speed.
The cruise control system operates
only when riding in 3rd gear at speeds
between about 50 km/h (31 mi/h) and
160 km/h (100 mi/h), 4th or 5th gear at
speeds between about 50 km/h (31
mi/h) and 180 km/h (112 mi/h), or 6th
gear at speeds between about 55 km/h
(34 mi/h) and 180 km/h (112 mi/h).
WARNING
EWA16341
Improper use of the cruise con-
trol system may result in loss of
control, which coul d lea d to an
acci dent. Do not activate the
cruise control system in heavy
traffic, poor weather con ditions,
or amon g win din g, slippery,
hilly, rou gh or g ravel roa ds.
When travelin g uphill or d own-
hill, the cruise control system
may not b e able to maintain the
set cruisin g speed .
To prevent acci dentally activat-
in g the cruise control system,
turn it off when not in use. Make
sure that the cruise control sys-
tem ind icator light “ ” is off.
UB95E2E0.book Page 6 Tuesday, December 17, 2019 10:29 AM
Page 25 of 122

Instrument and control functions
3-11
3
“F” (full) towards “E” (empty) as the fuel
level decreases. When the last seg-
ment starts flashing, refuel as soon as
possible.
When the key is turned to “ON”, all dis-
play segments come on once in order
to test the electrical circuit.
TIP
If a problem is detected in the fuel me-
ter electrical circuit, the fuel meter dis-
play segments will flash repeatedly.
Have a Yamaha dealer check the vehi-
cle.
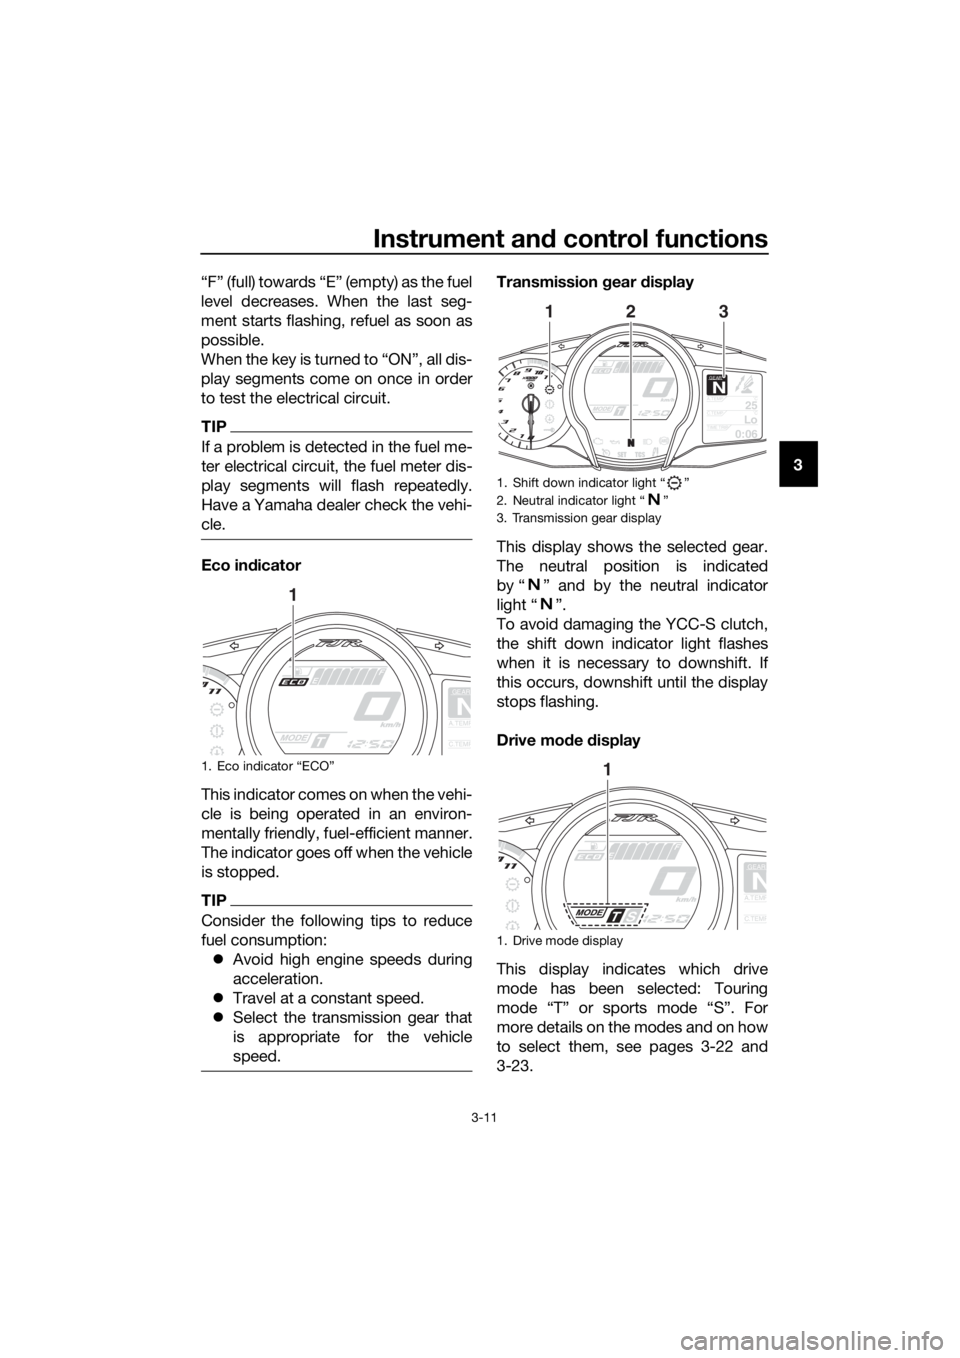
Eco in
dicator
This indicator comes on when the vehi-
cle is being operated in an environ-
mentally friendly, fuel-efficient manner.
The indicator goes off when the vehicle
is stopped.
TIP
Consider the following tips to reduce
fuel consumption: Avoid high engine speeds during
acceleration.
Travel at a constant speed.
Select the transmission gear that
is appropriate for the vehicle
speed.
Transmission gear display
This display shows the selected gear.
The neutral position is indicated
by “ ” and by the neutral indicator
light “ ”.
To avoid damaging the YCC-S clutch,
the shift down indicator light flashes
when it is necessary to downshift. If
this occurs, downshift until the display
stops flashing.
Drive mo de display
This display indicates which drive
mode has been selected: Touring
mode “T” or sports mode “S”. For
more details on the modes and on how
to select them, see pages 3-22 and
3-23.
1. Eco indicator “ECO”
GEAR
NA.TEMP
C.TEMP
1
1. Shift down indicator light “ ”
2. Neutral indicator light “ ”
3. Transmission gear display
1. Drive mode display
GEARN25A.TEMP ˚C
LoC.TEMP˚C
0:06TIME TRIP
213
GEAR
NA.TEMP
C.TEMP
1
UB95E2E0.book Page 11 Tuesday, December 17, 2019 10:29 AM
Page 43 of 122

Instrument and control functions
3-29
3
Turnin
g TCS off or on
When the vehicle is turned on, the trac-
tion control system automatically turns
on.
To turn off the traction control system,
stop the vehicle and push the traction
control system button for 2 seconds.
The TCS indicator light will come on.
To turn traction control back on, push
the TCS button again. The TCS indica-
tor light will turn off.
TIP
Turn off traction control to help free the
rear wheel if stuck in mud, sand, or
other situation.
Notes on usa ge
The traction control system will disable
if: either wheel comes off the
ground.
excessive rear wheel spin is de-
tected.
either wheel is forcibly rotated
(such as when performing mainte-
nance).
TIP
If the traction control system is dis-
abled, both the TCS indicator light and
the engine trouble warning light will
come on.
NOTICE
ECA16801
Use only the specifie d tires. (See
pa ge 6-20.) Usin g different sized
tires will prevent the traction control
system from controllin g tire rotation
accurately.
To reset the traction control system
1. Turn the vehicle off and wait a few seconds.
2. Turn the vehicle on and start the engine.
3. After traveling at least 20 km/h (12 mph), the TCS indicator light
should turn off and the system be
enabled.
4. Have a Yamaha dealer check the vehicle and turn off the engine
trouble warning light.
TIP
If the TCS indicator light or engine trou-
ble warning light remain on after reset-
ting, ride cautiously and have a
Yamaha dealer check the vehicle as soon as possible.
1. “TCS” button
2. Engine trouble warning light “ ”
3. Traction control system indicator light “ ”
132
UB95E2E0.book Page 29 Tuesday, December 17, 2019 10:29 AM
Page 56 of 122

Instrument and control functions
3-42
3 • The suspension will still operate
as normal, only the preload ad-
justing function cannot be used.
• To reset the suspension system warning light, wait approximate-
ly 6 minutes and then turn the
main switch off or immediately
turn the main switch off and
then wait 6 minutes.
• If the suspension system warn- ing light remains on, have a
Yamaha dealer check the vehi- cle.
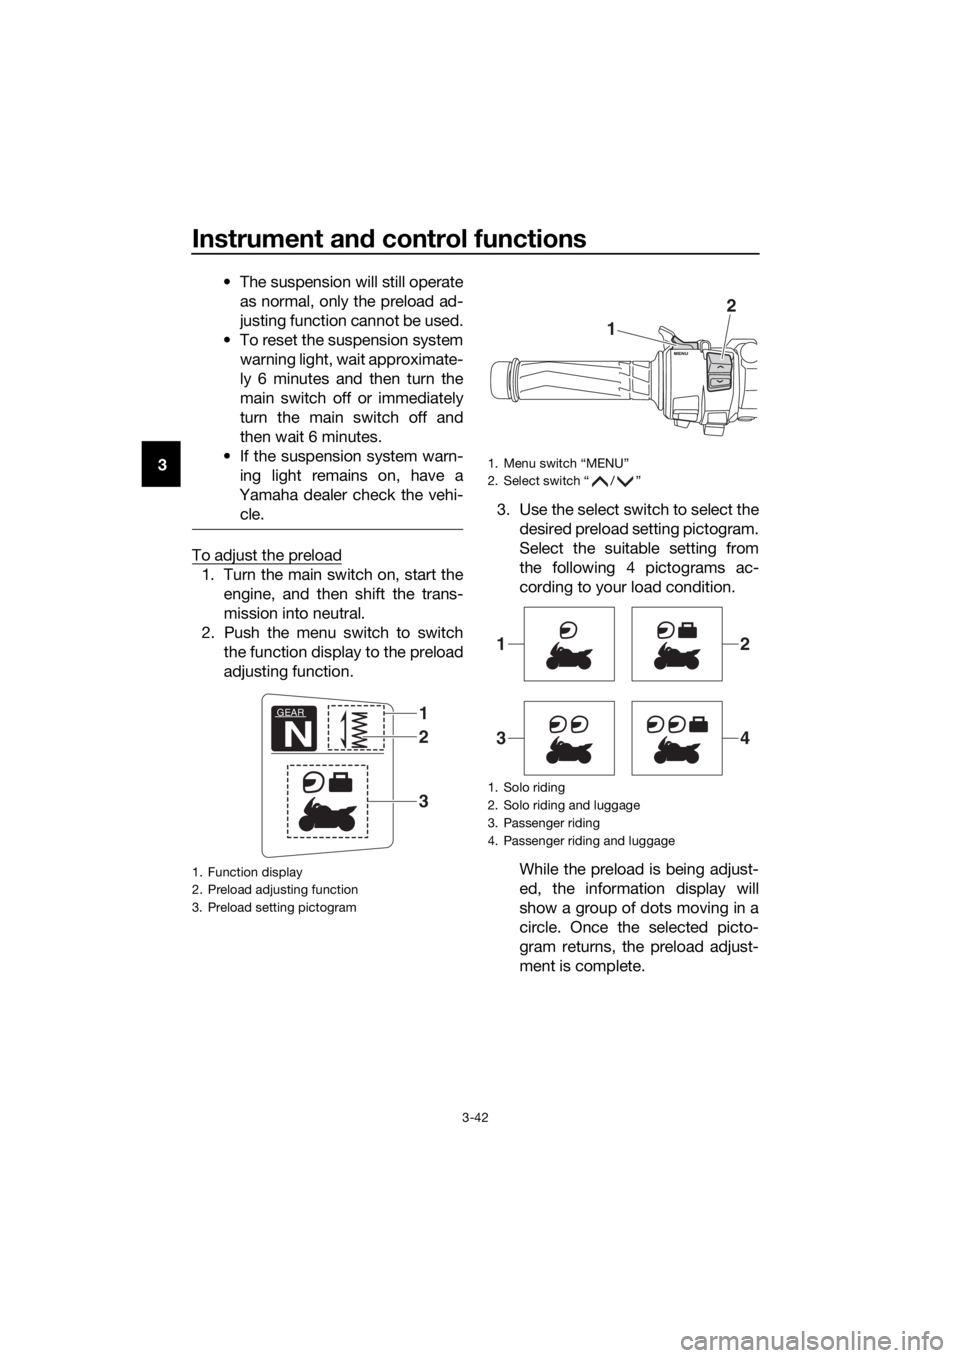
To adjust the preload
1. Turn the main switch on, start the engine, and then shift the trans-
mission into neutral.
2. Push the menu switch to switch the function display to the preload
adjusting function. 3. Use the select switch to select the
desired preload setting pictogram.
Select the suitable setting from
the following 4 pictograms ac-
cording to your load condition.
While the preload is being adjust-
ed, the information display will
show a group of dots moving in a
circle. Once the selected picto-
gram returns, the preload adjust-
ment is complete.
1. Function display
2. Preload adjusting function
3. Preload setting pictogram
GEAR
N
1
3
2
1. Menu switch “MENU”
2. Select switch “ / ”
1. Solo riding
2. Solo riding and luggage
3. Passenger riding
4. Passenger riding and luggage
1
2
12
34
UB95E2E0.book Page 42 Tuesday, December 17, 2019 10:29 AM
Page 62 of 122

Instrument and control functions
3-48
3
With the engine turned off:
1. Place vehicle on centerstand.
2. Move the sidestand down.
3. Set engine stop switch to run position.
4. Turn main switch to on position.
5. Shift transmission into neutral.
6. Apply the front or rear brake.
7. Push the start switch.
Does the engine start?
With the engine still running:
8. Move the sidestand up.
9. Apply the rear brake (to prevent a
TCS error).
10. Shift transmission into gear.
11. Move the sidestand down.
Does the engine stall?
After the engine has stalled:
12. Move the sidestand up.
13. Release the brake.
14. Push the start switch.
Does the engine start?
The system is OK. The motorcycle can
be ridden.
The neutral switch, a brake light switch
or the YCC-S system may not be
working.
The motorcycle should not be ridden
until checked by a Yamaha dealer.
The sidestand switch may not be
working.
The motorcycle should not be ridden
until checked by a Yamaha dealer.
A brake light switch may not be working.
The motorcycle should not be ridden
until checked by a Yamaha dealer.
WARNING
The vehicle must be placed on the centerstand during this inspection.
If a malfunction is found, have the vehicle inspected before riding.
YES NO
YESNO
NOYES
UB95E2E0.book Page 48 Tuesday, December 17, 2019 10:29 AM