Page 17 of 43

Pressing also resumes the stored speed for the selected func-
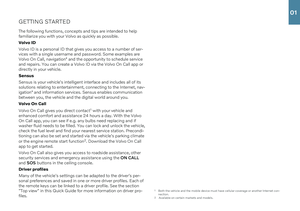
tion. Right-side steering wheel keypadThe right-side steering wheel keypad controls the instrument panel.
Open/close the app menu. From here, you can control the trip computer, media player, a connected cell phone and the navi-
gation system *.
Press the left/right arrows to scroll among the apps.
Select/deselect or confirm a choice, e.g. select the trip com- puter's menu or erase a message from the instrument panel.
Scroll among a selected app's functions by pressing the up/ down arrows.
Raise/lower the media volume by pressing or . If no other
function is active these buttons serve as volume control. Voice control is activated by pressing the
button to give voice
commands for e.g. media, navigation and climate systems. Say e.g. “
Radio”, “Raise temperature” or “Cancel”.
See the chapter "Voice control" in this Quick Guide for additional voice commands. Trip computerThe trip computer shows e.g. mileage, fuel consumption and aver- age speed. You can choose the type of trip computer information that will be displayed in the instrument panel. The trip computer calculates the distance that can be driven on the amount of fuelremaining. Use the buttons on the right-side steering wheel keypadto display the various options. When “----” is displayed in theinstrument panel, the fuel level is too low to calculate the distanceremaining. Refuel as soon as possible.
02
Page 18 of 43

LEFT-SIDE STEERING WHEEL LEVER
Headlight functions are controlled using the left-side steering
wheel lever. In AUTO mode, the vehicle will automatically monitor lighting con-
ditions and adjust headlight illumination accordingly, e.g. switch from daytime running lights to low beam when the sun goes downor when you drive into a tunnel. To switch on the Active High Beamfunction, which automatically dims the headlights for approaching vehicles, turn the lighting ring on the lever to
. Move the lever
toward the steering wheel to activate manual high beams and toward the dashboard to deactivate. Active Bending Lights * are designed to follow the movement of
the steering wheel to help provide maximum illumination in turns and intersections. The function is automatically activated when the engine is started and can be deactivated in the center display's Function view,
.
Approach lighting is activated when you unlock the vehicle using
the key and provides illumination to help you approach the vehicle safely in the dark. Home Safe Lighting illuminates some of the exterior lights after
the vehicle is locked to provide illumination around the vehicle in dark conditions. To activate the function, switch off the ignition andmove the left-side steering wheel lever toward the dashboard andrelease. The length of time home safe lighting remains illuminatedcan be set in the center display. Resetting the trip odometers Reset all information in the manual trip odometer (TM) by pressing and holding the RESET button. Press the button briefly to reset
only the mileage. The automatic trip odometer (TA) resets automat-ically when the vehicle is switched off for more than 4 hours.
02
Page 19 of 43

RIGHT-SIDE STEERING WHEEL LEVERThe right-side steering wheel lever controls the wipers and the rain sensor.
–Move the lever downward for a single sweep of the windshield.
–Move the lever upward in steps for intermittent, normal speed and high speed.
–Use the lever's thumb wheel to adjust intermittent wiping speed.
–Move the lever toward the steering wheel to start the windshield and headlight washers and toward the dashboard to start therear window washers.
Press the rain sensor button to activate/deactivate the rain sensor. The windshield wiper lever should be in position 0, or
in the single swipe position. The rain sensor monitors theamount of water on the windshield and starts the windshieldwipers automatically when needed. Turn the thumb wheelupward/downward for higher/lower sensitivity.
Press for rear window intermittent wiping.
Press for continuous rear window wiper speed.
Use the windshield wipers service position when you e.g. replace, wash or lift the wiper blade. Tap
Wiper Service
Position in the center display's function view to activate or
deactivate service position.
02
Page 20 of 43
Page 21 of 43

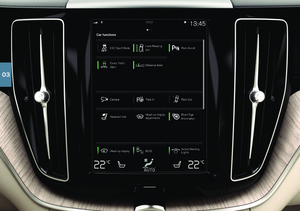
PASSENGER COMPARTMENT CLIMATEClimate system functions for the front and rear sections of the pas- senger compartment are controlled from the center display andfrom the buttons on the center console and the rear side of the tun- nel console *. Some functions can also be controlled using voice
commands.
The icon for opening Climate view is located at the center of the climate bar at the bottom of the center display.When the
Clean Zone text is BLUE, this indicates that the
conditions for good air quality in the passenger compart- ment have been met.
–Tap AUTO in climate view for automatic control of several cli-
mate system functions. Tap for automatic control of air recircula- tion, air conditioning and air distribution. Press and hold for automatic control of air recirculation, air con- ditioning and air distribution and to change temperature andblower speed to standard settings: 22 °C (72 °F) and speed
3
(speed 2 in the rear seat 4
). It is possible to change the tempera-
ture and blower speed without deactivating automatic climate control.
–Tap any of the icons in the climate bar at the bottom of the cen- ter display to set temperature, seat heating * and blower speed.
To synchronize the temperature for all of the vehicle's zones with the driver side's temperature, tap the driver side's temperature iconand then tap
Synchronize temperature .
Preconditioning *
Preconditioning can be set in the vehicle's center display and with the Volvo On Call app. Preconditioning ventilates the passenger compartment before driv- ing. Preconditioning can be started directly from the vehicle or setto start automatically using a timer.
Preconditioning direct start
1. Open Climate view in the center display.
2. Tap the
Parking climate tab and then tap Preconditioning.
Setting a preconditioning timer
1. Open Climate view in the center display.
2. Select the
Parking climateAdd timer tab and set a date/day/
time.
Interior Air Quality System IAQS *
IAQS is part of the Clean Zone Interior Package * and is a fully auto-
matic system that filters passenger compartment air to help remove air contaminants such as particulates, hydrocarbons, nitric oxides and ground-level ozone. Tap
SettingsClimateAir
Quality Sensor
in the center display's top view to activate the
function.
4 For vehicles with 4-zone climate system *.
02
Page 22 of 43

CONNECTIONSThe vehicle's various types of connections can be used to play or voice-control media, send or receive text messages, make orreceive phone calls, connect to the Internet, etc. from an externaldevice such as a smartphone. In order to connect your devices tothe vehicle, the ignition must be in at least mode I.
Vehicle's modem 5
The easiest and most efficient way to connect the vehicle to theInternet is to use its own modem. This provides the highest per-formance, is activated automatically each time the engine is startedand does not require the use of a smartphone.
1. Insert a personal SIM card in the holder in the passenger-side floorwell. 2. Tap
SettingsCommunicationVehicle Modem Internet in
top view.
3. Activate by checking the box for
Vehicle modem Internet.
Sharing Internet connection (tethering) When the vehicle is connected to the Internet via the vehicle's
modem, you can share the vehicle's Internet connection (Wi-Fi hot-spot) with other devices. Tap
Settings in Top view and
CommunicationVehicle Wi-Fi Hotspot.
Bluetooth Use Bluetooth as first choice for handling phone calls, text mes- sages and media from your phone to the vehicle's systems.Bluetooth can also be used to connect the vehicle to the Internet.Two Bluetooth devices can be connected at the same time but only
02
Page 23 of 43
. Up to20")
one of them can be used to stream media. The two most recently connected phones will connect automatically when the ignition isswitched on (if the phone's Bluetooth function is activated). Up to20 devices are saved in a list to facilitate connection at a later time.
1. Activate Bluetooth in the phone. Also activate tethering/personalhotspot if you would like to connect to the Internet.
2. Open the phone tile in the center display.
3. Tap
Add phone or, if a phone is already connected, tap Changeand then Add phone.
4. Select the phone to be connected and then follow the steps on the center display and in the phone. Note that in certain phones, the message function is activated.
Wi-Fi Wi-Fi connections can be used to connect the vehicle to the Inter- net at greater speeds than are possible using Bluetooth to streamonline services such as web radio and music via apps in the vehicle,download/upload software, etc. A Wi-Fi connection from a smart-phone acts as a hotspot for the vehicle and any external devicesthat may be in the vehicle.
1. Activate tethering in the phone.
2. Tap
Settings in the center display's top view.
3. Tap
CommunicationWi-Fi and activate by checking the box
for Wi-Fi connection.
Please note that in certain phones, tethering is closed after contact with the vehicle has been broken. The phone's tethering functionwill then need to be reactivated before it can be used again. USB The USB ports can be used to connect an external device to e.g. play music. You can also use the USB port for Apple CarPlay * and
Android Auto *. If there are two USB ports, use the one with the
white frame. The external device will also be recharged while it is connected to the vehicle.
USB ports (type A) are provided in the armrest storage com- partment between the seats.
Electrical sockets Your vehicle contains the following electrical sockets:
12-volt electrical socket.
12-volt electrical socket and 120-volt electrical socket *. There is
also a 12-volt socket * in the trunk/cargo compartment.
5
Only vehicles with P-SIM. Vehicles equipped with Volvo On Call will use the vehicle modem Internet connection for the services.
02
Page 24 of 43

6For information about which phones are compatible with the vehicle, go to support.volvocars.com.
USING CONNECTED DEVICES
External devices can be connected to e.g. handle phone calls and play media in the vehicle's audio and media systems. Handling phone calls 6
You can make and receive calls from a Bluetooth-connected phone.
Making calls using the center display
1. Open the Phone tile in home view. Select to make a call using
the list of recent calls or your list of contacts, or enter a number using the keypad.
2. Tap
.
Making a call using the right-side steering wheel keypad
1. Tap and navigate to Phone by tapping or .
2. Scroll through the list of calls using
and select using .
You can also handle calls using voice commands. Tap the voice control button (
) in the right-side steering wheel keypad. For
voice commands, see the "Voice control" chapter in this Quick Guide. Playing media In order to listen to audio content from an external device, connect it to the vehicle using the connection of your choice; see the previ-ous section for connection options.
Bluetooth-connected device
1. Start playback in the connected device.
2. Open the
Bluetooth app in App view in the center
display. Playback will begin.
USB-connected device
1. Start the
USB app in app view.
02