2020 VOLKSWAGEN TRANSPORTER window
[x] Cancel search: windowPage 127 of 486
Always stow all items of luggage in the vehicle securely.
• Distribute items in the vehicle, on the roof and on the trailer as evenly as possible.
• Place heavy objects as far forward in the lug-gage compartment as possible. Position the rear seat backrests securely in the upright position.
• Secure luggage in the luggage compartment to the fastening rings with suitable straps 130.
• Adjust the headlight range 106.
• Adjust the tyre pressure according to the vehi-cle load. Adhere to the tyre pressure plate 367.
• In vehicles with a tyre monitoring system, set the new vehicle load level as necessary 318.
Stowing cargo
r-111 First read and observe the introductory L-l=:.LI information and safety warnings & on page 125.
Stow the load securely in the vehicle or on the load surface
• Before loading the vehicle, place a sturdy mat or similar cover flush with the vehicle floor. Where necessary, do not cover protruding parts of the ve-hicle floor.
• If necessary, remove the seats to increase the load area.
• The vehicle floor must be free of oil and dust, dry and fully clean in order to help prevent the load from sliding.
• Observe gross axle weight ratings and the gross vehicle weight rating.
• Distribute items in the vehicle, on the load sur-face, on the roof and on the trailer as evenly as possible.
• Stow heavy objects directly on the floor and above or in front of the rear axle and engage the rear seat backrests securely in an upright position.
CD
Hard objects on the shelf can chafe against the wires of the heating element in the rear window and cause damage.
m • Observe any information concerning the l!J loading of a trailer 139 .
• Observe any information concerning the load-ing of a roof carrier 137.
• Protect the seat rails or seat anchor points from damage.
• Secure luggage with suitable securing straps on the fastening rings 130.
• Adjust the headlight range 106.
• Adjust the tyre pressure according to the vehi-cle load. Adhere to the tyre pressure plate 367.
• In vehicles with a tyre monitoring system, set the new vehicle load level as necessary 318.
CD
Hard objects on the shelf can chafe against the wires of the heating element in the rear window and cause damage.
m • Observe any information concerning the l!J loading of a trailer =>page 139 .
• Observe any information concerning the load-ing of a roof carrier =>page 137 .
Page 130 of 486
A WARNING (Continued)
• Any objects protruding from the luggage compartment must be marked to ensure that they are visible to other road users. Comply with legal regulations.
• If items protrude out of the luggage com-partment, never use the tail gate or wing doors to "hold them in position".
• If you drive with the tailgate or wing doors open, remove any racks and luggage from the tail gate or a wing door.
A WARNING
Poisonous exhaust fumes can get into the in-terior when the tailgate or wing doors are open. This can result in loss of conscious-ness, carbon monoxide poisoning, serious Injury and accidents.
Driving a loaded vehicle
1"''l1 First read and observe the introductory L--Wl information and safety warnings & on page 125.
For good vehicle handling when driving a loaded vehicle, please observe the following:
• Stow all items of luggage page 127.
• Accelerate carefully and gently.
• Avoid sudden braking and driving manoeuvres.
• Brake earlier than in normal driving.
• If applicable, heed the information about driving with a trailer 139.
• If applicable, observe the information concern-ing the roof carrier 137.
Luggage compartment
CO Introduction
This chapter contains information on the following subjects:
Luggage compartment cover . . . . . . . . . . . . . . 132
130 Before the JOUrney
A WARNING (Continued)
• Always drive with the wing doors or tail-gate closed to prevent poisonous exhaust fumes getting into the vehicle.
• If exceptional circumstances require you to drive with an open tallgate or open wing doors, do the following to reduce the amount of poisonous exhaust fumes that could enter into the vehicle:
CD
-Close all windows and the sliding/tilting roof.
-Switch off air reclrculatlon mode.
-Open all vents In the dash panel.
-Switch the blowers to the highest set-ting.
The vehicle length and height are different when the wing doors or tailgate are open.
A wARNING
Moving loads can severely impair the vehi-cle's stability and driving safety which could cause accidents and severe Injuries.
• Secure objects properly to prevent them from sliding.
• Use suitable straps when securing heavy objects.
• Engage the rear seat backrests securely In
Page 131 of 486
Additional information and warnings:
• Airbag system =:.page 87
• Lights =:.page 106
• Transporting =:.page 125
• Towing a trailer=> page 139
• Luggage net, California =>page 192
• Wheels and tyres =>page 367
A WARNING
When the vehicle is not in use or is not being supervised, always lock the doors and tail-gate to reduce the risk of severe or fatal inju-ries.
• Never leave children unattended, especial-ly when the tailgate is open. Children could make their way into the luggage compart-ment, close the tailgate and be unable to get out. This can cause severe or fatal injuries.
• Never let children play in or around the ve-hicle.
• Do not travel with people in the luggage compartment.
A WARNING
Objects that are not secured, or are secured Incorrectly, can cause serious injuries in the event of a sudden driving or braking manoeu-vre or accident. This applies particularly if objects are struck by the alrbag when activa-ted and then flung through the vehicle interi-or. To reduce the risk of accidents, please ob-serve the following guidelines:
• Always stow all objects In the vehicle se· curely. Always stow luggage and heavy ob-jects in the luggage compartment.
• Always use suitable straps to prevent lug-gage from being thrown through the vehicle Interior and entering the deployment zones of
A WARNING (Continued)
the curtain alrbag, the combined curtain and side airbag or the front airbag In the event of a sudden driving or braking manoeuvre.
• Always keep stowage compartments closed while the vehicle is In motion.
• Do not stow any hard, heavy or sharp ob· jects loose in any of the vehicle's open stow-age areas, on the luggage compartment cov-er or on the dash panel.
• Remove any hard, heavy or sharp objects from items of clothing and bags Inside the vehicle and stow them securely.
A WARNING
Transporting heavy objects changes the vehi-cle's handling and increases the braking dis-tance. Heavy loads that are not properly stowed or secured in the vehicle can lead to a loss of vehicle control and can cause serious injury.
• Transporting heavy objects changes the vehicle's handling and the centre of gravity.
• The payload should be distributed as evenly as possible in the vehicle.
• Always secure heavy objects In the lug-gage compartment as far in front of the rear axle as possible.
CD
Hard objects on the shelf can chafe against the wires of the heating element in the rear window and cause damage.
m Always ensure that the venlilalion openings L!J between the rear window and the stowage area are uncovered to allow stale air to escape from the vehicle.
Page 151 of 486
A WARNING (Continued)
• Never stow lighters in stowage areas or compartments or on other surfaces In the ve-hicle. Cigarette lighters may self-Ignite on high-temperature surfaces, especially in sum-mer.
CD
• Hard objects on the shelf can chafe against the wires of the heating element In the rear win-dow and cause damage.
• Objects stored In the vehicle that are made from transparent materials, such as glasses, magnifying glasses or transparent suction cups on the windows, can concentrate the sun's rays and thus cause damage to the vehi-cle.
r:F1 Always ensure that the ventilation openings W between the rear window and the stowage area are uncovered to allow stale air to escape from the vehicle.
r('n First read and observe the introductory L-Jc.lJ information and safety warnings.& on page 150.
There is a stowage compartment in the centre con-sole, which. depending on the vehicle equipment level, may have a cover flap.
To open, press the button on the cover flap. The stowage compartment opens automatically.
To close, press the cover down until it engages. Do not press the button while doing this.
Depending on the vehicle equipment level, there may be open stowage compartments under the vents on the dash panel.
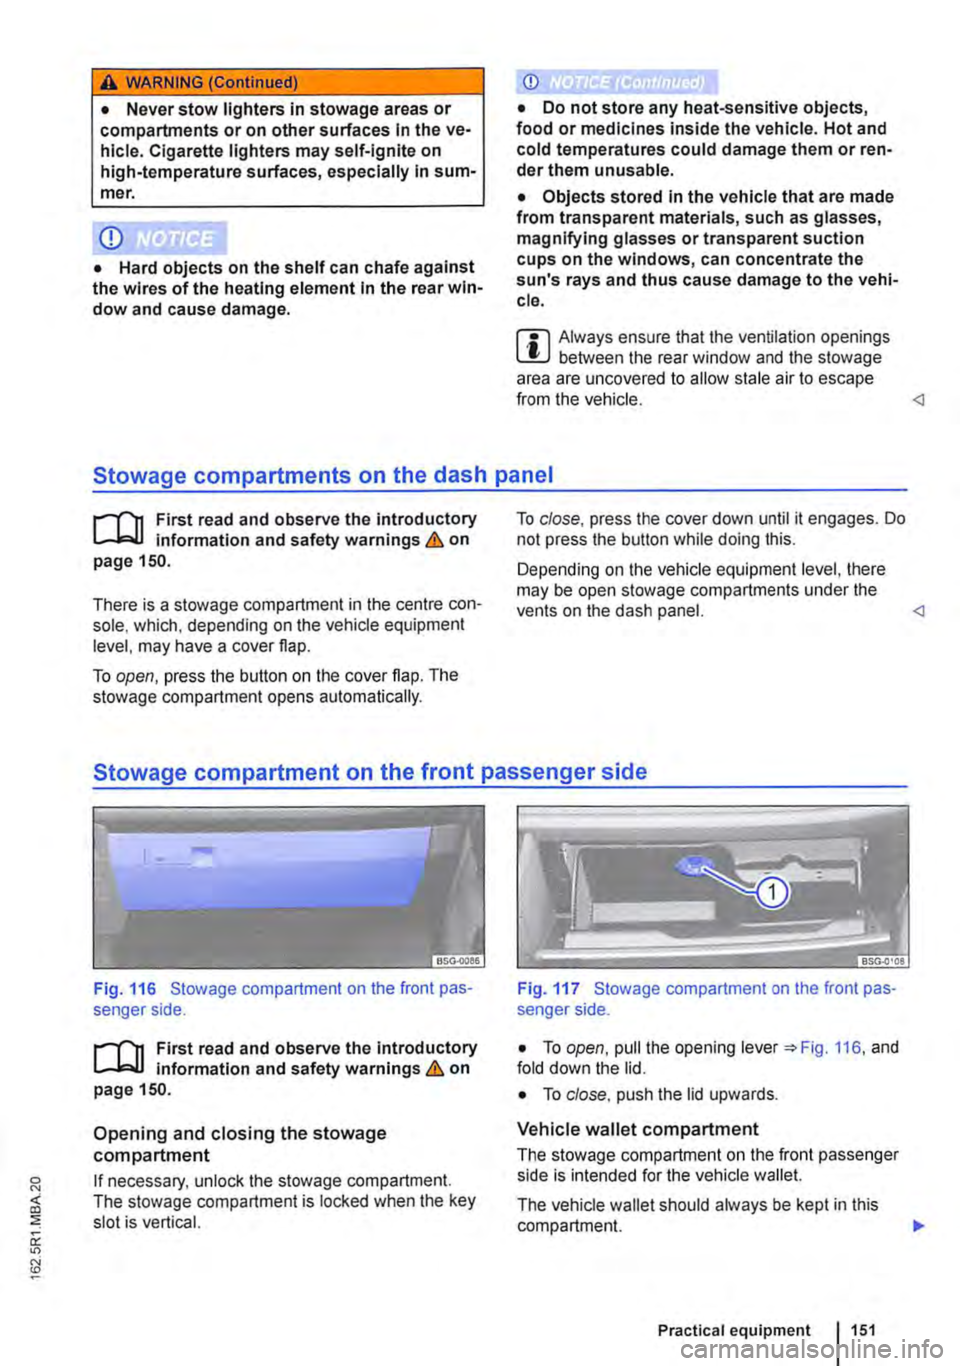
Fig. 116 Stowage compartment on the front pas-senger side.
r('n First read and observe the introductory L-Jc.lJ Information and safety warnings.& on page 150.
Opening and closing the stowage compartment
If necessary, unlock the stowage compartment. The stowage compartment is locked when the key slot is vertical.
Fig. 117 Stowage compartment on the front pas-senger side.
• To open, pull the opening lever =:.Fig. 116, and fold down the lid.
• To close. push the lid upwards.
Vehicle wallet compartment
The stowage compartment on the front passenger side is intended for the vehicle wallet.
The vehicle wallet should always be kept in this compartment. .,.
Practical equipment 1151
Page 166 of 486
A WARNING
LCD screens contain liquid crystal, which can escape if the screen is broken. The fluid could cause irritation to the skin, eyes and respiratory organs.
• The escaping fluid could cause irritation to the skin, eyes and respiratory organs, es-pecially in people who suffer from asthma or similar illnesses. Immediately ensure that there is a sufficient supply of fresh air and get out of the vehicle. If this is not possible, open all of the windows and doors.
• If fluid gets Into your eyes or onto your skin, Immediately wash the affected area with lots of water for at least 15 minutes and con-suit a doctor.
• If fluid gets onto shoes or clothing, wash immediately with lots of water for at least 15 minutes. Clean shoes and clothes thoroughly before wearing them again.
• If fluid is swallowed, Immediately rinse the mouth out with lots of water for at least 15 minutes. Do not Induce vomiting unless In· structed to do so by a doctor. Seek medical assistance immediately.
A WARNING
Opening a DVD player's housing can lead to injuries from invisible laser radiation.
Components
,...-('n First read and observe the introductory L-Wl Information and safety warnings & on page 165.
The rear seat entertainment system is made up of the following components:
1661 Before the journey
A WARNING (Continued)
• DVD players should only be repaired by a qualified workshop.
CD
The LCD screen can be damaged If it is not handled properly.
• Always fold the LCD screen completely open or shut.
• The LCD screen Is not a "touchscreen". Do not touch or press the surface of the LCD screen.
• Do not expose the LCD screen to direct sun-light or intensive ultraviolet light for long peri-ods. This could damage the screen.
CD
Cleaning agents containing solvents can dam-age the LCD screen.
• Use cleaning agents that do not contain sol-vents such as petrol or turpentine to clean the LCD screen.
r:(jh The LCD screen contains mercury. Dispose I!!S of the LCD screen in accordance with legal requirements.
m The rear seat entertainment system only W works if the temperature inside the vehicle is between -1s•c (+S.F) and +so•c (+140.F). At temperatures outside this range, you will not be able to switch the rear seat entertainment system on. If switched on, it will switch off automatically.
• Infrared remote control unit '*page 169.
m Two sets of infrared headphones are deliv-l!J ered with the rear seat entertainment system.
Page 175 of 486
Equipment, Multivan
Darkening the interior of the vehicle, Multivan
n:n Introduction
This chapter contains information on the following subjects:
Components of the opaque shades kit . . . 175
Assembling opaque shades for the windscreen and the rear window . . . . . . . 176
Fitting opaque shades for the windscreen and the rear window . . . . . . . . . . . . . . . . . . . . . . . . . 177
Fitting the opaque shades to the side windows . . . . . . . . . . . . . . . . . . . . . . . . . . . . . 178
Removing and stowing the opaque shades . . 179
Darkening the interior of the vehicle
The opaque shades kit is supplied in a zippered storage bag, which can be securely stowed in a drawer underneath the 3-seat bench.
Additional information and warnings:
• Windows 36
• Seat functions, front 61
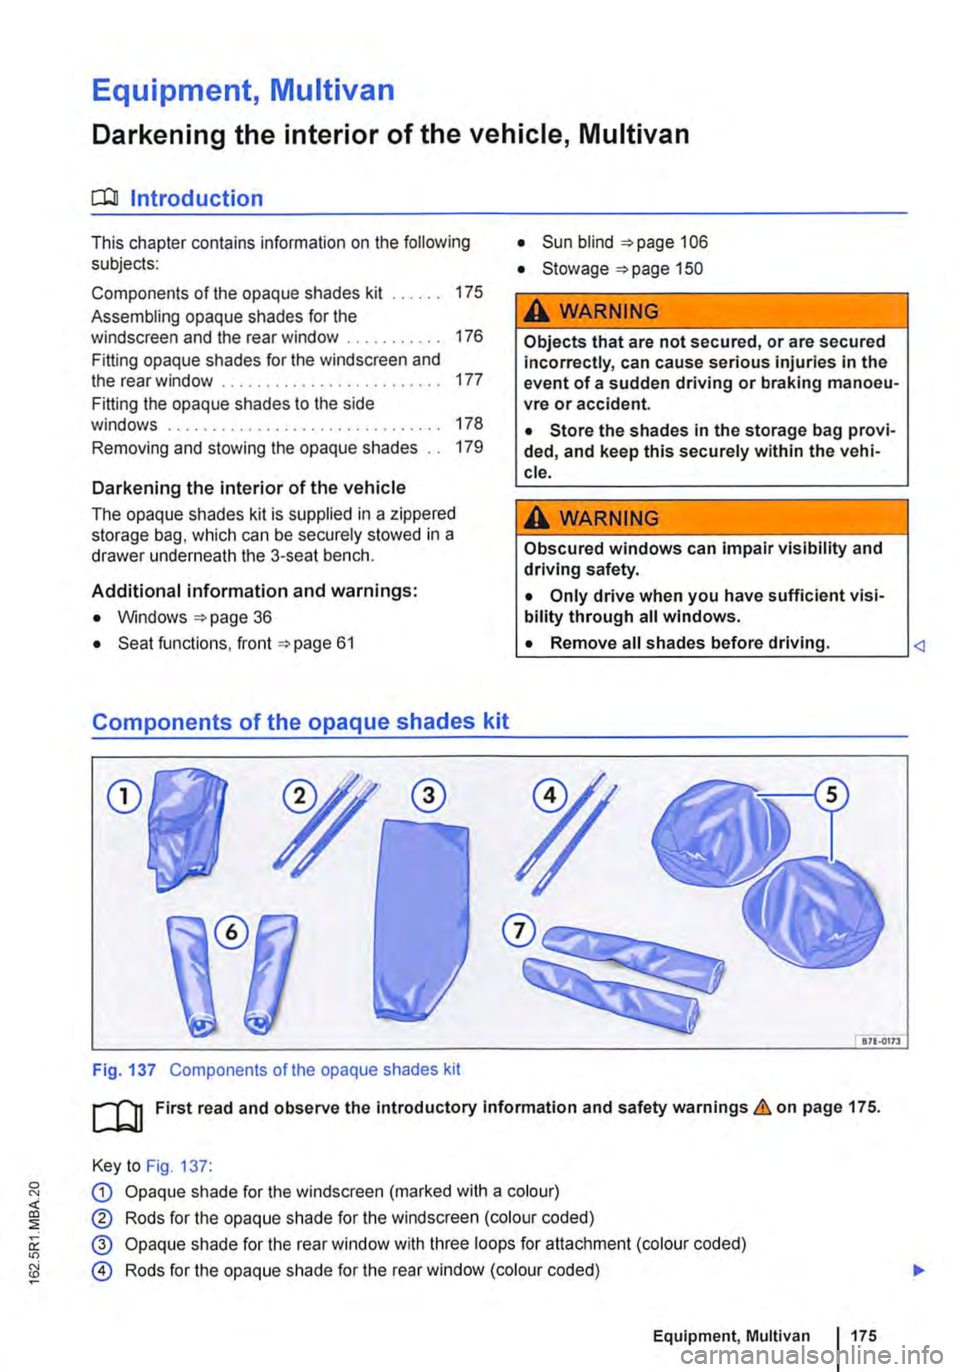
Components of the opaque shades kit
CD
Fig. 137 Components of the opaque shades kit
• Sun blind 106
• Stowage "'page 150
A WARNING
Objects that are not secured, or are secured incorrectly, can cause serious injuries in the event of a sudden driving or braking manoeu-vre or accident.
• Store the shades in the storage bag provi-ded, and keep this securely within the vehi-cle.
A WARNING
Obscured windows can impair visibility and driving safety.
• Only drive when you have sufficient visi-bility through all windows.
L• ___
&71.0173
[QJ First read and observe the introductory information and safety warnings.&. on page 175.
Key to Fig. 137:
G) Opaque shade for the windscreen (marked with a colour)
® Rods for the opaque shade for the windscreen (colour coded)
@ Opaque shade for the rear window with three loops for attachment (colour coded)
@ Rods for the opaque shade for the rear window (colour coded)
Equipment, Multivan 1175
Page 176 of 486
® Shades for the driver and front passenger door windows (with flexible frames)
® Opaque shades for the centre side windows with four-part fasteners
Q) Opaque shades for the rear side windows with two-part fasteners
Opaque shade for rear window for Multivan Start-line 177.
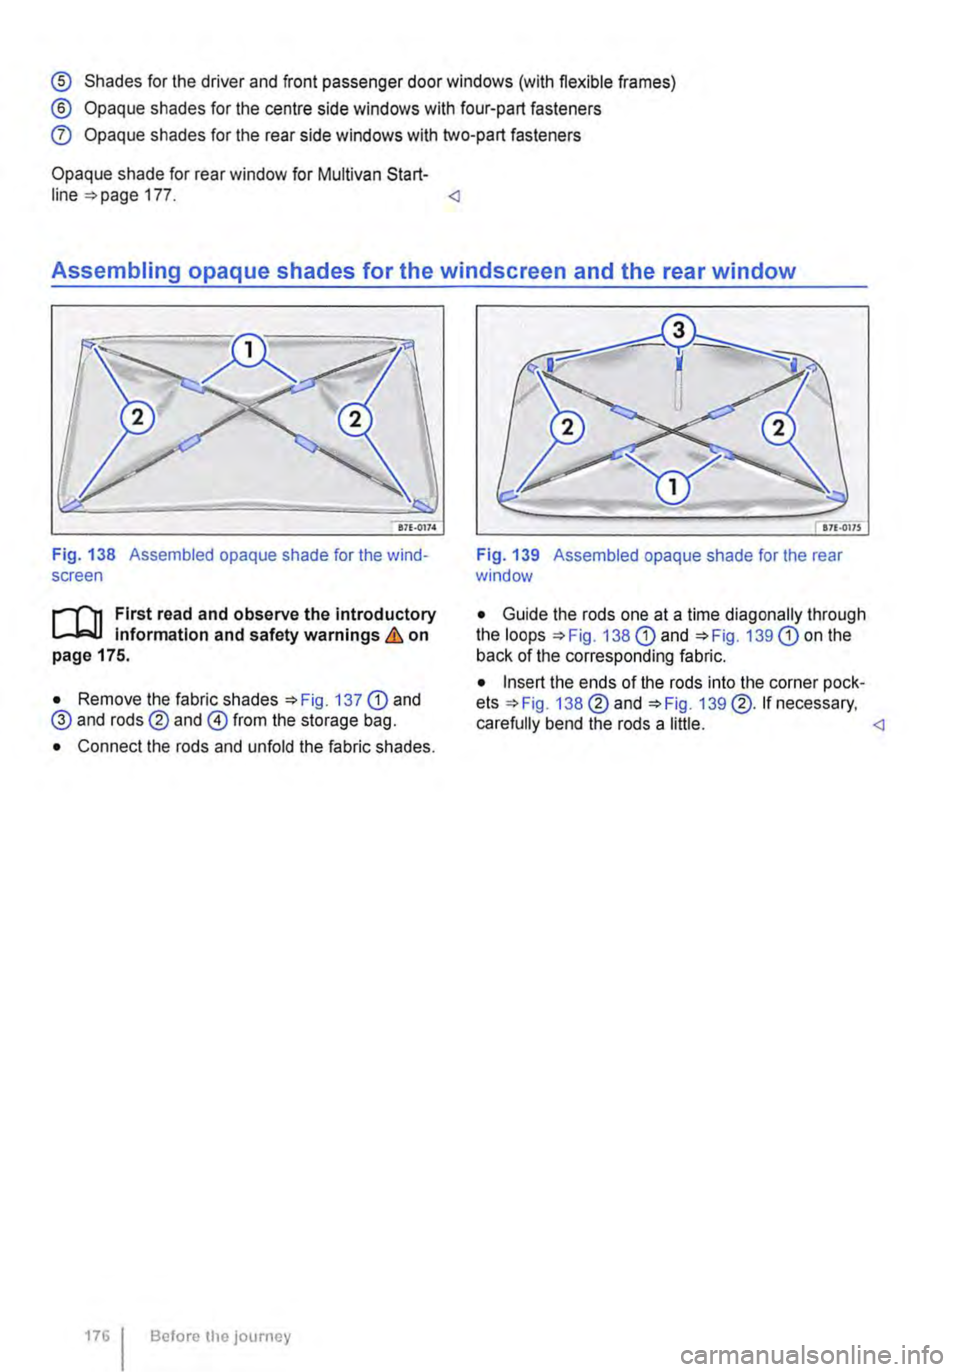
Fig. 138 Assembled opaque shade for the wind-screen
n1t First read and observe the introductory L-J,:.JJ Information and safety warnings & on page 175.
• Remove the fabric shades 137
1761 Before the journey
Fig. 139 Assembled opaque shade for the rear window
• Guide the rods one at a time diagonally through the loops 138
Page 177 of 486
Fitting opaque shades for the windscreen and the rear window
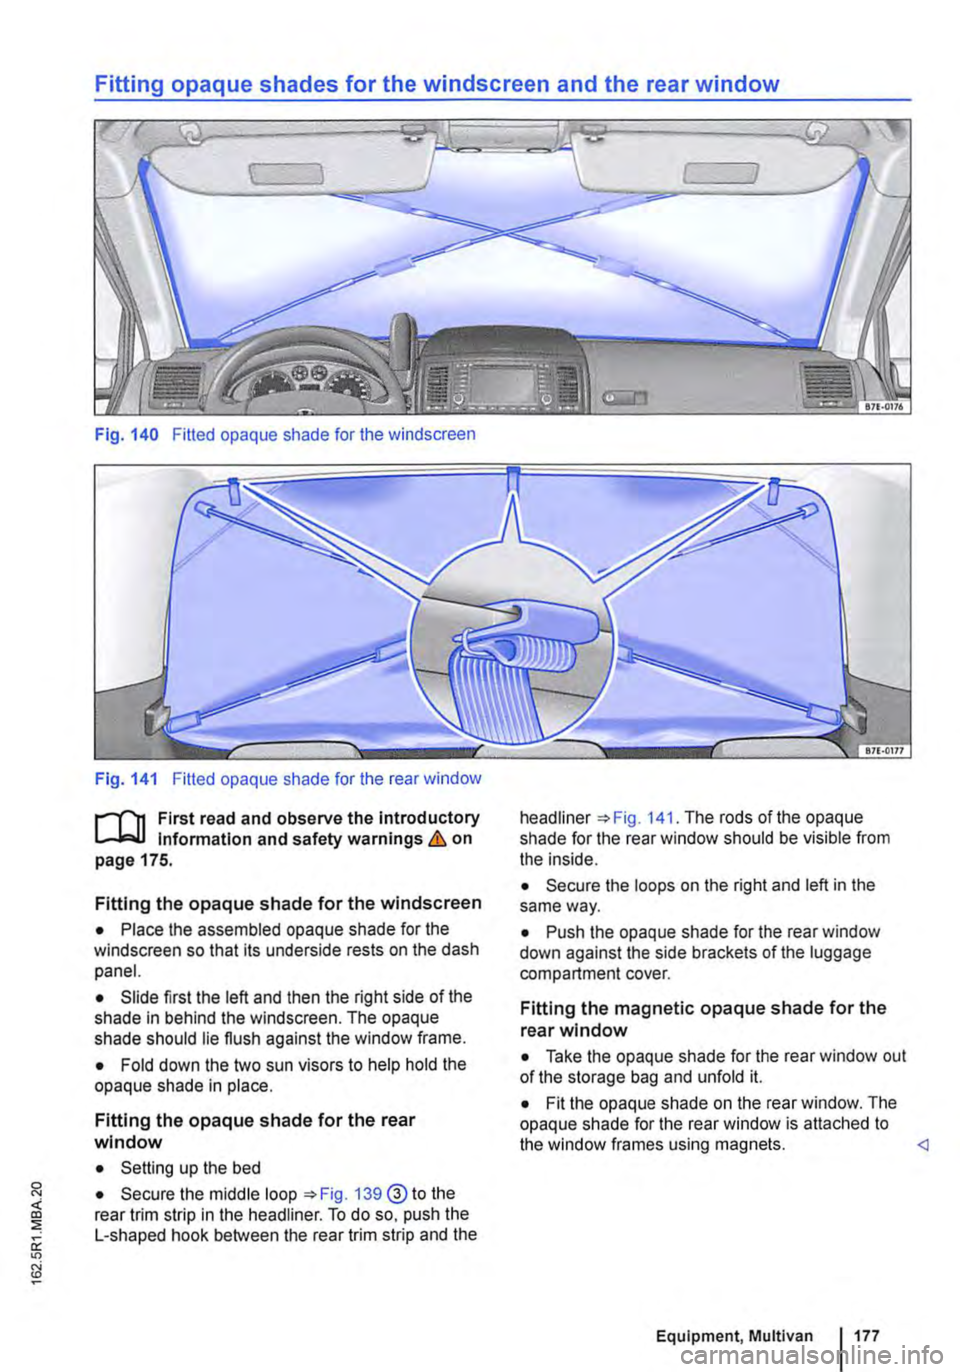
Fig. 140 Fitted opaque shade for the windscreen
Fig. 141 Fitted opaque shade for the rear window
f"""l'"'n First read and observe the introductory Information and safety warnings&. on page 175.
Fitting the opaque shade for the windscreen
• Place the assembled opaque shade for the windscreen so that its underside rests on the dash panel.
• Slide first the left and then the right side of the shade in behind the windscreen. The opaque shade should lie flush against the window frame.
• Fold down the two sun visors to help hold the opaque shade in place.
Fitting the opaque shade for the rear window
• Setting up the bed
• Secure the middle loop 139@ to the rear trim strip in the headliner. To do so, push the L-shaped hook between the rear trim strip and the
headliner The rods of the opaque shade for the rear window should be visible from the inside.
• Secure the loops on the right and left in the same way.
• Push the opaque shade for the rear window down against the side brackets of the luggage compartment cover.
Fitting the magnetic opaque shade for the rear window
• Take the opaque shade for the rear window out of the storage bag and unfold it.
• Fit the opaque shade on the rear window. The opaque shade for the rear window is attached to the window frames using magnets.