2020 VAUXHALL CROSSLAND X wiper
[x] Cancel search: wiperPage 98 of 245

96Instruments and controlsVehicle personalisationThe vehicle's behaviour can be
personalised by changing the settings in the Info Display.
Some functions are only displayed or
active when the engine is running.
Graphic Info Display
Press MENU to open the menu page.
Use four-way button to operate the
display:
Select ˆ Personalisation-
configuration I OK .
Unit settings
Select Display configuration I OK .
Select Choise of units I OK .
Select desired settings I OK .
Language settings
Select Display configuration I OK .
Select Choise of language I OK .
Select desired language I OK .
Vehicle settings
Select Define vehicle parameters I
OK .
In the corresponding submenus the
following settings can be changed:
● Lighting .
Follow me home headlamps :
Activation and setting duration
time.
Welcome lighting : Activation and
setting duration time.
● Comfort
Ambient lighting : Activation /
Deactivation.
Rear wiper in reverse gear :
Activation / Deactivation.● Vehicle
Unlocking boot only : Activation /
Deactivation.
Plip action : Driver / all doors.
● Driving assistance
Fatigue Detection system :
Activation / Deactivation.
Speed recommendation :
Activation / Deactivation.
7" Colour Info Display
Press ; to open homepage.
Use touch buttons to operate the
display:
Select Settings .
Page 99 of 245

Instruments and controls97Unit settings
Select Units
Change units for Consumption and
Distance and Temperature .
Language settings
Select Language .
Change language by touching the
respective entry.
Vehicle settings
Select Vehicle .
In the corresponding submenus the
following settings can be changed:
● Collision / Detection Systems
Side Blind Spot Alert : Activates
or deactivates side blind spot
alert.
Drowsy Driver Alert : Activates or
deactivates the driver
drowsiness system.
Speed Limit Information :
Activates or deactivates the
speed limit information by traffic
sign recognition.
Rear View Camera Guidelines :
Activates or deactivates the rearview camera guidelines on the
Info Display.
● Comfort and Convenience
Auto Wipe in Reverse Gear :
Activates or deactivates
automatic switching on of the
rear window wiper when reverse gear is engaged.
● Lighting
Ambient Lighting : Activates or
deactivates the ambient lighting
and adjusts its brightness.
Welcome Lighting : Activates or
deactivates and changes the duration of welcome lighting.
Exit Lighting : Activates or
deactivates and changes the
duration of exit lighting.
● Remote Lock, Unlock, Start
Remote Door Unlock : Changes
the configuration to unlock the
driver's door only or all doors
when pressing O on the remote
control.
Unlock boot only : Activates or
deactivates unlocking the tailgateonly when pressing T on the
remote control.
8" Colour Info Display
Press SET to open settings menu.
Use touch buttons to operate the
display.
Unit settings
Select System settings .
Change units for Consumption and
Distance and Temperature .
Confirm with G.
Language settings
Select Languages .
Page 100 of 245

98Instruments and controlsChange language by touching the
respective entry.
Confirm with G.
Vehicle settings
Press Í.
Select Vehicle settings .
In the corresponding submenus the
following settings can be changed:
● Headlights
Welcome lighting : Activates or
deactivates the function and
adjusts its duration.
Guide-me-home lighting :
Activates or deactivates the
function and adjusts its duration.
● Comfort
Mood lighting : Adjusts the
brightness of the ambient
lighting.
Rear wiper in reverse : Activates
or deactivates automatic
switching on of the rear window
wiper when reverse gear is
engaged.
● Vehicle access
Door unlock: boot only : Activates
or deactivates unlocking only the
tailgate when pressing T on the
remote control.
Door unlock: driver only :
Changes the configuration to unlock only the driver's door and
fuel filler flap or all doors, load
compartment and fuel filler flap
when pressing O on the remote
control.
● Safety
Driver attention warning :
Activates or deactivates the
driver drowsiness system.Driving functions
Press Í.
Select Driving functions .
In the corresponding submenus the
following settings can be changed:
● Park Assist : Activates advanced
park assist, a parking maneuver can be selected.
● Blind Spot Sensors : Activates or
deactivates side blind spot alert.
● Panoramic view system :
Activation / deactivation of the
function.
Page 104 of 245

102LightingAutomatic light control
When the automatic light control
function is switched on and the
engine is running, the system
switches between daytime running
lights and headlights automatically
depending on the external lighting
conditions and information given by
the wiper system.
Make sure the sensor is not blocked
3 10, 3 35.
Daytime running light 3 104.
Automatic headlight activation During poor lighting conditions
headlights are switched on.
Additionally, headlights are switched
on if the windscreen wipers have
been activated for several wipes.
LED headlights 3 104.
Tunnel detection
When a tunnel is entered headlights
are switched on immediately.
High beam
Push to switch from low to high beam.Pull to deactivate high beam.
High beam assist 3 102.
High beam assist
The camera in the windscreen
detects the lights of oncoming or
preceding vehicles. Once activated,
high beam assist remains active and
switches high beam on and off
depending on surrounding
conditions. The latest setting of the
high beam assist will remain after the ignition is switched on again.
This feature automatically activates
the high beam in the dark when
vehicle speed is faster than 15 mph.
It switches automatically back to low
beam when:
● The camera in the windscreen detects the lights of oncoming or
preceding vehicles.
● The vehicle speed drops below 9 mph.
● It is foggy or snowy.
● Front or rear fog lights are switched on.
● Driving in urban areas.
If there are no restrictions detected,
the system switches back to high
beam.
Page 115 of 245

Climate control113Notice
If à is pressed while the engine is
running, an Autostop will be inhibited
until à is pressed again.
If à is pressed while the engine is in
an Autostop, the engine will restart
automatically.
Stop-start system 3 126.
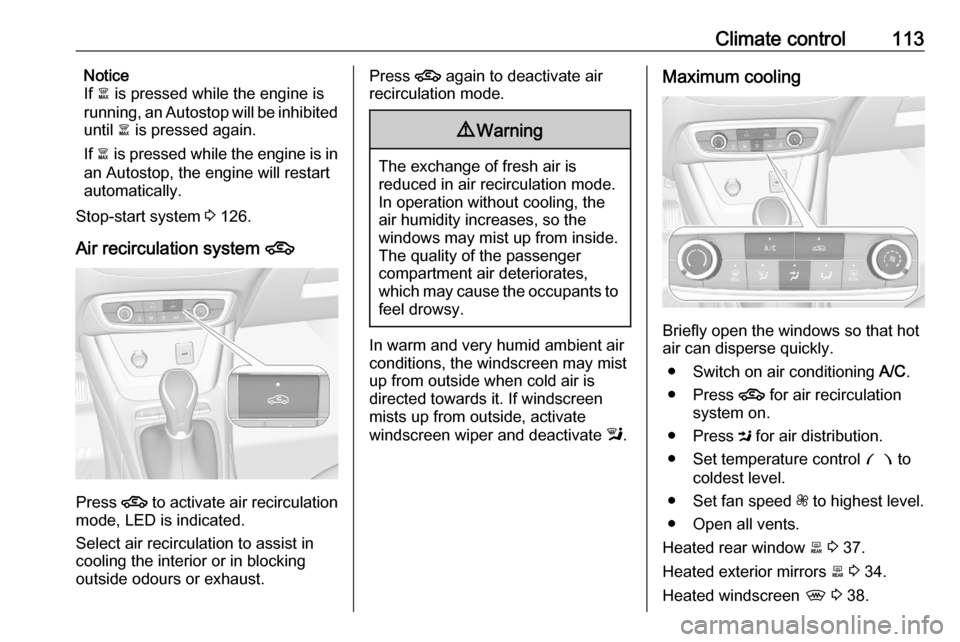
Air recirculation system 4
Press 4 to activate air recirculation
mode, LED is indicated.
Select air recirculation to assist in
cooling the interior or in blocking
outside odours or exhaust.
Press 4 again to deactivate air
recirculation mode.9 Warning
The exchange of fresh air is
reduced in air recirculation mode.
In operation without cooling, the
air humidity increases, so the
windows may mist up from inside.
The quality of the passenger
compartment air deteriorates,
which may cause the occupants to
feel drowsy.
In warm and very humid ambient air
conditions, the windscreen may mist
up from outside when cold air is
directed towards it. If windscreen
mists up from outside, activate
windscreen wiper and deactivate l.
Maximum cooling
Briefly open the windows so that hot
air can disperse quickly.
● Switch on air conditioning A/C.
● Press 4 for air recirculation
system on.
● Press M for air distribution.
● Set temperature control £ to
coldest level.
● Set fan speed Z to highest level.
● Open all vents.
Heated rear window b 3 37.
Heated exterior mirrors b 3 34.
Heated windscreen , 3 38.
Page 119 of 245

Climate control117Cooling A/C
Press A/C to switch on cooling. The
LED in the button illuminates to
indicate activation. Cooling is only
functional when the engine is running and climate control fan is switched on.
Press A/C again to switch off cooling.
The air conditioning system cools and
dehumidifies (dries) when outside
temperature is above a specific level. Therefore condensation may form
and drip from under the vehicle.
If no cooling or drying is required,
switch off the cooling system for fuel
saving reasons.
Manual air recirculation 4
Press 4 to activate the air
recirculation mode. The LED in the
button illuminates to indicate
activation.
Press 4 again to deactivate
recirculation mode.
9 Warning
The exchange of fresh air is
reduced in air recirculation mode.
In operation without cooling, the
air humidity increases, so the
windows may mist up from inside.
The quality of the passenger
compartment air deteriorates,
which may cause the occupants to
feel drowsy.
In warm and very humid ambient air
conditions, the windscreen may mist
up from outside, when cold air is
directed towards it. If windscreen
mists up from outside, activate
windscreen wiper and deactivate l.
Page 176 of 245

174Vehicle careVehicle careGeneral Information...................174
Accessories and vehicle modifications .......................... 174
Vehicle storage ........................175
End-of-life vehicle recovery .....175
Vehicle checks ........................... 176
Performing work ......................176
Bonnet ..................................... 176
Engine oil ................................. 177
Engine coolant ......................... 178
Washer fluid ............................ 178
Brakes ..................................... 179
Brake fluid ............................... 179
Vehicle battery ......................... 179
Diesel fuel system bleeding .....181
Wiper blade replacement ........181
Bulb replacement .......................182
Halogen headlights ..................182
LED headlights ........................ 185
Front fog lights ......................... 185
Tail lights ................................. 186
Side turn lights ......................... 190
Number plate light ...................190
Interior lights ............................ 190Electrical system........................191
Fuses ....................................... 191
Engine compartment fuse box . 191
Instrument panel fuse box .......193
Vehicle tools .............................. 195
Tools ........................................ 195
Wheels and tyres .......................196
Winter tyres ............................. 196
Tyre designations ....................196
Tyre pressure .......................... 196
Tyre deflation detection system .................................... 197
Tread depth ............................. 198
Changing tyre and wheel size . 199
Wheel covers ........................... 199
Tyre chains .............................. 199
Tyre repair kit .......................... 200
Wheel changing .......................203
Spare wheel ............................ 204
Jump starting ............................. 208
Towing ....................................... 209
Towing the vehicle ...................209
Towing another vehicle ...........210
Appearance care .......................211
Exterior care ............................ 211
Interior care ............................. 213
Floor mats ............................... 214General Information
Accessories and vehicle modifications
We recommend the use of genuine parts and accessories and factory
approved parts specific for this
vehicle type. We cannot assess or
guarantee reliability of other products - even if they have a regulatory or
otherwise granted approval.
Any modification, conversion or other
changes made to standard vehicle
specifications (including, without
limitation, software modifications,
modifications of the electronic control units) may invalidate the warranty
offered by Vauxhall.
Furthermore, such changes may
affect driver assistance systems, may
impact fuel consumption, CO 2
emissions and other emissions of the
vehicle and cause the vehicle to no
longer conform to the operating
permit, impacting the validity of your
vehicle registration.
Page 183 of 245

Vehicle care181● See the Owner's Manual forfurther information.
● Explosive gas may be present in the vicinity of the vehicle battery.
Power saving mode
This mode deactivates electrical
consumers to avoid excessive
discharging of the vehicle battery.
These consumers, such as the
infotainment system, windscreen
wipers, low beam headlights,
courtesy light, etc. can be used for a
total maximum time of about
40 minutes after ignition is switched
off.
Deactivating power saving mode
Power saving mode is deactivated
automatically when the engine is
restarted. Run the engine for a
sufficient charge:
● for less than 10 minutes to use the consumers for approx.
5 minutes
● for more than 10 minutes to use the consumers for up to approx.
30 minutesDiesel fuel system bleeding
If the tank has been run dry, the diesel fuel system must be bled. Switch on
the ignition three times for
15 seconds at a time. Then crank the
engine for a maximum of
40 seconds. Repeat this process after
no less than 5 seconds. If the engine fails to start, seek the assistance of a
workshop.
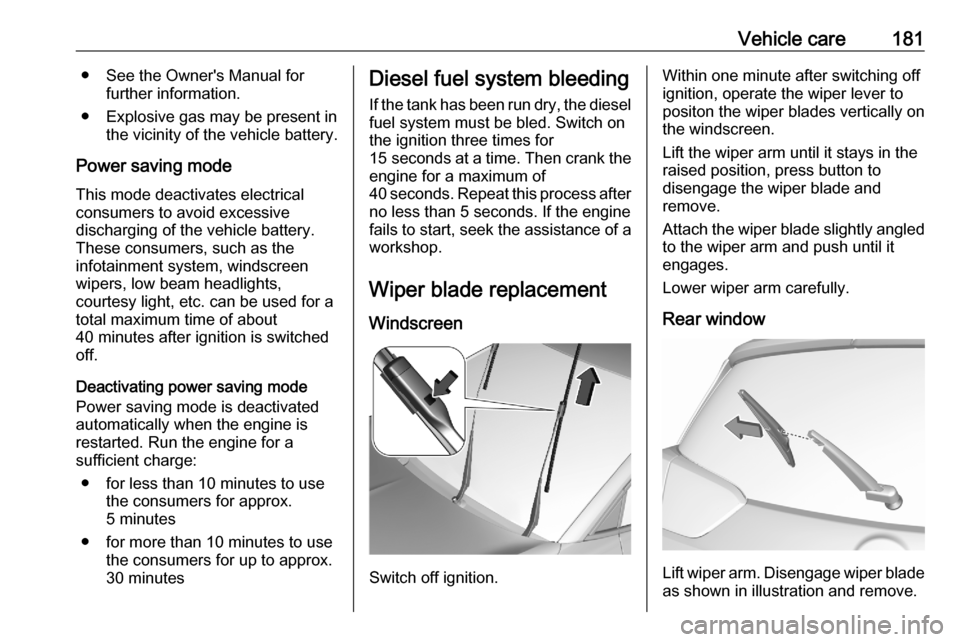
Wiper blade replacement
Windscreen
Switch off ignition.
Within one minute after switching off
ignition, operate the wiper lever to
positon the wiper blades vertically on
the windscreen.
Lift the wiper arm until it stays in the
raised position, press button to
disengage the wiper blade and
remove.
Attach the wiper blade slightly angled
to the wiper arm and push until it
engages.
Lower wiper arm carefully.
Rear window
Lift wiper arm. Disengage wiper blade as shown in illustration and remove.