Page 291 of 418

291
Changing a wheel
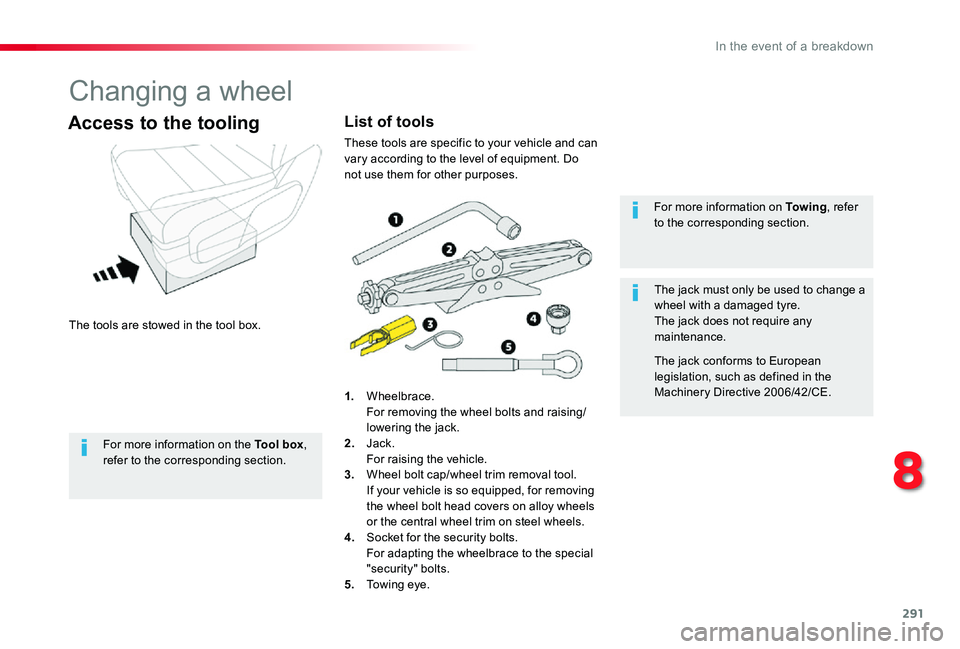
The tools are stowed in the tool box.
Access to the tooling
1. Wheelbrace. For removing the wheel bolts and raising/lowering the jack.2. Jack.
For raising the vehicle.3. Wheel bolt cap/wheel trim removal tool. If your vehicle is so equipped, for removing the wheel bolt head covers on alloy wheels or the central wheel trim on steel wheels.4. Socket for the security bolts. For adapting the wheelbrace to the special "security" bolts.5. Towing eye.
For more information on To w i n g, refer to the corresponding section.
The jack must only be used to change a wheel with a damaged tyre.The jack does not require any maintenance.
The jack conforms to European legislation, such as defined in the Machinery Directive 2006/42/CE.
List of tools
These tools are specific to your vehicle and can vary according to the level of equipment. Do not use them for other purposes.
For more information on the Tool box, refer to the corresponding section.
8
In the event of a breakdown
Page 294 of 418

294
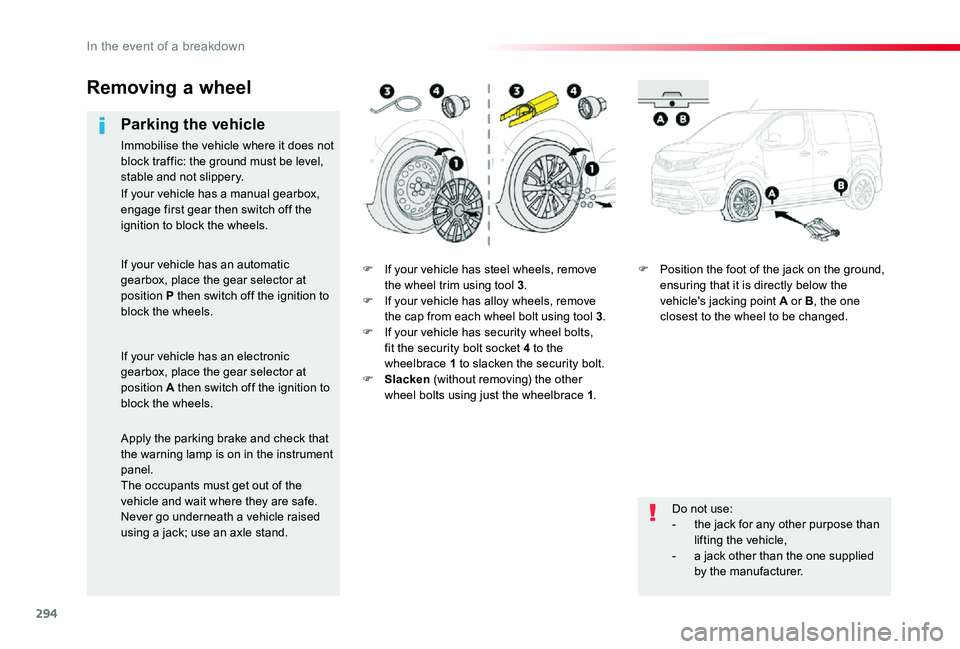
F If your vehicle has steel wheels, remove the wheel trim using tool 3.F If your vehicle has alloy wheels, remove the cap from each wheel bolt using tool 3.F If your vehicle has security wheel bolts, fit the security bolt socket 4 to the wheelbrace 1 to slacken the security bolt.F Slacken (without removing) the other wheel bolts using just the wheelbrace 1.
F Position the foot of the jack on the ground, ensuring that it is directly below the vehicle's jacking point A or B, the one closest to the wheel to be changed.
Removing a wheel
Parking the vehicle
Immobilise the vehicle where it does not block traffic: the ground must be level, stable and not slippery.
Do not use:- the jack for any other purpose than lifting the vehicle,
- a jack other than the one supplied by the manufacturer.
If your vehicle has a manual gearbox, engage first gear then switch off the ignition to block the wheels.
If your vehicle has an automatic gearbox, place the gear selector at position P then switch off the ignition to block the wheels.
If your vehicle has an electronic gearbox, place the gear selector at position A then switch off the ignition to block the wheels.
Apply the parking brake and check that
the warning lamp is on in the instrument panel.The occupants must get out of the vehicle and wait where they are safe.Never go underneath a vehicle raised using a jack; use an axle stand.
In the event of a breakdown
Page 296 of 418
296
Fitting a wheel
F Put the wheel in place on the hub.F Screw in the bolts fully by hand.F If your vehicle is so equipped, tighten the security bolt using the wheelbrace 1 fitted with the security socket 4.F Pre-tighten the other bolts using the wheelbrace 1 o n l y.
F Lower the vehicle fully.F Fold the jack 2 and detach it.
In the event of a breakdown
Page 297 of 418

297
F If your vehicle is so equipped, tighten the security bolt using the wheelbrace 1 fitted with the security socket 4.F Tighten the other bolts using the wheelbrace 1 o n l y.F Stow the tools in the tool box.
The tyre inflation pressures are given on this label.
After changing a wheel
Stow the punctured wheel in the carrier.Have the tightening of the bolts and the pressure of the spare wheel checked by an authorized Toyota dealer or repairer, or another duly qualified and equipped professional without delay.Have the punctured wheel repaired and refitted to the vehicle as soon as possible.
If your vehicle has tyre pressure warning system, check the tyre pressures and reinitialise the system.
Tyre Pressure Warning System (TPWS)
The steel spare wheel does not have a sensor.
Wheel with large wheel
trim
When refitting the wheel, refit the wheel trim by placing its cut-out at the valve, and press round its edge with the
palm of your hand.
For more information on Under-inflation detection, refer to the corresponding section.
8
In the event of a breakdown
Page 307 of 418
307
Courtesy lamps
(front and rear)
Ty p e A, W5W-5W
F Unclip the lens by inserting a thin screwdriver into the cut-outs at each side of the lamp.F Pull the bulb out and change it.F Clip the lens in place and ensure that it is secure.
8
In the event of a breakdown
Page 316 of 418

316
12 V batteryThe battery is located under the bonnet.F Open the bonnet using the interior release lever, then the exterior safety catch.F Secure the bonnet stay.
Access to the battery
Procedure for starting the engine using another battery or charging a discharged battery.
General points
Lead-acid starter batteries
Protect your eyes and face before handling the battery.All operations on the battery must be carried out in a well ventilated area and away from naked flames and sources of sparks, so as to avoid the risk of explosion or fire.Wash your hands afterwards.
Versions equipped with Stop & Start are fitted with a 12 V lead-acid battery of specific technology and specification.Its replacement should be carried out only by an authorized Toyota dealer or repairer, or another duly qualified and
equipped professional.
If your vehicle has an automatic gearbox, do not try to start the engine by pushing the vehicle.
Batteries contain harmful substances such as sulphuric acid and lead.They must be disposed of in accordance with regulations and must not, in any circumstances, be discarded with household waste.Take used remote control batteries and vehicle batteries to a special collection point.
For more information on the Bonnet and the Engine, refer to the corresponding section(s).
F Remove the plastic cover on the (+) terminal.The battery (-) terminal is not accessible.A remote earth point is provided at the front of the vehicle.
In the event of a breakdown
Page 345 of 418

345
OR
Press Applications to display the primary page.
Press the "OPTIONS" button to go to the secondary page.
Select "Wi- Fi network connection".
Select the "Secured" or "Not secured" or "Stored" tab.
Select a network.
Using the virtual keypad, enter the "Key" for the Wi-Fi network and the "Password".
The ser vices offered with connected navigation are as follows.A Connected Ser vices pack:- Weather,- Filling stations,- Car park,
- Tr a f f i c ,- POI local search.A Danger zone pack (as an option).
Settings specific to
connected navigation
Press the "MENU" button to go to the secondary page.
Select "Settings".
Select "Map".
Press "OK" to start the connection.
Usage restrictions:- With CarPlay®, connection sharing is only with a Wi-Fi connection.- With MirrorLinkTM, connection sharing is only with a USB connection.The quality of ser vices depends on the quality of the network connection.
With the arrival of "TOMTOM TR AFFIC", the ser vices will be available.
Processes and standards are constantly changing ; for the communication process between the smartphone and the system to work correctly, it is recommended to update the operating system of the smar tphone as well as the date and time of the smar tphone and of the system.
Press Navigation to display the primary page.
Activate or deactivate:- "Allow declaration of danger zones".- "Guidance to final destination on foot"- "Display recommended speed”These settings must be made according to each profile.
Select "Alerts".
Activate or deactivate:- "Advise of car park nearby", "Filling station alert", "Risk areas alert", "Accident black spot alert" then select the alert symbol, "Give an audible warning", "Advise proximity of POI 1", "Advise proximity of POI 2".
To have access to connected navigation, select the option: "Authorise sending information" in "Settings".
.
Toyota Pro Touch with navigation system
Page 350 of 418

350
Select "Wi- Fi network connection".
Select the "Secured" or "Not secured" or "Stored" tab.
Select a network.
Using the virtual keypad, enter the "Key" for the Wi-Fi network and the
"Password".
Press "OK" to start the connection.
The Wi-Fi connection and the sharing of the Wi-Fi connection are exclusive.
Wi-Fi connection sharing
Creation of a local Wi-Fi network by the system.
Press Applications to display the primary page.
Press the "OPTIONS" button to go to the secondary page.
Select "Wi-Fi connection sharing".
Select the "Activation" tab to activate or deactivate sharing of the Wi-Fi connection.
And/or
Select the "Settings" tab to change the name of the system network and the password.
Press "OK" to confirm.
To protect against unauthorised access and to make the set of systems as secure as possible, the use of a security code or a complex password is recommended.
Managing connections
Press Applications to display the primary page.
Press the "OPTIONS" button to go to the secondary page.
Select "Manage connection".
With this function, you can view the access to connected ser vices, the availability of connected services and modify the connection mode.
Radio
Selecting a station
Press Radio Media to display the primary page.
Press "Frequency".
Press one of the buttons for an automatic search for radio stations.
Or
Move the slider for a manual search for frequencies up or down.
Or
Press Radio Media to display the primary page.
Press the "OPTIONS" button to go to the secondary page.
Select "Radio stations" in the secondary page.
Press "Frequency".
Enter the values using the virtual keypad.First enter the units then click on the decimals zone to enter the figures after the decimal point.
Toyota Pro Touch with navigation system