2020 TOYOTA PROACE VERSO parking brake
[x] Cancel search: parking brakePage 213 of 418

213
With the ignition on, the flashing of A or AUTO, accompanied by an audible signal and a message, indicates a malfunction of the gearbox.
Operating fault
Have it checked by an authorized Toyota dealer or repairer, or another duly qualified and equipped professional.
Stopping the vehicle
Before switching off the engine, you can:- move to position N to engage neutral,or- leave the gear engaged; in this case, it will not be possible to move the vehicle.In both cases, you must apply the parking brake to immobilise the vehicle.
At low speed, if reverse gear is requested, the N indicator flashes and the gearbox goes into neutral automatically. To engage reverse, move the selector to position N, then position R.
When immobilising the vehicle, with the engine running, you must move the selector to neutral N.Before doing anything under the bonnet ensure that the selector is in neutral N and that the parking brake is applied.
Always press the brake pedal when starting the engine.In all parking situations, you must apply the parking brake to immobilise the vehicle.
To engage reverse gear R, the vehicle must be immobilised with your foot on the brake pedal.
Reverse
F Select position R.Engagement of reverse gear is accompanied by an audible signal.
6
Driving
Page 214 of 418

214
Stop & StartGoing into engine
STOP mode
If your vehicle has a manual gearbox, its speed must be below 12 mph (20 km/h) or stationary (depending on engine); the "ECO" indicator lamp comes on in the instrument panel and the engine goes into standby automatically when you place the gear lever in neutral and you release the clutch pedal.
For your comfort, during parking manoeuvres, STOP mode is not available for a few seconds after coming out of reverse gear.Stop & Start does not affect the functionality of the vehicle, such as for example, braking, power steering...A slight delay between the vehicle stopping and the engine cutting out may be noticed.
If your vehicle is fitted with Stop & Start, a time counter calculates the time spent in
STOP mode during a journey.It resets to zero every time the ignition is switched on.
Stop & Start time counter
The Stop & Start system puts the engine temporarily into standby - STOP mode - during stops in the traffic (red lights, traffic jams, or other...). The engine restarts automatically - START mode - as soon as you want to move off. The restart takes place instantly, quickly and silently.Per fect for urban use, the Stop & Start system reduces fuel consumption and exhaust emissions as well as the noise level when stationary.
If your vehicle has an automatic gearbox and the vehicle is stationary, the "ECO" indicator lamp comes on and the engine goes into standby automatically when you press the brake pedal or place the gear selector in position N.
If your vehicle has an electronic gearbox and the vehicle's speed is below 5 mph (8 km/h), the "ECO" indicator lamp comes on and the engine goes into standby automatically when you press the brake pedal or place the gear selector in position N.
(minutes / seconds or hours / minutes)
Never refuel with the engine in STOP mode; you must switch off the ignition with the button.
Driving
Page 215 of 418

215
Going into engine
START mode
START mode is invoked automatically in certain temporary conditions (examples: battery charge, engine temperature, braking assistance, air conditioning setting) to assure correct operation of the system and mainly when:- you open the driver's door,- you open a sliding side door,- you unfasten the driver's seat belt,- the speed of the vehicle exceeds 15 mph (25 km/h) or 2 mph (3 km/h) (depending on the engine) with a manual gearbox,- the speed of the vehicle exceeds 2 mph (3 km/h) with an automatic gearbox.
Special cases: START invoked automatically
In this case the "ECO" warning lamp flashes for a few seconds, then goes of f.
This operation is perfectly normal.
If your vehicle has a manual gearbox, the "ECO" indicator lamp goes off in the instrument panel and the engine restarts automatically when you fully depress the clutch pedal.
If your vehicle has an automatic gearbox, the "ECO" lamp goes off in the instrument panel
and the engine restarts automatically when:- you release the brake pedal with the gear selector in position D or M,- you are in position N with the brake pedal released and you move the gear selector to position D or M,- you engage reverse.
If your vehicle has an electronic gearbox, the "ECO" lamp goes off in the instrument panel and the engine restarts automatically when:- you release the brake pedal with the gear selector in position A ou M,- you are in position N with the brake pedal released and you move the gear selector to position A or M,- you enegage reverse.
Special cases: STOP mode not available
STOP mode is not invoked in certain temporary conditions (examples: battery charge, engine temperature, braking assistance, ambient temperature) to assure correct operation of the system and mainly when:- the vehicle is on a steep slope (rising or falling),- the driver's door is open,- a sliding side door is open,- the driver's seat belt is not fastened,- the vehicle has not exceeded 6 mph (10 km/h) since the last engine start by the driver,- the electric parking brake is applied or being applied,- the engine is needed to maintain a comfortable temperature in the passenger compartment,- demisting is active.
In this case, the "ECO" warning lamp flashes for a few seconds then goes of f.
This operation is perfectly normal.
6
Driving
Page 264 of 418

264
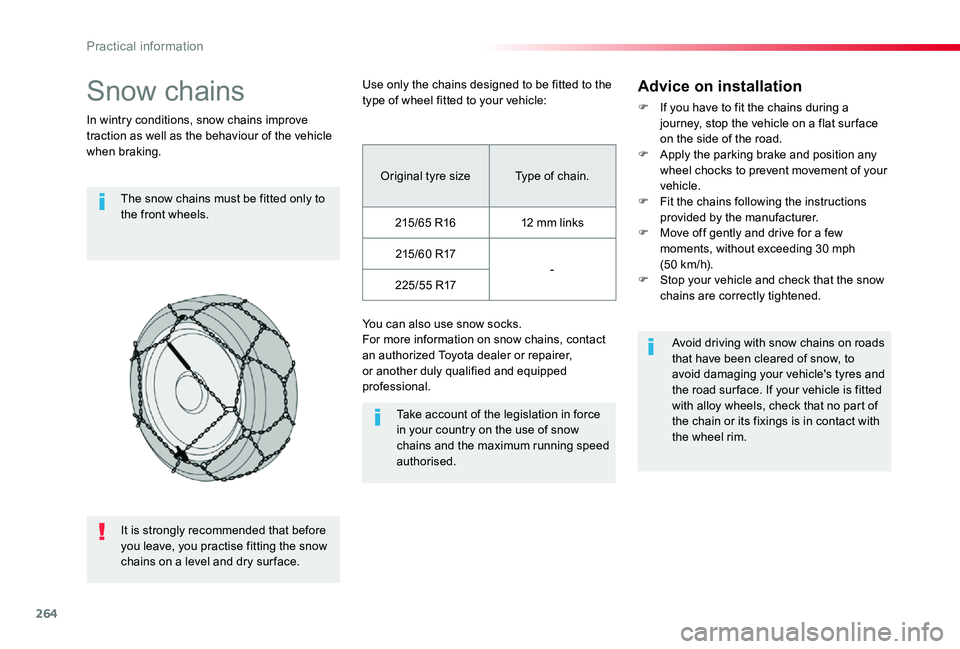
Snow chains
In wintry conditions, snow chains improve traction as well as the behaviour of the vehicle when braking.
The snow chains must be fitted only to the front wheels.
Take account of the legislation in force in your country on the use of snow chains and the maximum running speed authorised.
Avoid driving with snow chains on roads that have been cleared of snow, to avoid damaging your vehicle's tyres and the road sur face. If your vehicle is fitted with alloy wheels, check that no part of the chain or its fixings is in contact with the wheel rim.
Use only the chains designed to be fitted to the type of wheel fitted to your vehicle:
You can also use snow socks.For more information on snow chains, contact an authorized Toyota dealer or repairer, or another duly qualified and equipped professional.
Advice on installation
F If you have to fit the chains during a journey, stop the vehicle on a flat sur face on the side of the road.F Apply the parking brake and position any wheel chocks to prevent movement of your vehicle.F Fit the chains following the instructions provided by the manufacturer.F Move off gently and drive for a few
moments, without exceeding 30 mph (50 km/h).F Stop your vehicle and check that the snow chains are correctly tightened.
Original tyre sizeType of chain.
215/65 R1612 mm links
215/60 R17-225/55 R17
It is strongly recommended that before
you leave, you practise fitting the snow chains on a level and dry sur face.
Practical information
Page 277 of 418

277
Manual gearbox
The gearbox does not require any maintenance (no oil change).Refer to the manufacturer's service schedule for the checking inter val for this component.
Brake wear depends on the style of driving, particularly in the case of vehicles used in town, over short distances. It may be necessary to
Brake pads
For information on checking brake disc wear, contact an authorized Toyota dealer or repairer, or another duly qualified and equipped professional.
Brake disc wear
Only use products recommended by Toyota or products of equivalent quality and specification.In order to optimise the operation of units as important as those in the braking system, Toyota selects and offers very specific products.After washing the vehicle, dampness, or in wintry conditions, ice can form on the brake discs and pads: braking efficiency may be reduced. Make light brake applications to dry and defrost the brakes.
Parking brake
If excessive travel or a loss of effectiveness of this system is noticed, the parking brake must be checked, even between two ser vices.
Checking this system must be done by an authorized Toyota dealer or repairer, or another duly qualified and equipped professional.
have the condition of the brakes checked, even between vehicle services.Unless there is a leak in the circuit, a drop in the brake fluid level indicates that the brake pads are worn.
Automatic gearbox
The gearbox does not require any maintenance (no oil change).Refer to the manufacturer's service schedule for the checking inter val for this component.
Electronic gearbox
The gearbox does not require any maintenance (no oil change).
Refer to the manufacturer's service schedule for the checking inter val for this component.
7
Practical information
Page 294 of 418

294
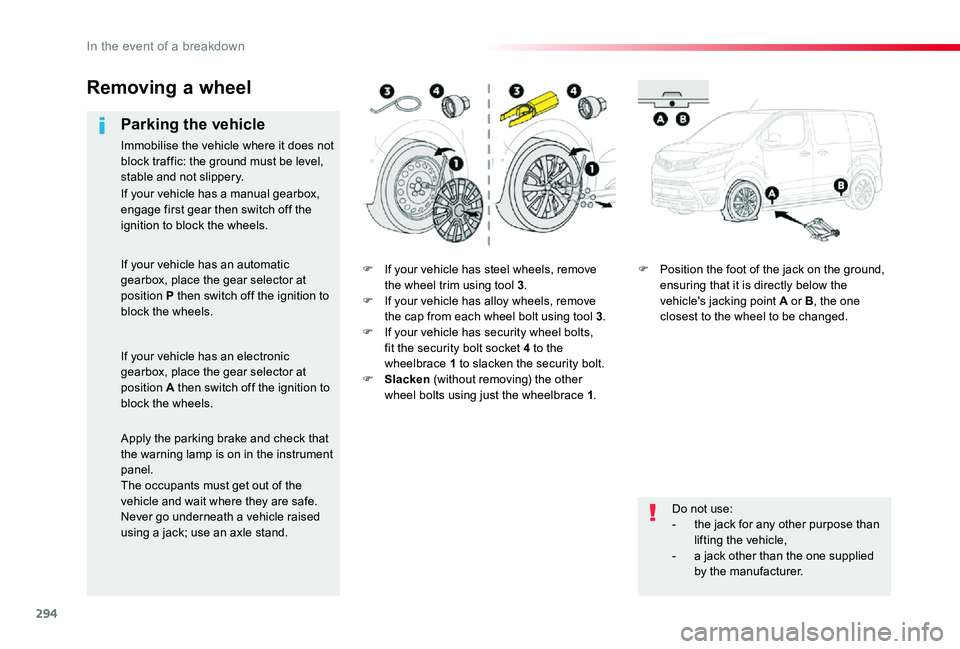
F If your vehicle has steel wheels, remove the wheel trim using tool 3.F If your vehicle has alloy wheels, remove the cap from each wheel bolt using tool 3.F If your vehicle has security wheel bolts, fit the security bolt socket 4 to the wheelbrace 1 to slacken the security bolt.F Slacken (without removing) the other wheel bolts using just the wheelbrace 1.
F Position the foot of the jack on the ground, ensuring that it is directly below the vehicle's jacking point A or B, the one closest to the wheel to be changed.
Removing a wheel
Parking the vehicle
Immobilise the vehicle where it does not block traffic: the ground must be level, stable and not slippery.
Do not use:- the jack for any other purpose than lifting the vehicle,
- a jack other than the one supplied by the manufacturer.
If your vehicle has a manual gearbox, engage first gear then switch off the ignition to block the wheels.
If your vehicle has an automatic gearbox, place the gear selector at position P then switch off the ignition to block the wheels.
If your vehicle has an electronic gearbox, place the gear selector at position A then switch off the ignition to block the wheels.
Apply the parking brake and check that
the warning lamp is on in the instrument panel.The occupants must get out of the vehicle and wait where they are safe.Never go underneath a vehicle raised using a jack; use an axle stand.
In the event of a breakdown
Page 321 of 418

321
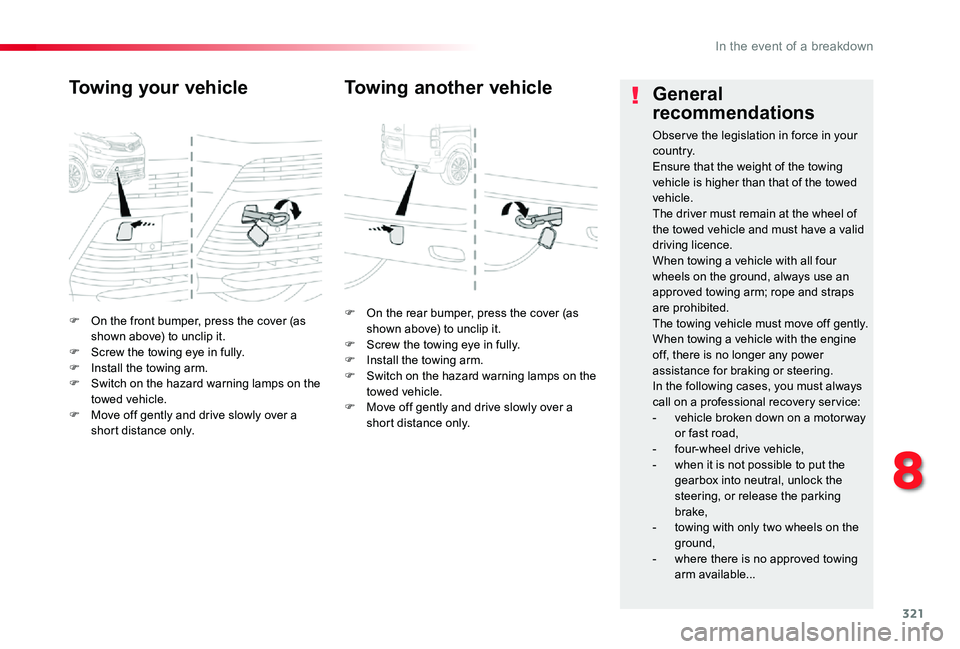
F On the front bumper, press the cover (as shown above) to unclip it.F Screw the towing eye in fully.F Install the towing arm.F Switch on the hazard warning lamps on the towed vehicle.F Move off gently and drive slowly over a short distance only.
Towing your vehicle
F On the rear bumper, press the cover (as shown above) to unclip it.F Screw the towing eye in fully.F Install the towing arm.F Switch on the hazard warning lamps on the towed vehicle.F Move off gently and drive slowly over a short distance only.
Towing another vehicleGeneral
recommendations
Obser ve the legislation in force in your c o u nt r y.Ensure that the weight of the towing vehicle is higher than that of the towed vehicle.The driver must remain at the wheel of the towed vehicle and must have a valid
driving licence.When towing a vehicle with all four wheels on the ground, always use an approved towing arm; rope and straps are prohibited.The towing vehicle must move off gently.When towing a vehicle with the engine off, there is no longer any power assistance for braking or steering.In the following cases, you must always call on a professional recovery ser vice:- vehicle broken down on a motor way or fast road,- four-wheel drive vehicle,- when it is not possible to put the gearbox into neutral, unlock the
steering, or release the parking brake,- towing with only two wheels on the ground,
- where there is no approved towing arm available...
8
In the event of a breakdown
Page 414 of 418

414
Roof bars .......................................................268Roof rack .......................................................268Running out of fuel (Diesel) ..........................322
Safety, children ................................167, 170, 173 -191Saturation of the Diesel Particle Filter (DPF) ..........................................................276Screen, instrument panel ..........................38, 39Screenwash ..................................................15 6Screenwash, rear ..........................................15 5SCR (Selective Catalytic Reduction) ............278Seat and bench seat, rear, fixed .............98, 109Seat and bench seat, rear, on rails .......................................101, 109Seat belts ...............................16 4-167, 179, 18 0Seat belts, rear ..............................................165Seat, bench front, 2-seat ........................93, 165Seats, electric .................................................90Seats, front ................................................87, 90Seats, front bench ...........................................94Seats, heated ............................................91, 94Seat(s), captain, rear, on rails ................................................105, 166Seats, rear .........................................95, 98, 101
S
Pads, brake ...................................................277Paint colour code ..........................................327Parcel shelf, rear ...........................................11 8Parking brake ..................................16, 201, 277Parking sensors, audible and visual ....................................................253Plates, identification......................................327Pressures, tyres ........................... 290, 297, 327Pre-tensioning seat belts ..............................16 4Priming the fuel system ................................322Protecting children ..................167, 170, 173 -191Puncture ........................................................285
PR
Range ..............................................................40Range, AdBlue ................................................33Rear screen, demisting .................................13 3Rear screen, opening .....................................82Recharging the battery .................................318Recirculation, air ...................................125, 13 0Reduction of electrical load .............................................................266Regeneration of the Diesel Particle Filter (DPF) ..................276Reinitialisation of the Tyre Pressure Warning System (TPWS) ...........................259Reinitialising the remote control .....................................................51, 62Reminder, key in ignition ...............................197Reminder, lighting on ....................................14 6Remote control .....................................................45-65Removing a wheel ........................................294Removing the mat .........................................11 0Replacing bulbs ...........................................................298Replacing fuses ............................................311Replacing the air filter ...................................276Replacing the oil filter ...................................276Replacing the passenger compartment filter ......................................276Reser voir, headlamp wash ...........................275Reservoir, screenwash .................................275Resetting the service indicator ........................................................31Resetting the trip recorder ........................................................36Rev counter ...............................................13, 14Reversing camera .........................................255Reversing camera (on interior mirror) .......................................254Reversing lamp ....................................305, 308Road Sign Assist ...........................................221
Alphabetical index