2020 TOYOTA PROACE CITY VERSO steering
[x] Cancel search: steeringPage 112 of 272
11 2
NOTIC E
The inflation pressures defined for the vehicle can be found on the tyre pressure label.For more information on the Identification markings, refer to the corresponding section.
WARNI NG
Checking tyre pressuresThis check should be done when the tyres are "cold" (vehicle stopped for 1 hour or after a journey of less than 10 km (6 miles) at moderate speeds).Otherwise, add 0.3 bar to the pressures shown on the label.
NOTIC E
Snow chainsThe system does not have to be reinitialised after fitting or removing snow chains.
NOTIC E
Spare wheelThe steel spare wheel does not have an under-inflation detection sensor.
Under-inflation alert
This is signalled by the fixed illumination of this warning lamp, accompanied by an audible signal and, depending on equipment, the display of a message.► Reduce speed immediately, avoid excessive steering movements and avoid sudden braking.► Stop the vehicle as soon as it is safe to do so.
WARNI NG
The loss of pressure detected does not always cause visible bulging of the tyre.Do not rely on just a visual check.
► Using a compressor, such as the one in the temporary puncture repair kit, check the pressures of the four tyres when cold.► If it is not possible to make this check immediately, drive carefully at reduced speed.► In the event of a puncture, use the temporary puncture repair kit or the spare wheel (depending on equipment).
NOTIC E
The alert is kept active until the system is reinitialised.
Reinitialisation
Reinitialise the system after adjusting one or more tyre pressures and after changing one or more wheels.
WARNI NG
Before reinitialising the system, make sure that the pressures of the four tyres are correct for the conditions of use of the vehicle and
conform to the values written on the tyre pressure label.Check the pressures of the four tyres before performing the reinitialisation.The system does not advise if a pressure is incorrect at the time of reinitialisation.
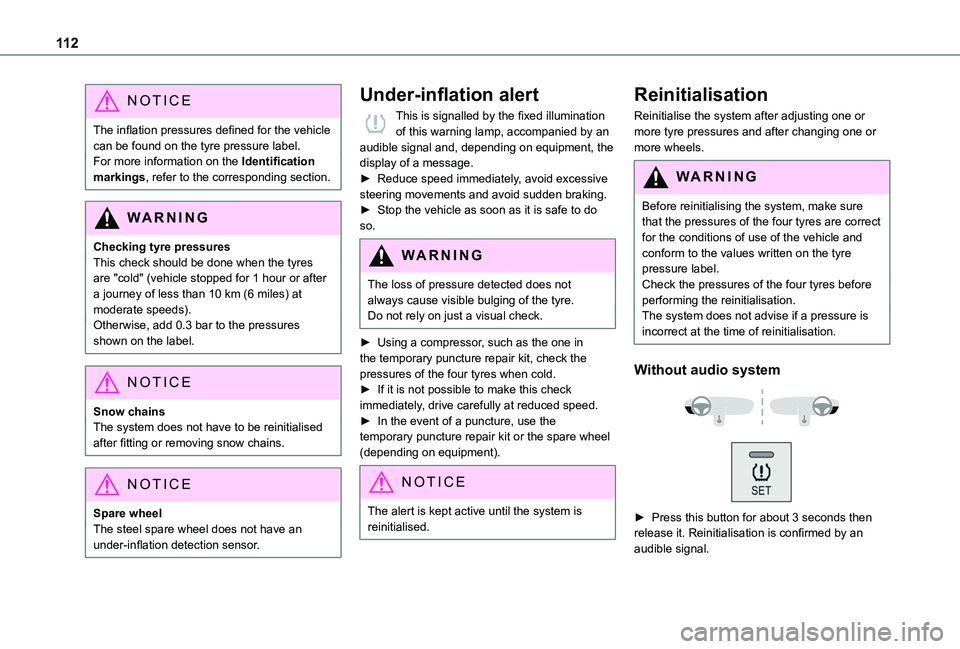
Without audio system
► Press this button for about 3 seconds then release it. Reinitialisation is confirmed by an audible signal.
Page 114 of 272
11 4
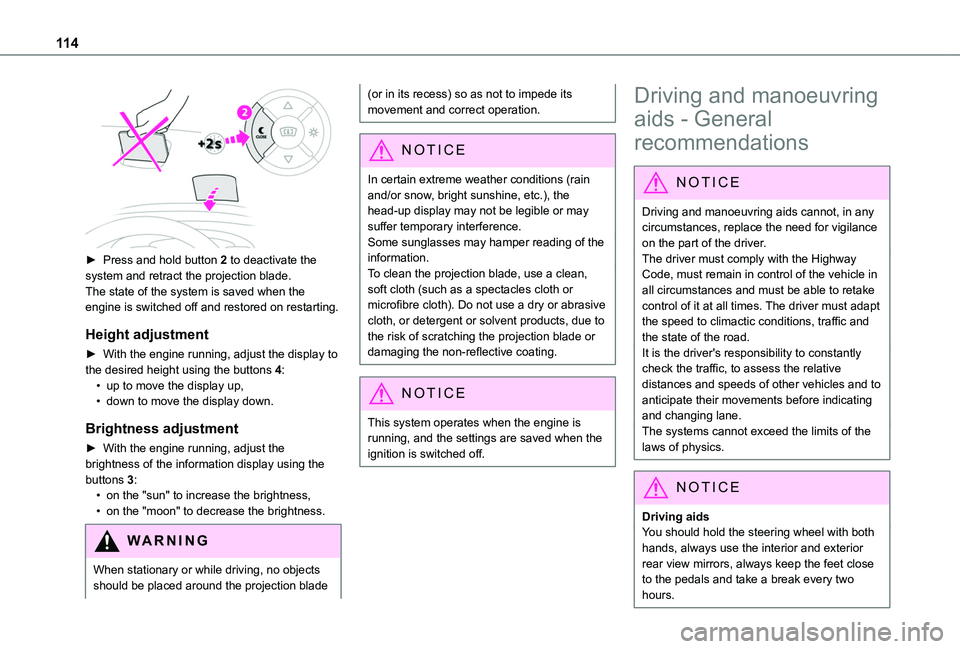
► Press and hold button 2 to deactivate the system and retract the projection blade.The state of the system is saved when the engine is switched off and restored on restarting.
Height adjustment
► With the engine running, adjust the display to the desired height using the buttons 4:• up to move the display up,• down to move the display down.
Brightness adjustment
► With the engine running, adjust the brightness of the information display using the buttons 3:• on the "sun" to increase the brightness,• on the "moon" to decrease the brightness.
W ARNI NG
When stationary or while driving, no objects should be placed around the projection blade
(or in its recess) so as not to impede its movement and correct operation.
NOTIC E
In certain extreme weather conditions (rain and/or snow, bright sunshine, etc.), the head-up display may not be legible or may suffer temporary interference.Some sunglasses may hamper reading of the
information.To clean the projection blade, use a clean, soft cloth (such as a spectacles cloth or microfibre cloth). Do not use a dry or abrasive cloth, or detergent or solvent products, due to the risk of scratching the projection blade or damaging the non-reflective coating.
NOTIC E
This system operates when the engine is running, and the settings are saved when the ignition is switched off.
Driving and manoeuvring
aids - General
recommendations
NOTIC E
Driving and manoeuvring aids cannot, in any circumstances, replace the need for vigilance on the part of the driver.The driver must comply with the Highway Code, must remain in control of the vehicle in all circumstances and must be able to retake control of it at all times. The driver must adapt the speed to climactic conditions, traffic and the state of the road.It is the driver's responsibility to constantly check the traffic, to assess the relative distances and speeds of other vehicles and to anticipate their movements before indicating and changing lane.The systems cannot exceed the limits of the
laws of physics.
NOTIC E
Driving aidsYou should hold the steering wheel with both hands, always use the interior and exterior rear view mirrors, always keep the feet close to the pedals and take a break every two hours.
Page 118 of 272
11 8
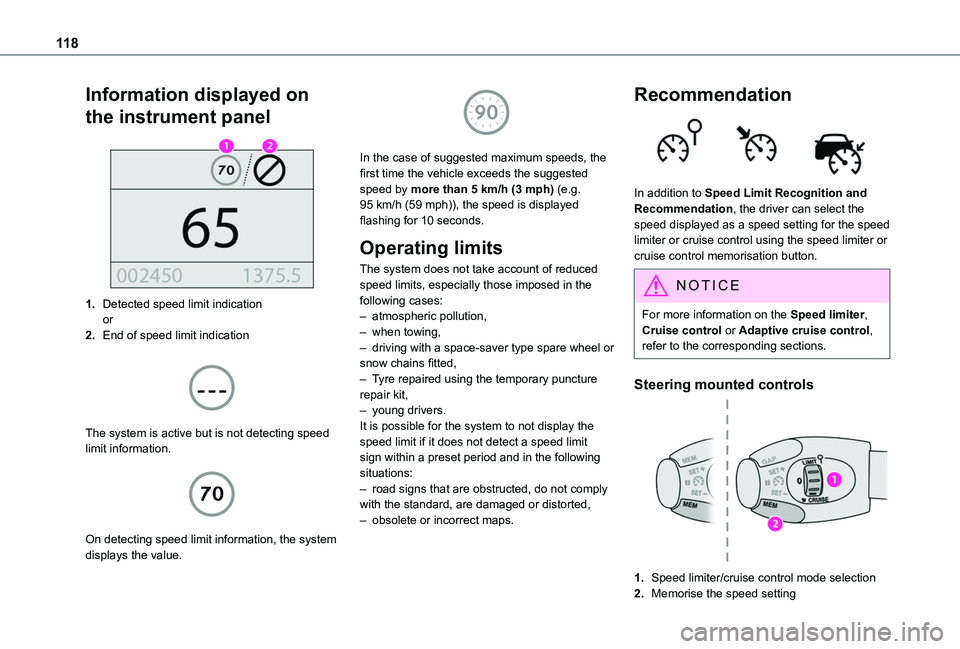
Information displayed on
the instrument panel
1.Detected speed limit indicationor
2.End of speed limit indication
The system is active but is not detecting speed limit information.
On detecting speed limit information, the system displays the value.
In the case of suggested maximum speeds, the first time the vehicle exceeds the suggested speed by more than 5 km/h (3 mph) (e.g. 95 km/h (59 mph)), the speed is displayed flashing for 10 seconds.
Operating limits
The system does not take account of reduced speed limits, especially those imposed in the following cases:– atmospheric pollution,– when towing,– driving with a space-saver type spare wheel or snow chains fitted,– Tyre repaired using the temporary puncture repair kit,– young drivers.It is possible for the system to not display the speed limit if it does not detect a speed limit sign within a preset period and in the following situations:– road signs that are obstructed, do not comply with the standard, are damaged or distorted,– obsolete or incorrect maps.
Recommendation
In addition to Speed Limit Recognition and Recommendation, the driver can select the speed displayed as a speed setting for the speed limiter or cruise control using the speed limiter or cruise control memorisation button.
NOTIC E
For more information on the Speed limiter, Cruise control or Adaptive cruise control, refer to the corresponding sections.
Steering mounted controls
1.Speed limiter/cruise control mode selection
2.Memorise the speed setting
Page 120 of 272
120
Steering mounted control
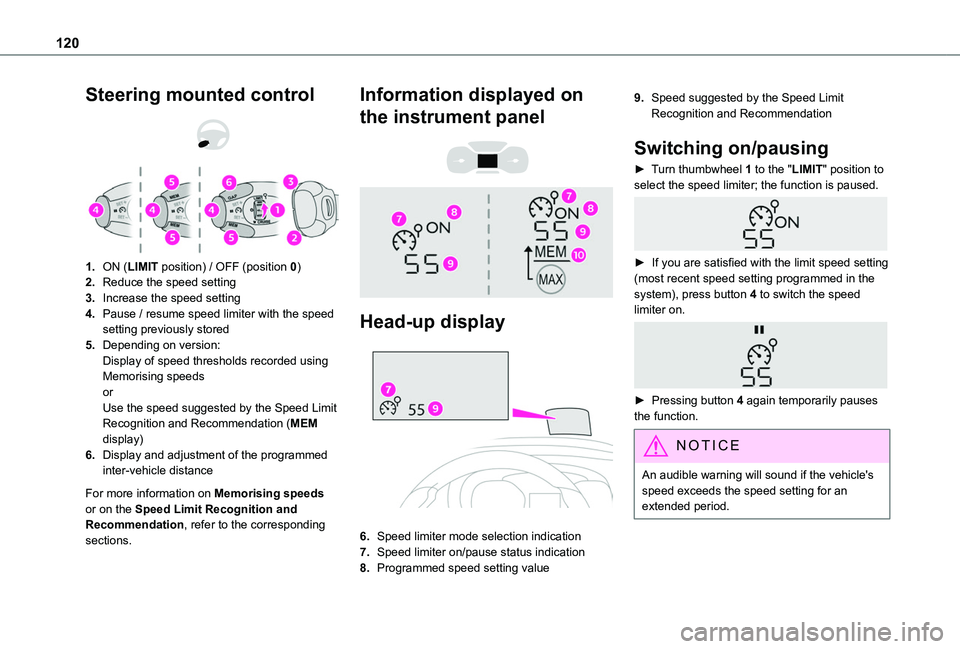
1.ON (LIMIT position) / OFF (position 0)
2.Reduce the speed setting
3.Increase the speed setting
4.Pause / resume speed limiter with the speed setting previously stored
5.Depending on version:Display of speed thresholds recorded using Memorising speedsorUse the speed suggested by the Speed Limit Recognition and Recommendation (MEM display)
6.Display and adjustment of the programmed inter-vehicle distance
For more information on Memorising speeds or on the Speed Limit Recognition and Recommendation, refer to the corresponding sections.
Information displayed on
the instrument panel
Head-up display
6.Speed limiter mode selection indication
7.Speed limiter on/pause status indication
8.Programmed speed setting value
9.Speed suggested by the Speed Limit Recognition and Recommendation
Switching on/pausing
► Turn thumbwheel 1 to the "LIMIT" position to select the speed limiter; the function is paused.
► If you are satisfied with the limit speed setting (most recent speed setting programmed in the system), press button 4 to switch the speed limiter on.
► Pressing button 4 again temporarily pauses the function.
NOTIC E
An audible warning will sound if the vehicle's speed exceeds the speed setting for an extended period.
Page 122 of 272
122
allow running at a constant speed and keeping an adequate safety distance.Remain vigilant when the cruise control is activated. If you hold one of the speed setting modification buttons, a very rapid change in the speed of your vehicle may occur.When descending a steep hill, the cruise control system cannot prevent the vehicle from exceeding the set speed. Brake if necessary to control the speed of your vehicle.On steep climbs or when towing, the set speed may not be reached or maintained.
NOTIC E
Exceeding the programmed speed settingYou can temporarily exceed the speed setting by pressing the accelerator pedal (the programmed speed flashes).To return to the speed setting, release the accelerator pedal (when the set speed is
reached again, the displayed speed stops flashing).
WARNI NG
Operating limitsNever use the system in the following situations:– in an urban area with the risk of
pedestrians crossing the road,
– in heavy traffic,– on winding or steep roads,– on slippery or flooded roads,– in unfavourable climatic conditions,– driving on a speed circuit,– driving on a rolling road,– use of snow chains, non-slip covers or studded tyres.
Programmable cruise
control
Refer to the General recommendations on the use of driving and manoeuvring aids and to Cruise control - particular recommendations.This system automatically keeps the vehicle’s speed at the cruise value programmed by the driver (speed setting), without using the accelerator pedal.The cruise control is switched on manually.It requires a minimum vehicle speed of 40 km/h (25 mph).
With a manual gearbox, third gear or higher must be engaged.With an automatic gearbox, mode D or second gear or higher in mode M must be engaged.
NOTIC E
The cruise control remains active after changing gear, regardless of the gearbox type, on engines fitted with Stop & Start.
NOTIC E
Switching off the ignition cancels any speed setting.
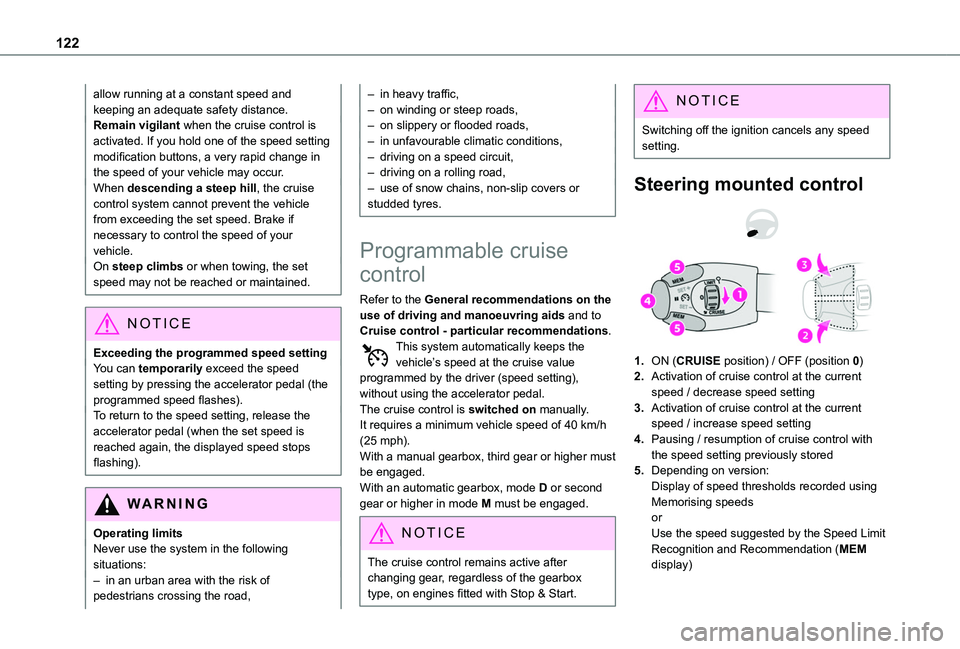
Steering mounted control
1.ON (CRUISE position) / OFF (position 0)
2.Activation of cruise control at the current speed / decrease speed setting
3.Activation of cruise control at the current speed / increase speed setting
4.Pausing / resumption of cruise control with the speed setting previously stored
5.Depending on version:Display of speed thresholds recorded using Memorising speedsorUse the speed suggested by the Speed Limit Recognition and Recommendation (MEM display)
Page 125 of 272
125
Driving
6
To do so, it has a camera located at the top of the windscreen and, depending on version, a radar located in the front bumper.
WARNI NG
Primarily designed for driving on main roads and motorways, this system only works with moving vehicles driving in the same direction as your vehicle.
NOTIC E
If the driver operates a direction indicator to overtake a slower vehicle, the cruise control allows the vehicle to temporarily approach the vehicle in front to assist the overtaking manoeuvre, without ever exceeding the speed setting.
WARNI NG
Some vehicles present on the road may not be properly seen or may be poorly interpreted by the camera and/or radar (e.g. a lorry), which may lead to a poor assessment of the distances and lead to the vehicle inappropriately accelerating or braking.
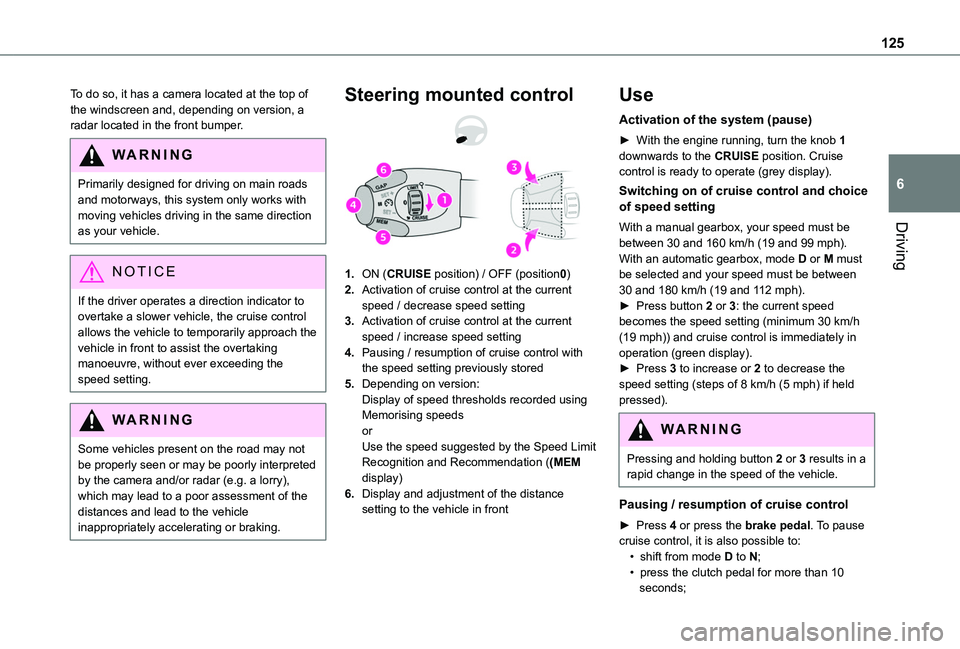
Steering mounted control
1.ON (CRUISE position) / OFF (position0)
2.Activation of cruise control at the current speed / decrease speed setting
3.Activation of cruise control at the current speed / increase speed setting
4.Pausing / resumption of cruise control with the speed setting previously stored
5.Depending on version:Display of speed thresholds recorded using Memorising speedsorUse the speed suggested by the Speed Limit Recognition and Recommendation ((MEM display)
6.Display and adjustment of the distance setting to the vehicle in front
Use
Activation of the system (pause)
► With the engine running, turn the knob 1 downwards to the CRUISE position. Cruise control is ready to operate (grey display).
Switching on of cruise control and choice of speed setting
With a manual gearbox, your speed must be between 30 and 160 km/h (19 and 99 mph).With an automatic gearbox, mode D or M must be selected and your speed must be between 30 and 180 km/h (19 and 112 mph).► Press button 2 or 3: the current speed becomes the speed setting (minimum 30 km/h (19 mph)) and cruise control is immediately in operation (green display).► Press 3 to increase or 2 to decrease the speed setting (steps of 8 km/h (5 mph) if held pressed).
WARNI NG
Pressing and holding button 2 or 3 results in a rapid change in the speed of the vehicle.
Pausing / resumption of cruise control
► Press 4 or press the brake pedal. To pause cruise control, it is also possible to:• shift from mode D to N;• press the clutch pedal for more than 10 seconds;
Page 130 of 272
130
Level 1 (orange): visual alert only, signalling that the vehicle in front is very close.The message "Vehicle close" is displayed.Level 2 (red): visual and audible alert, signalling that a collision is imminent.The message "Brake!" is displayed.Level 3: finally, in some cases, a haptic alert in the form of micro-braking can be given, confirming the risk of collision.
NOTIC E
Where the speed of your vehicle is too high approaching another vehicle, the first level of alert may not be displayed: the level 2 alert may be displayed directly.Important: the level 1 alert is never displayed for a stationary obstacle or when the "Close" trigger threshold has been selected.
Modifying the alert trigger threshold
This threshold determines how you wish to be warned of the presence of a moving or stationary vehicle in front of you, or a pedestrian present in your traffic lane.The current threshold can be modified via the vehicle configuration menu.You can select one of three pre-defined thresholds:– "Distant",
– "Normal",– "Close".The last threshold selected is memorised when the ignition is switched off.
Intelligent emergency
braking assistance
If the driver brakes, but not sufficiently to avoid a collision, this system will supplement the braking, within the limits of the laws of physics.This assistance will only be provided if you press the brake pedal.
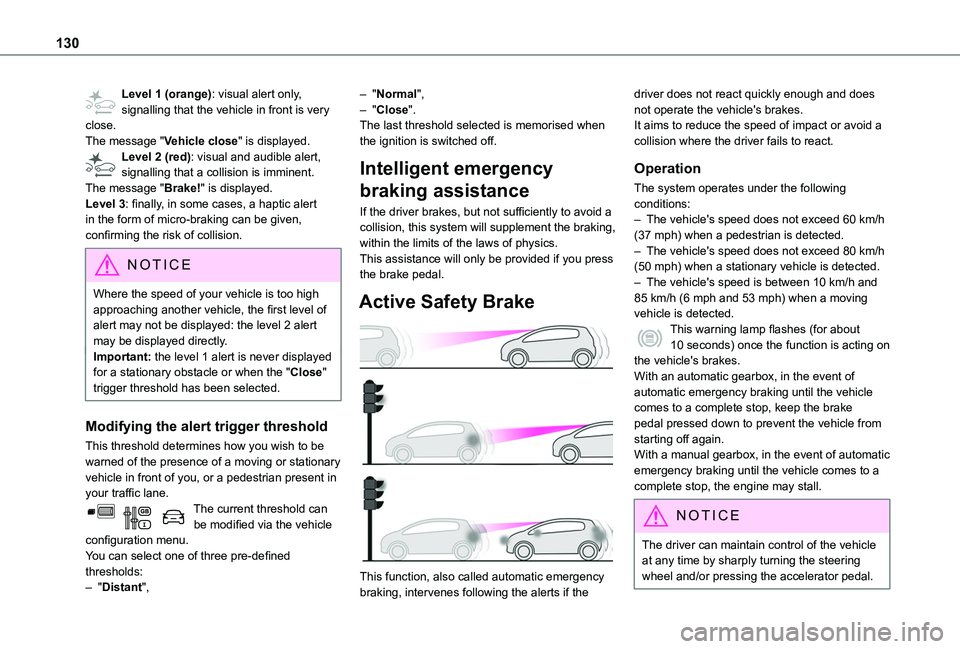
Active Safety Brake
This function, also called automatic emergency braking, intervenes following the alerts if the
driver does not react quickly enough and does not operate the vehicle's brakes.It aims to reduce the speed of impact or avoid a collision where the driver fails to react.
Operation
The system operates under the following conditions:– The vehicle's speed does not exceed 60 km/h (37 mph) when a pedestrian is detected.– The vehicle's speed does not exceed 80 km/h (50 mph) when a stationary vehicle is detected.– The vehicle's speed is between 10 km/h and 85 km/h (6 mph and 53 mph) when a moving vehicle is detected.This warning lamp flashes (for about 10 seconds) once the function is acting on the vehicle's brakes.With an automatic gearbox, in the event of automatic emergency braking until the vehicle comes to a complete stop, keep the brake pedal pressed down to prevent the vehicle from starting off again.
With a manual gearbox, in the event of automatic emergency braking until the vehicle comes to a complete stop, the engine may stall.
NOTIC E
The driver can maintain control of the vehicle at any time by sharply turning the steering wheel and/or pressing the accelerator pedal.
Page 131 of 272
131
Driving
6
NOTIC E
Operation of the function may be felt by slight vibration in the brake pedal.If the vehicle comes to a complete stop, the automatic braking is maintained for 1 to 2 seconds.
Deactivation/Activation
By default, the system is automatically activated at every engine start.This system can be deactivated or activated via the vehicle settings menu.Deactivation of the system is signalled by the illumination of this indicator lamp, accompanied by the display of a message.
Malfunction
In the event of a system malfunction, this warning lamp comes on on the instrument panel, accompanied by an onscreen message
and an audible signal.Contact a TOYOTA dealer or a qualified workshop to have the system checked.If these warning lamps come on after the engine has been switched off and then restarted, contact a TOYOTA dealer or a qualified workshop to have the system checked.
Active Lane Departure
Warning System
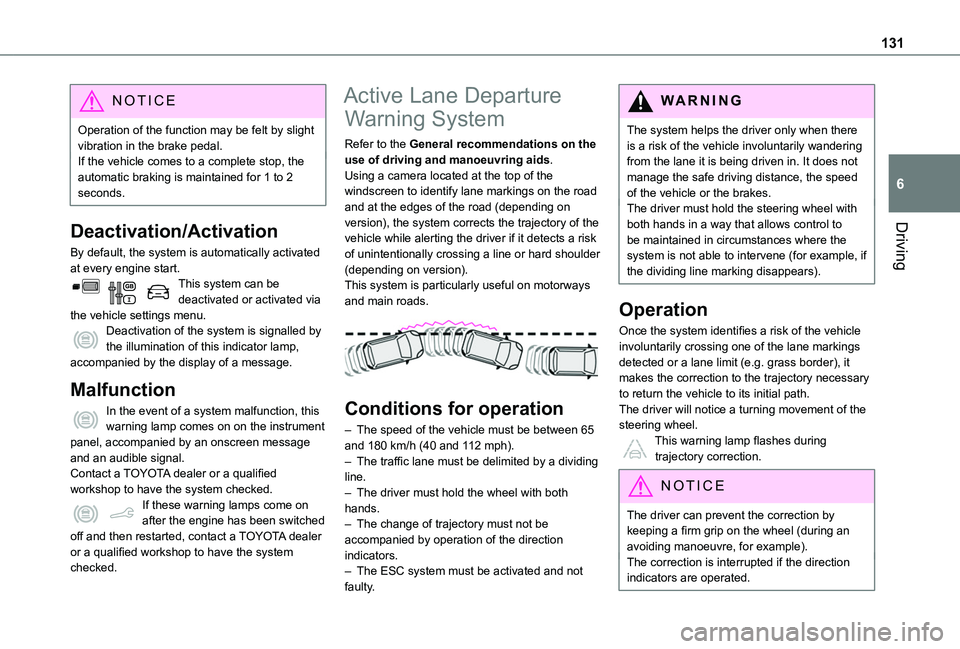
Refer to the General recommendations on the use of driving and manoeuvring aids.Using a camera located at the top of the windscreen to identify lane markings on the road and at the edges of the road (depending on version), the system corrects the trajectory of the vehicle while alerting the driver if it detects a risk of unintentionally crossing a line or hard shoulder (depending on version).This system is particularly useful on motorways and main roads.
Conditions for operation
– The speed of the vehicle must be between 65 and 180 km/h (40 and 112 mph).– The traffic lane must be delimited by a dividing line.– The driver must hold the wheel with both hands.– The change of trajectory must not be accompanied by operation of the direction indicators.– The ESC system must be activated and not faulty.
WARNI NG
The system helps the driver only when there is a risk of the vehicle involuntarily wandering from the lane it is being driven in. It does not manage the safe driving distance, the speed of the vehicle or the brakes.The driver must hold the steering wheel with both hands in a way that allows control to be maintained in circumstances where the system is not able to intervene (for example, if the dividing line marking disappears).
Operation
Once the system identifies a risk of the vehicle involuntarily crossing one of the lane markings detected or a lane limit (e.g. grass border), it makes the correction to the trajectory necessary to return the vehicle to its initial path.The driver will notice a turning movement of the steering wheel.This warning lamp flashes during
trajectory correction.
NOTIC E
The driver can prevent the correction by keeping a firm grip on the wheel (during an avoiding manoeuvre, for example).The correction is interrupted if the direction indicators are operated.