2020 TOYOTA PROACE CITY child lock
[x] Cancel search: child lockPage 2 of 272
2
■Overview
Labels 4
■Eco-driving
Eco-coaching 8
1Instruments
Instrument Panel 9Warning and indicator lamps 11Indicators 16Trip computer 21Setting the date and time 22
2Access
Electronic key with remote control function and built-in key, 23Back-up procedures 30Central locking / unlocking 32Doors 34General recommendations for the sliding side
doors 35Rear roof flap 36Alarm 37Electric windows 39Tilting rear door windows 40
3Ease of use and comfort
General recommendations for the seats 41Front seats 41
Steering wheel adjustment 44
Mirrors 442-seat front bench seat 45Rear bench seat 47Interior fittings 48Extenso cabin 53Crew cab 55Heating and Ventilation 58Heating 59Manual air conditioning 59Dual-zone automatic air conditioning 60Front demisting - defrosting 62Rear screen and/or door mirrors demisting - defrosting 63Additional heating/ventilation system 63
4Lighting and visibility
Lighting control lever 67Direction indicators 68Automatic illumination of headlamps 68Daytime running lamps / Sidelamps 69Parking lamps 69Automatic headlamp dipping 70
Headlamp beam height adjustment 71Wiper control lever 71Changing a wiper blade 73Automatic wiping 74
5Safety
General safety recommendations 75Emergency or assistance call 75Hazard warning lamps 78
Horn 78Electronic stability control (ESC) 78Advanced Grip Control 80Hill Assist Descent Control 82Seat belts 83Airbags 85Child seats 88Deactivating the front passenger airbag 90Manual child lock 93Electric child lock 93
6Driving
Driving recommendations 95Starting/switching off the engine 97Manual parking brake 100Electric parking brake 101Hill start assist 1045-speed manual gearbox 1046-speed manual gearbox 105Automatic gearbox 105Gear efficiency indicator 109Stop & Start 109
Under-inflation detection 111Head-up display 11 3Driving and manoeuvring aids - General recommendations 11 4Speed Limit Recognition and Recommendation 11 6Speed limiter 11 9Cruise control - particular recommendations 121Programmable cruise control 122
Adaptive Cruise Control 124
Page 4 of 272
4
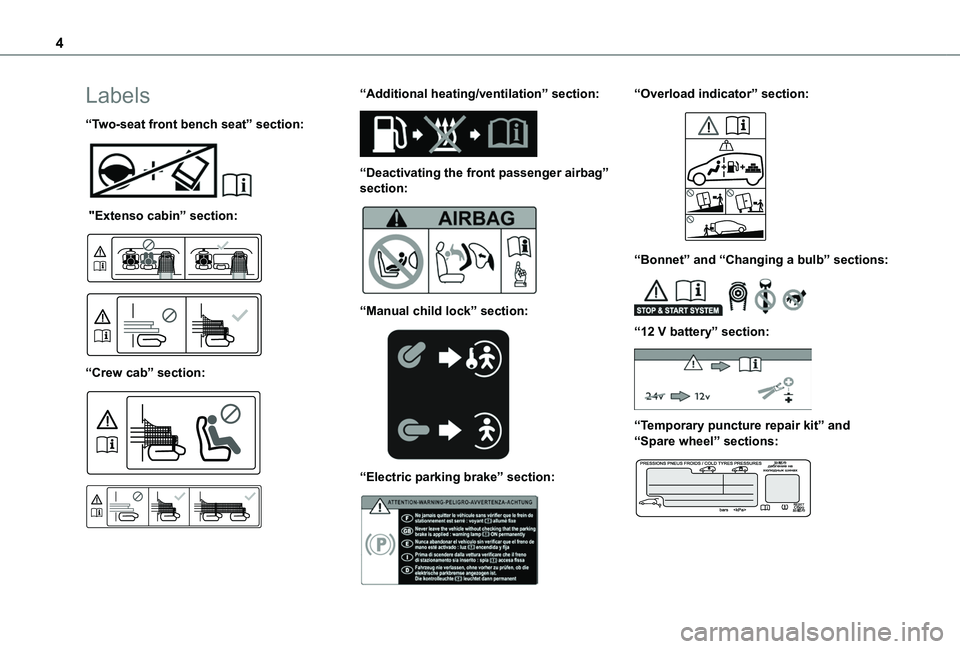
Labels
“Two-seat front bench seat” section:
"Extenso cabin” section:
“Crew cab” section:
“Additional heating/ventilation” section:
“Deactivating the front passenger airbag” section:
“Manual child lock” section:
“Electric parking brake” section:
“Overload indicator” section:
“Bonnet” and “Changing a bulb” sections:
“12 V battery” section:
“Temporary puncture repair kit” and “Spare wheel” sections:
Page 6 of 272

6
Side switch panel
1.Manual headlamp beam height adjustment
2.DSC / ASR systems
3.Stop & Start
4.Parking sensors
5.Additional heating / ventilation
6.Active Lane Departure Warning System
7.Tyre under-inflation detection
8.Electric child lock
9.Heated windscreen
10.Head-up display
Controls on the driver's door
1.Loading area
2.Electric child lock
Central switch panel
1.Hazard warning lamps
2.Locking / unlocking from the inside
3.Hill Assist Descent
4.Eco mode
5.Advanced Grip Control
6.Electric parking brake
7.Starting / switching off the engine
Page 14 of 272
14
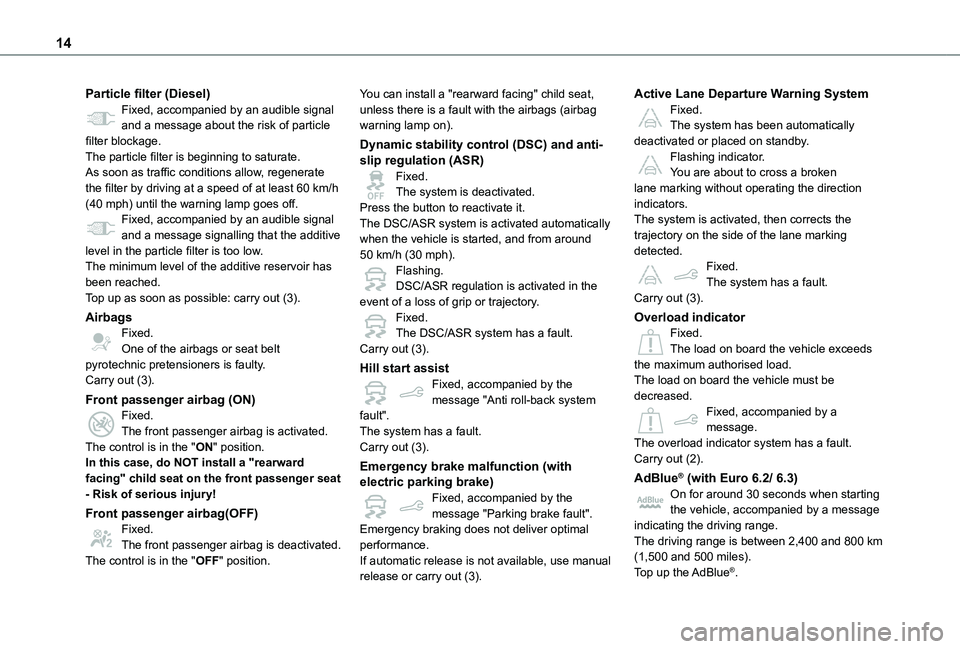
Particle filter (Diesel)Fixed, accompanied by an audible signal and a message about the risk of particle filter blockage.The particle filter is beginning to saturate.As soon as traffic conditions allow, regenerate the filter by driving at a speed of at least 60 km/h (40 mph) until the warning lamp goes off.Fixed, accompanied by an audible signal and a message signalling that the additive level in the particle filter is too low.The minimum level of the additive reservoir has been reached.Top up as soon as possible: carry out (3).
AirbagsFixed.One of the airbags or seat belt pyrotechnic pretensioners is faulty.Carry out (3).
Front passenger airbag (ON)Fixed.The front passenger airbag is activated.
The control is in the "ON" position.In this case, do NOT install a "rearward facing" child seat on the front passenger seat - Risk of serious injury!
Front passenger airbag(OFF)Fixed.The front passenger airbag is deactivated.The control is in the "OFF" position.
You can install a "rearward facing" child seat, unless there is a fault with the airbags (airbag warning lamp on).
Dynamic stability control (DSC) and anti-slip regulation (ASR)Fixed.The system is deactivated.Press the button to reactivate it.The DSC/ASR system is activated automatically when the vehicle is started, and from around 50 km/h (30 mph).Flashing.DSC/ASR regulation is activated in the event of a loss of grip or trajectory.Fixed.The DSC/ASR system has a fault.Carry out (3).
Hill start assistFixed, accompanied by the message "Anti roll-back system fault".The system has a fault.
Carry out (3).
Emergency brake malfunction (with electric parking brake)Fixed, accompanied by the message "Parking brake fault".Emergency braking does not deliver optimal performance.If automatic release is not available, use manual release or carry out (3).
Active Lane Departure Warning SystemFixed.The system has been automatically deactivated or placed on standby.Flashing indicator.You are about to cross a broken lane marking without operating the direction indicators.The system is activated, then corrects the trajectory on the side of the lane marking detected.Fixed.The system has a fault.Carry out (3).
Overload indicatorFixed.The load on board the vehicle exceeds the maximum authorised load.The load on board the vehicle must be decreased.Fixed, accompanied by a message.The overload indicator system has a fault.
Carry out (2).
AdBlue® (with Euro 6.2/ 6.3)On for around 30 seconds when starting the vehicle, accompanied by a message indicating the driving range.The driving range is between 2,400 and 800 km (1,500 and 500 miles).Top up the AdBlue®.
Page 28 of 272
28
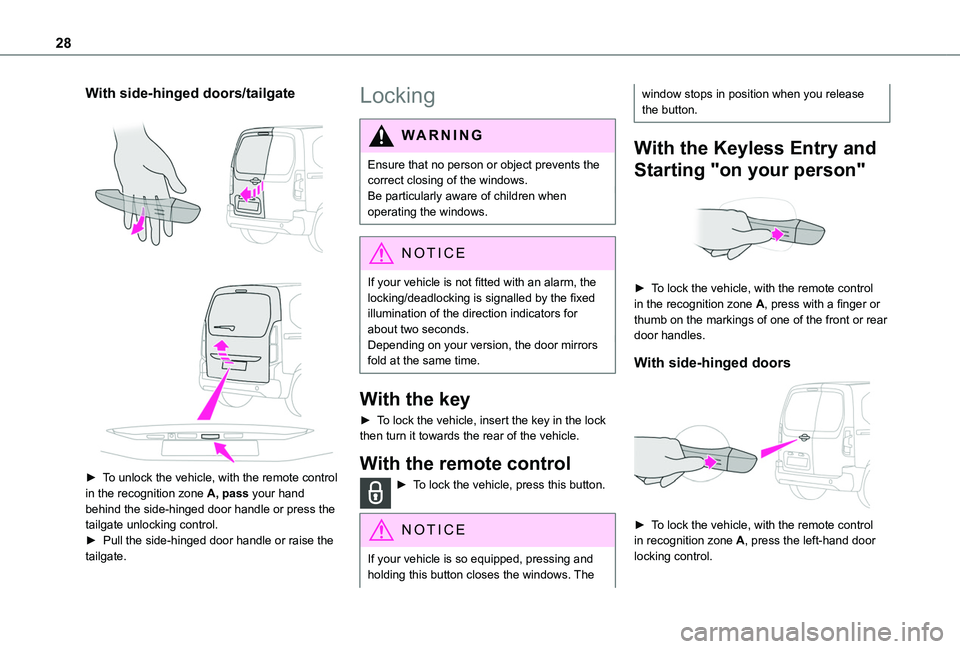
With side-hinged doors/tailgate
► To unlock the vehicle, with the remote control in the recognition zone A, pass your hand behind the side-hinged door handle or press the tailgate unlocking control. ► Pull the side-hinged door handle or raise the tailgate.
Locking
WARNI NG
Ensure that no person or object prevents the correct closing of the windows.Be particularly aware of children when operating the windows.
NOTIC E
If your vehicle is not fitted with an alarm, the locking/deadlocking is signalled by the fixed illumination of the direction indicators for about two seconds.Depending on your version, the door mirrors fold at the same time.
With the key
► To lock the vehicle, insert the key in the lock then turn it towards the rear of the vehicle.
With the remote control
► To lock the vehicle, press this button.
NOTIC E
If your vehicle is so equipped, pressing and holding this button closes the windows. The
window stops in position when you release the button.
With the Keyless Entry and
Starting "on your person"
► To lock the vehicle, with the remote control in the recognition zone A, press with a finger or thumb on the markings of one of the front or rear door handles.
With side-hinged doors
► To lock the vehicle, with the remote control in recognition zone A, press the left-hand door
locking control.
Page 30 of 272
30
Back-up procedures
Lost keys, remote control,
electronic key
Go to a TOYOTA dealer with the vehicle's registration certificate, your personal identification documents and if possible, the label bearing the key code.The TOYOTA dealer will be able to retrieve the key code and the transponder code, enabling a new key to be ordered.
Complete unlocking/locking
of the vehicle with the key
Use this procedure in the following situations:– Remote control battery discharged.– Remote control malfunction.– Vehicle battery discharged.– Vehicle in an area subject to strong electromagnetic interference.In the first case, change the remote control
battery.In the second case, reinitialise the remote control.Refer to the corresponding sections.► Insert the key in the door lock.► Turn the key towards the front/rear to unlock/lock the vehicle.► Turn the key rearwards again within 5 seconds to deadlock the vehicle.
NOTIC E
If the vehicle is fitted with an alarm, it will not be activated when locking with the key.If the alarm is activated, the siren sounds when the door is opened; switch on the ignition to stop it.
Central locking not
functioning
Use these procedures in the following cases:– Central locking malfunction.– Battery disconnected or discharged.
WARNI NG
In the event of a malfunction of the central locking system, the battery must be disconnected to ensure that the vehicle is locked fully.
Locking part of the vehicle (front
passenger door/sliding side door/
side-hinged doors)
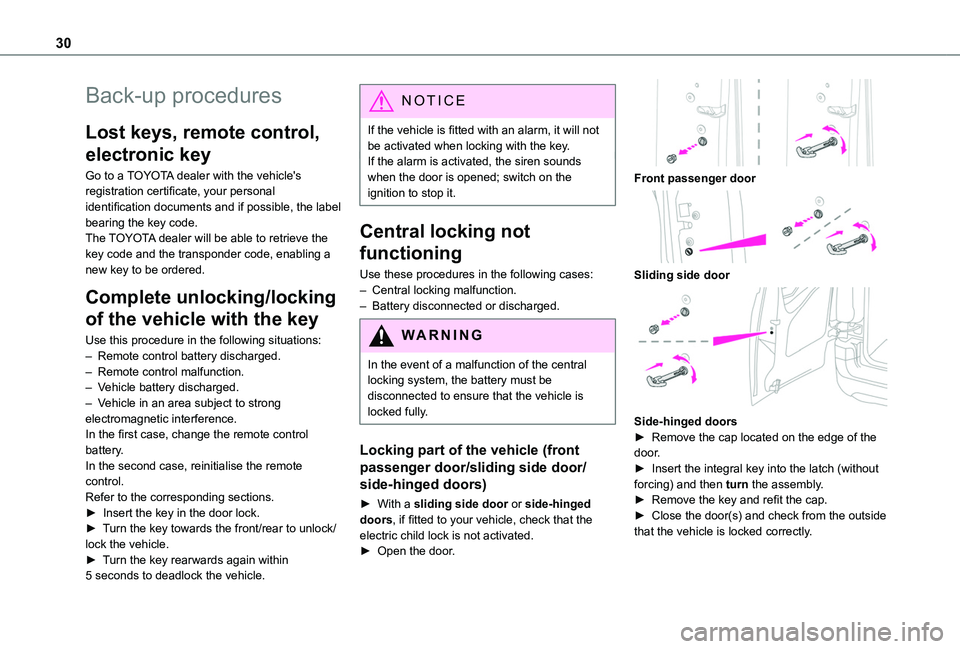
► With a sliding side door or side-hinged doors, if fitted to your vehicle, check that the electric child lock is not activated.► Open the door.
Front passenger door
Sliding side door
Side-hinged doors► Remove the cap located on the edge of the door.► Insert the integral key into the latch (without forcing) and then turn the assembly.► Remove the key and refit the cap. ► Close the door(s) and check from the outside that the vehicle is locked correctly.
Page 31 of 272
31
Access
2
Unlocking of one part of the vehicle
(front passenger door/sliding side
door/side-hinged doors)
► Use the interior opening handle.or► With side-hinged doors, insert the integral key in the (left-hand) door lock, then turn it.
NOTIC E
For more information on the Child lock on a sliding side door or side-hinged doors, refer to the corresponding section.
Unlocking the tailgate
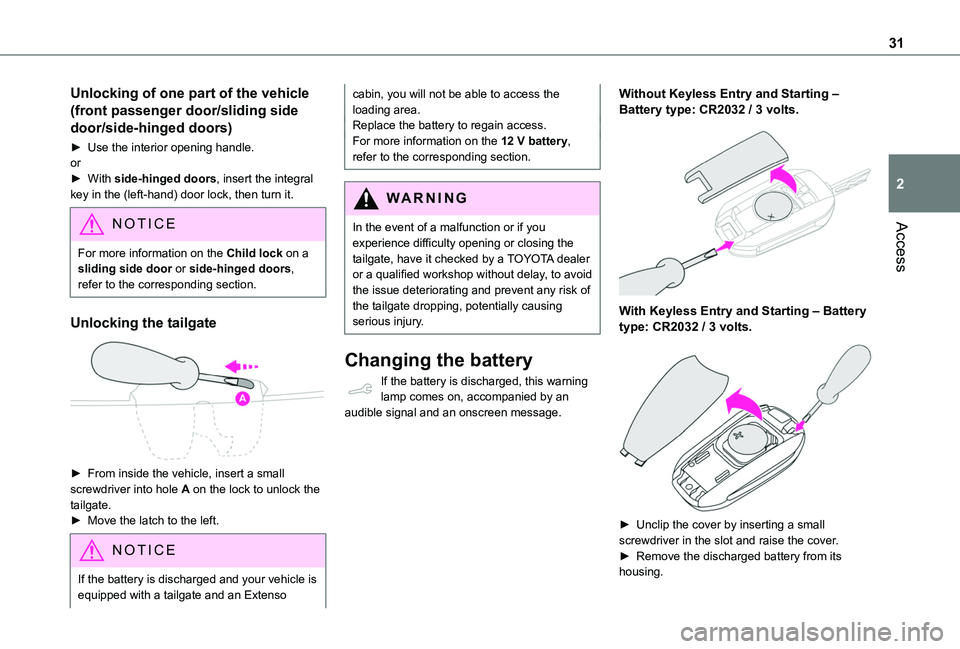
► From inside the vehicle, insert a small screwdriver into hole A on the lock to unlock the tailgate.► Move the latch to the left.
NOTIC E
If the battery is discharged and your vehicle is equipped with a tailgate and an Extenso
cabin, you will not be able to access the loading area.Replace the battery to regain access.For more information on the 12 V battery, refer to the corresponding section.
WARNI NG
In the event of a malfunction or if you experience difficulty opening or closing the tailgate, have it checked by a TOYOTA dealer or a qualified workshop without delay, to avoid the issue deteriorating and prevent any risk of the tailgate dropping, potentially causing serious injury.
Changing the battery
If the battery is discharged, this warning lamp comes on, accompanied by an audible signal and an onscreen message.
Without Keyless Entry and Starting ‒ Battery type: CR2032 / 3 volts.
With Keyless Entry and Starting ‒ Battery type: CR2032 / 3 volts.
► Unclip the cover by inserting a small screwdriver in the slot and raise the cover.
► Remove the discharged battery from its housing.
Page 35 of 272
35
Access
2
Opening to approximately 180°
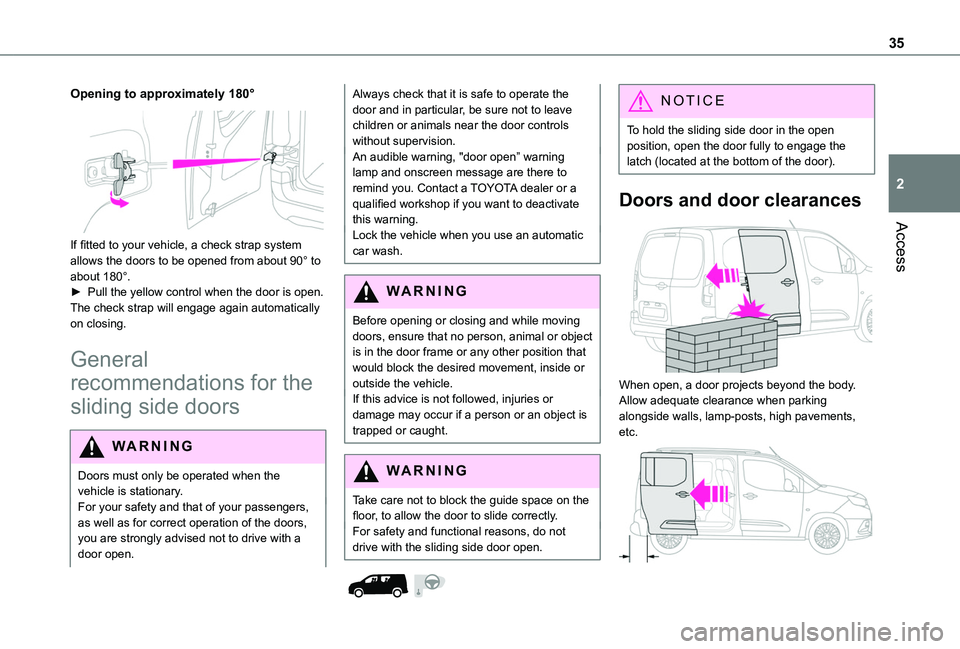
If fitted to your vehicle, a check strap system allows the doors to be opened from about 90° to about 180°.► Pull the yellow control when the door is open.The check strap will engage again automatically on closing.
General
recommendations for the
sliding side doors
WARNI NG
Doors must only be operated when the vehicle is stationary.For your safety and that of your passengers, as well as for correct operation of the doors, you are strongly advised not to drive with a door open.
Always check that it is safe to operate the door and in particular, be sure not to leave children or animals near the door controls without supervision.An audible warning, "door open” warning lamp and onscreen message are there to remind you. Contact a TOYOTA dealer or a qualified workshop if you want to deactivate this warning.Lock the vehicle when you use an automatic car wash.
WARNI NG
Before opening or closing and while moving doors, ensure that no person, animal or object is in the door frame or any other position that would block the desired movement, inside or outside the vehicle.If this advice is not followed, injuries or damage may occur if a person or an object is trapped or caught.
WARNI NG
Take care not to block the guide space on the floor, to allow the door to slide correctly.For safety and functional reasons, do not
drive with the sliding side door open.
NOTIC E
To hold the sliding side door in the open position, open the door fully to engage the latch (located at the bottom of the door).
Doors and door clearances
When open, a door projects beyond the body. Allow adequate clearance when parking alongside walls, lamp-posts, high pavements, etc.