2020 TOYOTA PROACE CITY warning
[x] Cancel search: warningPage 167 of 272
167
In the event of a breakdown
8
With an automatic gearbox, select mode P to lock the wheels, apply the parking brake, unless it is programmed to be in automatic mode, and switch off the ignition.Check for the fixed illumination of the parking brake warning lamps in the instrument panel.The occupants must get out of the vehicle and wait where they are safe.If necessary, place a chock under the wheel diagonally opposite the wheel to be changed.Never go underneath a vehicle raised using a jack; use an axle stand.
NOTIC E
Wheel with wheel trimWhen removing the wheel, first remove the wheel trim by pulling at the valve aperture using the wheelbrace.When refitting the wheel, refit the wheel trim, starting by placing its aperture in line with the valve and then pushing it into place
all round its edge with the palm of your hand.
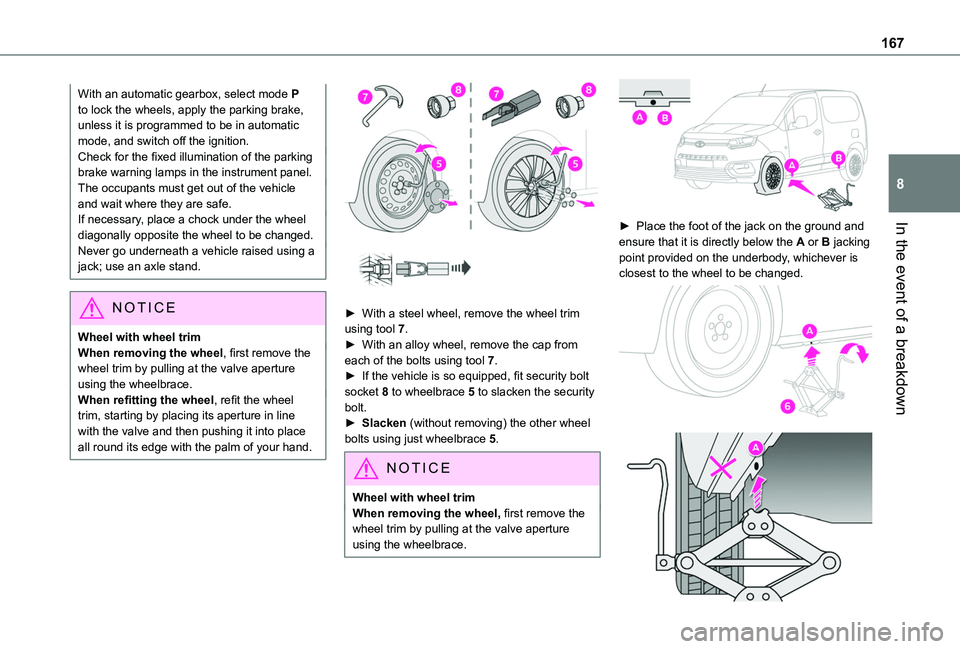
► With a steel wheel, remove the wheel trim using tool 7.► With an alloy wheel, remove the cap from each of the bolts using tool 7.► If the vehicle is so equipped, fit security bolt socket 8 to wheelbrace 5 to slacken the security bolt.► Slacken (without removing) the other wheel bolts using just wheelbrace 5.
NOTIC E
Wheel with wheel trimWhen removing the wheel, first remove the wheel trim by pulling at the valve aperture using the wheelbrace.
► Place the foot of the jack on the ground and ensure that it is directly below the A or B jacking
point provided on the underbody, whichever is closest to the wheel to be changed.
Page 181 of 272
181
In the event of a breakdown
8
NOTIC E
In case of battery or electric parking brake failure, it is essential to call a professional using flatbed recovery vehicles (excluding manual gearbox).
Access to the eye
NOTIC E
For more information on the Tool kit, refer to the corresponding section.
WARNI NG
With a manual gearbox, move the gear lever into neutral.With an automatic gearbox, place the gear selector into position N.Failure to adhere to this instruction may lead to damage to braking system components and the lack of braking assistance on restarting the engine.
Towing your vehicle
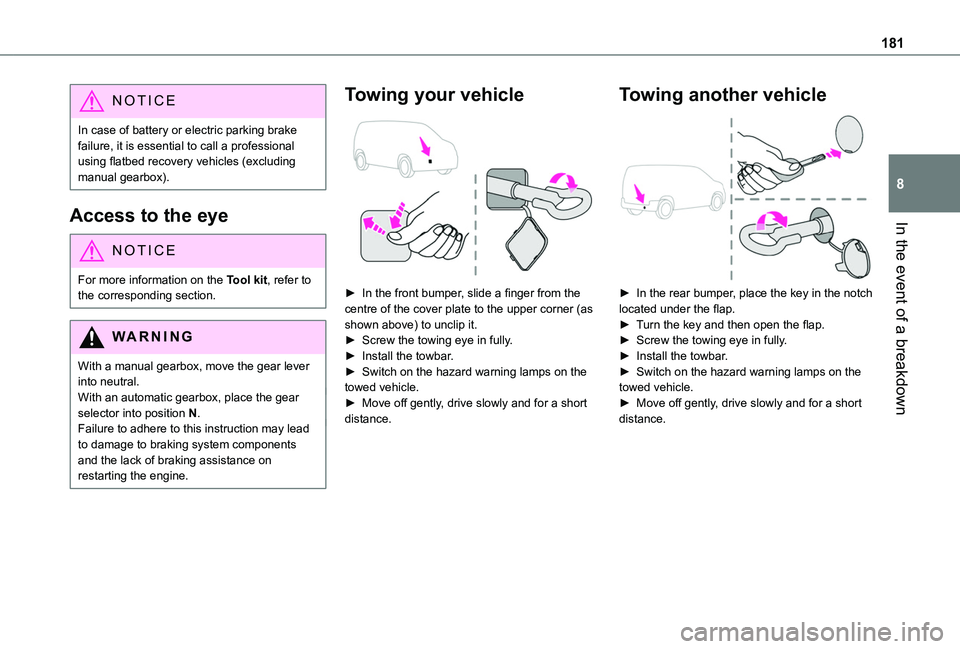
► In the front bumper, slide a finger from the centre of the cover plate to the upper corner (as shown above) to unclip it.► Screw the towing eye in fully.► Install the towbar.► Switch on the hazard warning lamps on the towed vehicle.► Move off gently, drive slowly and for a short distance.
Towing another vehicle
► In the rear bumper, place the key in the notch located under the flap.► Turn the key and then open the flap.► Screw the towing eye in fully.► Install the towbar.► Switch on the hazard warning lamps on the towed vehicle.► Move off gently, drive slowly and for a short distance.
Page 193 of 272
193
Bluetooth® audio system
10
Menus
Depending on version."Multimedia": Media settings, Radio settings."Telephone": Call, Directory management, Telephone management, Hang up."Trip computer".
"Maintenance": Diagnosis, Warning log, etc."Connections": Manage connections, search for devices."Personalisation-configuration": Define the vehicle parameters, Choice of language, Display configuration, Choice of units, Date and time adjustment.Press the "MENU" button.
Move from one menu to another.
Enter a menu.
Radio
Selecting a station
Press the SOURCE button repeatedly and select the radio.Press this button to select a waveband (FM / AM / DAB).
Press one of the buttons for an automatic search for radio stations.Press one of the buttons to carry out a manual search up / down for radio frequencies.Press this button to display the list of stations received locally.To update this list, press for more than two seconds. The sound is cut while updating.
RDS
NOTIC E
The external environment (hills, buildings, tunnels, basement car parks, etc.) may block reception, including in RDS mode. This is a normal effect of the way in which radio waves are transmitted and does not indicate any failure of the audio equipment.
NOTIC E
If RDS is not available, the RDS symbol appears struck out in the screen.
WARNI NG
The RDS, if activated, enables you to continue listening to the same station by automatic retuning to alternative frequencies. However, in certain conditions, coverage of
an RDS station may not be assured throughout the entire country as radio stations do not cover 100% of the territory. This explains the loss of reception of the station during a journey.
Short procedure
In "Radio" mode, press the OK button to activate or deactivate RDS directly.
Long procedure
Press the MENU button.
Select "Audio functions".
Press OK.
Select the "FM waveband preferences" function.Press OK.
Select "Frequency tracking (RDS)".
Press OK, RDS is displayed on the screen.
Play TA messages
WARNI NG
The TA (Traffic Announcement) function gives priority to TA alert messages. To operate, this
Page 228 of 272
228
Select "Wi-Fi network connection".
Select the "Secured", "Not secured" or "Stored” tab.Select a network.
Using the virtual keypad, enter the Wi-Fi network "Key” and "Password".Press "OK" to establish a connection between the smartphone and the vehicle’s system.
NOTIC E
Usage restrictions:– With CarPlay®, connection sharing is only available with a Wi-Fi connection.– With MirrorLinkTM, connection sharing is only available with a USB connection.The quality of services depends on the quality of the network connection.
Authorize sending
information
Press Settings to display the main page.
Press the "OPTIONS" button to access the secondary page.Select "System configuration".
Select the "Private mode” tab.
ORPress "Notifications".
Press "Private mode".
THENActivate or deactivate:
– "No sharing (data, vehicle position)".– “Only data sharing"– "Sharing data and vehicle position"
Settings specific to
connected navigation
Press Navigation to display the main page.Press the "MENU" button to access the secondary page.Select "Settings".
Select the "Map” tab.
Activate or deactivate:– "Allow declaration of danger zones".– "Guidance to final destination on foot".These settings must be configured for each profile.Press “OK” to confirm your selection.
Select the "Alerts” tab.
Activate or deactivate:
– "Advise of car park nearby".– "Filling station alert".– “Risk areas alert" then press the warning icon (triangle) to configure alerts.– "Give an audible warning".– "Advise proximity of POI 1".– "Advise proximity of POI 2".Press “OK” to confirm your selection.
NOTIC E
The "Notifications", in the upper bar, can be accessed at any time.
NOTIC E
Danger zone alerts may or may not be displayed, depending on the applicable legislation and subscription to the corresponding service.
When "TOMTOM TRAFFIC” appears, the services are available.
NOTIC E
The services offered with connected navigation are as follows.A Connected Services pack:– Weather,
Page 241 of 272
241
TOYOTA Connect Nav
12
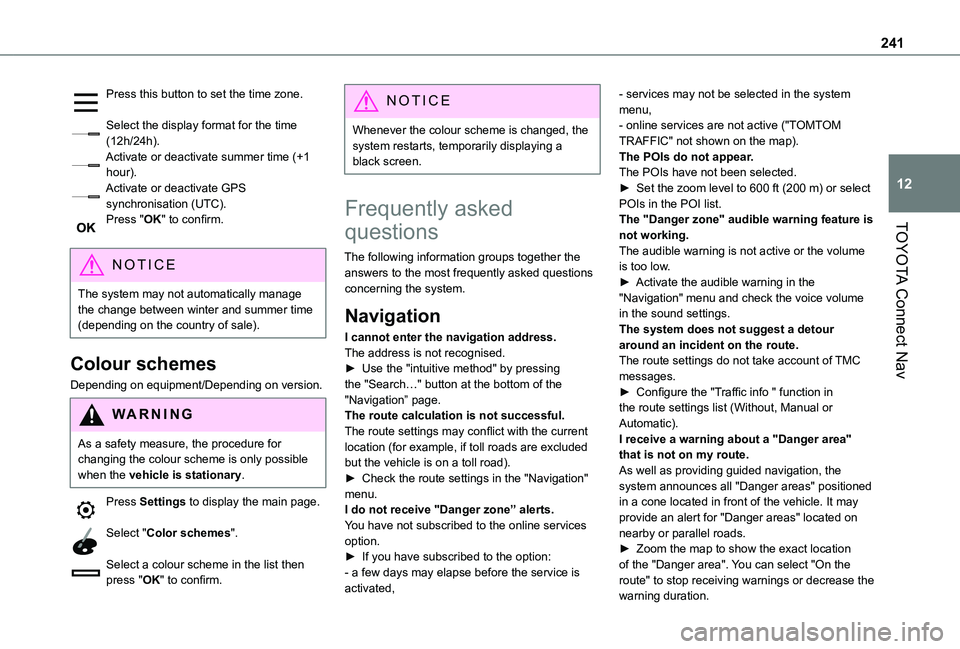
Press this button to set the time zone.
Select the display format for the time (12h/24h).Activate or deactivate summer time (+1 hour).Activate or deactivate GPS synchronisation (UTC).Press "OK" to confirm.
NOTIC E
The system may not automatically manage the change between winter and summer time (depending on the country of sale).
Colour schemes
Depending on equipment/Depending on version.
WARNI NG
As a safety measure, the procedure for changing the colour scheme is only possible when the vehicle is stationary.
Press Settings to display the main page.
Select "Color schemes".
Select a colour scheme in the list then press "OK" to confirm.
NOTIC E
Whenever the colour scheme is changed, the system restarts, temporarily displaying a black screen.
Frequently asked
questions
The following information groups together the answers to the most frequently asked questions concerning the system.
Navigation
I cannot enter the navigation address.The address is not recognised.► Use the "intuitive method" by pressing the "Search…" button at the bottom of the "Navigation” page.The route calculation is not successful.The route settings may conflict with the current
location (for example, if toll roads are excluded but the vehicle is on a toll road).► Check the route settings in the "Navigation" menu.I do not receive "Danger zone” alerts.You have not subscribed to the online services option.► If you have subscribed to the option:- a few days may elapse before the service is activated,
- services may not be selected in the system menu,- online services are not active ("TOMTOM TRAFFIC" not shown on the map).The POIs do not appear.The POIs have not been selected.► Set the zoom level to 600 ft (200 m) or select POIs in the POI list.The "Danger zone" audible warning feature is not working.The audible warning is not active or the volume is too low.► Activate the audible warning in the "Navigation" menu and check the voice volume in the sound settings.The system does not suggest a detour around an incident on the route.The route settings do not take account of TMC messages.► Configure the "Traffic info " function in the route settings list (Without, Manual or Automatic).I receive a warning about a "Danger area"
that is not on my route.As well as providing guided navigation, the system announces all "Danger areas" positioned in a cone located in front of the vehicle. It may provide an alert for "Danger areas" located on nearby or parallel roads.► Zoom the map to show the exact location of the "Danger area". You can select "On the route" to stop receiving warnings or decrease the
warning duration.
Page 245 of 272
245
Alphabetical index
A
ABS 78Accessories 75, 100Access to the spare wheel 166Active Safety Brake 128–130AdBlue® 157AdBlue® tank 158Additive, Diesel 155–156Adjusting headlamps 71Adjusting head restraints 48Adjusting seat 42Adjusting the air distribution 60Adjusting the air flow 60Adjusting the date 216, 240Adjusting the height and reach of the steering wheel 44Adjusting the lumbar support 42Adjusting the temperature 60Adjusting the time 215, 240Advanced Grip Control 80–81Advice on care and maintenance 160
Advice on driving 7, 95–96Airbags 85, 87–88, 90Airbags, curtain 86–88Airbags, front 85–87, 91Airbags, lateral 86–87Air conditioning 58, 61Air conditioning, digital 62Air conditioning, dual-zone automatic 60Air conditioning, manual 59, 62Air intake 60
Air vents 58Alarm 37–39Alarm, volumetric 37Android Auto connection 231Anti-lock braking system (ABS) 78–79Antitheft / Immobiliser 24Apple CarPlay connection 2 11, 230Applications 231Area, loading 25, 33–34, 52Armrest 42Armrest, front 48Assistance call 75–77Assistance, emergency braking 79, 130Audible warning 78Audio streaming (Bluetooth) 197, 210, 235
B
Battery 150, 177, 179Battery, 12 V 155, 176–178Battery, charging 178–179
Battery, remote control 31–32, 65Blind spot monitoring system 135Blind spot monitoring system, active 136Blind spot sensors 134, 136Bluetooth (hands-free) 198–199, 212–213, 236–237Bluetooth (telephone) 212–214, 236–237Bodywork 161Bonnet 151–152Boot lid 28, 31
Bottle holder 48Brake discs 156Brake lamps 173Brakes 156Braking assistance system 78–79Braking, automatic emergency 128–130Braking, dynamic emergency 102–103Brightness 215Bulbs 170Bulbs (changing) 169–170Bulbs (changing, type) 170
C
Capacity, fuel tank 144–145Cap, fuel filler 144–145Care of the bodywork 161CD 196, 210CD, MP3 196–197, 210Central locking 24, 28Changing a bulb 169–170
Changing a fuse 174–176Changing a wheel 163, 165Changing a wiper blade 73Changing the remote control battery 31Charger, induction 50Charger, wireless 50Checking the levels 153–154Checking tyre pressures (using the kit) 163, 165Checks 152, 155–156Checks, routine 155–156
Page 246 of 272
246
Child lock 93Children 84, 92Children (safety) 93Child seats 84, 88–89, 91–92Child seats, conventional 91Cleaning (advice) 160–161Closing the doors 24, 28Collision Risk Alert 128–129Connected applications 231Connection, Bluetooth 199, 212–214, 231–232, 236–237Connection, MirrorLink 2 11–212, 230Connection, Wi-Fi network 232Connectivity 230Container, AdBlue® 158Control, emergency boot release 31Control, emergency door 23, 30Control, heated seats 43Control lever, lighting 67, 69Control lever, wipers 71–74Courtesy lamp 66Courtesy lamp, front 66
Courtesy lamp, rear 66Courtesy lamps 66Cruise control 11 8–11 9, 121, 123–124, 128Cruise control, adaptive 124Cruise control by speed limit recognition 11 8–11 9Cruise control, dynamic with Stop function 11 8–11 9Cup holder 48
D
DAB (Digital Audio Broadcasting) - Digital radio 194–195, 209, 234Date (setting) 216, 240Daytime running lamps 69, 170–171Deactivating the passenger airbag 85–86, 90–91Deactivation of DSC (ESC) 79Deadlocking 29Defrosting 45, 62Demisting 62Demisting, rear 44, 63Demisting, rear screen 44, 63Dimensions 182Dipstick 153Direction indicators 68–69, 170, 172–173Display, head-up 11 3–11 4Doors, side 35Doors, side-hinged 28–29Driver’s attention warning 136–137Driving 95–96
Driving abroad 68Driving aids camera (warnings) 11 5Driving aids (recommendations) 11 4Driving economically 7Dynamic stability control (DSC) 79, 81
E
EBFD 78
Eco-driving (advice) 7Economy mode 150Electric windows 39Electronic brake force distribution (EBFD) 78–79Emergency braking assistance (EBA) 79Emergency call 75–77Emergency warning lamps 78Emissions control system, SCR 157Energy economy mode 150Engine compartment 152Engine, Diesel 144, 152, 162, 189Engine, petrol 152, 188Engines 187–189Environment 7, 32, 65ESC (electronic stability control) 78Expanded traffic sign recognition 11 9
F
Fatigue detection 136–137Filling the AdBlue® tank 155, 158
Filling the fuel tank 144–145Filter, air 155Filter, oil 155Filter, particle 155–156Filter, passenger compartment 58, 155Finisher 169Fitting a wheel 166–169Fitting roof bars 150–151Fittings, interior 48Flap, fuel filler 144–145
Page 247 of 272
247
Alphabetical index
Flap, removable 53–54Flashing indicators 68–69, 173Fluid, brake 154Fluid, engine coolant 154Foglamp, rear 173Foglamps 172Foglamps, front 67, 170Foglamps, rear 67Folding the rear seats 47Frequency (radio) 233–234Fuel 7, 144Fuel consumption 7Fuel tank 144–146Fusebox, dashboard 174Fusebox, engine compartment 174, 176Fuses 174–176
G
Gauge, fuel 144–145Gearbox, automatic 100, 104–11 0, 155
Gearbox, manual 104–105, 11 0, 155Gear lever, automatic gearbox 105–108Gear lever, manual gearbox 104–105Gear shift indicator ~ Gear efficiency indicator 109Glove box 48G.P.S. 226
H
Hazard warning lamps 78headlamp adjustment 71Headlamp adjustment 71Headlamps, automatic dipping 70–71, 135Headlamps, automatic illumination 68–70Headlamps, dipped beam 67, 170–171Headlamps, halogen 170Headlamps, main beam 67, 170, 172Head restraints, front 48Head restraints, rear 47Head-up display 11 3–11 4Heating 58–59, 62–65Heating, additional 37, 63–65Heating, programmable 37, 63–65Hill Assist Descent Control (HADC) 82–83Hill Descent Control 82–83Hill start assist 104Horn 78
I
Ignition 99–100, 238Ignition on 100Immobiliser, electronic 96Indicator, coolant temperature 16Indicator lamps, operation 67Indicators, direction 68Inflating tyres 156, 190
Inflating tyres and accessories (using the kit) 163, 165Infrared camera 11 5Instrument panel 9, 11 6Internet browser 227, 231
J
Jack 165Jump starting 177
K
Key 23–24, 26–28, 30Key, electronic 23–24, 100Keyless Entry and Starting 23, 25–28, 98–99Key with remote control 28Kit, hands-free 198–199, 212–213, 236–237Kit, puncture repair 162Kit, temporary puncture repair 162–163, 165
L
Labels 4Labels, identification 190Lamps, parking 69Lamps, rear 173Lane departure warning active 131, 136LEDs - Light-emitting diodes 69, 170