2020 TOYOTA PROACE CITY gearbox
[x] Cancel search: gearboxPage 122 of 272
122
allow running at a constant speed and keeping an adequate safety distance.Remain vigilant when the cruise control is activated. If you hold one of the speed setting modification buttons, a very rapid change in the speed of your vehicle may occur.When descending a steep hill, the cruise control system cannot prevent the vehicle from exceeding the set speed. Brake if necessary to control the speed of your vehicle.On steep climbs or when towing, the set speed may not be reached or maintained.
NOTIC E
Exceeding the programmed speed settingYou can temporarily exceed the speed setting by pressing the accelerator pedal (the programmed speed flashes).To return to the speed setting, release the accelerator pedal (when the set speed is
reached again, the displayed speed stops flashing).
WARNI NG
Operating limitsNever use the system in the following situations:– in an urban area with the risk of
pedestrians crossing the road,
– in heavy traffic,– on winding or steep roads,– on slippery or flooded roads,– in unfavourable climatic conditions,– driving on a speed circuit,– driving on a rolling road,– use of snow chains, non-slip covers or studded tyres.
Programmable cruise
control
Refer to the General recommendations on the use of driving and manoeuvring aids and to Cruise control - particular recommendations.This system automatically keeps the vehicle’s speed at the cruise value programmed by the driver (speed setting), without using the accelerator pedal.The cruise control is switched on manually.It requires a minimum vehicle speed of 40 km/h (25 mph).
With a manual gearbox, third gear or higher must be engaged.With an automatic gearbox, mode D or second gear or higher in mode M must be engaged.
NOTIC E
The cruise control remains active after changing gear, regardless of the gearbox type, on engines fitted with Stop & Start.
NOTIC E
Switching off the ignition cancels any speed setting.
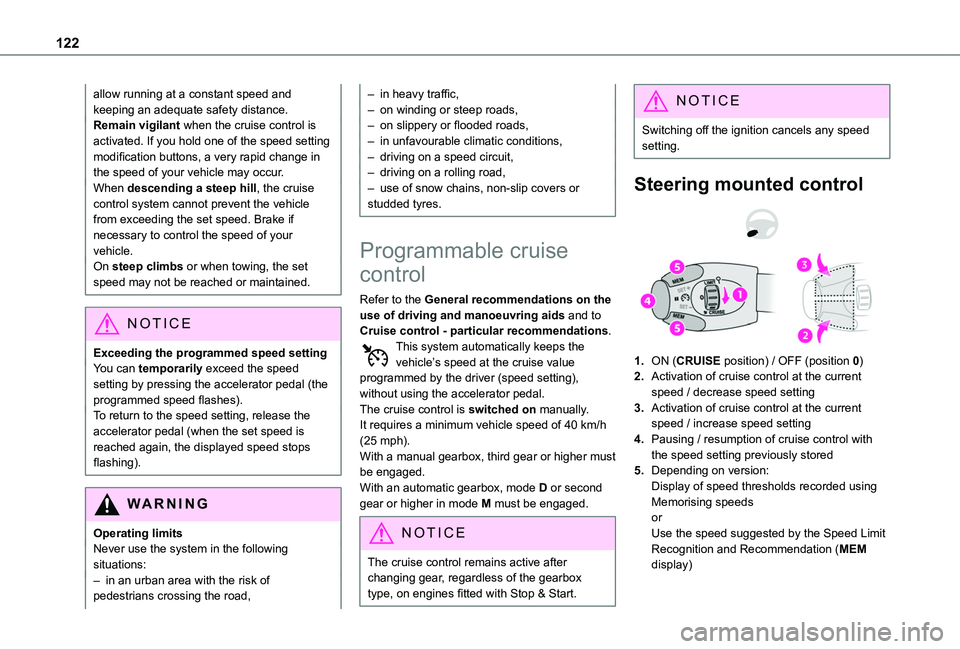
Steering mounted control
1.ON (CRUISE position) / OFF (position 0)
2.Activation of cruise control at the current speed / decrease speed setting
3.Activation of cruise control at the current speed / increase speed setting
4.Pausing / resumption of cruise control with the speed setting previously stored
5.Depending on version:Display of speed thresholds recorded using Memorising speedsorUse the speed suggested by the Speed Limit Recognition and Recommendation (MEM display)
Page 125 of 272
125
Driving
6
To do so, it has a camera located at the top of the windscreen and, depending on version, a radar located in the front bumper.
WARNI NG
Primarily designed for driving on main roads and motorways, this system only works with moving vehicles driving in the same direction as your vehicle.
NOTIC E
If the driver operates a direction indicator to overtake a slower vehicle, the cruise control allows the vehicle to temporarily approach the vehicle in front to assist the overtaking manoeuvre, without ever exceeding the speed setting.
WARNI NG
Some vehicles present on the road may not be properly seen or may be poorly interpreted by the camera and/or radar (e.g. a lorry), which may lead to a poor assessment of the distances and lead to the vehicle inappropriately accelerating or braking.
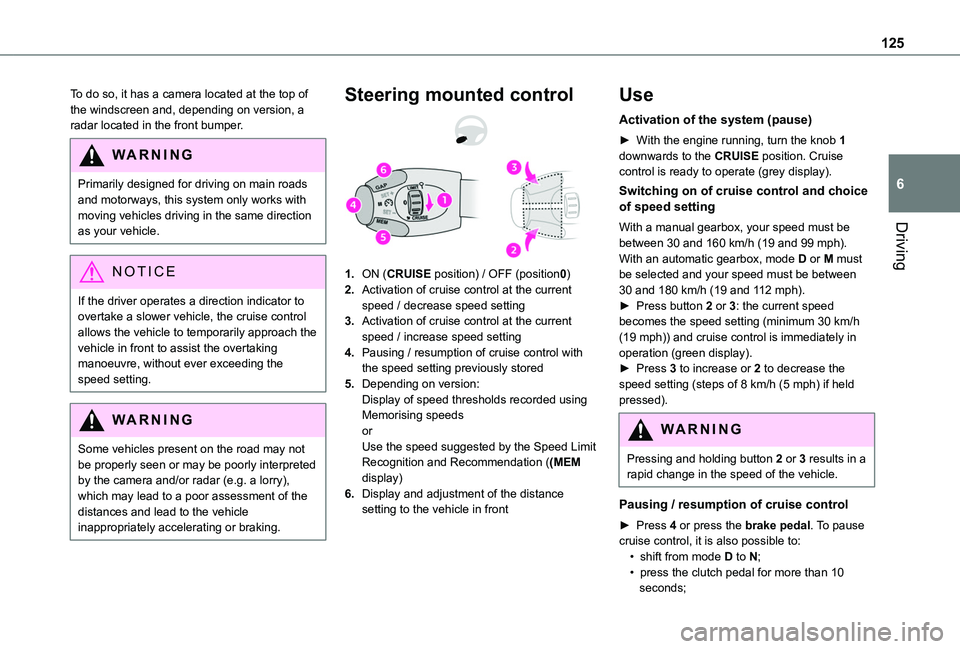
Steering mounted control
1.ON (CRUISE position) / OFF (position0)
2.Activation of cruise control at the current speed / decrease speed setting
3.Activation of cruise control at the current speed / increase speed setting
4.Pausing / resumption of cruise control with the speed setting previously stored
5.Depending on version:Display of speed thresholds recorded using Memorising speedsorUse the speed suggested by the Speed Limit Recognition and Recommendation ((MEM display)
6.Display and adjustment of the distance setting to the vehicle in front
Use
Activation of the system (pause)
► With the engine running, turn the knob 1 downwards to the CRUISE position. Cruise control is ready to operate (grey display).
Switching on of cruise control and choice of speed setting
With a manual gearbox, your speed must be between 30 and 160 km/h (19 and 99 mph).With an automatic gearbox, mode D or M must be selected and your speed must be between 30 and 180 km/h (19 and 112 mph).► Press button 2 or 3: the current speed becomes the speed setting (minimum 30 km/h (19 mph)) and cruise control is immediately in operation (green display).► Press 3 to increase or 2 to decrease the speed setting (steps of 8 km/h (5 mph) if held pressed).
WARNI NG
Pressing and holding button 2 or 3 results in a rapid change in the speed of the vehicle.
Pausing / resumption of cruise control
► Press 4 or press the brake pedal. To pause cruise control, it is also possible to:• shift from mode D to N;• press the clutch pedal for more than 10 seconds;
Page 126 of 272
126
• press the electric parking brake control;► Press 4 to restart cruise control. Cruise control may have been paused automatically:• when the speed of the vehicle goes below 30 km/h (19 mph) with a manual gearbox;• when the speed of the engine goes below 1100 rpm with a manual gearbox;• by triggering of the ESC system.With a manual gearbox, the driver should press the accelerator pedal to move off, then above 30 km/h (19 mph), reactivate the system by pressing one of the buttons 2, 3 or 4.With an automatic gearbox, following braking of the vehicle bringing it to a complete stop, the system holds the vehicle stationary; the cruise control is paused. The driver should press the accelerator pedal to move off, then above 30 km/h (19 mph), reactivate the system by pressing one of the buttons 2, 3 or 4.If the driver takes no action following this immobilisation, the electric parking brake is applied automatically after about 5 minutes.
N OTIC E
Cruise control remains active after changing gear regardless of the gearbox type.
WARNI NG
When the driver attempts to reactivate cruise control which was paused, the message "Activation not possible, unsuitable
conditions" is briefly displayed if reactivation is not possible (safety conditions not met).
Modifying the programmed speed setting with the Speed Limit Recognition and Recommendation function
► Press 5 to accept the speed suggested by the function in the instrument panel, then press again to confirm.
WARNI NG
To prevent any sudden acceleration or deceleration of the vehicle, select a speed setting fairly close to the current speed of the vehicle.
Changing the inter-vehicle distance
► Press 6 to display the distance setting thresholds (“Distant”, “Normal”, “Close“), then press again to select a threshold.After a few seconds, the option is accepted and will be memorised when the ignition is switched off.
Temporarily exceeding the speed setting
► Press the accelerator pedal fully. Distance monitoring and cruise control are deactivated as long as acceleration is maintained. "Cruise control suspended" is displayed.
System deactivation
► Turn knob 1 upwards to the OFF position.
Displays in the instrument
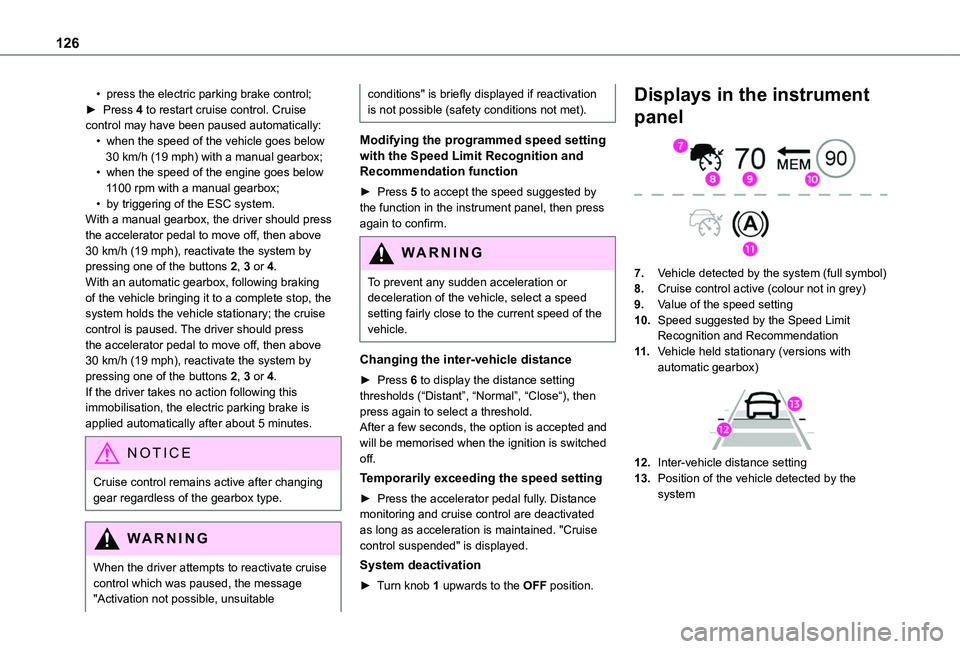
panel
7.Vehicle detected by the system (full symbol)
8.Cruise control active (colour not in grey)
9.Value of the speed setting
10.Speed suggested by the Speed Limit Recognition and Recommendation
11 .Vehicle held stationary (versions with automatic gearbox)
12.Inter-vehicle distance setting
13.Position of the vehicle detected by the system
Page 130 of 272

130
Level 1 (orange): visual alert only, signalling that the vehicle in front is very close.The message "Vehicle close" is displayed.Level 2 (red): visual and audible alert, signalling that a collision is imminent.The message "Brake!" is displayed.Level 3: finally, in some cases, a haptic alert in the form of micro-braking can be given, confirming the risk of collision.
NOTIC E
Where the speed of your vehicle is too high approaching another vehicle, the first level of alert may not be displayed: the level 2 alert may be displayed directly.Important: the level 1 alert is never displayed for a stationary obstacle or when the "Close" trigger threshold has been selected.
Modifying the alert trigger threshold
This threshold determines how you wish to be warned of the presence of a moving or stationary vehicle in front of you, or a pedestrian present in your traffic lane.The current threshold can be modified via the vehicle configuration menu.You can select one of three pre-defined thresholds:– "Distant",
– "Normal",– "Close".The last threshold selected is memorised when the ignition is switched off.
Intelligent emergency
braking assistance
If the driver brakes, but not sufficiently to avoid a collision, this system will supplement the braking, within the limits of the laws of physics.This assistance will only be provided if you press the brake pedal.
Active Safety Brake
This function, also called automatic emergency braking, intervenes following the alerts if the
driver does not react quickly enough and does not operate the vehicle's brakes.It aims to reduce the speed of impact or avoid a collision where the driver fails to react.
Operation
The system operates under the following conditions:– The vehicle's speed does not exceed 60 km/h (37 mph) when a pedestrian is detected.– The vehicle's speed does not exceed 80 km/h (50 mph) when a stationary vehicle is detected.– The vehicle's speed is between 10 km/h and 85 km/h (6 mph and 53 mph) when a moving vehicle is detected.This warning lamp flashes (for about 10 seconds) once the function is acting on the vehicle's brakes.With an automatic gearbox, in the event of automatic emergency braking until the vehicle comes to a complete stop, keep the brake pedal pressed down to prevent the vehicle from starting off again.
With a manual gearbox, in the event of automatic emergency braking until the vehicle comes to a complete stop, the engine may stall.
NOTIC E
The driver can maintain control of the vehicle at any time by sharply turning the steering wheel and/or pressing the accelerator pedal.
Page 140 of 272
140
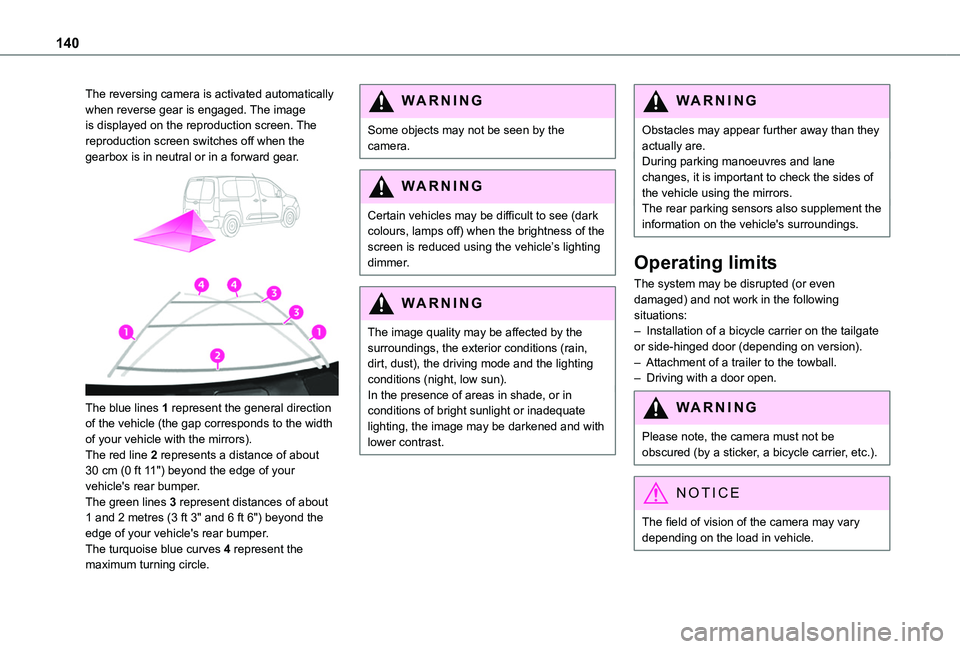
The reversing camera is activated automatically when reverse gear is engaged. The image is displayed on the reproduction screen. The reproduction screen switches off when the gearbox is in neutral or in a forward gear.
The blue lines 1 represent the general direction of the vehicle (the gap corresponds to the width of your vehicle with the mirrors).The red line 2 represents a distance of about 30 cm (0 ft 11") beyond the edge of your vehicle's rear bumper.The green lines 3 represent distances of about 1 and 2 metres (3 ft 3" and 6 ft 6") beyond the edge of your vehicle's rear bumper.
The turquoise blue curves 4 represent the maximum turning circle.
WARNI NG
Some objects may not be seen by the camera.
WARNI NG
Certain vehicles may be difficult to see (dark colours, lamps off) when the brightness of the
screen is reduced using the vehicle’s lighting dimmer.
WARNI NG
The image quality may be affected by the surroundings, the exterior conditions (rain, dirt, dust), the driving mode and the lighting conditions (night, low sun).In the presence of areas in shade, or in conditions of bright sunlight or inadequate lighting, the image may be darkened and with lower contrast.
WARNI NG
Obstacles may appear further away than they actually are.During parking manoeuvres and lane changes, it is important to check the sides of the vehicle using the mirrors.The rear parking sensors also supplement the information on the vehicle's surroundings.
Operating limits
The system may be disrupted (or even damaged) and not work in the following situations:– Installation of a bicycle carrier on the tailgate or side-hinged door (depending on version).– Attachment of a trailer to the towball.– Driving with a door open.
WARNI NG
Please note, the camera must not be obscured (by a sticker, a bicycle carrier, etc.).
NOTIC E
The field of vision of the camera may vary depending on the load in vehicle.
Page 155 of 272

155
Practical information
7
Diesel fuel additive (Diesel
with particle filter)
or On reaching the minimum level in the particle filter additive tank, this warning lamp comes on fixed, accompanied by an audible warning and a message warning that the additive level is too low.
Topping up
This additive must be topped up without delay by a TOYOTA dealer or a qualified workshop.
AdBlue (Diesel engines)
An alert is triggered when the reserve level is reached.For more information on the AdBlue range indicators, refer to the corresponding section.To avoid the vehicle being immobilised in accordance with regulations, you must top up the AdBlue tank.For more information on the Supply of AdBlue, refer to the corresponding section.
Checks
Unless otherwise indicated, check these components in accordance with the manufacturer's service schedule and according to your engine.Otherwise, have them checked by a TOYOTA dealer or a qualified workshop.
WARNI NG
Only use products recommended by TOYOTA or products of equivalent quality and specification.In order to optimise the operation of components as important as those in the braking system, TOYOTA selects and offers very specific products.
12 V battery
The battery does not require any maintenance.However, check regularly that the terminals are correctly tightened (versions without quick release terminals) and that the connections are clean.
NOTIC E
For more information on the precautions to take before any work on the 12 V battery, refer to the corresponding section.
WARNI NG
Versions equipped with Stop & Start are fitted with a 12 V lead-acid battery of specific technology and specification.Its replacement should be carried out only by a TOYOTA dealer or a qualified workshop.
Passenger compartment
filter
Depending on the environment and the use of the vehicle (e.g. dusty atmosphere, city driving), change it twice as often, if necessary.
NOTIC E
A clogged passenger compartment filter can adversely affect air conditioning system performance and generate undesirable odours.
Air filter
Depending on the environment and the use of the vehicle (e.g. dusty atmosphere, city driving), change it twice as often, if necessary.
Oil filter
Change the oil filter each time the engine oil is changed.
Manual gearbox
The gearbox does not require any maintenance (no oil change).
Automatic gearbox
The gearbox does not require any maintenance (no oil change).
Page 159 of 272
159
Practical information
7
WARNI NG
Important: in the event of a top-up after a breakdown because of a lack of AdBlue, it is essential to wait around 5 minutes before switching on the ignition, without opening the driver’s door, unlocking the vehicle, introducing the key into the ignition switch, or introducing the key of the “Keyless Entry and Starting ” system into the passenger compartment.Switch on the ignition, then wait for 10 seconds before starting the engine.
► Switch off the ignition and remove the key from the switch to switch off the engine.or► With Keyless Entry and Starting, press the "START/STOP" button to switch off the engine.
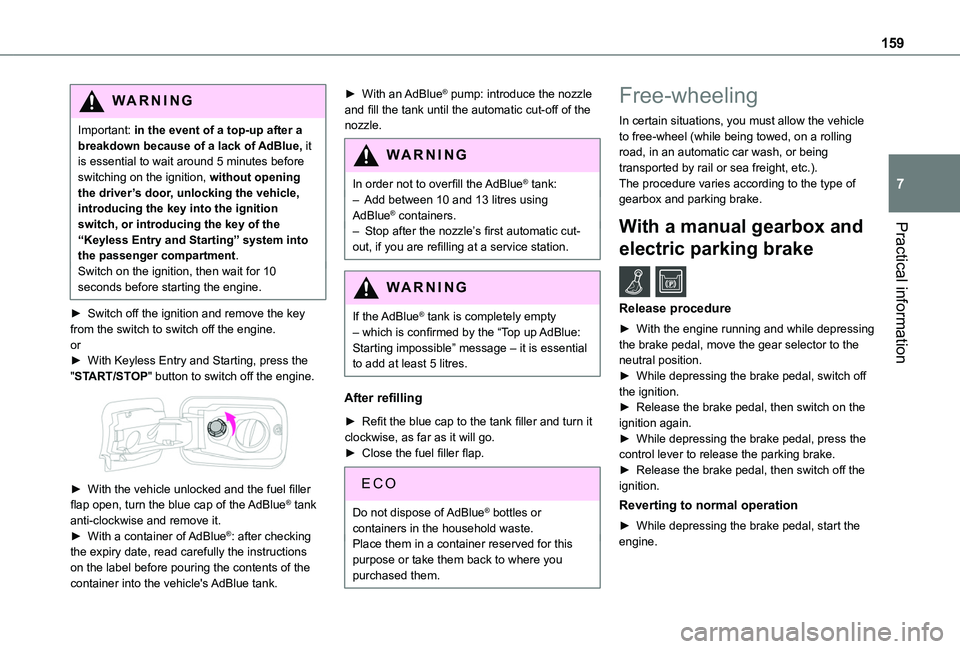
► With the vehicle unlocked and the fuel filler flap open, turn the blue cap of the AdBlue® tank anti-clockwise and remove it.► With a container of AdBlue®: after checking the expiry date, read carefully the instructions on the label before pouring the contents of the container into the vehicle's AdBlue tank.
► With an AdBlue® pump: introduce the nozzle and fill the tank until the automatic cut-off of the nozzle.
WARNI NG
In order not to overfill the AdBlue® tank:– Add between 10 and 13 litres using AdBlue® containers.– Stop after the nozzle’s first automatic cut-
out, if you are refilling at a service station.
WARNI NG
If the AdBlue® tank is completely empty – which is confirmed by the “Top up AdBlue: Starting impossible” message – it is essential to add at least 5 litres.
After refilling
► Refit the blue cap to the tank filler and turn it clockwise, as far as it will go.► Close the fuel filler flap.
Do not dispose of AdBlue® bottles or containers in the household waste.Place them in a container reserved for this
purpose or take them back to where you purchased them.
Free-wheeling
In certain situations, you must allow the vehicle to free-wheel (while being towed, on a rolling road, in an automatic car wash, or being transported by rail or sea freight, etc.).The procedure varies according to the type of gearbox and parking brake.
With a manual gearbox and
electric parking brake /
Release procedure
► With the engine running and while depressing the brake pedal, move the gear selector to the neutral position.► While depressing the brake pedal, switch off the ignition.► Release the brake pedal, then switch on the ignition again.► While depressing the brake pedal, press the
control lever to release the parking brake.► Release the brake pedal, then switch off the ignition.
Reverting to normal operation
► While depressing the brake pedal, start the engine.
Page 160 of 272
160
With an automatic gearbox
and electric parking brake /
Release procedure
► With the engine running and while depressing the brake pedal, set the gear selector to N.► While depressing the brake pedal, switch off the ignition.► Release the brake pedal, then switch on the ignition again.► While depressing the brake pedal, press the control lever to release the parking brake.► Release the brake pedal, then switch off the ignition.
Reverting to normal operation
► While depressing the brake pedal, start the engine.
NOTIC E
Keyless Entry and StartingYou must not depress the brake pedal while switching the ignition on or off. If you do, the engine will start, requiring you to restart the procedure.
Advice on care and
maintenance
General recommendations
Observe the following recommendations to avoid damaging your vehicle.
Exterior
WARNI NG
Never use a high-pressure jet wash in the engine compartment, due to the risk of damaging electrical components.Do not wash the vehicle in strong sunshine or extremely cold conditions.
NOTIC E
When washing the vehicle at an automatic roller-brush car wash, be sure to lock the doors and, depending on version, remove the electronic key.When using a pressure washer, hold the lance at least 30 cm (0 ft 11") from the vehicle (particularly when cleaning areas containing chipped paint, sensors or seals).Promptly clean up any stains containing
chemicals liable to damage the vehicle's paint (including tree resin, bird droppings, insect secretions, pollen and tar).
If justified by the environment, clean the vehicle more frequently to remove salty deposits (in coastal areas), soot (in industrial estates) and mud (in wet or cold areas). These substances can be highly corrosive.Contact a TOYOTA dealer or a qualified workshop if you require advice on removing stubborn stains requiring special products (such as tar or insect removers).Preferably, have paint touch-ups performed by a TOYOTA dealer or a qualified workshop.
Interior
WARNI NG
When washing the vehicle, never use a water hose or high-pressure washer to clean the interior.Liquids carried in cups or other open containers can spill, presenting a risk of damage if they come into contact with the controls in the dashboard and centre console. Take care!