2020 TOYOTA PROACE CITY trailer
[x] Cancel search: trailerPage 135 of 272
135
Driving
6
– flashing, after a delay of about one second, when overtaking a vehicle slowly, and when the direction indicator is used.
Activation / Deactivation
Activation or deactivation is set via the vehicle configuration menu.
NOTIC E
The system state remains in memory when the ignition is switched off.
NOTIC E
The system is automatically deactivated when towing with a towbar approved by TOYOTA.
Conditions for operation
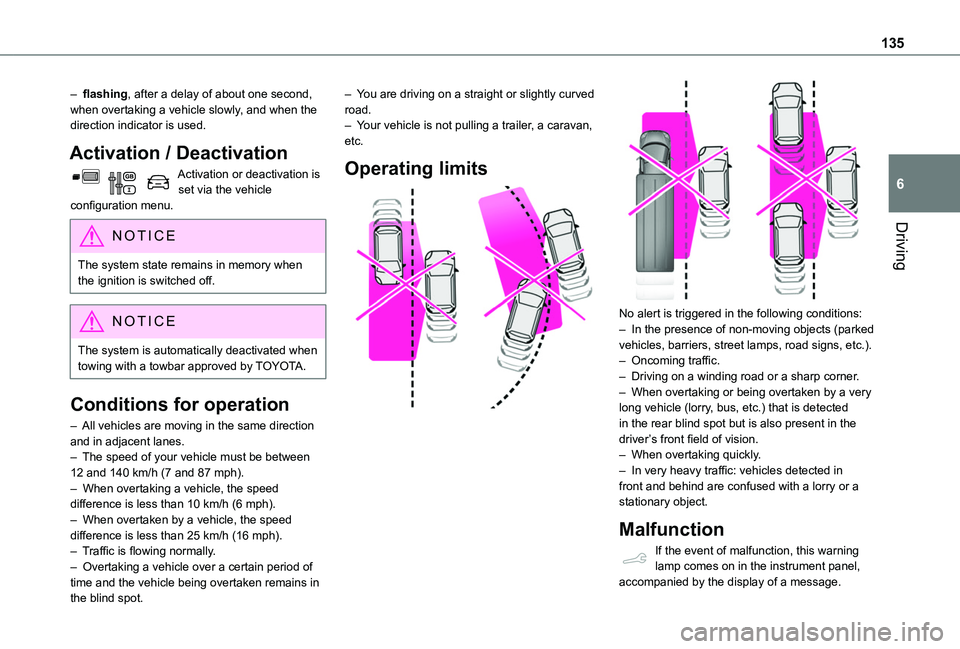
– All vehicles are moving in the same direction and in adjacent lanes.– The speed of your vehicle must be between 12 and 140 km/h (7 and 87 mph).– When overtaking a vehicle, the speed difference is less than 10 km/h (6 mph).– When overtaken by a vehicle, the speed difference is less than 25 km/h (16 mph).– Traffic is flowing normally.– Overtaking a vehicle over a certain period of time and the vehicle being overtaken remains in the blind spot.
– You are driving on a straight or slightly curved road.– Your vehicle is not pulling a trailer, a caravan, etc.
Operating limits
No alert is triggered in the following conditions:– In the presence of non-moving objects (parked vehicles, barriers, street lamps, road signs, etc.).– Oncoming traffic.– Driving on a winding road or a sharp corner.– When overtaking or being overtaken by a very long vehicle (lorry, bus, etc.) that is detected in the rear blind spot but is also present in the driver’s front field of vision.– When overtaking quickly.– In very heavy traffic: vehicles detected in front and behind are confused with a lorry or a stationary object.
Malfunction
If the event of malfunction, this warning lamp comes on in the instrument panel, accompanied by the display of a message.
Page 139 of 272
139
Driving
6
Side parking sensors
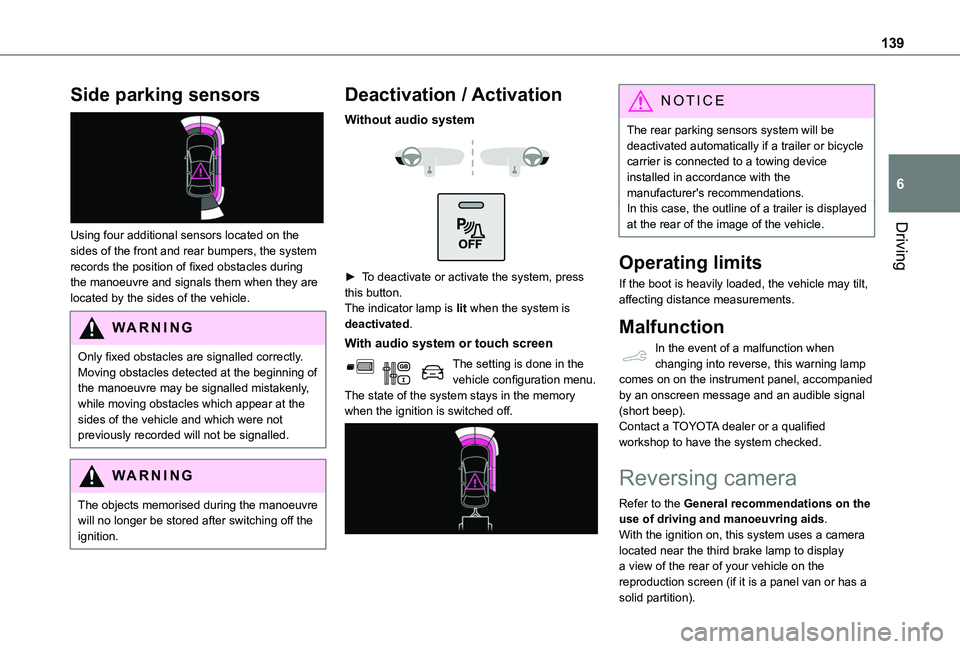
Using four additional sensors located on the sides of the front and rear bumpers, the system records the position of fixed obstacles during the manoeuvre and signals them when they are located by the sides of the vehicle.
WARNI NG
Only fixed obstacles are signalled correctly. Moving obstacles detected at the beginning of the manoeuvre may be signalled mistakenly, while moving obstacles which appear at the sides of the vehicle and which were not previously recorded will not be signalled.
WARNI NG
The objects memorised during the manoeuvre will no longer be stored after switching off the ignition.
Deactivation / Activation
Without audio system
► To deactivate or activate the system, press this button.The indicator lamp is lit when the system is deactivated.
With audio system or touch screen
The setting is done in the vehicle configuration menu.The state of the system stays in the memory when the ignition is switched off.
NOTIC E
The rear parking sensors system will be deactivated automatically if a trailer or bicycle carrier is connected to a towing device installed in accordance with the manufacturer's recommendations.In this case, the outline of a trailer is displayed at the rear of the image of the vehicle.
Operating limits
If the boot is heavily loaded, the vehicle may tilt, affecting distance measurements.
Malfunction
In the event of a malfunction when changing into reverse, this warning lamp comes on on the instrument panel, accompanied by an onscreen message and an audible signal (short beep).Contact a TOYOTA dealer or a qualified workshop to have the system checked.
Reversing camera
Refer to the General recommendations on the use of driving and manoeuvring aids.With the ignition on, this system uses a camera located near the third brake lamp to display a view of the rear of your vehicle on the reproduction screen (if it is a panel van or has a
solid partition).
Page 140 of 272
140
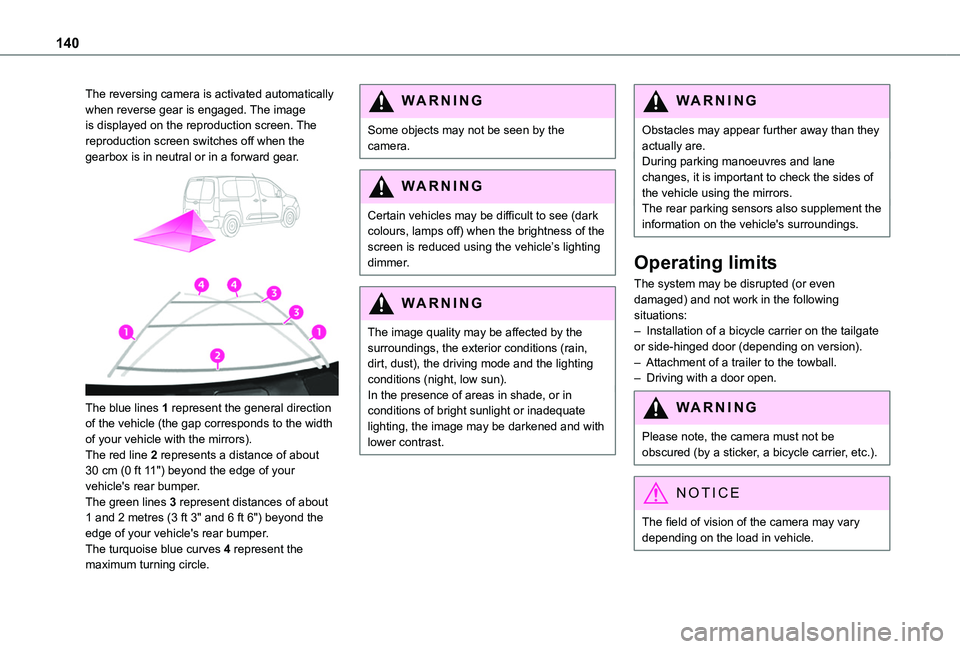
The reversing camera is activated automatically when reverse gear is engaged. The image is displayed on the reproduction screen. The reproduction screen switches off when the gearbox is in neutral or in a forward gear.
The blue lines 1 represent the general direction of the vehicle (the gap corresponds to the width of your vehicle with the mirrors).The red line 2 represents a distance of about 30 cm (0 ft 11") beyond the edge of your vehicle's rear bumper.The green lines 3 represent distances of about 1 and 2 metres (3 ft 3" and 6 ft 6") beyond the edge of your vehicle's rear bumper.
The turquoise blue curves 4 represent the maximum turning circle.
WARNI NG
Some objects may not be seen by the camera.
WARNI NG
Certain vehicles may be difficult to see (dark colours, lamps off) when the brightness of the
screen is reduced using the vehicle’s lighting dimmer.
WARNI NG
The image quality may be affected by the surroundings, the exterior conditions (rain, dirt, dust), the driving mode and the lighting conditions (night, low sun).In the presence of areas in shade, or in conditions of bright sunlight or inadequate lighting, the image may be darkened and with lower contrast.
WARNI NG
Obstacles may appear further away than they actually are.During parking manoeuvres and lane changes, it is important to check the sides of the vehicle using the mirrors.The rear parking sensors also supplement the information on the vehicle's surroundings.
Operating limits
The system may be disrupted (or even damaged) and not work in the following situations:– Installation of a bicycle carrier on the tailgate or side-hinged door (depending on version).– Attachment of a trailer to the towball.– Driving with a door open.
WARNI NG
Please note, the camera must not be obscured (by a sticker, a bicycle carrier, etc.).
NOTIC E
The field of vision of the camera may vary depending on the load in vehicle.
Page 143 of 272
143
Driving
6
NOTIC E
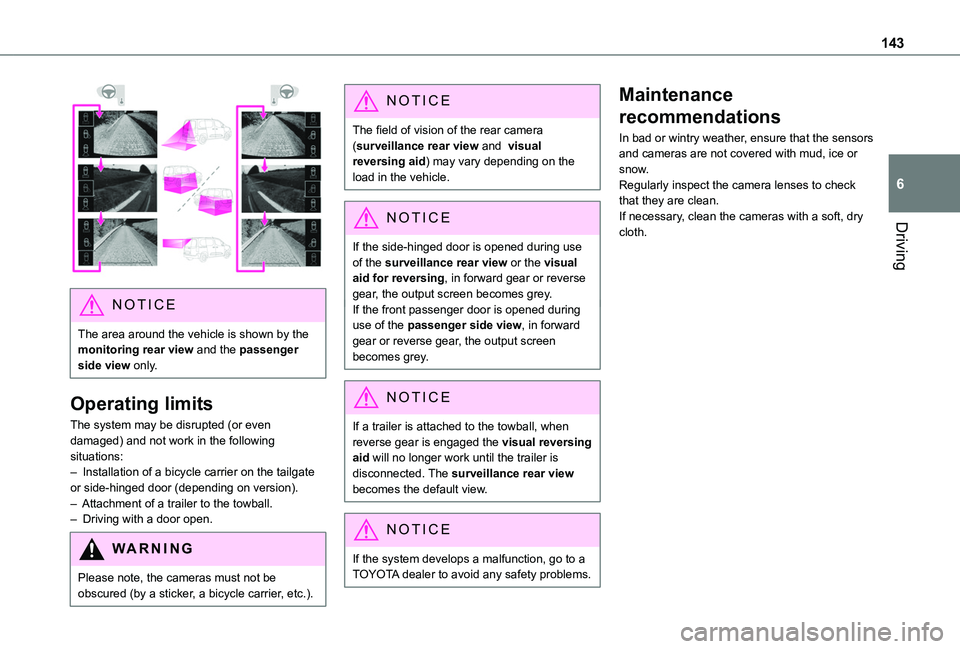
The area around the vehicle is shown by the monitoring rear view and the passenger side view only.
Operating limits
The system may be disrupted (or even damaged) and not work in the following situations:– Installation of a bicycle carrier on the tailgate or side-hinged door (depending on version).– Attachment of a trailer to the towball.– Driving with a door open.
WARNI NG
Please note, the cameras must not be obscured (by a sticker, a bicycle carrier, etc.).
NOTIC E
The field of vision of the rear camera (surveillance rear view and visual reversing aid) may vary depending on the load in the vehicle.
NOTIC E
If the side-hinged door is opened during use of the surveillance rear view or the visual aid for reversing, in forward gear or reverse gear, the output screen becomes grey.If the front passenger door is opened during use of the passenger side view, in forward gear or reverse gear, the output screen becomes grey.
NOTIC E
If a trailer is attached to the towball, when reverse gear is engaged the visual reversing aid will no longer work until the trailer is disconnected. The surveillance rear view becomes the default view.
NOTIC E
If the system develops a malfunction, go to a TOYOTA dealer to avoid any safety problems.
Maintenance
recommendations
In bad or wintry weather, ensure that the sensors and cameras are not covered with mud, ice or snow.Regularly inspect the camera lenses to check that they are clean.If necessary, clean the cameras with a soft, dry cloth.
Page 147 of 272
147
Practical information
7
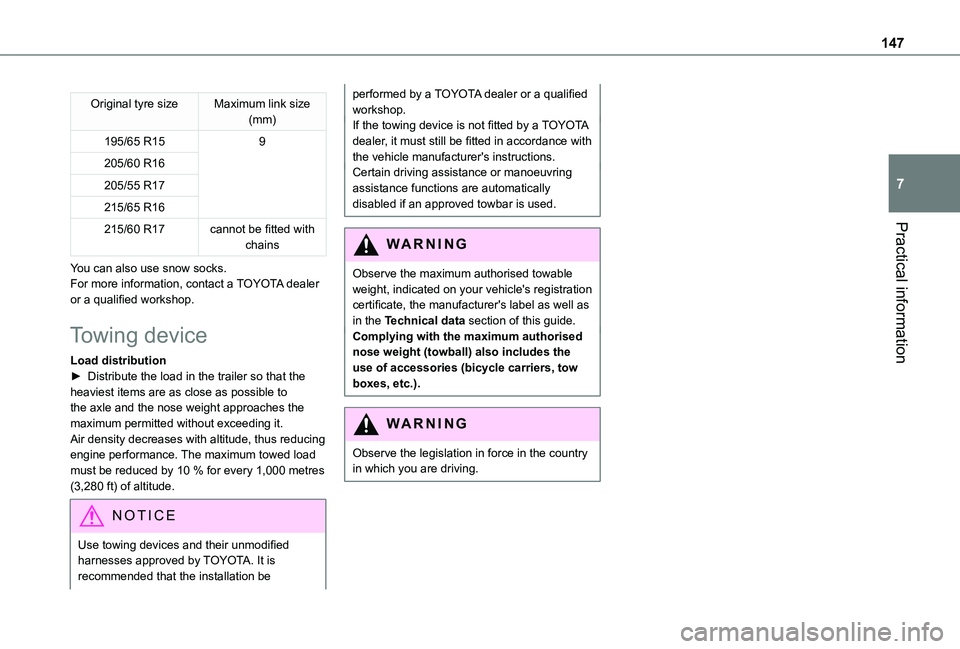
Original tyre sizeMaximum link size (mm)
195/65 R159
205/60 R16
205/55 R17
215/65 R16
215/60 R17cannot be fitted with chains
You can also use snow socks.For more information, contact a TOYOTA dealer or a qualified workshop.
Towing device
Load distribution► Distribute the load in the trailer so that the heaviest items are as close as possible to the axle and the nose weight approaches the maximum permitted without exceeding it.Air density decreases with altitude, thus reducing engine performance. The maximum towed load must be reduced by 10 % for every 1,000 metres (3,280 ft) of altitude.
NOTIC E
Use towing devices and their unmodified harnesses approved by TOYOTA. It is recommended that the installation be
performed by a TOYOTA dealer or a qualified workshop.If the towing device is not fitted by a TOYOTA dealer, it must still be fitted in accordance with the vehicle manufacturer's instructions.Certain driving assistance or manoeuvring assistance functions are automatically disabled if an approved towbar is used.
WARNI NG
Observe the maximum authorised towable weight, indicated on your vehicle's registration certificate, the manufacturer's label as well as in the Technical data section of this guide.Complying with the maximum authorised nose weight (towball) also includes the use of accessories (bicycle carriers, tow boxes, etc.).
WARNI NG
Observe the legislation in force in the country in which you are driving.
Page 148 of 272
148
Towing devices
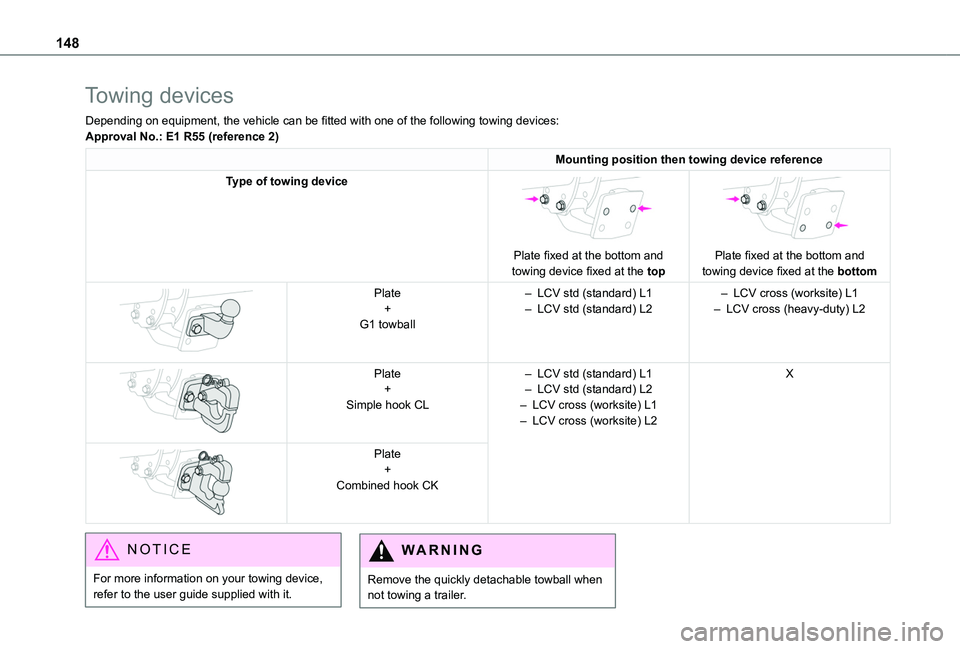
Depending on equipment, the vehicle can be fitted with one of the following towing devices:Approval No.: E1 R55 (reference 2)
Mounting position then towing device reference
Type of towing device
Plate fixed at the bottom and towing device fixed at the top
Plate fixed at the bottom and towing device fixed at the bottom
Plate+G1 towball
– LCV std (standard) L1– LCV std (standard) L2– LCV cross (worksite) L1– LCV cross (heavy-duty) L2
Plate+Simple hook CL
– LCV std (standard) L1– LCV std (standard) L2– LCV cross (worksite) L1– LCV cross (worksite) L2
X
Plate+Combined hook CK
NOTIC E
For more information on your towing device, refer to the user guide supplied with it.
WARNI NG
Remove the quickly detachable towball when not towing a trailer.
Page 149 of 272
149
Practical information
7
Overload indicator
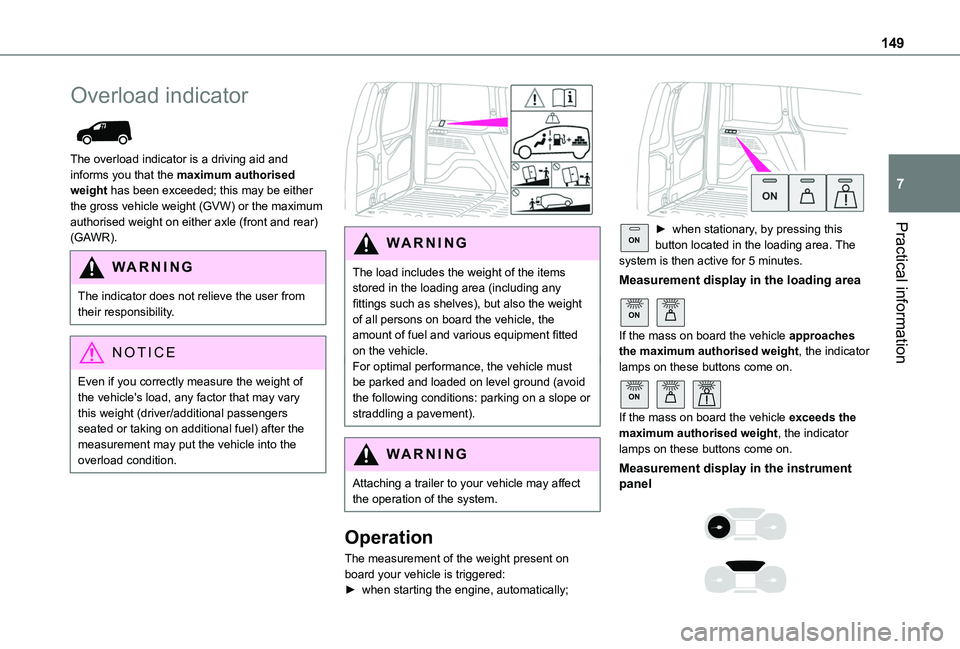
The overload indicator is a driving aid and informs you that the maximum authorised weight has been exceeded; this may be either the gross vehicle weight (GVW) or the maximum authorised weight on either axle (front and rear) (GAWR).
WARNI NG
The indicator does not relieve the user from their responsibility.
NOTIC E
Even if you correctly measure the weight of the vehicle's load, any factor that may vary this weight (driver/additional passengers seated or taking on additional fuel) after the measurement may put the vehicle into the overload condition.
WARNI NG
The load includes the weight of the items stored in the loading area (including any fittings such as shelves), but also the weight of all persons on board the vehicle, the amount of fuel and various equipment fitted on the vehicle.For optimal performance, the vehicle must be parked and loaded on level ground (avoid the following conditions: parking on a slope or straddling a pavement).
WARNI NG
Attaching a trailer to your vehicle may affect the operation of the system.
Operation
The measurement of the weight present on board your vehicle is triggered:► when starting the engine, automatically;
ON► when stationary, by pressing this button located in the loading area. The system is then active for 5 minutes.
Measurement display in the loading area
ON
If the mass on board the vehicle approaches the maximum authorised weight, the indicator lamps on these buttons come on.
ON
If the mass on board the vehicle exceeds the maximum authorised weight, the indicator
lamps on these buttons come on.
Measurement display in the instrument panel
Page 176 of 272
176
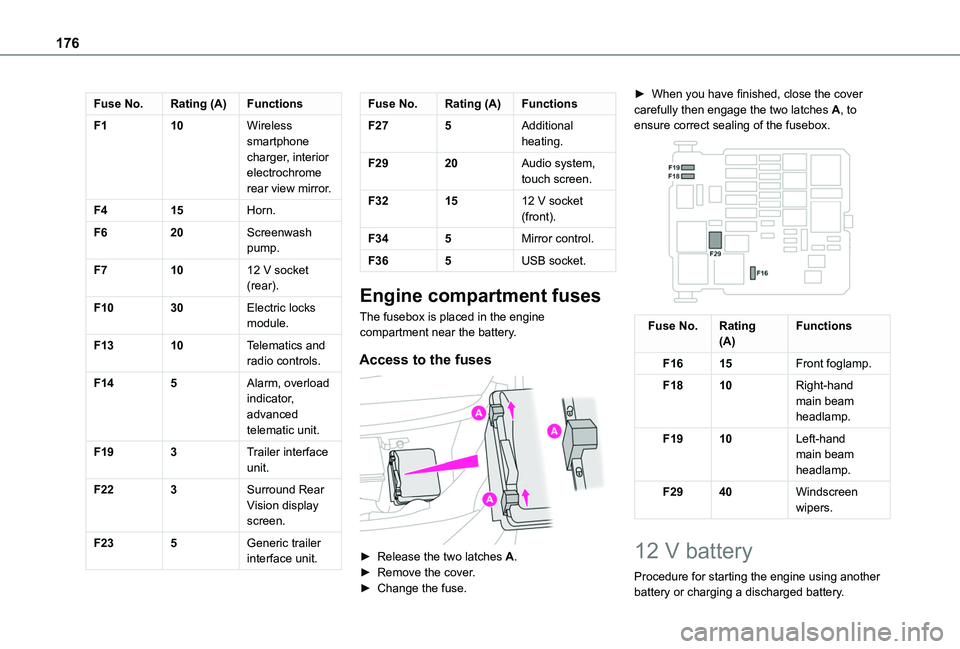
Fuse No.Rating (A)Functions
F110Wireless smartphone charger, interior electrochrome rear view mirror.
F415Horn.
F620Screenwash pump.
F71012 V socket (rear).
F1030Electric locks module.
F1310Telematics and radio controls.
F145Alarm, overload indicator, advanced telematic unit.
F193Trailer interface unit.
F223Surround Rear Vision display screen.
F235Generic trailer interface unit.
Fuse No.Rating (A)Functions
F275Additional heating.
F2920Audio system, touch screen.
F321512 V socket (front).
F345Mirror control.
F365USB socket.
Engine compartment fuses
The fusebox is placed in the engine compartment near the battery.
Access to the fuses
► Release the two latches A.► Remove the cover.► Change the fuse.
► When you have finished, close the cover carefully then engage the two latches A, to ensure correct sealing of the fusebox.
Fuse No.Rating(A)Functions
F1615Front foglamp.
F1810Right-hand main beam headlamp.
F1910Left-hand main beam headlamp.
F2940Windscreen wipers.
12 V battery
Procedure for starting the engine using another battery or charging a discharged battery.