2020 TOYOTA PROACE CITY maintenance
[x] Cancel search: maintenancePage 141 of 272
141
Driving
6
Maintenance
recommendations
In bad or wintry weather, ensure that the camera is not covered by mud, frost or snow.Check the cleanliness of the camera lens regularly.If necessary, clean the camera with a soft, dry cloth.When washing the vehicle using a high-pressure jet, keep the spray directed at least 30 cm (0 ft 11") away from the camera.
Surround Rear Vision
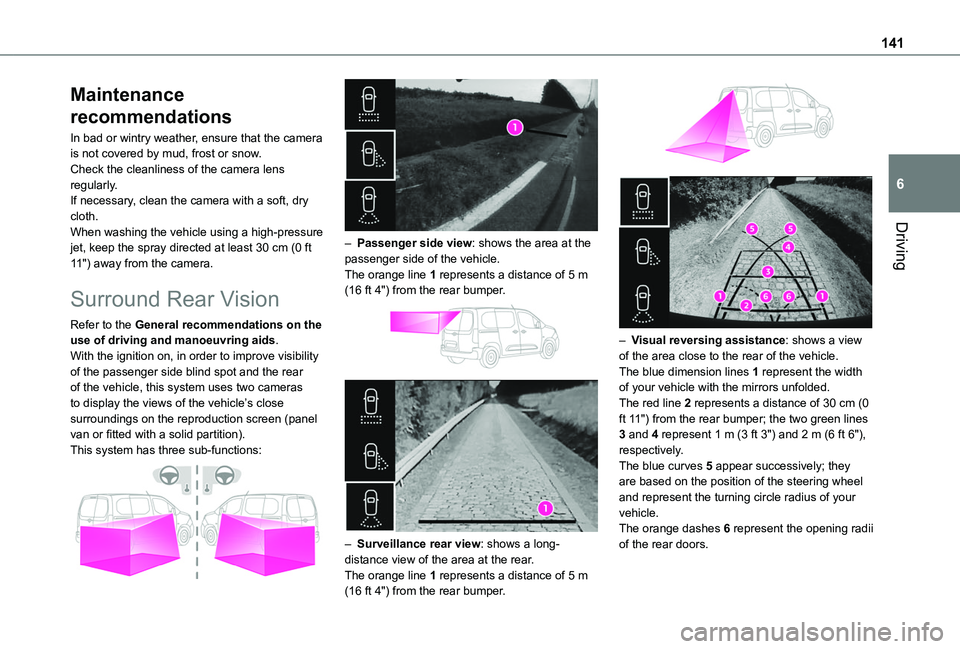
Refer to the General recommendations on the use of driving and manoeuvring aids.With the ignition on, in order to improve visibility of the passenger side blind spot and the rear of the vehicle, this system uses two cameras to display the views of the vehicle’s close surroundings on the reproduction screen (panel van or fitted with a solid partition).
This system has three sub-functions:
– Passenger side view: shows the area at the passenger side of the vehicle.The orange line 1 represents a distance of 5 m (16 ft 4") from the rear bumper.
– Surveillance rear view: shows a long-distance view of the area at the rear.The orange line 1 represents a distance of 5 m (16 ft 4") from the rear bumper.
– Visual reversing assistance: shows a view of the area close to the rear of the vehicle.The blue dimension lines 1 represent the width of your vehicle with the mirrors unfolded.The red line 2 represents a distance of 30 cm (0 ft 11") from the rear bumper; the two green lines 3 and 4 represent 1 m (3 ft 3") and 2 m (6 ft 6"), respectively.The blue curves 5 appear successively; they are based on the position of the steering wheel and represent the turning circle radius of your vehicle.The orange dashes 6 represent the opening radii of the rear doors.
Page 143 of 272
143
Driving
6
NOTIC E
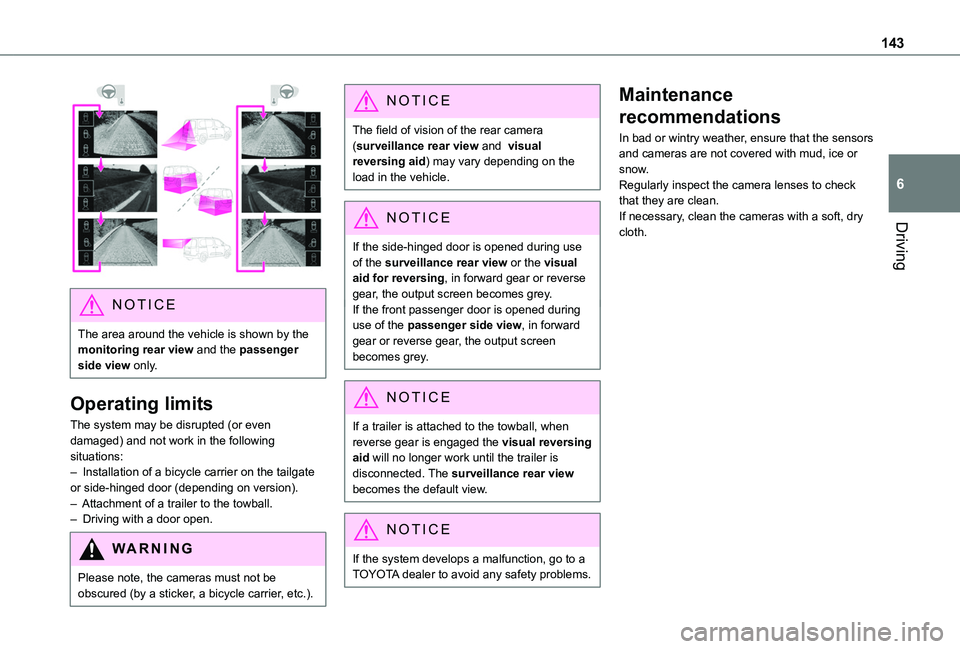
The area around the vehicle is shown by the monitoring rear view and the passenger side view only.
Operating limits
The system may be disrupted (or even damaged) and not work in the following situations:– Installation of a bicycle carrier on the tailgate or side-hinged door (depending on version).– Attachment of a trailer to the towball.– Driving with a door open.
WARNI NG
Please note, the cameras must not be obscured (by a sticker, a bicycle carrier, etc.).
NOTIC E
The field of vision of the rear camera (surveillance rear view and visual reversing aid) may vary depending on the load in the vehicle.
NOTIC E
If the side-hinged door is opened during use of the surveillance rear view or the visual aid for reversing, in forward gear or reverse gear, the output screen becomes grey.If the front passenger door is opened during use of the passenger side view, in forward gear or reverse gear, the output screen becomes grey.
NOTIC E
If a trailer is attached to the towball, when reverse gear is engaged the visual reversing aid will no longer work until the trailer is disconnected. The surveillance rear view becomes the default view.
NOTIC E
If the system develops a malfunction, go to a TOYOTA dealer to avoid any safety problems.
Maintenance
recommendations
In bad or wintry weather, ensure that the sensors and cameras are not covered with mud, ice or snow.Regularly inspect the camera lenses to check that they are clean.If necessary, clean the cameras with a soft, dry cloth.
Page 144 of 272
144
Compatibility of fuels
Petrol fuels conforming to the EN228 standard containing up to 5% and 10% ethanol respectively.
Diesel fuels conforming to the EN590, EN16734 and EN16709 standards and containing up to 7%, 10%, 20% and 30% fatty acid methyl ester respectively. The use of B20 or B30 fuels, even occasionally, imposes special maintenance conditions referred to as "Arduous conditions".
Paraffinic Diesel fuel conforming to the EN15940 standard.
WARNI NG
The use of any other type of (bio) fuel (vegetable or animal oils, pure or diluted, domestic fuel, etc.) is strictly prohibited (risk of damage to the engine and fuel system).
NOTIC E
The only fuel additives authorised for use are those that meet the B715001 (petrol) or B715000 (Diesel) standards.
Diesel at low temperature
At temperatures below 0 °C (+32 °F), the formation of paraffins in summer-type Diesel fuels could prevent the engine from operating correctly. In these temperature conditions, use winter-type Diesel fuel and keep the fuel tank more than 50 % full.At temperatures below -15 °C (+5 °F) to avoid problems starting, it is best to park the vehicle under shelter (heated garage).
Travelling abroad
Certain fuels could damage your vehicle’s engine.In certain countries, the use of a particular fuel may be required (specific octane rating, specific trade name, etc.) to ensure correct operation of the engine.For all additional information, consult a dealer.
Refuelling
Fuel tank capacity: approximately 61 litres (petrol) or 50 litres (Diesel).Reserve level: approximately 6 litres.
Low fuel level
/2
1 1When the low fuel level is reached, this warning lamp comes on on the instrument panel, accompanied by an onscreen message and an audible signal. When it first
comes on, about 6 litres of fuel remain in the tank.Until sufficient fuel is added, this warning lamp appears every time the ignition is switched on, accompanied by an onscreen message and an audible signal. When driving, this message and audible signal are repeated with increasing frequency as the fuel level drops towards 0.You must refuel as soon as possible to avoid running out of fuel.For more information on Running out of fuel (Diesel), refer to the corresponding section.
W
ARNI NG
Stop & StartNever refuel with the engine in STOP mode; you must switch off the ignition.
Refuelling
At least 10 litres of fuel must be added, in order to be registered by the fuel gauge.
Opening the filler cap may create a noise caused by an inrush of air. This is entirely normal and results from the sealing of the fuel system.To refuel in complete safety:► Always switch off the engine.► Unlock the vehicle using the Keyless Entry and Starting.► Open the fuel filler flap.
Page 155 of 272

155
Practical information
7
Diesel fuel additive (Diesel
with particle filter)
or On reaching the minimum level in the particle filter additive tank, this warning lamp comes on fixed, accompanied by an audible warning and a message warning that the additive level is too low.
Topping up
This additive must be topped up without delay by a TOYOTA dealer or a qualified workshop.
AdBlue (Diesel engines)
An alert is triggered when the reserve level is reached.For more information on the AdBlue range indicators, refer to the corresponding section.To avoid the vehicle being immobilised in accordance with regulations, you must top up the AdBlue tank.For more information on the Supply of AdBlue, refer to the corresponding section.
Checks
Unless otherwise indicated, check these components in accordance with the manufacturer's service schedule and according to your engine.Otherwise, have them checked by a TOYOTA dealer or a qualified workshop.
WARNI NG
Only use products recommended by TOYOTA or products of equivalent quality and specification.In order to optimise the operation of components as important as those in the braking system, TOYOTA selects and offers very specific products.
12 V battery
The battery does not require any maintenance.However, check regularly that the terminals are correctly tightened (versions without quick release terminals) and that the connections are clean.
NOTIC E
For more information on the precautions to take before any work on the 12 V battery, refer to the corresponding section.
WARNI NG
Versions equipped with Stop & Start are fitted with a 12 V lead-acid battery of specific technology and specification.Its replacement should be carried out only by a TOYOTA dealer or a qualified workshop.
Passenger compartment
filter
Depending on the environment and the use of the vehicle (e.g. dusty atmosphere, city driving), change it twice as often, if necessary.
NOTIC E
A clogged passenger compartment filter can adversely affect air conditioning system performance and generate undesirable odours.
Air filter
Depending on the environment and the use of the vehicle (e.g. dusty atmosphere, city driving), change it twice as often, if necessary.
Oil filter
Change the oil filter each time the engine oil is changed.
Manual gearbox
The gearbox does not require any maintenance (no oil change).
Automatic gearbox
The gearbox does not require any maintenance (no oil change).
Page 160 of 272
160
With an automatic gearbox
and electric parking brake /
Release procedure
► With the engine running and while depressing the brake pedal, set the gear selector to N.► While depressing the brake pedal, switch off the ignition.► Release the brake pedal, then switch on the ignition again.► While depressing the brake pedal, press the control lever to release the parking brake.► Release the brake pedal, then switch off the ignition.
Reverting to normal operation
► While depressing the brake pedal, start the engine.
NOTIC E
Keyless Entry and StartingYou must not depress the brake pedal while switching the ignition on or off. If you do, the engine will start, requiring you to restart the procedure.
Advice on care and
maintenance
General recommendations
Observe the following recommendations to avoid damaging your vehicle.
Exterior
WARNI NG
Never use a high-pressure jet wash in the engine compartment, due to the risk of damaging electrical components.Do not wash the vehicle in strong sunshine or extremely cold conditions.
NOTIC E
When washing the vehicle at an automatic roller-brush car wash, be sure to lock the doors and, depending on version, remove the electronic key.When using a pressure washer, hold the lance at least 30 cm (0 ft 11") from the vehicle (particularly when cleaning areas containing chipped paint, sensors or seals).Promptly clean up any stains containing
chemicals liable to damage the vehicle's paint (including tree resin, bird droppings, insect secretions, pollen and tar).
If justified by the environment, clean the vehicle more frequently to remove salty deposits (in coastal areas), soot (in industrial estates) and mud (in wet or cold areas). These substances can be highly corrosive.Contact a TOYOTA dealer or a qualified workshop if you require advice on removing stubborn stains requiring special products (such as tar or insect removers).Preferably, have paint touch-ups performed by a TOYOTA dealer or a qualified workshop.
Interior
WARNI NG
When washing the vehicle, never use a water hose or high-pressure washer to clean the interior.Liquids carried in cups or other open containers can spill, presenting a risk of damage if they come into contact with the controls in the dashboard and centre console. Take care!
Page 163 of 272
163
In the event of a breakdown
8
With spare wheel
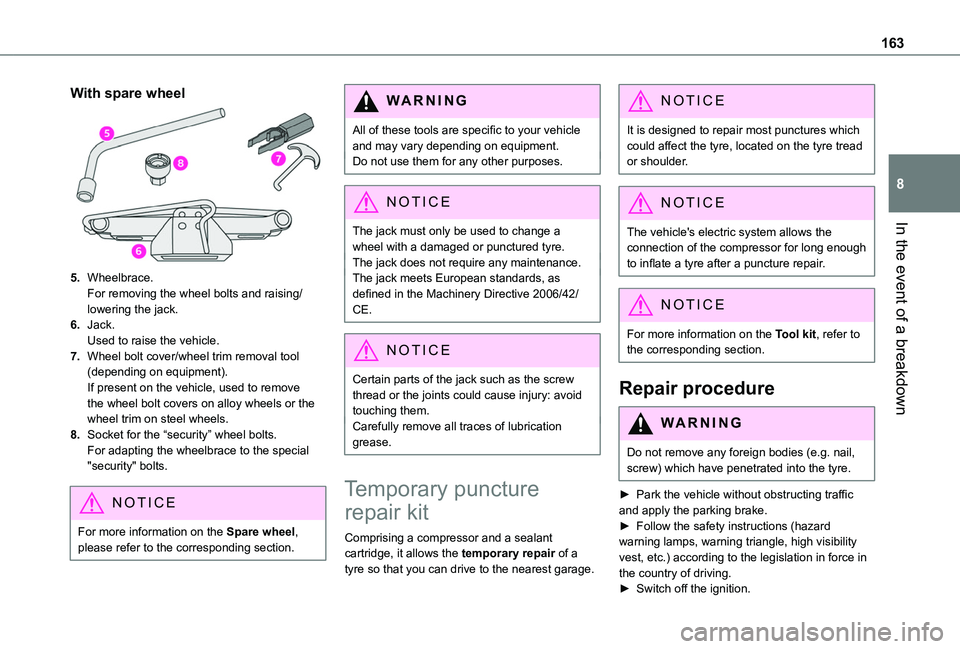
5.Wheelbrace.For removing the wheel bolts and raising/lowering the jack.
6.Jack.Used to raise the vehicle.
7.Wheel bolt cover/wheel trim removal tool (depending on equipment).If present on the vehicle, used to remove the wheel bolt covers on alloy wheels or the wheel trim on steel wheels.
8.Socket for the “security” wheel bolts.For adapting the wheelbrace to the special "security" bolts.
NOTIC E
For more information on the Spare wheel, please refer to the corresponding section.
WARNI NG
All of these tools are specific to your vehicle and may vary depending on equipment.Do not use them for any other purposes.
NOTIC E
The jack must only be used to change a
wheel with a damaged or punctured tyre.The jack does not require any maintenance.The jack meets European standards, as defined in the Machinery Directive 2006/42/CE.
NOTIC E
Certain parts of the jack such as the screw thread or the joints could cause injury: avoid touching them.Carefully remove all traces of lubrication grease.
Temporary puncture
repair kit
Comprising a compressor and a sealant
cartridge, it allows the temporary repair of a tyre so that you can drive to the nearest garage.
NOTIC E
It is designed to repair most punctures which could affect the tyre, located on the tyre tread or shoulder.
NOTIC E
The vehicle's electric system allows the connection of the compressor for long enough to inflate a tyre after a puncture repair.
NOTIC E
For more information on the Tool kit, refer to the corresponding section.
Repair procedure
WARNI NG
Do not remove any foreign bodies (e.g. nail, screw) which have penetrated into the tyre.
► Park the vehicle without obstructing traffic and apply the parking brake.► Follow the safety instructions (hazard warning lamps, warning triangle, high visibility vest, etc.) according to the legislation in force in the country of driving.► Switch off the ignition.
Page 193 of 272
193
Bluetooth® audio system
10
Menus
Depending on version."Multimedia": Media settings, Radio settings."Telephone": Call, Directory management, Telephone management, Hang up."Trip computer".
"Maintenance": Diagnosis, Warning log, etc."Connections": Manage connections, search for devices."Personalisation-configuration": Define the vehicle parameters, Choice of language, Display configuration, Choice of units, Date and time adjustment.Press the "MENU" button.
Move from one menu to another.
Enter a menu.
Radio
Selecting a station
Press the SOURCE button repeatedly and select the radio.Press this button to select a waveband (FM / AM / DAB).
Press one of the buttons for an automatic search for radio stations.Press one of the buttons to carry out a manual search up / down for radio frequencies.Press this button to display the list of stations received locally.To update this list, press for more than two seconds. The sound is cut while updating.
RDS
NOTIC E
The external environment (hills, buildings, tunnels, basement car parks, etc.) may block reception, including in RDS mode. This is a normal effect of the way in which radio waves are transmitted and does not indicate any failure of the audio equipment.
NOTIC E
If RDS is not available, the RDS symbol appears struck out in the screen.
WARNI NG
The RDS, if activated, enables you to continue listening to the same station by automatic retuning to alternative frequencies. However, in certain conditions, coverage of
an RDS station may not be assured throughout the entire country as radio stations do not cover 100% of the territory. This explains the loss of reception of the station during a journey.
Short procedure
In "Radio" mode, press the OK button to activate or deactivate RDS directly.
Long procedure
Press the MENU button.
Select "Audio functions".
Press OK.
Select the "FM waveband preferences" function.Press OK.
Select "Frequency tracking (RDS)".
Press OK, RDS is displayed on the screen.
Play TA messages
WARNI NG
The TA (Traffic Announcement) function gives priority to TA alert messages. To operate, this
Page 245 of 272
245
Alphabetical index
A
ABS 78Accessories 75, 100Access to the spare wheel 166Active Safety Brake 128–130AdBlue® 157AdBlue® tank 158Additive, Diesel 155–156Adjusting headlamps 71Adjusting head restraints 48Adjusting seat 42Adjusting the air distribution 60Adjusting the air flow 60Adjusting the date 216, 240Adjusting the height and reach of the steering wheel 44Adjusting the lumbar support 42Adjusting the temperature 60Adjusting the time 215, 240Advanced Grip Control 80–81Advice on care and maintenance 160
Advice on driving 7, 95–96Airbags 85, 87–88, 90Airbags, curtain 86–88Airbags, front 85–87, 91Airbags, lateral 86–87Air conditioning 58, 61Air conditioning, digital 62Air conditioning, dual-zone automatic 60Air conditioning, manual 59, 62Air intake 60
Air vents 58Alarm 37–39Alarm, volumetric 37Android Auto connection 231Anti-lock braking system (ABS) 78–79Antitheft / Immobiliser 24Apple CarPlay connection 2 11, 230Applications 231Area, loading 25, 33–34, 52Armrest 42Armrest, front 48Assistance call 75–77Assistance, emergency braking 79, 130Audible warning 78Audio streaming (Bluetooth) 197, 210, 235
B
Battery 150, 177, 179Battery, 12 V 155, 176–178Battery, charging 178–179
Battery, remote control 31–32, 65Blind spot monitoring system 135Blind spot monitoring system, active 136Blind spot sensors 134, 136Bluetooth (hands-free) 198–199, 212–213, 236–237Bluetooth (telephone) 212–214, 236–237Bodywork 161Bonnet 151–152Boot lid 28, 31
Bottle holder 48Brake discs 156Brake lamps 173Brakes 156Braking assistance system 78–79Braking, automatic emergency 128–130Braking, dynamic emergency 102–103Brightness 215Bulbs 170Bulbs (changing) 169–170Bulbs (changing, type) 170
C
Capacity, fuel tank 144–145Cap, fuel filler 144–145Care of the bodywork 161CD 196, 210CD, MP3 196–197, 210Central locking 24, 28Changing a bulb 169–170
Changing a fuse 174–176Changing a wheel 163, 165Changing a wiper blade 73Changing the remote control battery 31Charger, induction 50Charger, wireless 50Checking the levels 153–154Checking tyre pressures (using the kit) 163, 165Checks 152, 155–156Checks, routine 155–156