2020 TOYOTA PROACE CITY navigation system
[x] Cancel search: navigation systemPage 3 of 272

3
Contents
Memorising speeds 128Active Safety Brake with Collision Risk Alert and Intelligent emergency braking assistance 128Active Lane Departure Warning System 131Blind Spot Monitoring System 134Active Blind Spot Monitoring System 136Distraction detection 136Parking sensors 137Reversing Camera 139Surround Rear Vision 141
7Practical information
Compatibility of fuels 144Refuelling 144Misfuel prevention (Diesel) 145Snow chains 146Towing device 147Overload indicator 149Energy economy mode 150Roof bars / Roof rack 150Bonnet 151Engine compartment 152
Checking levels 153Speed checks 155AdBlue® (Diesel engines) 157Free-wheeling 159Advice on care and maintenance 160
8In the event of a breakdown
Running out of fuel (Diesel) 162Tool kit 162
Temporary puncture repair kit 163Spare wheel 165Changing a bulb 169Changing a fuse 17412 V battery 176Towing 180
9Technical data
Dimensions 182Engine technical data and towed loads 187Identification markings 190
10Bluetooth® audio system
First steps 191Steering mounted controls 192Menus 193Radio 193DAB (Digital Audio Broadcasting) radio 194Media 195Telephone 198Frequently asked questions 201
11TOYOTA Connect Radio
First steps 204Steering mounted controls 205Menus 206Applications 207Radio 207DAB (Digital Audio Broadcasting) radio 209Media 209
Telephone 2 11
Settings 214Frequently asked questions 216
12TOYOTA Connect Nav
First steps 218Steering mounted controls 219Menus 219Voice commands 221Navigation 225Connected navigation 227Applications 230Radio 233DAB (Digital Audio Broadcasting) radio 234Media 235Telephone 236Settings 239Frequently asked questions 241
■Alphabetical index
Page 113 of 272

11 3
Driving
6
With audio system or touch screen
With the vehicle stationary, the system is reinitialised via the vehicle configuration menu.
Malfunction
These warning lamps come on in the event of a malfunction.In this case, the tyre under-inflation monitoring function is no longer performed.Have the system checked by a TOYOTA dealer or a qualified workshop.
Head-up display
This system projects various information onto a smoked projection blade situated in the driver's field of vision, enabling them to drive without taking their eyes off the road.
Information displayed
during operation
Once the system has been activated, the following information is grouped together in the head-up display:
A.The speed of your vehicle.
B.Cruise control/speed limiter information.
C.If your vehicle is suitably equipped, distances between vehicles, automatic emergency braking alerts and navigation instructions.
D.If your vehicle is suitably equipped, speed limit information.
NOTIC E
For more information on Navigation, refer to the section Audio equipment and
telematics.
Selector
1.On.
2.Off (long press).
3.Brightness adjustment.
4.Display height adjustment.
Activation/Deactivation
► With the engine running, press button 1 to
activate the system and deploy the projection blade.
Page 116 of 272
11 6
NOTIC E
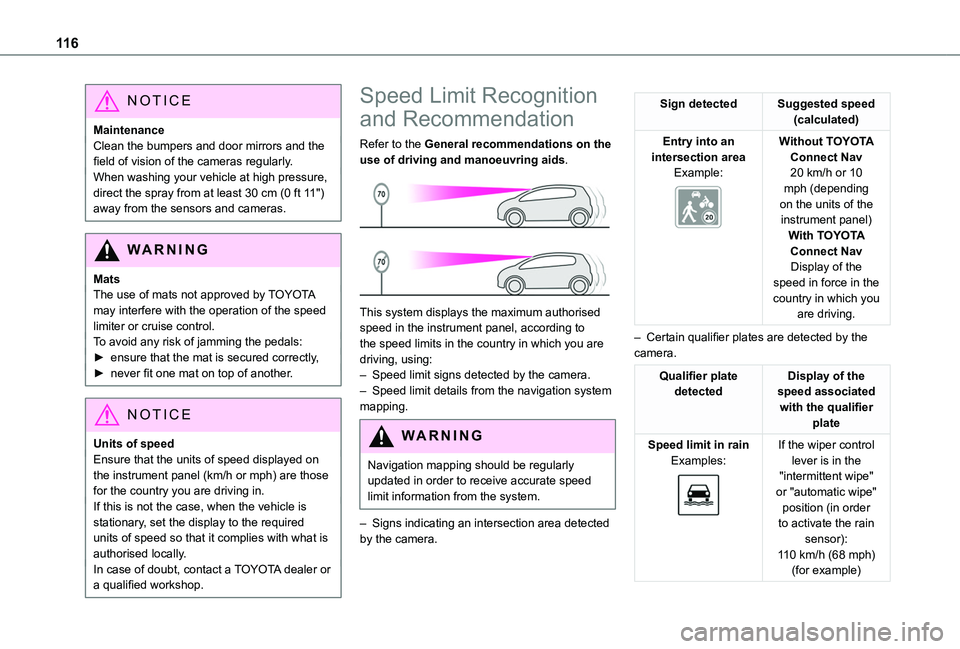
MaintenanceClean the bumpers and door mirrors and the field of vision of the cameras regularly.When washing your vehicle at high pressure, direct the spray from at least 30 cm (0 ft 11") away from the sensors and cameras.
WARNI NG
MatsThe use of mats not approved by TOYOTA may interfere with the operation of the speed limiter or cruise control.To avoid any risk of jamming the pedals:► ensure that the mat is secured correctly,► never fit one mat on top of another.
NOTIC E
Units of speed
Ensure that the units of speed displayed on the instrument panel (km/h or mph) are those for the country you are driving in.If this is not the case, when the vehicle is stationary, set the display to the required units of speed so that it complies with what is authorised locally.In case of doubt, contact a TOYOTA dealer or a qualified workshop.
Speed Limit Recognition
and Recommendation
Refer to the General recommendations on the use of driving and manoeuvring aids.
This system displays the maximum authorised speed in the instrument panel, according to the speed limits in the country in which you are driving, using:– Speed limit signs detected by the camera.– Speed limit details from the navigation system mapping.
WARNI NG
Navigation mapping should be regularly updated in order to receive accurate speed limit information from the system.
– Signs indicating an intersection area detected by the camera.
Sign detectedSuggested speed (calculated)
Entry into an intersection areaExample:
Without TOYOTA Connect Nav20 km/h or 10 mph (depending on the units of the instrument panel)With TOYOTA
Connect NavDisplay of the speed in force in the country in which you are driving.
– Certain qualifier plates are detected by the camera.
Qualifier plate detectedDisplay of the speed associated with the qualifier plate
Speed limit in rainExamples:
If the wiper control lever is in the "intermittent wipe" or "automatic wipe" position (in order to activate the rain sensor):
110 km/h (68 mph) (for example)
Page 207 of 272

207
TOYOTA Connect Radio
11
Navigation
Configure the navigation and select your destination via MirrorLinkTM, CarPlay® or Android Auto.
Air conditioning
21,518,5
Manage various temperature and air flow settings.
Applications
Viewing photos
Insert a USB memory stick in the USB port.
WARNI NG
To protect the system, do not use a USB hub.
The system can read folders and image files in the formats: .tiff; .gif; .jpg/jpeg; .bmp and .png.Press Applications to display the main page.Press "Photos".
Select a folder.
Select an image to view.
Press this button to display the details of the photo.Press the back arrow to go back a level.
Managing messages
Press Applications to display the main page.Press "SMS".
Select the "SMS” tab.
Press this button to select the display settings for messages.Press this button to search and select a recipient.Select the "Quick messages” tab.
Press this button to select the display settings for messages.Press this button to write a new message.
Press the bin alongside the selected message to delete it.Press this button alongside the selected message to display the secondary page.Press this button to edit and modify the existing text.Press this button to write a new message.
Press the bin to delete the message.
Radio
Selecting a station
Press Radio Media to display the main page.Press one of the buttons to perform an automatic search for radio stations.OrMove the slider to manually search for frequencies up or down.
Or
Page 212 of 272

212
OrIf the smartphone has already connected by Bluetooth®.Connect a USB cable. The smartphone charges when connected by a USB cable.From the system, press "Telephone" to display the main page.Press the "PHONE" button to access the secondary page.Press "CarPlay" to display the CarPlay® interface.
NOTIC E
On connecting the USB cable, the CarPlay® function deactivates the system's Bluetooth® mode.
NOTIC E
When the USB cable is disconnected and the ignition is switched off then back on, the system will not automatically switch to Radio Media mode; the source must be changed manually.
The CarPlay® navigation can be accessed at any time by pressing the system's Navigation button.
Android Auto smartphone
connection
On the smartphone, download the Android Auto application.
NOTIC E
The "Android Auto" function requires the use of a compatible smartphone and applications.
Telephone not connected by
Bluetooth®
Connect a USB cable. The smartphone charges when connected by a USB cable.From the system, press "Telephone" to display the main page.Press "Android Auto" to start the application in the system.Depending on the smartphone, it may be necessary to activate the "Android Auto" function.During the procedure, several screen pages relating to certain features are displayed.Accept to start and complete the connection.When connecting a smartphone to the system, we recommend enabling Bluetooth® on the smartphone.
Telephone connected by Bluetooth®
From the system, press "Telephone" to display the main page.Press the "PHONE" button to display the secondary page.Press "Android Auto" to start the application in the system.Access to the different audio sources remains available in the margin of the Android Auto display, using the touch buttons located in the upper bar.Access to the menus for the system is possible at any time using the dedicated buttons.
NOTIC E
There may be a pause before applications become available, depending on the quality of the network.
Pairing a Bluetooth®
telephone
WARNI NG
The services available depend on the network, the SIM card and the compatibility of the Bluetooth devices used. Consult the
telephone user guide and the service provider to check which services are available.
Page 218 of 272

218
TOYOTA Connect Nav
GPS navigation -
Applications - Multimedia
audio system - Bluetooth®
telephone
NOTIC E
The functions and settings described vary according to the vehicle version and configuration.
WARNI NG
For safety reasons and because they require sustained attention by the driver, the following operations must be carried out with the vehicle stationary and the ignition on:– Pairing the smartphone with the system in Bluetooth mode.– Using the smartphone.– Connection to the CarPlay®, MirrorLinkTM or Android Auto applications (certain applications interrupt their display while the vehicle is moving).– Watching a video (the video stops when the
vehicle starts to move again).– Changing the system settings and configuration.
NOTIC E
The system is protected in such a way that it will only operate in the vehicle.The Energy Economy Mode message is displayed when the system is about to enter the corresponding mode.
NOTIC E
System and map updates can be downloaded from the Brand’s website.The update procedure is also available on the website.
First steps
With the engine running, a press mutes the sound.With the ignition off, a press turns the system on.Increase or decrease the volume using the wheel or the "plus" or "minus" buttons (depending on the equipment).Use the menu buttons on either side of or below the touch screen for access to the menus, then press the virtual buttons in the touch screen.Depending on the model, use the "Source" or "Menu" buttons to access the rolling menus, then press the virtual buttons in the touch screen.Display the rolling menus at any time by pressing the screen briefly with three fingers.
All of the touch areas of the screen are white.Press the back arrow to go back a level.Press "OK" to confirm.
WARNI NG
The touch screen is of the "capacitive" type.To clean the screen, use a soft, non-abrasive cloth (e.g. spectacles cloth) with no additional product.
Do not use sharp objects on the screen.Do not touch the screen with wet hands.
Certain information is displayed permanently in the side bars or in the upper bar of the touch screen (depending on equipment):– Air conditioning status information (depending on version), and direct access to the corresponding menu.– Go directly to the audio source selection option, to view the list of radio stations (or list of titles depending on the source).– Go to the "Notifications" of messages, emails, map updates and, depending on the services, the navigation notifications.– Go to the settings for the touch screen and the digital instrument panel.Audio source selection (depending on equipment):– FM/DAB/AM radio stations (depending on equipment).– Telephone connected via Bluetooth and Bluetooth multimedia broadcast (streaming).
Page 219 of 272
.– Video (depending on equipment).
NOTIC E
In the \"Settings\" men")
219
TOYOTA Connect Nav
12
– USB memory stick.– Media player connected via the auxiliary socket (depending on equipment).– Video (depending on equipment).
NOTIC E
In the "Settings" menu, it is possible to create a profile for an individual or for a group of people with shared interests, and configure a wide range of settings (radio presets, audio settings, navigation history, favourite contacts, etc.). Settings are applied automatically.
NOTIC E
In very hot conditions, the volume may be limited to protect the system. It may enter
standby mode (with the screen and sound off) for 5 minutes or more.The system will resume normal operation when the temperature in the passenger compartment has dropped.
Steering mounted controls
Voice control:This control is located on the steering wheel or at the end of the lighting control lever (depending on equipment).Short press, system voice control.Long press, voice control for smartphone or CarPlay®, MirrorLinkTM (availability depending on country), Android Auto via the system.Increase volume.
Decrease volume.Mute by pressing the volume increase and decrease buttons simultaneously (depending on equipment).
Restore the sound by pressing one of the two volume buttons.Media (short press): change the multimedia source.Telephone (short press): start telephone call.Call in progress (short press): access telephone menu.
Telephone (long press): reject an incoming call, end call; when no call is in progress, access telephone menu.Radio (rotate): automatic search for the previous / next station.Media (rotate): previous / next track, move in a list.Short press: confirm a selection; if nothing selected, access to presets.Radio: display the list of stations.Media: display the list of tracks.Radio (press and hold): update the list of stations received.
Menus
Connected navigation
Enter navigation settings and choose a
destination.Use real-time services, depending on equipment.
Page 221 of 272

221
TOYOTA Connect Nav
12
Voice commands
Steering wheel-mounted
controls
Voice commands:Voice commands can be issued from any screen page after a short press on the "Voice commands" button located on the steering wheel or at the end of the lighting control lever (depending on equipment), as long as there is no telephone call in progress.
WARNI NG
To ensure that voice commands are always recognised by the system, please follow these recommendations: – use natural language in a normal tone without breaking up words or raising your voice.– always wait for the "beep" (audible signal) before speaking.– for best results, closing the windows and sunroof is recommended, to avoid extraneous interference (depending on version).– before issuing a voice command, ask any other passengers to refrain from speaking.
First steps
Example of a "voice command" for navigation:
"Navigate to address 11 regent street, London"Example of a "voice command" for the radio and media:"Play artist Madonna"Example of a "voice command" for the telephone:"Call David Miller"
WARNI NG
The voice commands, with a choice of 17 languages (Arabic, Brazilian, Czech, Danish, Dutch, English, Farsi, French, German, Italian, Norwegian, Polish, Portuguese, Russian, Spanish, Swedish, Turkish), are made using the language previously chosen and set in the system.For some voice commands, there are alternative synonyms.Example: Guide to / Navigate to / Go to / ...The voice commands in Arabic for: "Navigate to address" and "Display POI in the city", are not available.
Information - Using the
system
When voice commands are activated, by briefly pressing the button, help is displayed on the touch screen, offering various menus and enabling voice-based interaction with the system.
A number of commands are available when a menu is selected.
Press the Push To Talk button and tell me what you'd like after the tone. Remember you can interrupt me at any time by pressing this button. If you press it again while I'm waiting for you to speak, it'll end the conversation. If you need to start over, say "cancel". If you want to undo something, say "undo". And to get information and tips at any time, just say "help". If you ask to me do something and there's some information missing that I need, I'll give you