2020 TOYOTA HILUX warning light
[x] Cancel search: warning lightPage 640 of 744

6408-2. Steps to take in an emergency
HILUX_OM_OM0K321E_(EE)
*1: The buzzer sounds if the vehicle reaches a speed of 5 km/h (3 mph).
*2: Slow down until the lamp goes off.
*3: The buzzer sounds when the differential oil temperature is too high and
turning the front-wheel drive control switch to H2 is required.
*4: The buzzer will sound at the same time the warning light flashes.
*5: The open door warning buzzer sounds if the vehicle reaches or exceeds a
speed of 5 km/h (3 mph).
*6: Except for Russia, Byelarus, Moldova and Ukraine and models for model
code destination Blank*8:
The driver’s and front passenger’s seat belt buzzer sounds to alert the
driver and front passenger that his or her seat belt is not fastened. The
buzzer sounds intermittently for 24 seconds after the vehicle reaches a
speed of 20 km/h (12 mph). Then, if the seat belt is still unfastened, the
buzzer will sound in a different tone for 100 more seconds.
For Russia, Byelarus, Moldova and Ukraine and models for model code
destination Blank*8:
The driver’s and front passenger’s seat belt buzzer sounds to alert the
driver and front passenger that his or her seat belt is not fastened. The
buzzer sounds intermittently for 30 seconds after the vehicle reaches a
speed of 20 km/h (12 mph). Then, if the seat belt is still unfastened, the
buzzer will sound in a different tone for 90 more seconds.
*7: Except for Russia, Byelarus, Moldova, Ukraine, Turkey and Israel:
The rear passengers’ seat belt buzze r sounds to alert the rear passenger
that his or her seat belt is not fastened. The buzzer sounds intermittently
for 24 seconds after the vehicle reaches a speed of 20 km/h (12 mph).
Then, if the seat belt is still unfastened, the buzzer will sound in a different
tone for 100 more seconds.
For Russia, Byelarus, Moldova and Ukraine:
The rear passengers’ seat belt buzze r sounds to alert the rear passenger
that his or her seat belt is not fastened. The buzzer sounds intermittently
for 30 seconds after the seat belt is fastened and unfastened, and the vehi-
cle reaches a speed of 20 km/h (12 mph). Then, if the seat belt is still
unfastened, the buzzer will sound in a different tone for 90 more seconds.
For Turkey and Israel:
The rear passengers’ seat belt buzze r sounds to alert the rear passenger
that his or her seat belt is not fastened. The buzzer sounds intermittently
for 6 seconds after the seat belt is fastened and unfastened, and the vehi-
cle reaches a speed of 20 km/h (12 mph). Then, if the seat belt is still
unfastened, the buzzer will sound in a different tone for 60 more seconds.
*8: See “Checking your vehicle’s model” if you are not sure of which model
your vehicle is. ( P. 1 2 )
Page 641 of 744

6418-2. Steps to take in an emergency
HILUX_OM_OM0K321E_(EE)
8
When trouble arises
*9: The parking brake engaged warning buzzer sounds if the vehicle reaches a
speed of approximately 5 km/h (3 mph) or more.
■ Passenger detection sensor, seat belt reminder and warning buzzer
● If luggage is placed on the passenger seat, the front passenger detection
sensor or the rear passenger detecti on sensor (if equipped) may cause the
warning light to flash and the warning buzzer to sound even if a passenger
is not sitting in the seat.
● If a cushion is placed on the seat, the sensor may not detect a passenger,
and the warning light may not operate properly.
■ If the malfunction indicator lamp comes on while driving
For some models, malfunction indicator lamp will come on if the fuel tank
becomes completely empty. If the fuel tank is empty, refuel the vehicle imme-
diately. The malfunction indicator lamp will go off after several trips.
If the malfunction indicator lamp does not go off, contact any authorized
Toyota retailer or Toyota authorized repai rer, or any reliable repairer as soon
as possible.
■ If the DPF system warning light comes on (if equipped)
The deposit collected in the filter needs to be regenerated.
P. 433
■ Warning buzzer
In some cases, the buzzer may not be heard due to being in a noisy location
or audio sound.
Page 642 of 744

6428-2. Steps to take in an emergency
HILUX_OM_OM0K321E_(EE)
WARNING
■If a warning light comes on or a warning buzzer sounds when a warn-
ing message is shown on the multi-information display (vehicles with
multi-information display)
Check and follow the message shown on the multi-information display. Fail-
ure to do so may result in death or serious injury.
■ If both the ABS and the brake system warning lights remain on
Stop your vehicle in a safe place immediately and contact any authorized
Toyota retailer or Toyota authorized r epairer, or any reliable repairer. The
vehicle will become extremely unstable during braking, and the ABS system
may fail, which could cause an accident resulting in death or serious injury.
NOTICE
■ If the malfunction indicator lamp comes on when the boost pressure in
the turbocharger is abnormally high (diesel engine)
Never drive at high speed or race the engine even after the lamp goes off.
■ If the fuel system warning light flashes (diesel engine)
Never drive the vehicle with the warn ing light flashing. Continued driving
with water accumulated in the fuel filter will damage the fuel injection pump.
Page 643 of 744

6438-2. Steps to take in an emergency
HILUX_OM_OM0K321E_(EE)
8
When trouble arises
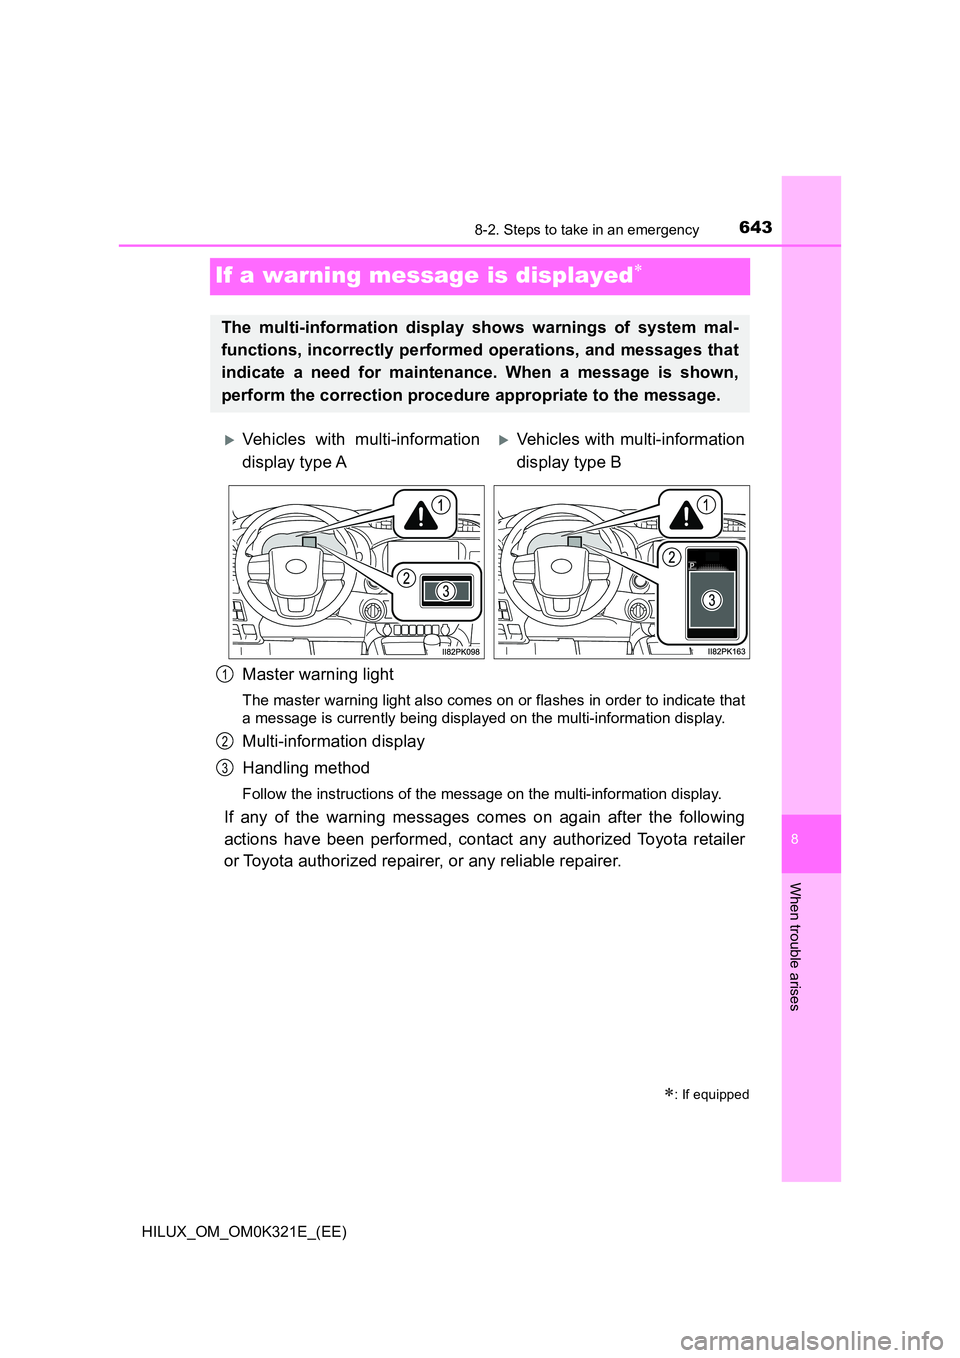
If a warning message is displayed
Master warning light
The master warning light also comes on or flashes in order to indicate that
a message is currently being displayed on the multi-information display.
Multi-information display
Handling method
Follow the instructions of the message on the multi-information display.
If any of the warning messages comes on again after the following
actions have been performed, contact any authorized Toyota retailer
or Toyota authorized repairer, or any reliable repairer.
: If equipped
The multi-information display shows warnings of system mal-
functions, incorrectly performed operations, and messages that
indicate a need for maintenance. When a message is shown,
perform the correction procedure appropriate to the message.
Vehicles with multi-information
display type A
Vehicles with multi-information
display type B
1
2
3
Page 644 of 744

6448-2. Steps to take in an emergency
HILUX_OM_OM0K321E_(EE)
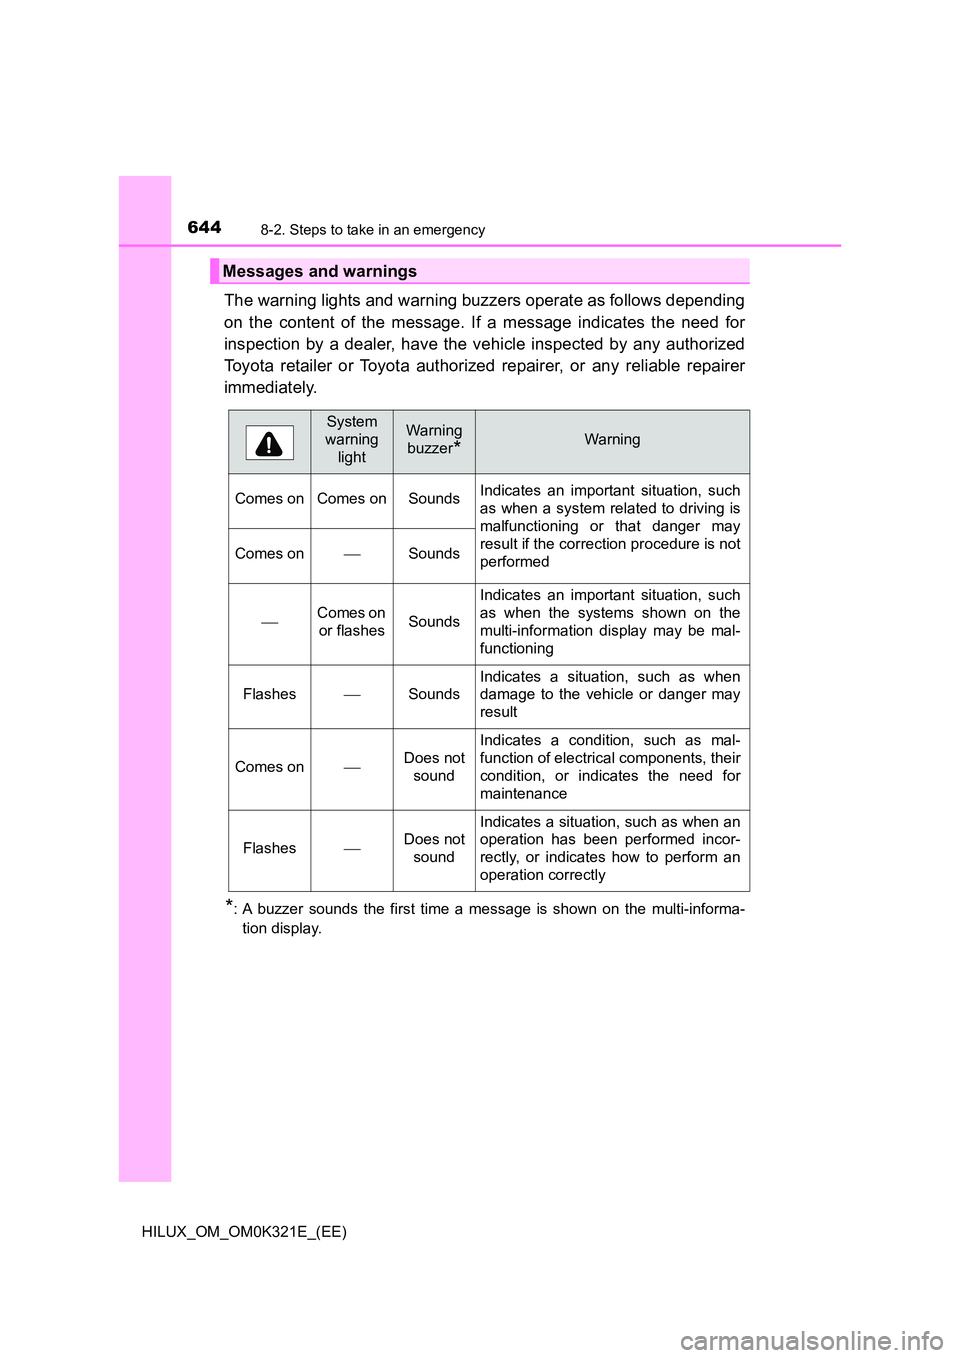
The warning lights and warning buzzers operate as follows depending
on the content of the message. If a message indicates the need for
inspection by a dealer, have the vehicle inspected by any authorized
Toyota retailer or Toyota authorized repairer, or any reliable repairer
immediately.
*: A buzzer sounds the first time a message is shown on the multi-informa-
tion display.
Messages and warnings
System
warning
light
Warning
buzzer*Warning
Comes on Comes on Sounds Indicates an important situation, such
as when a system related to driving is
malfunctioning or that danger may
result if the correction procedure is not
performedComes onSounds
Comes on
or flashesSounds
Indicates an important situation, such
as when the systems shown on the
multi-information display may be mal-
functioning
FlashesSounds
Indicates a situation, such as when
damage to the vehicle or danger may
result
Comes onDoes not
sound
Indicates a condition, such as mal-
function of electrical components, their
condition, or indicates the need for
maintenance
FlashesDoes not
sound
Indicates a situation, such as when an
operation has been performed incor-
rectly, or indicates how to perform an
operation correctly
Page 646 of 744

6468-2. Steps to take in an emergency
HILUX_OM_OM0K321E_(EE)
■ If “DIFFERENTIAL OIL TEMP HIGH SHIFT TO 2WD MODE COOLING TIME
REQUIRED”/“Differential oil temp high Shift to 2WD mode Cooling time
required” or “DIFFERENTIAL OIL TEMP HIGH COOLING TIME
REQUIRED”/“Differential oil temp high Cooling time required” is shown
on the multi-information display
The differential oil temperature is too high.
Turn the front-wheel drive control switch to H2, and reduce the vehicle speed
or stop the vehicle in a safe place. ( P. 398)
■ If “ENGINE OIL LEVEL LOW ADD OR REPLACE”/“Engine oil level low
Add or replace” is shown on the multi-information display
The engine oil level is low. (This warning message may be displayed if the
vehicle is stopped on a slope. Move to a level surface and check to see if the
message goes off.)
Check the level of the engine oil and add or replace oil if necessary.
( P. 563)
■ If “POWER TURNED OFF TO SAVE BATTERY”/“Power turned off to save
battery” is shown on the multi-information display
Power was turned off due to the automatic power off function.
Next time when starting the engine, increase the engine speed slightly and
maintain that level for approximately 5 minutes to recharge the battery.
■ If “DPF FULL MANUAL REGENERATION REQUIRED SEE OWNER’S
MANUAL”/“DPF full Manual regeneration required See owner’s manual”
is shown on the multi-information display
The deposit collected in the filter needs to be regenerated.
P. 433
■ If “Front Camera Unavailable” or “Front Camera Temporarily Unavailable
See Owner’s Manual” is shown on the multi-information display
The following systems may be suspended until the problem shown in the
message is resolved. ( P. 337, 634)
● PCS (Pre-Collision System)
● LDA (Lane Departure Alert with Yaw Assist Function)
● RSA (Road Sign Assist)
● Dynamic radar cruise control
■ If a message that indicates the need for the shift lever operation is
shown on the multi-information display
To prevent the shift lever from being operated incorrectly or the vehicle from
moving unexpectedly, a message that requires shifting the shift lever may be
shown on the multi-information display. In that case, follow the instruction of
the message and shift the shift lever.
Page 648 of 744

6488-2. Steps to take in an emergency
HILUX_OM_OM0K321E_(EE)
WARNING
■If a warning light comes on or a warning buzzer sounds when a warn-
ing message is shown on the multi-information display
Check and follow the message shown on the multi-information display. Fail-
ure to do so may result in death or serious injury.
NOTICE
■ While the engine oil level warning is shown on the multi-information
display
Continued engine operation with lo w engine oil will damage the engine.
■ If “WATER ACCUMULATION IN FUEL FILTER SEE OWNER’S MAN-
UAL”/“Water accumulation in fuel fi lter See owner’s manual” is shown
on the multi-information display
Never drive the vehicle if the warning message is displayed. Continued driv-
ing with water accumulated in the fuel filter will damage the fuel injection
pump.
Page 676 of 744

6768-2. Steps to take in an emergency
HILUX_OM_OM0K321E_(EE)
WARNING
■When removing the battery terminals
Always remove the negative (-) terminal first. If the positive (+) terminal con-
tacts any metal in the surrounding area when the positive (+) terminal is
removed, a spark may occur, leading to a fire in addition to electrical shocks
and death or serious injury.
■ Avoiding battery fires or explosions
Observe the following precautions to prevent accidentally igniting the flam-
mable gas that may be emitted from the battery:
● Make sure each jumper cable is connected to the correct terminal and that
it is not unintentionally in contact with any other than the intended terminal.
● Do not allow the other end of the jumper cable connected to the “+” termi-
nal to come into contact with any other parts or metal surfaces in the area,
such as brackets or unpainted metal.
● Do not allow the + and - clamps of the jumper cables to come into contact
with each other.
● Do not smoke, use matches, cigarette lighters or allow open flame near
the battery.
■ Battery precautions
The battery contains poisonous and corrosive acidic electrolyte, while
related parts contain lead and lead compounds. Observe the following pre-
cautions when handling the battery:
● When working with the battery, always wear safety glasses and take care
not to allow any battery fluids (acid) to come into contact with skin, clothing
or the vehicle body.
● Do not lean over the battery.
● In the event that battery fluid comes into contact with the skin or eyes,
immediately wash the affected area with water and seek medical attention.
Place a wet sponge or cloth over the affected area until medical attention
can be received.
● Always wash your hands after handling the battery support, terminals, and
other battery-related parts.
● Do not allow children near the battery.