2020 TOYOTA HILUX remote control
[x] Cancel search: remote controlPage 509 of 744
5095-10. Bluetooth®
5
Audio system
HILUX_OM_OM0K321E_(EE)
■ Compatible models
● Bluetooth® specifications:
Ver. 1.1, or higher (Recommended: Ver. 2.1 + EDR or higher)
● Following Profiles:
• A2DP (Advanced Audio Distribution Profile) Ver. 1.0 or higher (recom-
mended: Ver. 1.2 or higher)
• AVRCP (Audio/Video Remote Control Profile) Ver. 1.0 or higher (recom-
mended: Ver. 1.3 or higher)
Portable players must correspond to the above specifications in order to be
connected to the Bluetooth® audio/phone. However, please note that some
functions may be limited depending on the type of portable player.
● Cellular phone
• HFP (Hands Free Profile) Ver. 1.0 or higher (Recommended: Ver. 1.5)
• OPP (Object Push Profile) Ver. 1.1
• PBAP (Phone Book Access Profile) Ver. 1.0
Page 555 of 744

555
7Maintenance and care
HILUX_OM_OM0K321E_(EE)
7-1. Maintenance and care
Cleaning and protecting
the vehicle exterior .......... 556
Cleaning and protecting
the vehicle interior ........... 560
7-2. Maintenance
Maintenance
requirements.................... 563
7-3. Do-it-yourself maintenance
Do-it-yourself service
precautions ...................... 566
Hood .................................. 568
Engine compartment.......... 570
Tires ................................... 590
Tire inflation pressure ........ 593
Wheels ............................... 595
Air conditioning filter .......... 597
Wireless remote control/
electronic key battery....... 599
Checking and
replacing fuses ................ 602
Light bulbs ......................... 607
Page 580 of 744
5807-3. Do-it-yourself maintenance
HILUX_OM_OM0K321E_(EE)
■Before recharging
When recharging, the battery produces hydrogen gas which is flammable and
explosive. Therefore, observe the following before recharging:
● If recharging with the battery installed on the vehicle, be sure to disconnect
the ground cable.
● Make sure the power switch on the charger is off when connecting and dis-
connecting the charger cables to the battery.
■ After recharging/reconnecting the battery (vehicles with smart entry &
start system)
The engine may not start. Follow the procedure below to initialize the system.
Shift the shift lever to P (automat ic transmission) or depress the brake
pedal with the shift lever in N (manual transmission).
Open and close any of the doors.
Restart the engine.
● Unlocking the doors using the smart entry & start system may not be possi-
ble immediately after reconnecting the battery. If this happens, use the wire-
less remote control or the mechanical key to lock/unlock the doors.
● Start the engine with the engine switch in ACCESSORY mode. The engine
may not start with the engine switch turned off. However, the engine will
operate normally from the second attempt.
● The engine switch mode is recorded by the vehicle. If the battery is recon-
nected, the vehicle will return the engine switch mode to the status it was in
before the battery was disconnected. Make sure to turn off the engine
before disconnect the battery. Take extra care when connecting the battery
if the engine switch mode prior to discharge is unknown.
If the system will not start even after multiple attempts, contact any authorized
Toyota retailer or Toyota authorized repairer, or any reliable repairer.
■ If a symbol of a battery is shown on the multi-information display (if
equipped)
There is a malfunction in the vehicle’s charging system.
Immediately stop the vehicle in a safe place and contact any authorized
Toyota retailer or Toyota authorized repai rer, or any reliable repairer. Continu-
ing to drive the vehicle may be dangerous.
1
2
3
Page 599 of 744
5997-3. Do-it-yourself maintenance
HILUX_OM_OM0K321E_(EE)
7
Maintenance and care
Wireless remote control/electronic key
batter y
● Flathead screwdriver
● Small flathead screwdriver
● Lithium battery
Vehicles without smart entry & start system: CR1620
Vehicles with smart entry & start system: CR2032
Vehicles without smart entry & start system
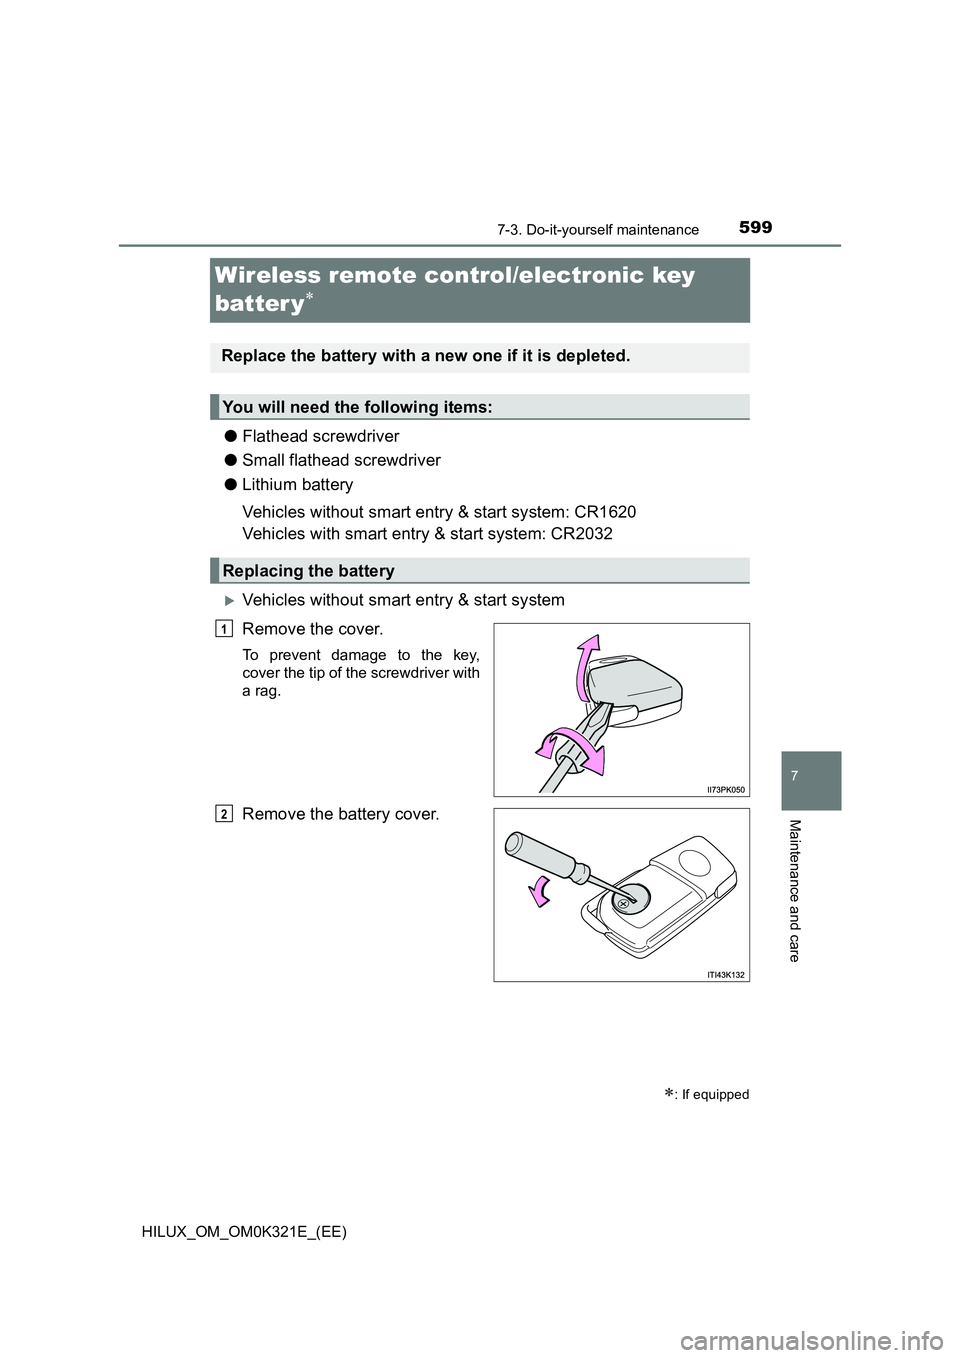
Remove the cover.
To prevent damage to the key,
cover the tip of the screwdriver with
a rag.
Remove the battery cover.
: If equipped
Replace the battery with a new one if it is depleted.
You will need the following items:
Replacing the battery
1
2
Page 601 of 744
6017-3. Do-it-yourself maintenance
HILUX_OM_OM0K321E_(EE)
7
Maintenance and care
■Use a lithium battery
Vehicles without smart entry & start system: CR1620
Vehicles with smart entry & start system: CR2032
● Batteries can be purchased at any authorized Toyota retailer or Toyota
authorized repairer, or any reliable repairer, local electrical appliance shops
or camera stores.
● Replace only with the same or equivalent type recommended by the manu-
facturer.
● Dispose of used batteries according to local laws.
■ If the key battery is depleted
The following symptoms may occur:
● The smart entry & start system (if equipped) and wireless remote control will
not function properly.
● The operational range will be reduced.
WARNING
■Removed battery and other parts
These parts are small and if swallowed by a child, they can cause choking.
Keep away from children. Failure to do so could result in death or serious
injury.
■ Certification for the key battery
CAUTION
RISK OF EXPLOSION IF BATTERY IS REPLACED BY AN INCORRECT
TYPE. DISPOSE OF USED BATTERIES ACCORDING TO THE
INSTRUCTIONS
NOTICE
■ For normal operation after replacing the battery
Observe the following precautions to prevent accidents:
● Always work with dry hands.
Moisture may cause the battery to rust.
● Do not touch or move any other component inside the remote control.
● Do not bend either of the battery terminals.
Page 668 of 744
6688-2. Steps to take in an emergency
HILUX_OM_OM0K321E_(EE)
If the electronic key does not operate properly
(vehicles with smart entry & start system)
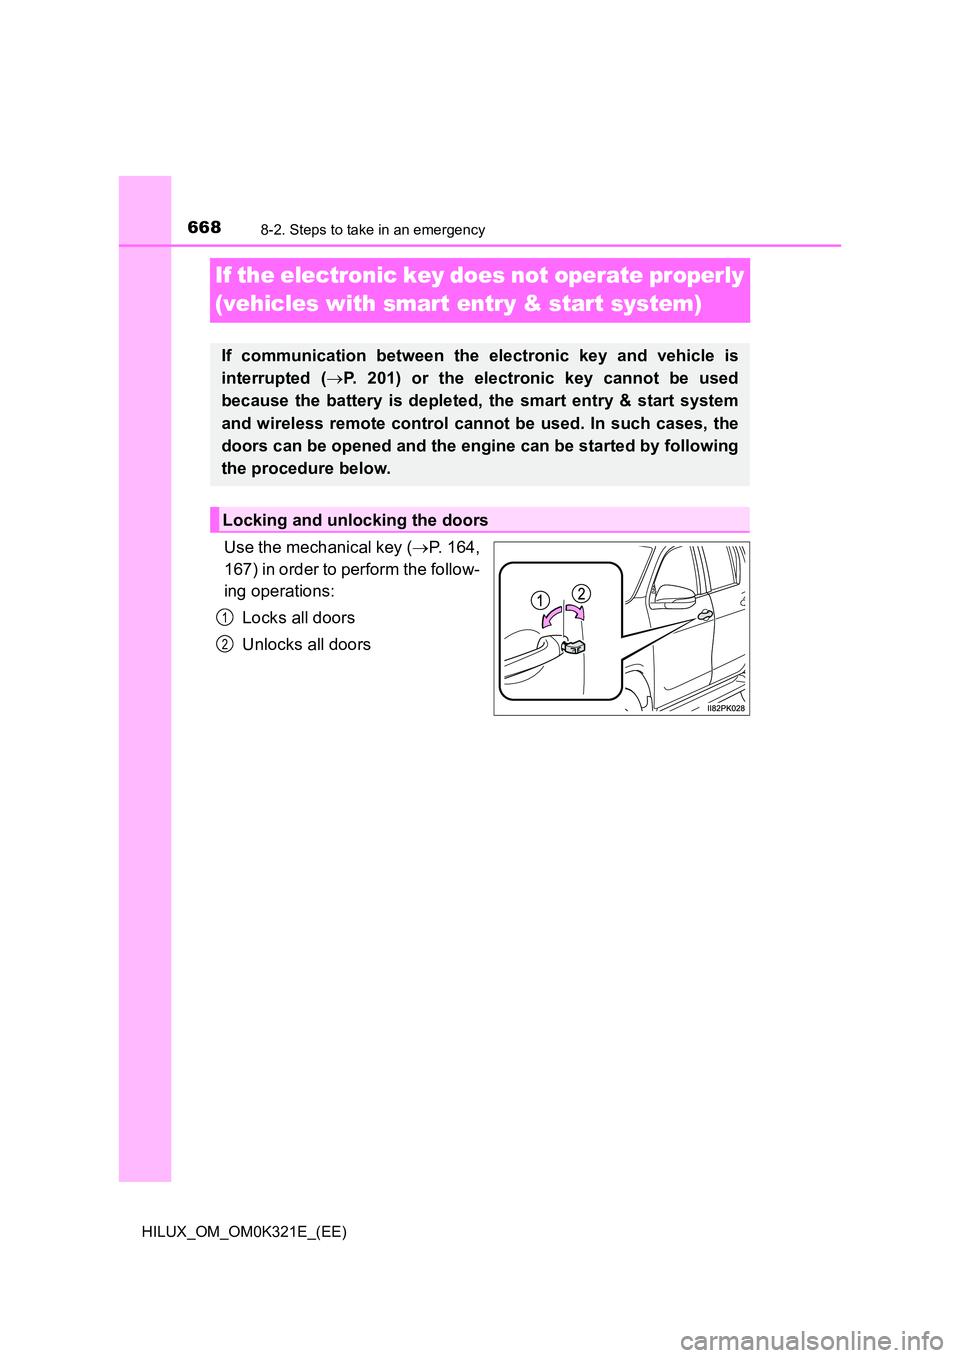
Use the mechanical key (P. 164,
167) in order to perform the follow-
ing operations:
Locks all doors
Unlocks all doors
If communication between the electronic key and vehicle is
interrupted ( P. 201) or the electronic key cannot be used
because the battery is depleted, the smart entry & start system
and wireless remote control cannot be used. In such cases, the
doors can be opened and the engine can be started by following
the procedure below.
Locking and unlocking the doors
1
2
Page 674 of 744

6748-2. Steps to take in an emergency
HILUX_OM_OM0K321E_(EE)
Once the vehicle’s engine has started, remove the jumper cables in
the exact reverse order from which they were connected.
Once the engine starts, have the vehicle inspected at any authorized
Toyota retailer or Toyota authorized repairer, or any reliable repairer
as soon as possible.
■ Starting the engine when the battery is discharged (vehicles with auto-
matic transmission)
The engine cannot be started by push-starting.
■ To prevent battery discharge
● Turn off the headlights and the audio system while the engine is off.
(Vehicles with Stop & Start system: Except when the engine is stopped due
to the Stop & Start system)
● Turn off any unnecessary electrical components when the vehicle is running
at a low speed for an extended period, such as in heavy traffic.
■ When the battery is removed or discharged
● Information stored in the ECU is cleared. When the battery is depleted, have
the vehicle inspected at any authorized Toyota retailer or Toyota authorized
repairer, or any reliable repairer.
● The power windows may not close normally. In this case, initialize the power
windows. (if equipped) ( P. 250)
■ Charging the battery
The electricity stored in the battery will discharge gradually even when the
vehicle is not in use, due to natural discharge and the draining effects of cer-
tain electrical appliances. If the vehicle is left for a long time, the battery may
discharge, and the engine may be unable to start. (The battery recharges
automatically during driving.)
■ When recharging or replacing the battery (vehicles with smart entry &
start system)
● In some cases, it may not be possible to unlock the doors using the smart
entry & start system when the battery is discharged. Use the wireless
remote control or the mechanical key to lock or unlock the doors.
● The engine may not start on the first attempt after the battery has recharged
but will start normally after the second attempt. This is not a malfunction.
● The engine switch mode is memorized by the vehicle. When the battery is
reconnected, the system will return to the mode it was in before the battery
was discharged. Before disconnecting the battery, turn the engine switch off.
If you are unsure what mode the engine switch was in before the battery dis-
charged, be especially careful when reconnecting the battery.
● Vehicles with Stop & Start system: After the battery terminals have been dis-
connected and reconnected or, the battery has been replaced, the Stop &
Start system may not automatically stop the engine for approximately 5 to
60 minutes.
6
Page 738 of 744

738Alphabetical index
HILUX_OM_OM0K321E_(EE)
Jack
Vehicle-equipped jack ........... 650
Jack handle .............................. 655
Jam protection function
Power windows ..................... 249
Keyless entry
Smart entry & start system.... 188
Wireless remote control ........ 166
Keys .......................................... 164
Electronic key........................ 164
Engine switch ........................ 282
If the electronic key does
not operate properly ........... 668
If you lose your keys ............. 168
Key number plate .................. 164
Keyless entry ........................ 166
Keys ...................................... 164
Replacing the battery ............ 599
Wireless remote
control key .......................... 166
Lever
Auxiliary catch lever .............. 568
Hood lock release lever ........ 568
Shift lever ...................... 293, 300
Turn signal lever ................... 306
Wiper lever ............................ 318
LDA (Lane Departure Alert
with Yaw Assist Function) .... 350
License plate light
Light switch ........................... 308
Replacing light bulbs ............. 619
Wattage................................. 714
Light
Engine switch light ................ 537
Fog light switch ..................... 315
Headlight switch.................... 308
Illuminated entry system ....... 539
Interior lights ......................... 538
Interior light list...................... 537
Personal/interior lights .......... 538
Replacing light bulbs............. 607
Turn signal lever ................... 306
Wattage ................................ 714
Light bulbs
Replacing .............................. 607
Wattage ................................ 714
Lock steering column ..... 284, 290
Maintenance
Do-it-yourself maintenance ... 566
Maintenance data ................. 686
Maintenance requirements ... 563
Malfunction indicator lamp ..... 635
Manual headlight
leveling dial............................ 310
Manual transmission ............... 300
Master warning light................ 639
Meter
Indicators .............................. 134
Instrument panel light
control................................. 144
Meters ................................... 142
Multi-information
display ........................ 147, 151
Warning lights ....................... 634
Microphone .............................. 484
Mirrors
Inside rear view mirror .......... 244
Outside rear view mirror
defoggers ................... 519, 528
Outside rear view mirrors...... 245
Vanity mirror ......................... 548
J
K
L
M