2020 TESLA MODEL Y climate control
[x] Cancel search: climate controlPage 30 of 232

Removing/Installing a Head Support
To remove the head support:
1.
Raise the head support as described above.
2.
Press and hold the button on the outer base of the right post.
3.
Insert a short, flat object (such as a small flat-head
screwdriver) into the opening on the inside base of
the left post and pull the head support upward.
To re-install the head support:
1.
With the front of the head support facing forward, insert both posts into the corresponding holes on the seat back.
2.
Press down on the head support until it clicks into place.
3.
Pull up on the head support to ensure that it is
secure.
WARNING: Ensure that the head support is
correctly installed before seating an occupant.
Failure to do so increases the risk of injury or
death if a collision occurs.
Seat Heaters
The front and rear seats contain heating pads that
operate at three levels from 3 (highest) to 1 (lowest).
To
operate the seat heaters, see Climate Controls on page
125.
WARNING: To avoid burns resulting from
prolonged use, individuals who have peripheral
neuropathy, or whose capacity to feel pain is
limited because of diabetes, age, neurological
injury, or some other condition, should exercise
caution when using the climate control system
and seat heaters.
Seat Covers
WARNING: Do not use seat covers in Model Y.
Doing so could restrict deployment of the seat-
mounted side air bags if a collision occurs. Also, if
the vehicle is equipped with an occupant
detection system that is used to determine the
status of the passenger front airbag, seat covers
may interfere with this system.
Front and Rear Seats
28MODEL Y OWNER
Page 59 of 232

Low beam headlights are on.
High beam headlights are on and Auto
High Beam is disabled or currently
unavailable.Auto High Beam is enabled and high
beams are on.
Model Y is ready to turn
off the high beams if light is detected.
See
High Beam Headlights on page 54.
Auto High Beam is enabled but high beams are not on because light is
detected in front of
Model Y. When light
is no longer detected, high beams
automatically turn back on. See
High
Beam Headlights on page 54.
This indicator flashes amber when the
electronic stability control systems are actively minimizing wheel spin by
controlling brake pressure and motor
power. See
Traction Control on page
63. If this indicator stays illuminated, a
fault is detected (contact Tesla
immediately).
Electronic stability control systems are no longer minimizing wheel spin. See
Traction Control on page 63.
Trailer mode (if equipped) is active (see
Towing and Accessories on page 73).Vehicle Hold is actively applying the brakes. See
Vehicle Hold on page 66.
A door or trunk is open. See Doors on
page 13, Rear Trunk on page 16, or Front
Trunk on page 18.
Appears when some of the stored energy in the Battery may not be available due to cold weather conditions. If
Model Y is
plugged in, you can heat your Battery by
turning on climate control with the
mobile app. The snowflake icon
disappears when the Battery is
su
Page 127 of 232

Overview of Climate Controls
Climate controls are always available at the bottom of the touchscreen. To turn the climate control system on, touch
the fan icon or adjust the cabin temperature. To turn it
off, touch the fan icon and then touch the off button near the
center of the popup window.
By default, climate control is set to the Auto setting, which maintains optimum comfort in all but the most severe weather conditions. When you adjust the cabin temperature in the Auto setting, the system automatically adjusts the
heating, air conditioning, air distribution, and fan speed to maintain the cabin at your selected temperature. To
override the Auto setting, touch the fan icon, turn
off the Auto setting, then manually adjust your settings (see
Adjusting Climate Control Settings on page 125). If you
Page 128 of 232

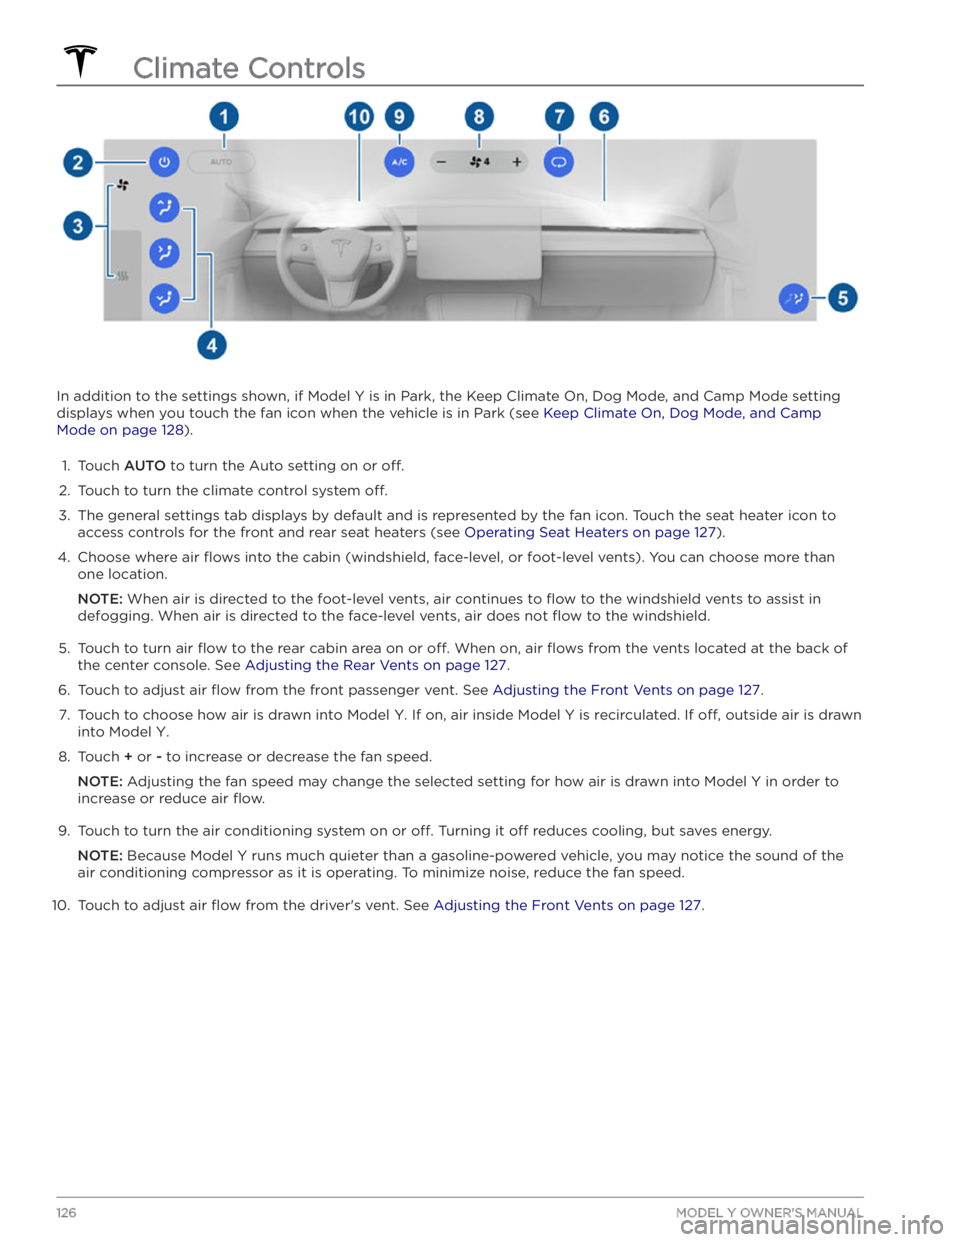
In addition to the settings shown, if Model Y is in Park, the Keep Climate On, Dog Mode, and Camp Mode setting
displays when you touch the fan icon when the vehicle is in Park (see
Keep Climate On, Dog Mode, and Camp
Mode on page 128).
1.
Touch AUTO to turn the Auto setting on or off.
2.
Touch to turn the climate control system off.
3.
The general settings tab displays by default and is represented by the fan icon. Touch the seat heater icon to
access controls for the front
and rear seat heaters (see Operating Seat Heaters on page 127).
4.
Choose where air flows into the cabin (windshield, face-level, or foot-level vents). You can choose more than
one location.
NOTE: When air is directed to the foot-level vents, air continues to flow to the windshield vents to assist in
defogging. When air is directed to the face-level vents, air does not
flow to the windshield.
5.
Touch to turn air flow to the rear cabin area on or off. When on, air flows from the vents located at the back of
the center console. See
Adjusting the Rear Vents on page 127.
6.
Touch to adjust air flow from the front passenger vent. See Adjusting the Front Vents on page 127.
7.
Touch to choose how air is drawn into Model Y. If on, air inside Model Y is recirculated. If off, outside air is drawn
into
Model Y.
8.
Touch + or - to increase or decrease the fan speed.
NOTE: Adjusting the fan speed may change the selected setting for how air is drawn into Model Y in order to
increase or reduce air
flow.
9.
Touch to turn the air conditioning system on or off. Turning it off reduces cooling, but saves energy.
NOTE: Because Model Y runs much quieter than a gasoline-powered vehicle, you may notice the sound of the
air conditioning compressor as it is operating. To minimize noise, reduce the fan speed.
10.
Touch to adjust air flow from the driver
Page 129 of 232

Operating Seat Heaters
To control the front seat heaters for the driver and
passenger, touch the corresponding control on the main climate control area at the bottom of the touchscreen.
To control the rear seat heaters (if equipped) or access
duplicate controls for the front seat heaters, touch the
fan icon, then touch the seat heater icon followed by
the seat for which you want to adjust heating. Seat
heaters operate at three setting levels from 3 (highest)
to 1 (lowest). When operating, the associated seat icon
displays twisting lines that turn red to indicate the setting level. You can touch
All Off to turn off all seat
heaters simultaneously.
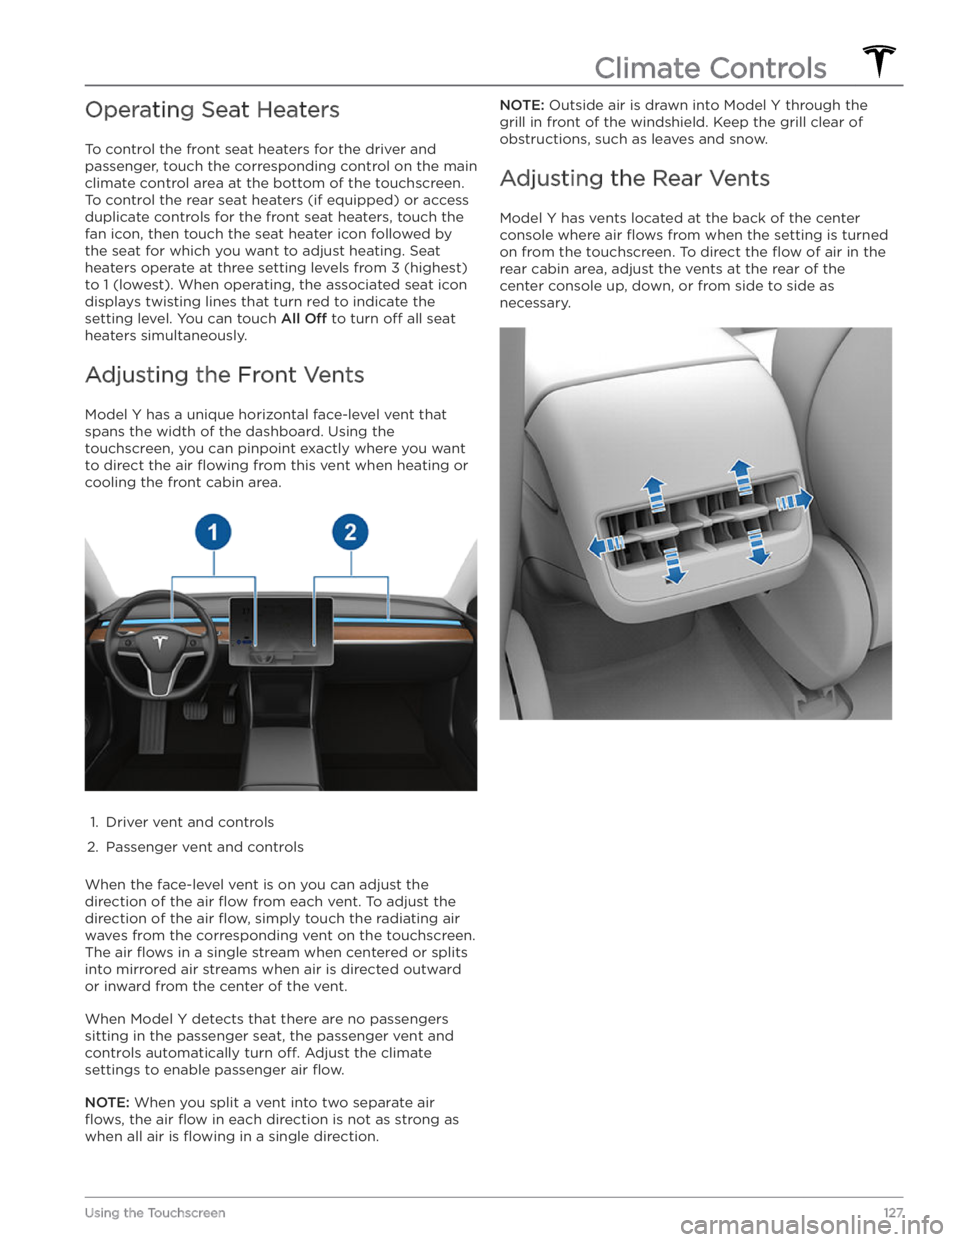
Adjusting the Front Vents
Model Y has a unique horizontal face-level vent that
spans the width of the dashboard. Using the
touchscreen, you can pinpoint exactly where you want to direct the air
flowing from this vent when heating or
cooling the front cabin area.
1.
Driver vent and controls
2.
Passenger vent and controls
When the face-level vent is on you can adjust the direction of the air
flow from each vent. To adjust the
direction of the air
flow, simply touch the radiating air
waves from the corresponding vent on the touchscreen.
The air
flows in a single stream when centered or splits
into mirrored air streams when air is directed outward or inward from the center of the vent.
When Model Y detects that there are no passengers
sitting in the passenger seat, the passenger vent and controls automatically turn
off. Adjust the climate
settings to enable passenger air
flow.
NOTE: When you split a vent into two separate air
flows, the air flow in each direction is not as strong as
when all air is
flowing in a single direction.
NOTE: Outside air is drawn into Model Y through the
grill in front of the windshield. Keep the grill clear of
obstructions, such as leaves and snow.
Adjusting the Rear Vents
Model Y has vents located at the back of the center
console where air
flows from when the setting is turned
on from the touchscreen. To direct the
flow of air in the
rear cabin area, adjust the vents at the rear of the center console up, down, or from side to side as necessary.
Climate Controls
127Using the Touchscreen
Page 130 of 232

Keep Climate On, Dog Mode, and
Camp Mode
The Keep Climate On, Dog, and Camp settings allow
you to keep the climate control system running when in Park, even after you
Page 131 of 232

WARNING: Never leave children or pets in the
vehicle unattended. Due to automatic shut-off or
extreme outside conditions, the inside of the
vehicle can become dangerously hot, even when
Cabin Overheat Protection is enabled.
Climate Control Operating Tips
Page 226 of 232

CE certifications: 202
CHAdeMO: 155
chains: 168
change of ownership: 124
charge port: 157
charge port light: 159
charge port manual release: 158
charge port release cable: 158
charging: 154, 155, 157, 159
charge settings: 159
charging status: 159
components and equipment: 154
instructions: 157
public charging stations: 155
scheduling: 159
charging locations, finding: 132
child protection: 15
disabling rear window switches: 15
child seats: 32
installing and using: 32
child-protection locks: 14
cleaning: 170
climate controls: 125
coat hangers: 23
cold weather best practices: 79
collision avoidance assist: 114
connecting to Wi-Fi: 148
console: 21, 23
12V power socket: 23
opening: 21
rear: 21
USB ports: 21
consumption chart: 67
contact information: 193, 202
roadside assistance: 193
Tesla: 202
copyrights: 198
cruise control: 84
D
dashboard overview: 2
Dashcam: 70
data recording: 199
data sharing: 199
declarations of conformity: 202
delivery mileage: 200
devices: 136, 137
Bluetooth, playing audio files: 137
playing audio files from: 136
dimensions: 181
Dog Mode: 128
dome (map) lights: 53
door handles: 13
door labels: 179
doors: 13, 14
Child Lock: 14
exterior door handles: 13
interior locking and unlocking: 14
keyless entry: 13
locking: 13
opening from exterior: 13
opening from interior: 13
Unlock on Park: 14
unlocking: 13
doorsfunction: 14
Walk-Away Door Lock: 14
drive away locking: 14
Drive gear: 51
driver: 44
profiles: 44
driving: 25, 49, 67
seating position: 25
starting: 49
tips to maximize range: 67
E
Easter Eggs: 198
easy entry, driver profile: 44
EDR (event data recorder): 199
electric parking brake: 62
emergency braking: 114
emergency flashers: 55
Emergency Lane Departure Avoidance: 111
emission label: 178
energy: 56, 61
gained from regenerative braking: 61
range information: 56
Energy app: 67
energy use predictions (navigating): 132
Erase & Reset: 124
event data recording: 199
exterior: 3, 53, 170, 171, 172, 181
car cover: 172
cleaning: 170
dimensions: 181
lights: 53
overview: 3
polishing, touch up, & repair: 171
Index