Page 3 of 247

Overview
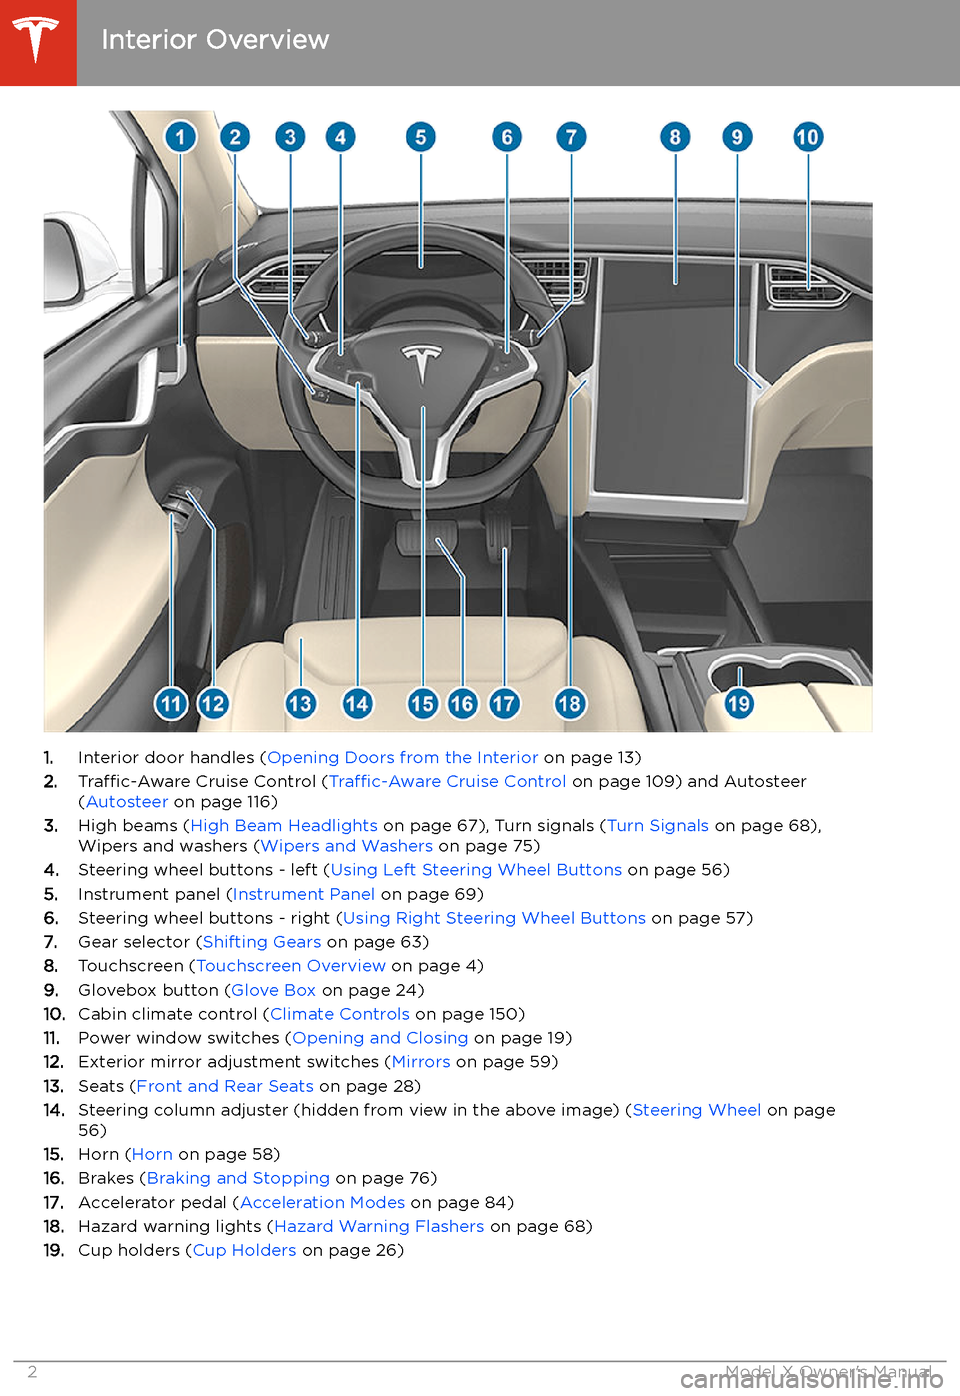
Interior Overview
1. Interior door handles ( Opening Doors from the Interior on page 13)
2. Traffic-Aware Cruise Control ( Traffic-Aware Cruise Control on page 109) and Autosteer
( Autosteer on page 116)
3. High beams ( High Beam Headlights on page 67), Turn signals ( Turn Signals on page 68),
Wipers and washers ( Wipers and Washers on page 75)
4. Steering wheel buttons - left ( Using Left Steering Wheel Buttons on page 56)
5. Instrument panel ( Instrument Panel on page 69)
6. Steering wheel buttons - right ( Using Right Steering Wheel Buttons on page 57)
7. Gear selector ( Shifting Gears on page 63)
8. Touchscreen ( Touchscreen Overview on page 4)
9. Glovebox button ( Glove Box on page 24)
10. Cabin climate control ( Climate Controls on page 150)
11. Power window switches ( Opening and Closing on page 19)
12. Exterior mirror adjustment switches ( Mirrors on page 59)
13. Seats ( Front and Rear Seats on page 28)
14. Steering column adjuster (hidden from view in the above image) ( Steering Wheel on page
56)
15. Horn ( Horn on page 58)
16. Brakes ( Braking and Stopping on page 76)
17. Accelerator pedal ( Acceleration Modes on page 84)
18. Hazard warning lights ( Hazard Warning Flashers on page 68)
19. Cup holders ( Cup Holders on page 26)
Interior Overview
2Model X Owner
Page 25 of 247
Interior Storage and Electronics
Glove Box
To open the glove box, press the switch located on the side of the touchscreen. The
glove box locks whenever Model X is locked
externally, using the key or walk-away locking.
It also locks when Model X is in Valet mode
(see Valet Mode on page 54). It does not
lock when you lock Model X using the lock
icon on the touchscreen
Page 198 of 247

Warning: Road holding is seriously
impaired if the tires are incorrectly
installed on the wheels.Removing and Installing Lug Nut Covers
If your Model X is equipped with lug nut
covers, you must remove them to access the
lug nuts.
To remove a lug nut cover:
1. Insert the curved part of the lug nut cover
tool (located in the glovebox for some
vehicles) into the hole at the base of the
Tesla "T".
Note: The lug nut cover tool can also be
purchased at an auto parts store or
through online retailers.
2. Maneuver the lug nut cover tool so that it
is fully inserted into the hole in the lug nut
cover.
3. Twist the lug nut cover tool so that the
curved part is touching the middle of the
lug nut cover.
4. Firmly pull the lug nut tool away from the
wheel until the lug nut cover is released.
To install the lug nut cover:
1. Align the lug nut cover into position.
2. Push firmly on the lug nut cover until it
fully snaps into place.
Caution: Make sure the lug nut cover
is fully secure before driving to
prevent it from falling off.
Tire Care and Maintenance
Maintenance197
Page 243 of 247
gates, opening 175
GAWR 212
gears 63
glove box 24
Gross Axle Weight Rating 212
Gross Vehicle Weight Rating 212
ground clearance 213
GVWR 212
H
hazard warning