Page 3 of 247

Overview
Interior Overview
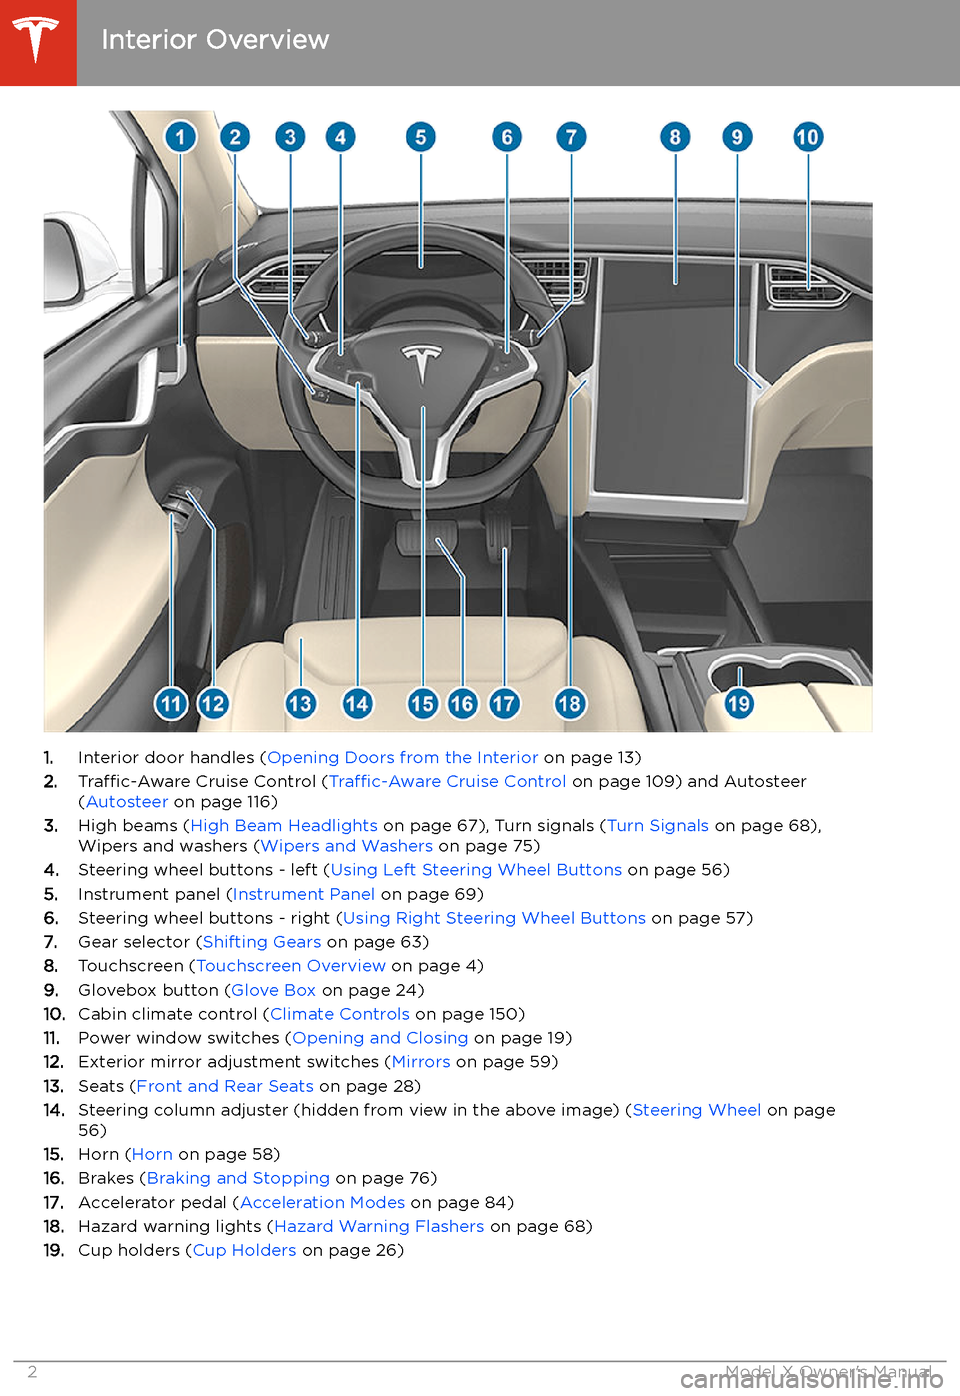
1. Interior door handles ( Opening Doors from the Interior on page 13)
2. Traffic-Aware Cruise Control ( Traffic-Aware Cruise Control on page 109) and Autosteer
( Autosteer on page 116)
3. High beams ( High Beam Headlights on page 67), Turn signals ( Turn Signals on page 68),
Wipers and washers ( Wipers and Washers on page 75)
4. Steering wheel buttons - left ( Using Left Steering Wheel Buttons on page 56)
5. Instrument panel ( Instrument Panel on page 69)
6. Steering wheel buttons - right ( Using Right Steering Wheel Buttons on page 57)
7. Gear selector ( Shifting Gears on page 63)
8. Touchscreen ( Touchscreen Overview on page 4)
9. Glovebox button ( Glove Box on page 24)
10. Cabin climate control ( Climate Controls on page 150)
11. Power window switches ( Opening and Closing on page 19)
12. Exterior mirror adjustment switches ( Mirrors on page 59)
13. Seats ( Front and Rear Seats on page 28)
14. Steering column adjuster (hidden from view in the above image) ( Steering Wheel on page
56)
15. Horn ( Horn on page 58)
16. Brakes ( Braking and Stopping on page 76)
17. Accelerator pedal ( Acceleration Modes on page 84)
18. Hazard warning lights ( Hazard Warning Flashers on page 68)
19. Cup holders ( Cup Holders on page 26)
Interior Overview
2Model X Owner
Page 69 of 247
Turn Signals
Move the left-hand steering column lever up
(before turning right) or down (before turning
left). The turn signals
Page 103 of 247

Attaching and Removing the Ball
Mount
The Model X towing package does not include
a ball mount. You must purchase a ball mount
suitable for the type of trailer you are towing. The Model X hitch receiver supports a ballmount up to 8” with a rise of up to 0.75”. Do
not use any type of drop ball mount.
To attach a ball mount:
1. If necessary, remove the cotter pin from
the locking bolt and slide the locking bolt out of the hitch assembly.
2. Slide the ball holder into the hitch
assembly.
3. Align the hole in the ball holder with the
one in the hitch assembly.
4. Slide the locking bolt through the hitch
assembly/ball holder.
5. Insert the cotter pin in the hole at the end
of the locking bolt.
To remove a ball mount:
1. Remove the cotter pin from the locking
bolt and slide the locking bolt out of the
ball holder/hitch assembly.
2. Pull the ball holder out of the hitch
assembly.
Electrical Connections
Regulations require all trailers to be equipped
with tail lights, brake lights, side marker lights,
and turn signals. To provide power for trailer
lighting, a built-in seven-way wiring connector (SAE J560) is attached near the tow hitch.Most trailer wiring plugs can be attached tothis connector.
1. Reverse Lights (Purple)
2. 12V Power (Red or Black)
3. Right Turn Signal and Brake Light (Green)
4. Brake Controller Output (Blue)
5. Tail Lights and Running Lights (Brown)
6. Left Turn Signal and Brake Light (Yellow)
7. Ground (White)
Note: It is the driver
Page 117 of 247
Autosteer
Note: Autosteer is a BETA feature.
Autosteer builds upon Traffic-Aware Cruise
Control (see Traffic-Aware Cruise Control on
page 109), intelligently keeping Model X in its driving lane when cruising at a set speed.
Autosteer also allows you to use the turn
signals to move Model X into an adjacent lane (see Auto Lane Change on page 118). Using
the vehicle
Page 122 of 247
Whenever Navigate on Autopilot is active, the
instrument panel displays the driving lane as a
single blue line in front of Model X:
When Navigate on Autopilot is active and you
approach an off-ramp or freeway interchange
along your navigation route, the appropriate
turn signal engages and Autosteer maneuvers Model X onto the off-ramp or interchange.
Warning:
Never depend on Navigate on
Autopilot to determine an appropriate lane at an off-ramp. Stay alert and
perform visual checks to ensure that the driving lane is safe and appropriate.
When you leave a controlled-access road (for
example, you exit a freeway or you enter a section of the navigation route that is nolonger supported), Navigate on Autopilot
reverts back to Autosteer
Page 123 of 247

When the instrument panel displays a
message asking you to confirm the lane
change, pull the Autopilot stalk toward you or
engage the appropriate turn signal. If you do
not confirm the lane change within three
seconds, a chime sounds to remind you that
Navigate on Autopilot requires your
confirmation to change lanes.
If Require Lane Change Confirmation is turned
off, Navigate on Autopilot engages the
appropriate turn signal, checks for vehicles
and objects, and when appropriate,
maneuvers Model X into the adjacent lane.
If Require Lane Change Confirmation is turned
on, you must pull the Autopilot stalk toward
you or engage the appropriate turn signal to confirm that you want Navigate on Autopilot
to make the lane change. If you do not confirm
the lane change within three seconds, a chime
sounds to remind you that Navigate on Autopilot requires your confirmation to
change lanes.
Note: If you ignore a route-based lane change
suggestion (for example, you are driving in the
left lane while approaching an off-ramp on the
right side of the highway), Navigate on
Autopilot will be unable to maneuver onto the off-ramp and as a result, the navigation
system will re-route you to your destination.Warning: Navigate on Autopilot may not
always attempt to exit at an off-ramp or
change lanes, even when an exit or lane
change is determined by the navigation
route. Always remain alert and be prepared to manually steer onto an off-
ramp, or make a lane change to prepare
for, or to exit at, an off-ramp or
interchange.
Be Ready to Assist
When attempting to change lanes or
maneuver Model X, or when approaching
construction zones, Navigate on Autopilot
may be unable to determine the appropriate
driving lane (for example, complex clover leafs
and multi-lane off-ramps) and the instrument
panel displays an alert indicating that
Navigate on Autopilot is trying to maneuver
and may require assistance. When you see the
message, be prepared to take immediate
action to ensure that it is safe and appropriate
to complete the lane change or maneuver.
Limitations
Autosteer and its associated functions are
particularly unlikely to operate as intended
when:
Page 172 of 247
Security Settings
About the Security System
If Model X does not detect a key nearby and a
locked door or trunk is opened, an alarm sounds and the headlights and turn signals
Page 246 of 247
towing guidelines 99
towing instructions 227
Towing Label 211TPMSFCC certification 238
overview of 198
Tracking Disabled 156
traction control 80
trademarks 232
Traffic-Aware Cruise Control 109
Trailer Brakes for towing 97
Trailer Mode 97
trailer, towing 94
transmission specifications 216
transponders, attaching 209
Transport Canada, contacting 236
Transport Mode 228
transporting 227, 228
trip chart 87
trip meter 86
Trip Planner 160
trunk, front 22
trunk, rearchild-protection lock 17
disabling interior handle 17
turn signals 68
U ultrasonic sensors 106
uniform tire quality grading 222
Unlock on Park 10
unlocking when key doesn