2020 TESLA MODEL 3 tow
[x] Cancel search: towPage 4 of 220

Exterior Overview
1.Exterior lights ( Lights on page 58)
2. Autopilot camera ( About Autopilot on page 84)
3. Front door handle ( Using Exterior Door Handles on page 15)
4. Key card sensor ( Keys on page 9), Autopilot camera ( About Autopilot on page 84)
5. Rear door handle ( Using Exterior Door Handles on page 15)
6. Charge port ( Charging Instructions on page 157)
7. Autopilot cameras ( About Autopilot on page 84)
8. Exterior mirrors ( Mirrors on page 52)
9. Radar sensor (hidden from view) ( About Autopilot on page 84)
10. Hood/front trunk ( Front Trunk on page 21)
11. Tow eye cover ( Instructions for Transporters on page 199)
12. Wheels and tires ( Wheels and Tires on page 190)
13. Rear view camera ( Rear View Camera on page 75)
14. Rear trunk ( Rear Trunk on page 19)
Exterior Overview
Overview3
Page 23 of 220

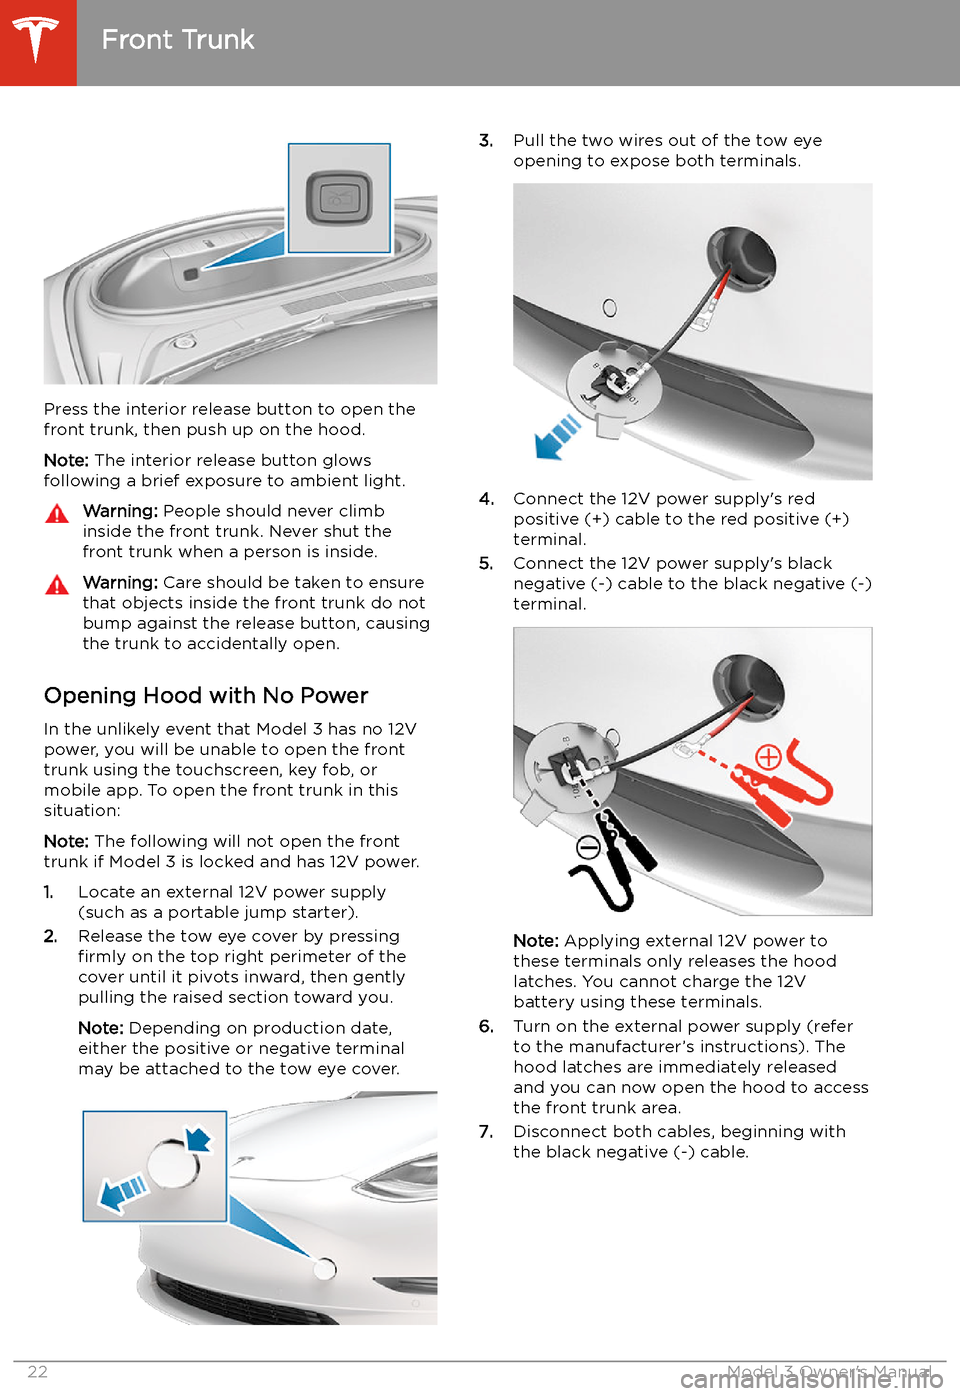
Press the interior release button to open the
front trunk, then push up on the hood.
Note: The interior release button glows
following a brief exposure to ambient light.
Warning: People should never climb
inside the front trunk. Never shut the
front trunk when a person is inside.Warning: Care should be taken to ensure
that objects inside the front trunk do not
bump against the release button, causing the trunk to accidentally open.
Opening Hood with No Power
In the unlikely event that Model 3 has no 12V power, you will be unable to open the front
trunk using the touchscreen, key fob, or
mobile app. To open the front trunk in this situation:
Note: The following will not open the front
trunk if Model 3 is locked and has 12V power.
1. Locate an external 12V power supply
(such as a portable jump starter).
2. Release the tow eye cover by pressing
firmly on the top right perimeter of the
cover until it pivots inward, then gently pulling the raised section toward you.
Note: Depending on production date,
either the positive or negative terminal
may be attached to the tow eye cover.
3. Pull the two wires out of the tow eye
opening to expose both terminals.
4. Connect the 12V power supply
Page 26 of 220

Note: Power is available whenever the vehicle
is considered "awake". The vehicle may be
awake for many reasons. For example, when
using features such as Summon, or when features such as Cabin Overheat Protection,Keep Climate On, Dog Mode, Sentry Mode,
etc. are enabled. The vehicle is also awake
whenever the 12V battery is being charged or
is in use, during HV charging, when the vehicle
is communicating with the mobile app, etc. Leaving an accessory plugged in does notdeplete the 12V battery.
Note: Always use USB 2.0 compliant cables
when connecting devices to the USB ports.
Using non-compliant cables can result in
slower charging and, if plugged into either of the front two ports, can result in potential connection problems or degraded
performance when trying to access media files
on the device.
Note: Do not connect multiple devices using a
USB hub. This can prevent connected devices from charging or from being recognized by
Media Player, Sentry Mode, Dashcam, etc.
Installing Phone Charging Cable To make it easy to connect your phone while
keeping the console free of clutter, you can install a phone charging cable in Model 3.
Note: The phone dock supports two phones
side-by-side.
To install a phone charging cable:
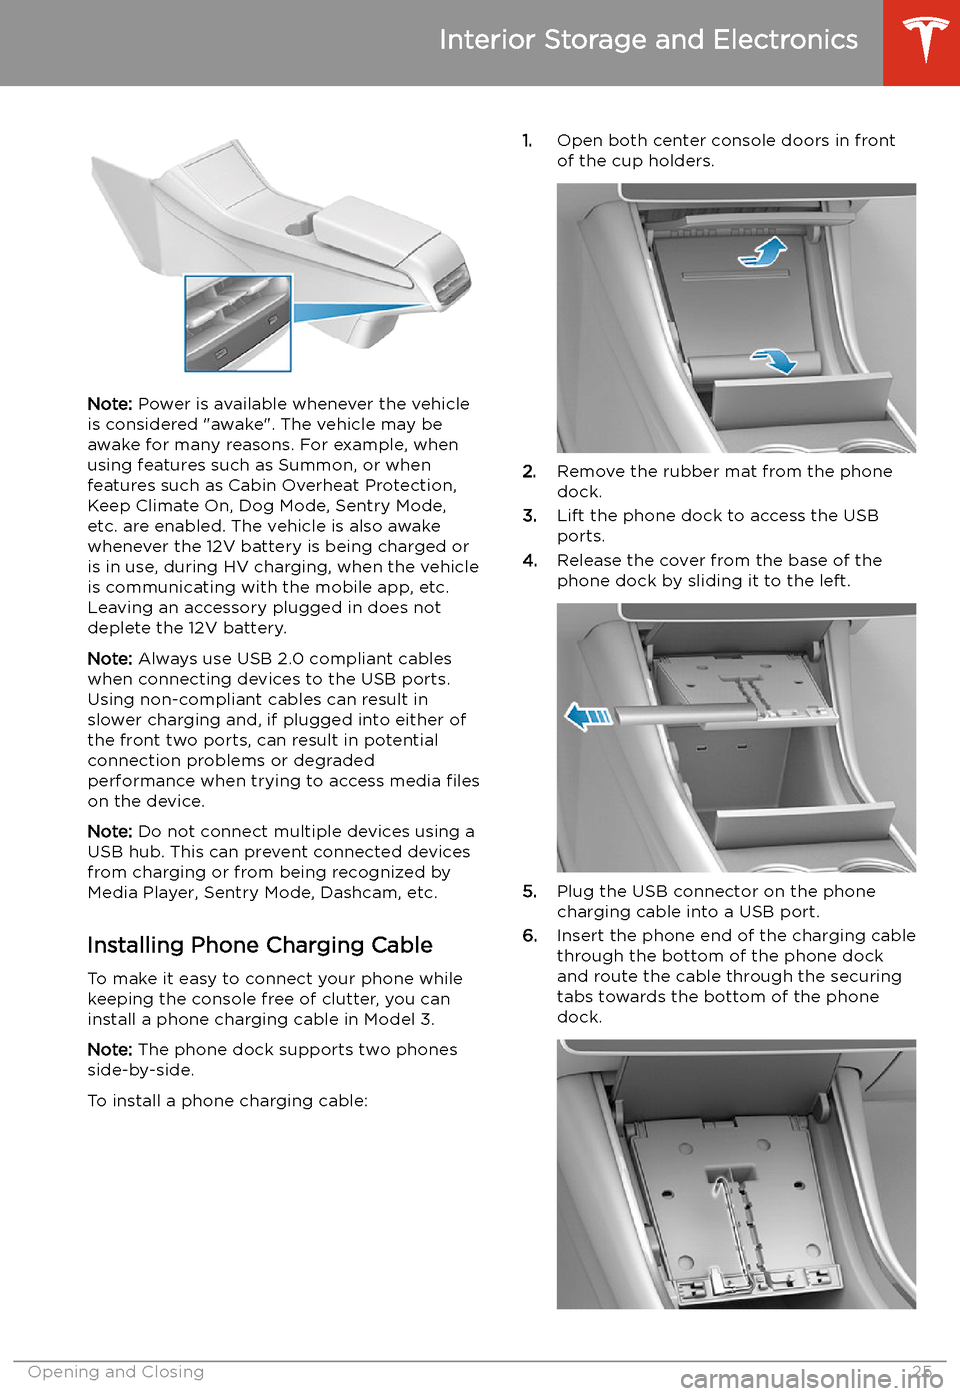
1. Open both center console doors in front
of the cup holders.
2. Remove the rubber mat from the phone
dock.
3. Lift the phone dock to access the USB
ports.
4. Release the cover from the base of the
phone dock by sliding it to the left.
5. Plug the USB connector on the phone
charging cable into a USB port.
6. Insert the phone end of the charging cable
through the bottom of the phone dock
and route the cable through the securing
tabs towards the bottom of the phone dock.
Interior Storage and Electronics
Opening and Closing25
Page 83 of 220

performing the procedure, and do not
attempt to use tools or excessive force.
Note: Preemptively applying WD-40 to the
door handle pivot pins can help prevent ice buildup inside your door handle. See Applying
WD-40 to Door Handle Pivot Pins for
instructions.
Perform the following to remove ice from the door handle:
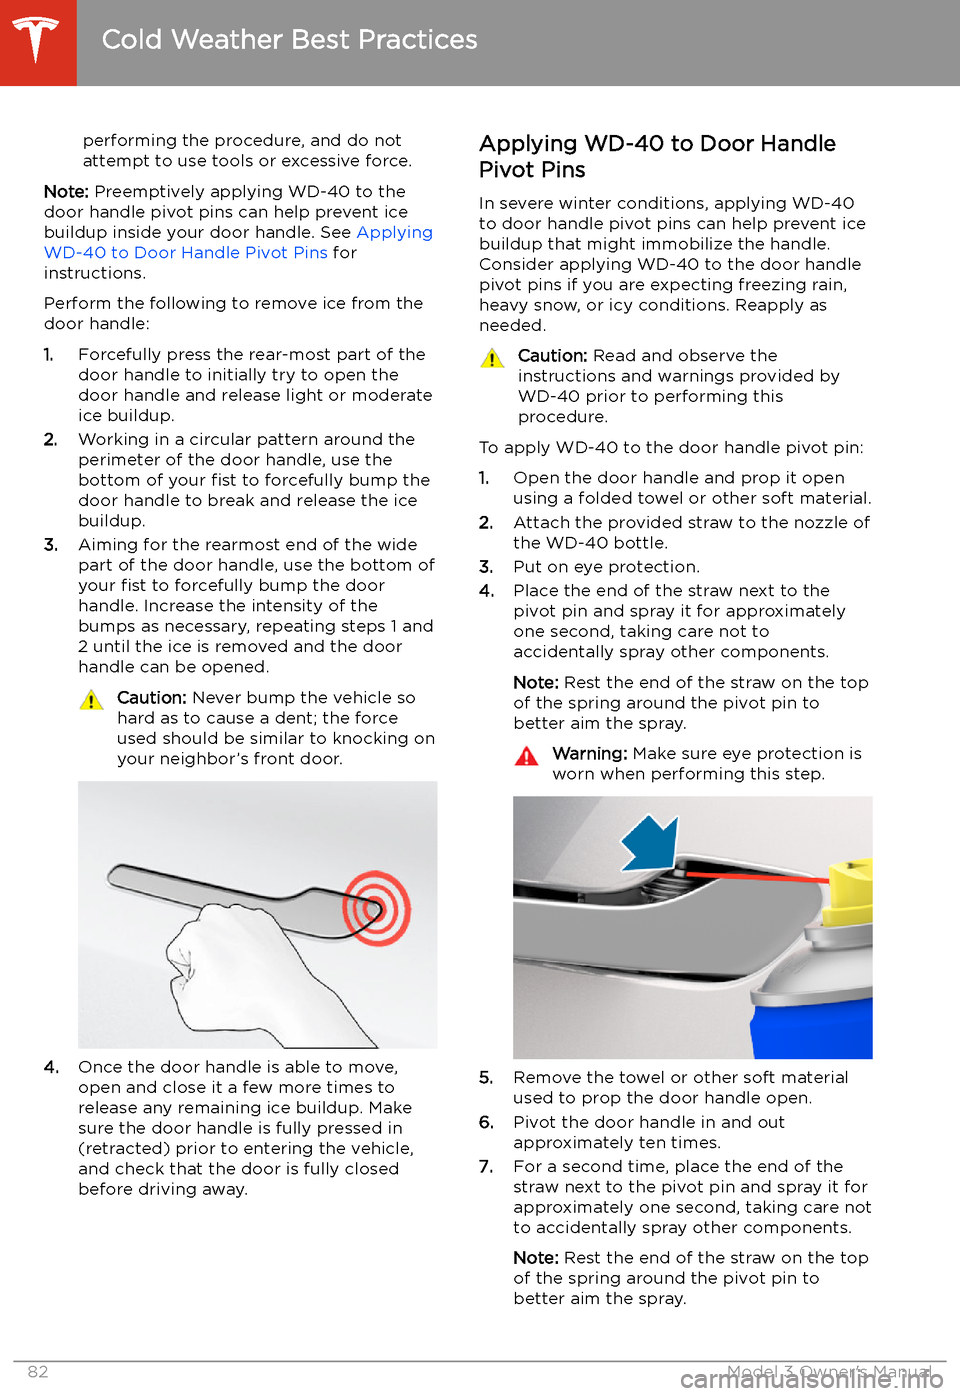
1. Forcefully press the rear-most part of the
door handle to initially try to open the
door handle and release light or moderate ice buildup.
2. Working in a circular pattern around the
perimeter of the door handle, use the
bottom of your fist to forcefully bump the
door handle to break and release the ice
buildup.
3. Aiming for the rearmost end of the wide
part of the door handle, use the bottom of
your fist to forcefully bump the door
handle. Increase the intensity of the
bumps as necessary, repeating steps 1 and
2 until the ice is removed and the door
handle can be opened.
Caution: Never bump the vehicle so
hard as to cause a dent; the force
used should be similar to knocking on
your neighbor’s front door.
4. Once the door handle is able to move,
open and close it a few more times to
release any remaining ice buildup. Make
sure the door handle is fully pressed in
(retracted) prior to entering the vehicle,
and check that the door is fully closed
before driving away.
Applying WD-40 to Door Handle
Pivot Pins
In severe winter conditions, applying WD-40
to door handle pivot pins can help prevent ice
buildup that might immobilize the handle.
Consider applying WD-40 to the door handle pivot pins if you are expecting freezing rain,heavy snow, or icy conditions. Reapply as
needed.Caution: Read and observe the
instructions and warnings provided by
WD-40 prior to performing this
procedure.
To apply WD-40 to the door handle pivot pin:
1. Open the door handle and prop it open
using a folded towel or other soft material.
2. Attach the provided straw to the nozzle of
the WD-40 bottle.
3. Put on eye protection.
4. Place the end of the straw next to the
pivot pin and spray it for approximately
one second, taking care not to
accidentally spray other components.
Note: Rest the end of the straw on the top
of the spring around the pivot pin to
better aim the spray.
Warning: Make sure eye protection is
worn when performing this step.
5. Remove the towel or other soft material
used to prop the door handle open.
6. Pivot the door handle in and out
approximately ten times.
7. For a second time, place the end of the
straw next to the pivot pin and spray it for
approximately one second, taking care not
to accidentally spray other components.
Note: Rest the end of the straw on the top
of the spring around the pivot pin to better aim the spray.
Cold Weather Best Practices
82Model 3 Owner
Page 84 of 220

8.Remove the towel or other soft material
used to prop the door handle open.
9. Pivot the door handle in and out
approximately ten times.
10. Perform this procedure on the other three
door handles.
Cold Weather Best Practices
Driving83
Page 91 of 220

Cruising Near or On Freeway Exits
When cruising near an exit on a controlled
access road (such as a highway or freeway)
and engaging the turn signal toward the exit,
Traffic-Aware Cruise Control assumes you are
exiting and begins to slow down the vehicle. If
you do not drive onto the exit, Traffic-Aware
Cruise Control resumes cruising at the set
speed. In a region with right hand traffic, this
occurs only when you engage the right turn signal when driving in the right-most lane
within 164 feet (50 meters) of an exit. Likewise
in regions with left hand traffic; when
engaging the left turn signal when driving in
the left-most lane within 164 feet (50 meters)
of an exit.
Note: The onboard Global Positioning System
(GPS) determines if you are driving in a region
with right or left hand traffic. In situations
where GPS data is unavailable (for example, if
there is inadequate signal), engaging the turn
signal near an exit does not cause Traffic-
Aware Cruise Control to slow down Model 3.
When enabled while on a highway interchange
or off-ramp, Traffic-Aware Cruise Control may
reduce your set speed in 5 mph (5 km/h)
increments
Page 159 of 220

wall outlet instead of using energy stored in
the Battery. For example, if you are sitting in
Model 3 and using the touchscreen while
parked and plugged in, Model 3 draws energy
from the wall outlet instead of the Battery.Caution: The connector end of the charge
cable can damage the paint if dropped
onto the vehicle.
During Charging
During charging, the charge port light (the Tesla "T" logo) pulses green, and thetouchscreen displays the charging status. The
frequency at which the charge port light
pulses slows down as the charge level
approaches full. When charging is complete,
the light stops pulsing and is solid green.
Note: If Model 3 is locked, the charge port
light does not light up.
If the charge port light turns red while
charging, a fault is detected. Check the
touchscreen for a message describing the
fault. A fault can occur due to something as
common as a power outage. If a power outage
occurs, charging resumes automatically when
power is restored.
Note: When charging, particularly at high
currents, the refrigerant compressor and fan
operate as needed to keep the Battery cool.
Therefore, it is normal to hear sounds during charging.
Note: Air conditioning performance is
generally not affected by charging. However,
under certain circumstances (for example, you
are charging at high currents during a
particularly warm day), the air coming from
the vents may not be as cool as expected and
a message displays on the touchscreen. This is
normal behavior and ensures that the Battery stays within an optimum temperature range
while charging to support longevity and optimum performance.
Warning: Never spray liquid at a high
velocity (for example, if using a pressure
washer) towards the charge port while
charging. Failure to follow these
instructions can result in serious injury or
damage to the vehicle, charging
equipment, or property.
Stopping Charging
Stop charging at any time by disconnecting
the charge cable or touching Stop Charging
on the touchscreen.
Note: To prevent unauthorized unplugging of
the charge cable, the charge cable latch remains locked and Model 3 must be unlockedor able to recognize your authenticated phone
before you can disconnect the charge cable.
However, in cold ambient temperatures below
41
Page 168 of 220

Asymmetric Tires
Model 3 tires are asymmetric and must be
mounted on the wheel with the correct
sidewall facing outward. The sidewall of the
tire is marked with the word OUTSIDE. When
new tires are installed, make sure that the tires
are correctly mounted on the wheels.Warning: Road holding is seriously
impaired if the tires are incorrectly
installed on the wheels.
Removing and Installing Aero Covers
If your Model 3 is equipped with aero covers,
you must remove them to access the lug nuts.
To remove an aero cover:
1. Grasp the aero cover firmly with both
hands.
2. Pull the aero cover toward you to release
the retaining clips.
To install an aero cover:
1. Align the aero cover into position so that
the notch at the base of the Tesla "T" is aligned with the tire