Page 12 of 220
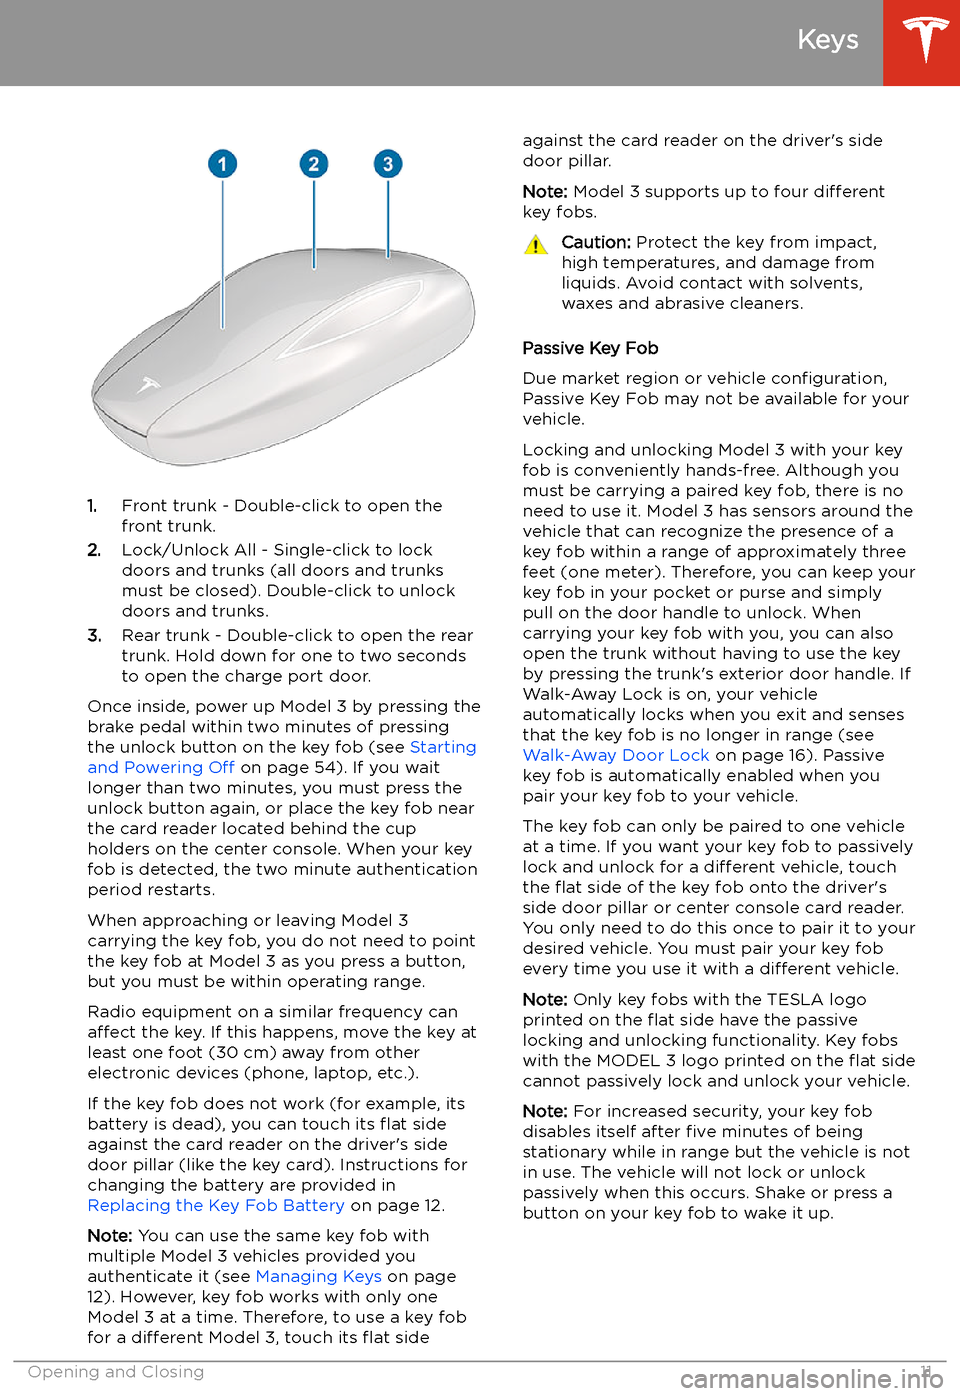
1.Front trunk - Double-click to open the
front trunk.
2. Lock/Unlock All - Single-click to lock
doors and trunks (all doors and trunks
must be closed). Double-click to unlock doors and trunks.
3. Rear trunk - Double-click to open the rear
trunk. Hold down for one to two seconds to open the charge port door.
Once inside, power up Model 3 by pressing the
brake pedal within two minutes of pressing
the unlock button on the key fob (see Starting
and Powering Off on page 54). If you wait
longer than two minutes, you must press the
unlock button again, or place the key fob near
the card reader located behind the cup holders on the center console. When your key
fob is detected, the two minute authentication period restarts.
When approaching or leaving Model 3
carrying the key fob, you do not need to point the key fob at Model 3 as you press a button,
but you must be within operating range.
Radio equipment on a similar frequency can
affect the key. If this happens, move the key at
least one foot (30 cm) away from other electronic devices (phone, laptop, etc.).
If the key fob does not work (for example, its
battery is dead), you can touch its
Page 14 of 220
mobile app installed and connected to the
vehicle’s Tesla account.
1. While sitting in the vehicle, open the Tesla
mobile app and select the appropriate
vehicle (if there are multiple vehicles
associated with the account), then touch
Phone Key > Start .
2. Scan an already-authenticated key card or
key fob on the key reader behind the cup
holders on the top of the center console.
3. When the mobile app notifies you that the
pairing was successful, touch Done. The
key list on the touchscreen ( Controls >
Locks ) displays the new phone key. The
name of the phone key is determined by
the name used in the phone’s settings.
Removing a key:
When you no longer want a key to access your
vehicle (for example, you lost your phone or key card, etc.), you can remove the key.
1. On the touchscreen, touch Controls >
Locks .
2. Find the key that you would like to delete
in the key list, then touch the key’s
associated trash icon.
3. When prompted, scan an already-
authenticated key card or key fob on the
key reader behind the cup holders on the
top of the center console to confirm the
deletion. When complete, the key list no
longer includes the deleted key.
Note: Your vehicle requires at least one
authenticated key card or key fob at all times.
If only one key card is included on the key list,
this key cannot be deleted.
Mobile App
In addition to using it to authenticate a phone
as your Model 3 key, you can use the mobile
app to communicate with Model 3 remotely
using your iPhone
Page 25 of 220
Interior Storage and Electronics
Glovebox
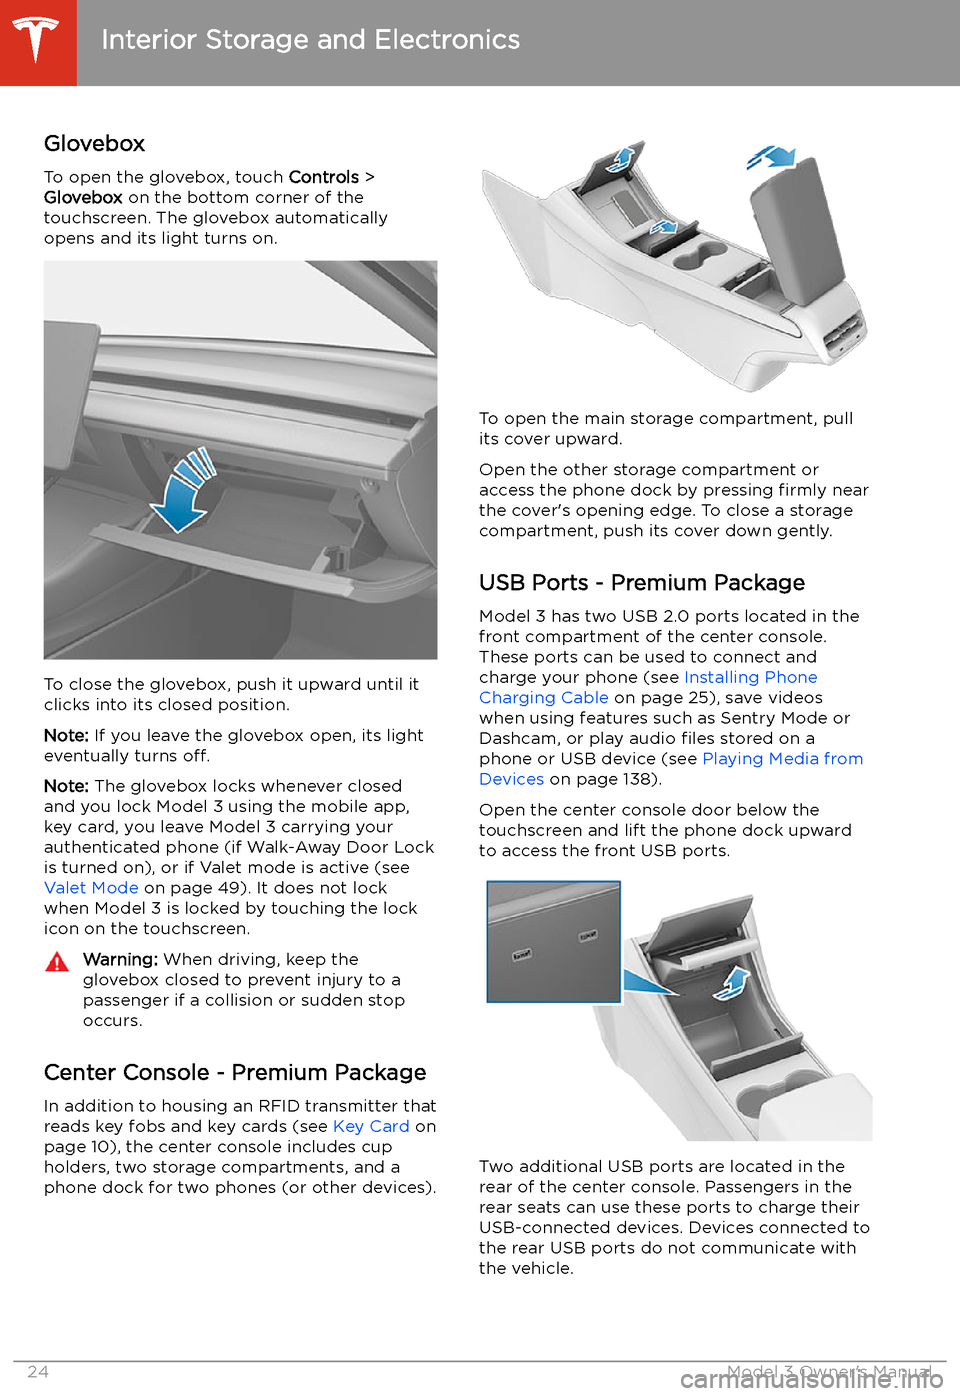
To open the glovebox, touch Controls >
Glovebox on the bottom corner of the
touchscreen. The glovebox automatically
opens and its light turns on.
To close the glovebox, push it upward until it
clicks into its closed position.
Note: If you leave the glovebox open, its light
eventually turns off.
Note: The glovebox locks whenever closed
and you lock Model 3 using the mobile app,
key card, you leave Model 3 carrying your authenticated phone (if Walk-Away Door Lock
is turned on), or if Valet mode is active (see Valet Mode on page 49). It does not lock
when Model 3 is locked by touching the lock
icon on the touchscreen.
Warning: When driving, keep the
glovebox closed to prevent injury to a
passenger if a collision or sudden stop occurs.
Center Console - Premium Package
In addition to housing an RFID transmitter that reads key fobs and key cards (see Key Card on
page 10), the center console includes cup
holders, two storage compartments, and a
phone dock for two phones (or other devices).
To open the main storage compartment, pull its cover upward.
Open the other storage compartment or
access the phone dock by pressing firmly near
the cover
Page 26 of 220
Note: Power is available whenever the vehicle
is considered "awake". The vehicle may be
awake for many reasons. For example, when
using features such as Summon, or when features such as Cabin Overheat Protection,Keep Climate On, Dog Mode, Sentry Mode,
etc. are enabled. The vehicle is also awake
whenever the 12V battery is being charged or
is in use, during HV charging, when the vehicle
is communicating with the mobile app, etc. Leaving an accessory plugged in does notdeplete the 12V battery.
Note: Always use USB 2.0 compliant cables
when connecting devices to the USB ports.
Using non-compliant cables can result in
slower charging and, if plugged into either of the front two ports, can result in potential connection problems or degraded
performance when trying to access media files
on the device.
Note: Do not connect multiple devices using a
USB hub. This can prevent connected devices from charging or from being recognized by
Media Player, Sentry Mode, Dashcam, etc.
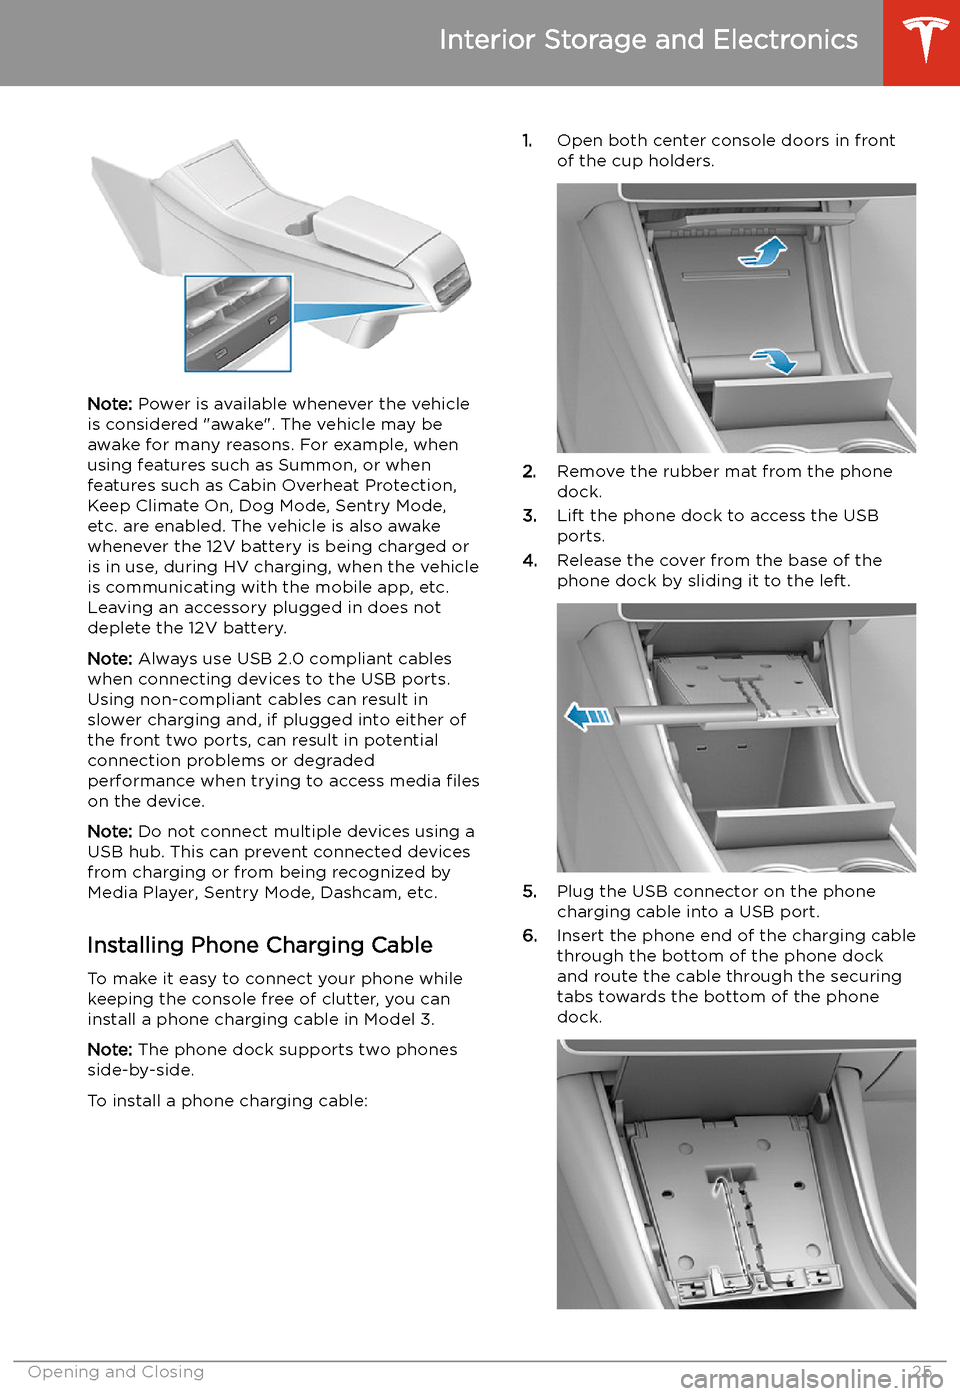
Installing Phone Charging Cable To make it easy to connect your phone while
keeping the console free of clutter, you can install a phone charging cable in Model 3.
Note: The phone dock supports two phones
side-by-side.
To install a phone charging cable:
1. Open both center console doors in front
of the cup holders.
2. Remove the rubber mat from the phone
dock.
3. Lift the phone dock to access the USB
ports.
4. Release the cover from the base of the
phone dock by sliding it to the left.
5. Plug the USB connector on the phone
charging cable into a USB port.
6. Insert the phone end of the charging cable
through the bottom of the phone dock
and route the cable through the securing
tabs towards the bottom of the phone dock.
Interior Storage and Electronics
Opening and Closing25
Page 27 of 220
7.Reinstall the cover to the base of the
phone dock by sliding it to the right.
8. Lower the phone dock and reinstall the
rubber mat.
12V Power Socket Your Model 3 has a power socket located in
the center console
Page 55 of 220
Starting and Powering
Off
Starting When you open a door, Model 3 powers on the
touchscreen and you can operate all controls.
To drive Model 3:
1. PRESS THE BRAKE PEDAL - Model 3
powers on and is ready to drive.
2. SELECT A GEAR - Move the gear lever all
the way down for Drive and all the way up
for Reverse. See Shifting Gears on page
56.
Note: If the PIN to Drive feature is enabled
(see PIN to Drive on page 143), you must also
enter a valid PIN on the touchscreen before
you can drive Model 3.
Note: If Passive Entry is off and you do not
press the brake pedal to start Model 3 within
approximately five minutes, a message
displays on the touchscreen and you must use
the key to lock then unlock Model 3 again before starting the vehicle.
Everything you need to know when driving
Model 3 displays on the touchscreen.
Drive Disabled - Requires Authentication
If Model 3 does not detect a key when you
press the brake (an authenticated phone is not
detected, or 30 seconds has passed since you
used the key card), the touchscreen displays a
message telling you that driving requires
authentication.
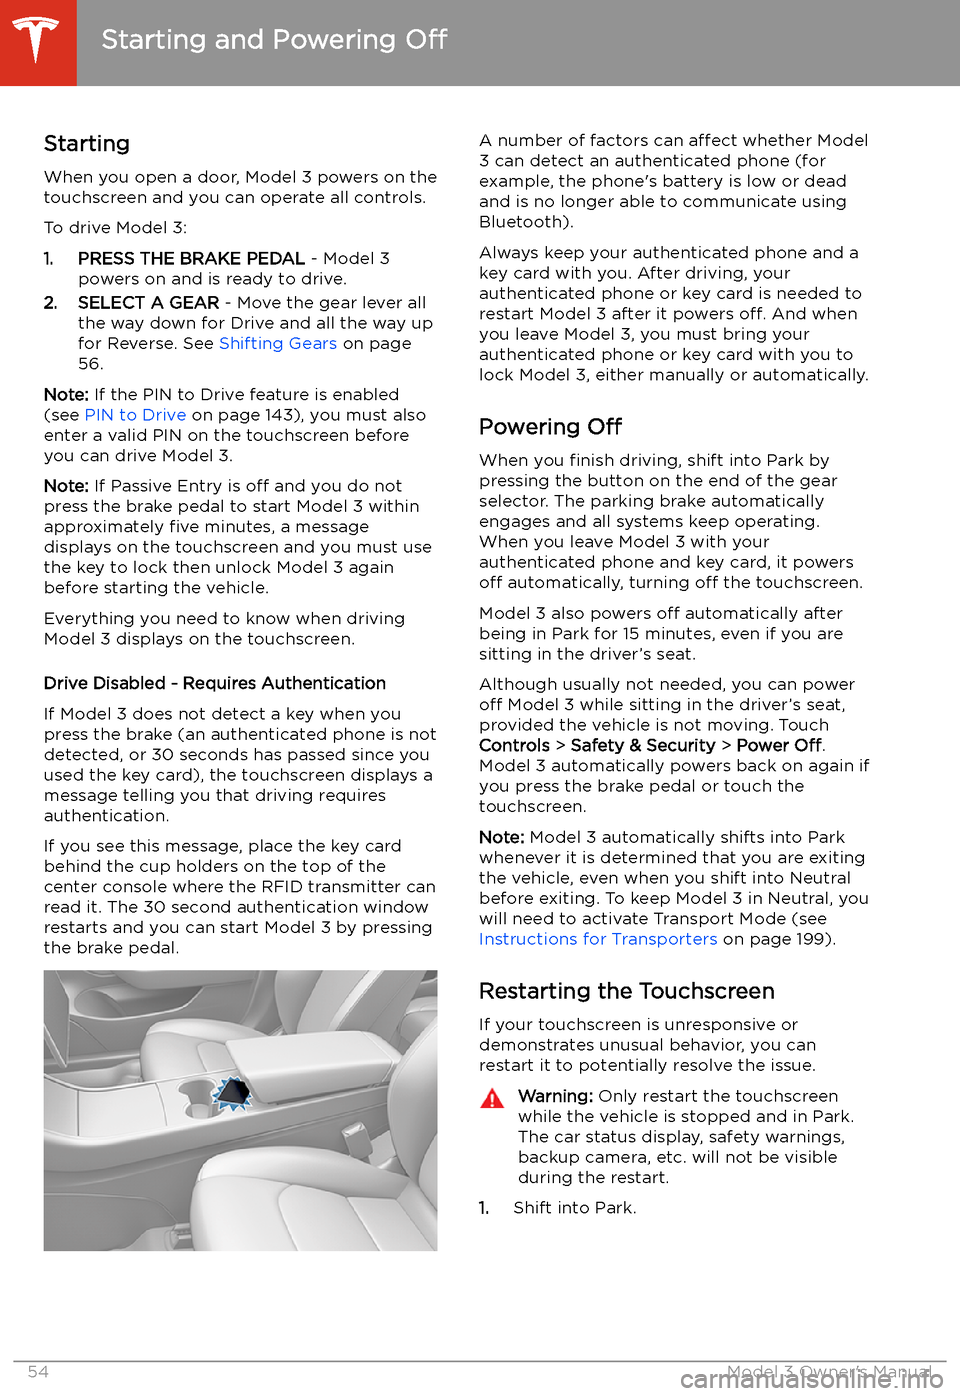
If you see this message, place the key card
behind the cup holders on the top of the center console where the RFID transmitter canread it. The 30 second authentication window
restarts and you can start Model 3 by pressing
the brake pedal.
A number of factors can affect whether Model
3 can detect an authenticated phone (for
example, the phone
Page 210 of 220
Declarations of Conformity
FCC and IC Certification
ComponentManufacturerModel
Operating
Frequency
(MHz)
FCC IDIC ID
Pillar
EndpointTesla1089773
1089773E13.56
2400-2483.52AEIM-10897
773
2AEIM-10897
73E20098-10897
73
20098-10897
73ECenter
ConsoleTesla108977413.56
2400-2483.52AEIM-10897
7420098-10897
74Fascia
EndpointTesla10897752400-2483.52AEIM-10897
7520098-10897
75Key fobTesla11331482400-2483.52AEIM-113314
820098-113314
8TPMSContinentalTIS-01433.92KR5TIS-017812-TIS01RadarContinentalARS 4-B76000-77000OAYARS4B4135A-ARS4BHomelinkGentexADHL5C286-440MHzNZLADHL5C4112A-
ADHL5CCarPCTesla1098058--YZP-RBHP-
B216C
RI7LE940B6N
ARBHP-B216C
5131A-
LE940B6NA
The devices listed above comply with Part 15 of the FCC rules and Industry Canada