2020 TESLA MODEL 3 Battery
[x] Cancel search: BatteryPage 12 of 220

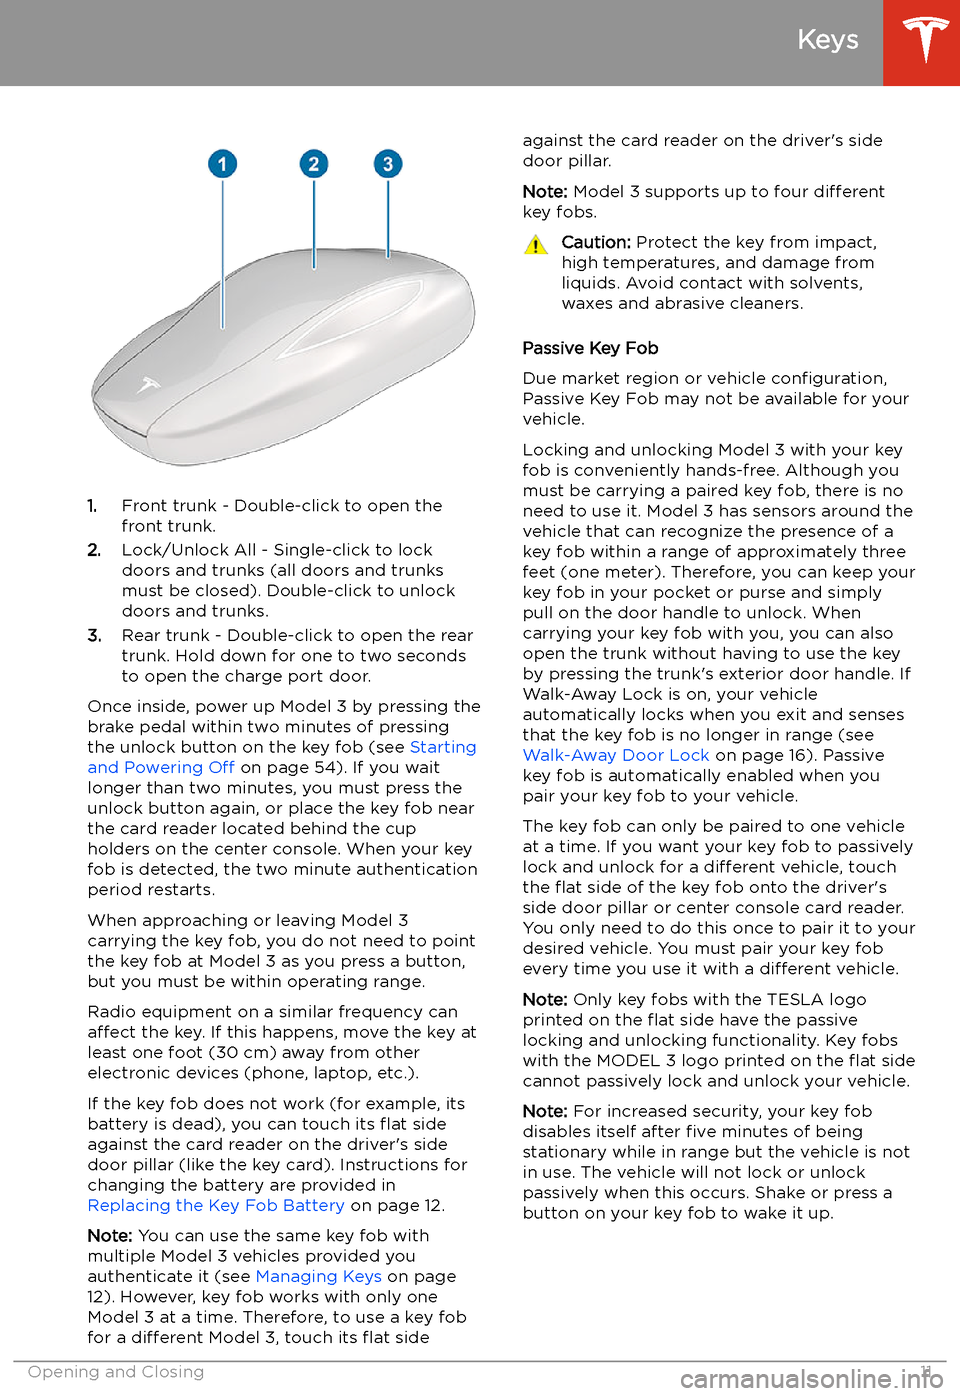
1.Front trunk - Double-click to open the
front trunk.
2. Lock/Unlock All - Single-click to lock
doors and trunks (all doors and trunks
must be closed). Double-click to unlock doors and trunks.
3. Rear trunk - Double-click to open the rear
trunk. Hold down for one to two seconds to open the charge port door.
Once inside, power up Model 3 by pressing the
brake pedal within two minutes of pressing
the unlock button on the key fob (see Starting
and Powering Off on page 54). If you wait
longer than two minutes, you must press the
unlock button again, or place the key fob near
the card reader located behind the cup holders on the center console. When your key
fob is detected, the two minute authentication period restarts.
When approaching or leaving Model 3
carrying the key fob, you do not need to point the key fob at Model 3 as you press a button,
but you must be within operating range.
Radio equipment on a similar frequency can
affect the key. If this happens, move the key at
least one foot (30 cm) away from other electronic devices (phone, laptop, etc.).
If the key fob does not work (for example, its
battery is dead), you can touch its
Page 13 of 220

Replacing the Key Fob Battery
Under normal use, the accessory key fob
(available at https://shop.tesla.com ) has a
battery that lasts for up to five years,
depending on key fob version and selected
vehicle settings. When the battery is low, a
message displays on the touchscreen.
To replace the key fob battery:
1. With the key fob placed button side down
on a soft surface, release the bottom cover.
2. Remove the battery by lifting it away from
the retaining clips.
3. While avoiding touching the battery
Page 26 of 220

Note: Power is available whenever the vehicle
is considered "awake". The vehicle may be
awake for many reasons. For example, when
using features such as Summon, or when features such as Cabin Overheat Protection,Keep Climate On, Dog Mode, Sentry Mode,
etc. are enabled. The vehicle is also awake
whenever the 12V battery is being charged or
is in use, during HV charging, when the vehicle
is communicating with the mobile app, etc. Leaving an accessory plugged in does notdeplete the 12V battery.
Note: Always use USB 2.0 compliant cables
when connecting devices to the USB ports.
Using non-compliant cables can result in
slower charging and, if plugged into either of the front two ports, can result in potential connection problems or degraded
performance when trying to access media files
on the device.
Note: Do not connect multiple devices using a
USB hub. This can prevent connected devices from charging or from being recognized by
Media Player, Sentry Mode, Dashcam, etc.
Installing Phone Charging Cable To make it easy to connect your phone while
keeping the console free of clutter, you can install a phone charging cable in Model 3.
Note: The phone dock supports two phones
side-by-side.
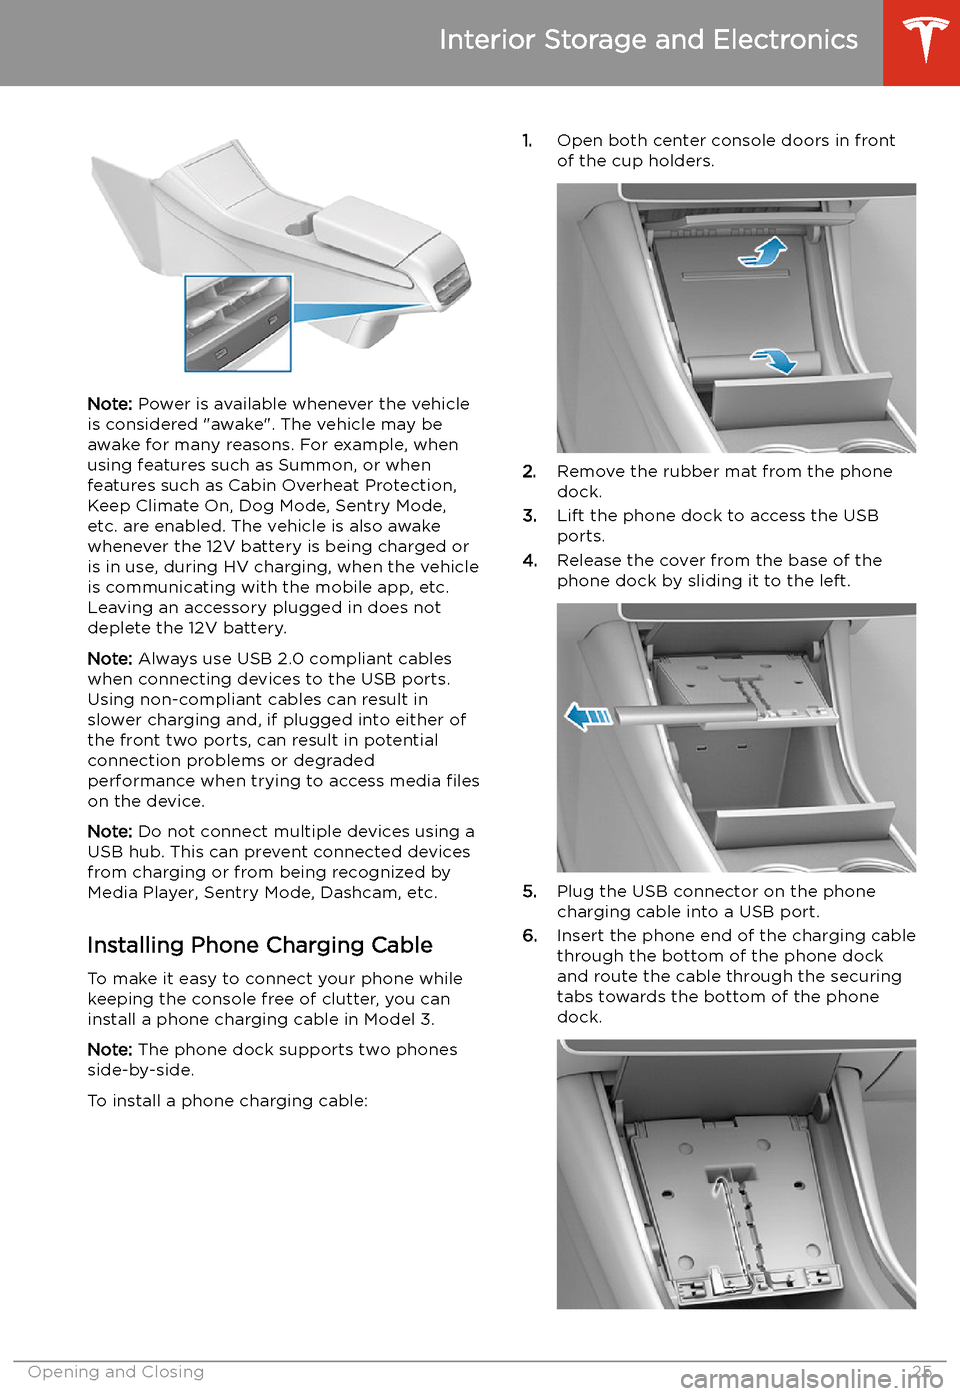
To install a phone charging cable:
1. Open both center console doors in front
of the cup holders.
2. Remove the rubber mat from the phone
dock.
3. Lift the phone dock to access the USB
ports.
4. Release the cover from the base of the
phone dock by sliding it to the left.
5. Plug the USB connector on the phone
charging cable into a USB port.
6. Insert the phone end of the charging cable
through the bottom of the phone dock
and route the cable through the securing
tabs towards the bottom of the phone dock.
Interior Storage and Electronics
Opening and Closing25
Page 67 of 220

Caution: If the brakes are not functioning
properly, stop the vehicle as soon as safety permits and contact Tesla Service.
See Park on page 56 for information on
using the Park button to stop the vehicle
in case of emergency.Warning: Always maintain a safe driving
distance from the vehicle in front of you
and be cautious in hazardous driving
conditions. Do not rely on brake disc
wiping or hydraulic fade compensation to act as a substitute for adequate braking.
Regenerative Braking
Whenever Model 3 is moving and your foot is
off the accelerator, regenerative braking slows
down Model 3 and feeds any surplus energy back to the Battery.
By anticipating your stops and reducing or
removing pressure from the accelerator pedal
to slow down, you can take advantage of regenerative braking to increase driving range.
Of course, this is no substitute for regular braking when needed for safety.
Note: If regenerative braking is aggressively
slowing Model 3 (such as when your foot is
completely off the accelerator pedal at
highway speeds), the brake lights turn on to
alert others that you are slowing down.
Note: Installing winter tires with aggressive
compound and tread design may result in
temporarily-reduced regenerative braking
power. However, your vehicle is designed to continuously recalibrate itself, and after changing tires it will increasingly restore
regenerative braking power after some
moderate-torque straight-line accelerations.
For most drivers this occurs after a short
period of normal driving, but drivers who
normally accelerate lightly may need to use
slightly harder accelerations while the
recalibration is in progress.
Warning: In snowy or icy conditions
Model 3 may experience traction loss
during regenerative braking, particularly
when in the Standard setting and/or not
using winter tires. Tesla recommends
using the Low setting (see To Set the
Regenerative Braking Level on page 66)
in snowy or icy conditions to help maintain vehicle stability.The amount of energy fed back to the Battery
using regenerative braking can depend on the
current state of the Battery and the charge
level setting that you are using. For example,
regenerative braking may be limited if the Battery is already fully charged or if the
ambient temperature is too cold.
Note: If regenerative braking is limited, a
dashed line displays on the energy bar (see
Driving Status on page 63).
To Set the Regenerative Braking Level
You can use the touchscreen to change the
level of regenerative braking:
1. Touch Controls > Driving > Regenerative
Braking .
2. Choose from two levels:
Page 81 of 220

Cold Weather Best Practices
The following best practices can help ensure
that you have the best ownership experience
possible in harsh cold weather conditions.
Before Driving Warm the cabin and Battery ahead of
departure for maximum range and performance. There are several ways toprecondition your vehicle:
Page 82 of 220

Regenerative Braking
Regenerative braking may be limited if the Battery is too cold. As you continue to drive,
the Battery warms up and regenerative power
increases (see Regenerative Braking on page
66).
Note: Limited regenerative braking can be
avoided if you allow enough time to precondition your vehicle or use scheduleddeparture before your drive, as mentioned
previously.
Note: Installing winter tires may result in
temporarily reduced regenerative braking
power but Model 3 will recalibrate itself to correct this after a short period of driving.
Blue Snow
Page 154 of 220

Charging
Electric Vehicle Components
High Voltage Components
1. Air Conditioning Compressor
2. Front Motor (Dual Motor vehicles only)
3. Cabin Heater
4. High Voltage Battery
5. High Voltage Battery Service Panel
6. Rear Motor
7. High Voltage Cabling
8. Charge Port
Warning:
The high voltage system has no user serviceable parts. Do not disassemble, remove
or replace high voltage components, cables or connectors. High voltage cables are typically colored orange for easy identification.Warning: Read and follow all instructions provided on the labels that are attached to Model 3.
These labels are there for your safety.Warning: In the unlikely event that a fire occurs, immediately contact your local fire
emergency responders.
Electric Vehicle Components
Charging153
Page 156 of 220

Battery Information
About the Battery
Model 3 has one of the most sophisticated
battery systems in the world. The most
important way to preserve the Battery is to LEAVE YOUR VEHICLE PLUGGED IN when
you are not using it. This is particularly important if you are not planning to drive
Model 3 for several weeks. When plugged in,
Model 3 wakes up when needed to
automatically maintain a charge level that
maximizes the lifetime of the Battery.
Note: When left idle and unplugged, your
vehicle periodically uses energy from the Battery for system tests and recharging the
12V battery when necessary.
There is no advantage to waiting until the
Battery’s level is low before charging. In fact, the Battery performs best when charged
regularly.
Note: If you allow the Battery to discharge to
0%, other components may become damaged
or require replacement (for example, the 12V
battery). In these cases, you are responsible for repair and/or transporting expenses.
Discharge-related expenses are not covered
by the warranty or under the Roadside
Assistance policy.
The peak charging rate of the Battery may
decrease slightly after a large number of DC
Fast Charging sessions, such as those at
Superchargers. To ensure maximum driving
range and Battery safety, the Battery charge
rate is decreased when the Battery is too cold,
when the Battery’s charge is nearly full, and when the Battery conditions change with
usage and age. These changes in the condition of the Battery are driven by battery physics
and may increase the total Supercharging
duration by a few minutes over time.
Battery Care
Never allow the Battery to fully discharge.
Even when Model 3 is not being driven, its
Battery discharges very slowly to power the
onboard electronics. The Battery can
discharge at a rate of approximately 1% per day, though the discharge rate may vary
depending on environmental factors (such as
cold weather), vehicle configuration, and your
selected settings on the touchscreen.
Situations can arise in which you must leave
Model 3 unplugged for an extended period of time (for example, at an airport when
traveling). In these situations, keep the 1% in
mind to ensure that you leave the Battery with a sufficient charge level. For example, over a
two week period (14 days), the Battery may
discharge by approximately 14%.
Discharging the Battery to 0% may result in
damage to vehicle components. To protect
against a complete discharge, Model 3 enters
a low-power consumption mode when the
displayed charge level drops to approximately
0%. In this mode, the Battery stops supporting
the onboard electronics and auxiliary 12V
battery. Once this low-power consumption
mode is active, immediately plug in Model 3 to
prevent a jump-start and 12V battery
replacement.
Note: If the vehicle is unresponsive and will
not unlock, open, or charge, then the 12V
battery may have become discharged. In this
situation, contact Tesla.
Temperature Limits
For better long-term performance, avoid
exposing Model 3 to ambient temperatures
above 140