2020 SUBARU OUTBACK seats
[x] Cancel search: seatsPage 12 of 132

SEATING
Manual Seats
1Forward/Backward: Pull the lever below the
seat up and slide the seat forward or backward.
Release the lever and make sure the seat is
locked into place.
2 Seat Height (Driver’s Seat): Pulling up or
pushing down on the lever will raise or lower the
seat cushion.
3 Recline Seatback: Pull the lever up to adjust the seatback to the desired position.
Release the lever and make sure the seat is locked into place.
Power Driver’s Seat (if equipped)
1Forward/Backward and Height: Moving
the switch forward or backward will
adjust the seat in that direction. Pulling
up or pushing down on the front or back
of the switch will adjust the angle of the
seat cushion. Pulling up or pushing down
the entire switch will adjust the height of
the seat cushion.
2 Recline Seatback: Moving the switch
forward or backward will adjust the angle
of the seatback.
3 Lumbar Support (if equipped): Pressing
the front of the switch will increase
support. Pressing the rear of the switch
will decrease support.
4 Thigh Extension (if equipped): Pull up
on the lever below the seat cushion to
adjust the length.
GETTING COMFORTABLE
10
Page 21 of 132

12Driver’s Climate Button: Touching this
button will bring up another window that
will allow you to adjust the air
temperature, turn the heated/cooled
seats on or off and allow you to SYNC
(15) the passenger’s side air temp with
the driver’s temperature.
NOTE: The temperature bar only adjusts
the air temperature, it does not adjust the
seat temperature.
13 Driver Heated Seat Button: Pushing this
button will turn the heated driver seat on
High. Pushing it a second time will turn it
on Medium, third push for Low and fourth
time to turn Off.
14 Driver Vented Seat Button: Pushing this
button will turn the vented driver seat on
High. Pushing it a second time will turn it
on Medium, third push for Low and fourth
time to turn Off.
15 SYNC Button: Press the button to synchronize the driver’s and passenger’s
temperatures to the driver’s temperature control dial. This will make the Driver control
the master temperature control.
GETTING COMFORTABLE
19
Page 22 of 132

16Passengers’s Climate Button: Touching
this button will bring up another window
that will allow you to adjust the
temperature, turn the heated/cooled
seats on or off and allow you to SYNC
(15) the passenger’s side temp with the
driver’s temperature.
17 Passenger Heated Seat Button:
Pushing this button will turn the
passenger heated seat on High. Pushing
it a second time will turn it on Medium,
third push for Low and fourth time to turn
Off.
18 Passenger Vented Seat Button:
Pushing this button will turn the
passenger vented seat on High. Pushing
it a second time will turn it on Medium,
third push for Low and fourth time to turn
Off.
Auto Mode
When using automatic mode, the fan speed, airflow distribution, air-inlet control and air
conditioning compressor are controlled automatically. To activate:
1. Press the “AUTO” button. The “FULL AUTO” indicator light illuminates on the climate control display.
2. Set the preferred temperature using the temperature control arrows. Another method would be to touch the climate control button, then use the touch buttons or slide bar to
adjust the temperature.
If you operate any of the buttons other than “ON/OFF”, rear window defogger, front
defroster, “SYNC”, or the temperature buttons, the “FULL” indicator light will turn off, the
"Auto" will display in the screen button. You can then manually control the system as
desired. Press the “AUTO” button to change back to “FULL AUTO” mode if the
customizable button is programmed to “Auto”.
GETTING COMFORTABLE
20
Page 24 of 132
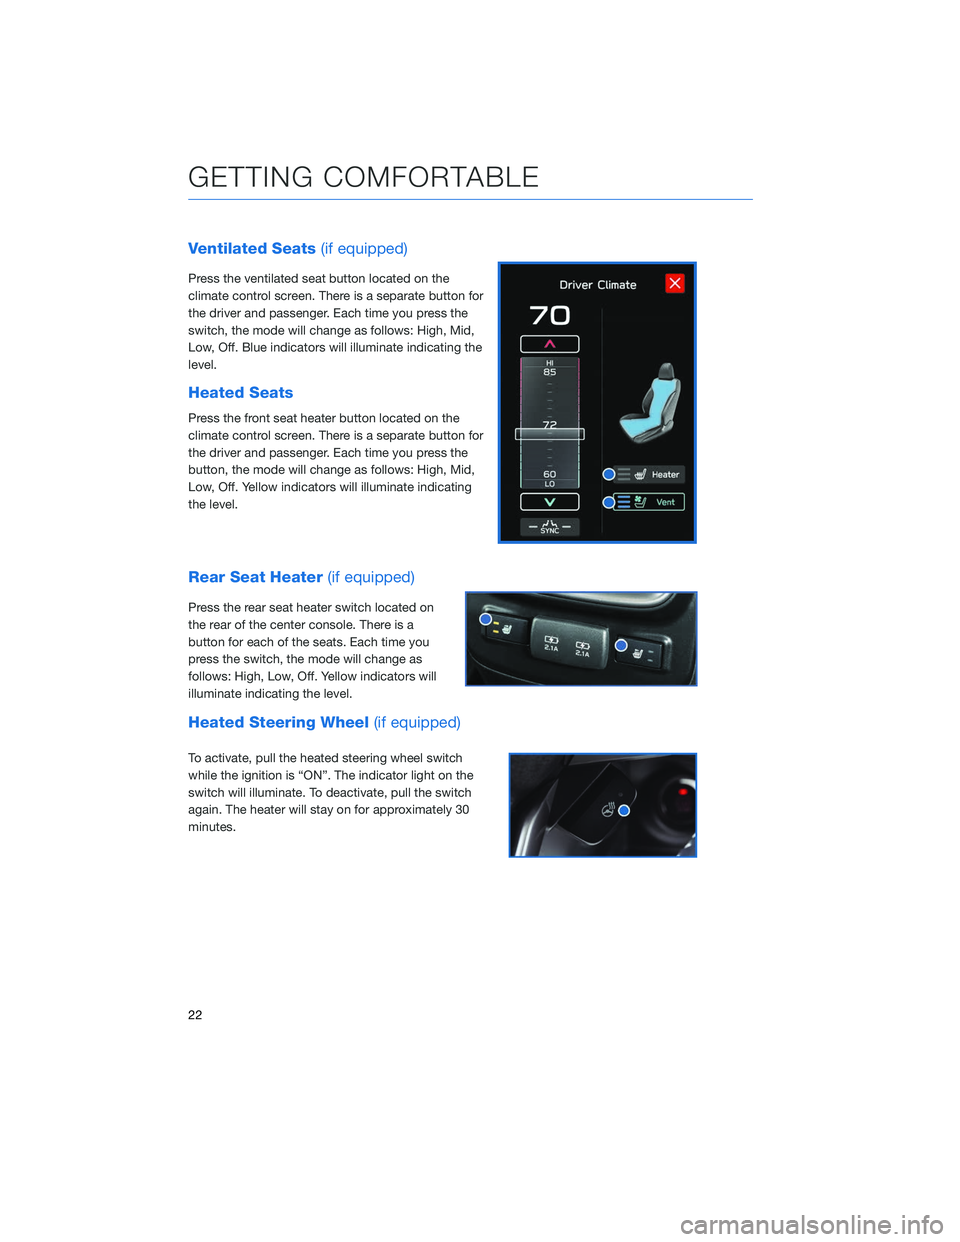
Ventilated Seats(if equipped)
Press the ventilated seat button located on the
climate control screen. There is a separate button for
the driver and passenger. Each time you press the
switch, the mode will change as follows: High, Mid,
Low, Off. Blue indicators will illuminate indicating the
level.
Heated Seats
Press the front seat heater button located on the
climate control screen. There is a separate button for
the driver and passenger. Each time you press the
button, the mode will change as follows: High, Mid,
Low, Off. Yellow indicators will illuminate indicating
the level.
Rear Seat Heater (if equipped)
Press the rear seat heater switch located on
the rear of the center console. There is a
button for each of the seats. Each time you
press the switch, the mode will change as
follows: High, Low, Off. Yellow indicators will
illuminate indicating the level.
Heated Steering Wheel (if equipped)
To activate, pull the heated steering wheel switch
while the ignition is “ON”. The indicator light on the
switch will illuminate. To deactivate, pull the switch
again. The heater will stay on for approximately 30
minutes.
GETTING COMFORTABLE
22
Page 41 of 132
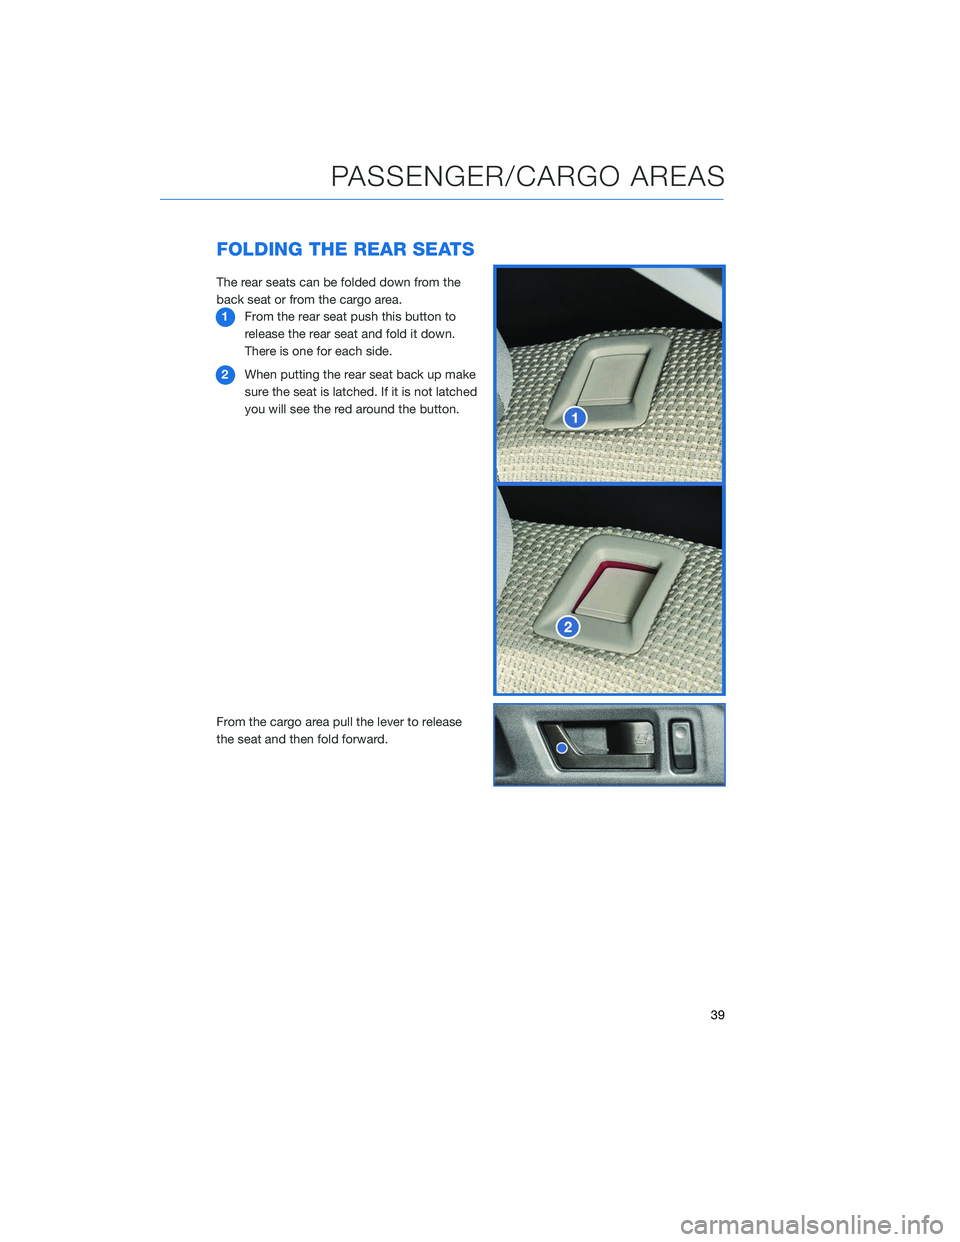
FOLDING THE REAR SEATS
The rear seats can be folded down from the
back seat or from the cargo area.1 From the rear seat push this button to
release the rear seat and fold it down.
There is one for each side.
2 When putting the rear seat back up make
sure the seat is latched. If it is not latched
you will see the red around the button.
From the cargo area pull the lever to release
the seat and then fold forward.
PASSENGER/CARGO AREAS
39
Page 54 of 132
OVERVIEW OF YOUR MULTIMEDIA SYSTEM
SUBARU STARLINK™ Multimedia combines the radio along with the ability to connect
your phone* through Bluetooth®to the radio for making calls, sending text messages and
listening to your favorite songs that are on your phone.
* *Compatible smartphone and application required. For applications to operate, latest version of each application required. Data provided by smartphone is displayed on the Touchscreen. Some state laws
prohibit the operation of handheld electronic devices while operating a vehicle. Smartphone apps
should only be launched when vehicle is safely parked. Your wireless carrier’s rates may apply.
Various Systems
Depending on your model and trim level, there are several types of SUBARU STARLINK™
Multimedia systems. Some of the functions described in this guide will vary by system.
• Dual 7–inch Multimedia
• 11.6–inch Multimedia Plus
• 11.6–inch Multimedia Navigation
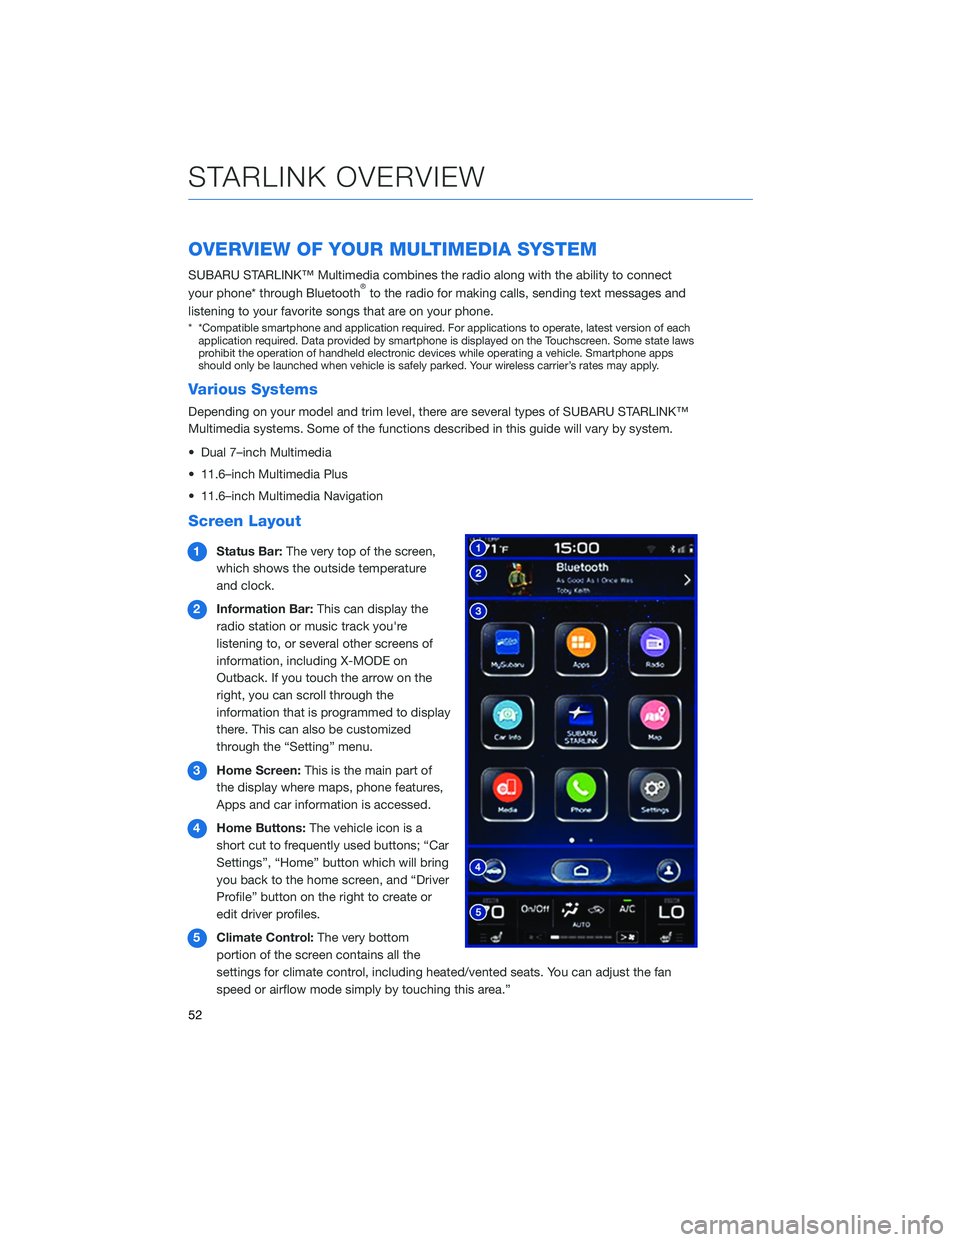
Screen Layout
1 Status Bar: The very top of the screen,
which shows the outside temperature
and clock.
2 Information Bar: This can display the
radio station or music track you're
listening to, or several other screens of
information, including X-MODE on
Outback. If you touch the arrow on the
right, you can scroll through the
information that is programmed to display
there. This can also be customized
through the “Setting” menu.
3 Home Screen: This is the main part of
the display where maps, phone features,
Apps and car information is accessed.
4 Home Buttons: The vehicle icon is a
short cut to frequently used buttons; “Car
Settings”, “Home” button which will bring
you back to the home screen, and “Driver
Profile” button on the right to create or
edit driver profiles.
5 Climate Control: The very bottom
portion of the screen contains all the
settings for climate control, including heated/vented seats. You can adjust the fan
speed or airflow mode simply by touching this area.”
STARLINK OVERVIEW
52
Page 126 of 132
2.4L TURBO ENGINE . . . . .......48
2.5L ENGINE . . . . . . . . . . . .....47
A
ACCESSORY CONNECTIONS Power Outlets (12V) . . . . . . . . . . . 23
ADDING SHORTCUTS . . . . . . . . . . 60
ADDITIONAL RESOURCES . . . . . . . . 2
ADVANCED ADAPTIVE CRUISE CONTROL . . . . . . . . . . ......24
ANDROID AUTO Cables .................116
Compatible Models . . . . ......118
Connecting an Android Phone . . . . 116
APPLE CARPLAY Cables .................119
Compatible Models . . . . ......119
Connecting an iPhone . . . . . . . . 119
AUDIO CONTROLS . . . . . . . . . . . . 24
AUTO START–STOP SYSTEM . . . . . . 35
B
BLUETOOTH
®PAIRING
Pairing an Android Device . . ....110
Pairing an iOS/Apple Device . . . . . 113
BUTTONS Controlling the Volume . . . . . . . . . 53
C
CARGO COVER . . . . . . . . . .....44
CHILD SAFETY LOCKS . . . . . . . . . . 40
CLIMATE CONTROL SYSTEM 11.6–Inch Automatic Climate
Control ..................17
Dual 7–Inch Automatic Climate Control
System ..................21
Heated Seats . . . . . . . . . .....22
Heated Steering Wheel . . . . . . . . 22
Rear Seat Heater . . . . . . . .....22Remote Engine Start with Climate
Control
..................21
Ventilated Seats . . . . . . . . ....22
CLOCK Automatically ..............105
Manually . . . . . . ..........106
CREATING HOME/WORK . . . . . . . . . 81
D
DRIVERFOCUS . . . ............37
DRIVING THE VEHICLE Automatic Transmission Shift Mode . 31
Paddle Shift Control Switches . ....31
E
ELECTRONIC PARKING BRAKE (EPB) Auto Vehicle Hold (AVH) . . . . . . . . 33
ENGINE OIL . . . . . . ...........49
ENGINE OIL CAPACITY . . . . . . . . . . 49
F
FINDING A DESTINATION Arrival Time/Distance . . ........85
Canceling Guidance . . . .......99
Finding a Destination By Address . . 85
Finding a Destination By POI . ....89
Guidance Screen Icons . .......96
Map View/Perspectives ........98
Map Zoom . . . . ............97
Nearest Gas Station . . . . . . . . . . 99
Route Options . . . . . . . .......91
Saving Destination as a Favorite . . . 93
Shortest/Fastest/Economic . . . . . . 92
Traffic Information . . . . . . . . ....99
FIRMWARE SOFTWARE UPDATES . . 122
FOLDING THE REAR SEATS .......39
FORWARD ..................2
FUEL .....................38
FUEL CAPACITY . .............38
FUEL FILLER LID . . . . . . . . . .....38
INDEX
124
Page 128 of 132
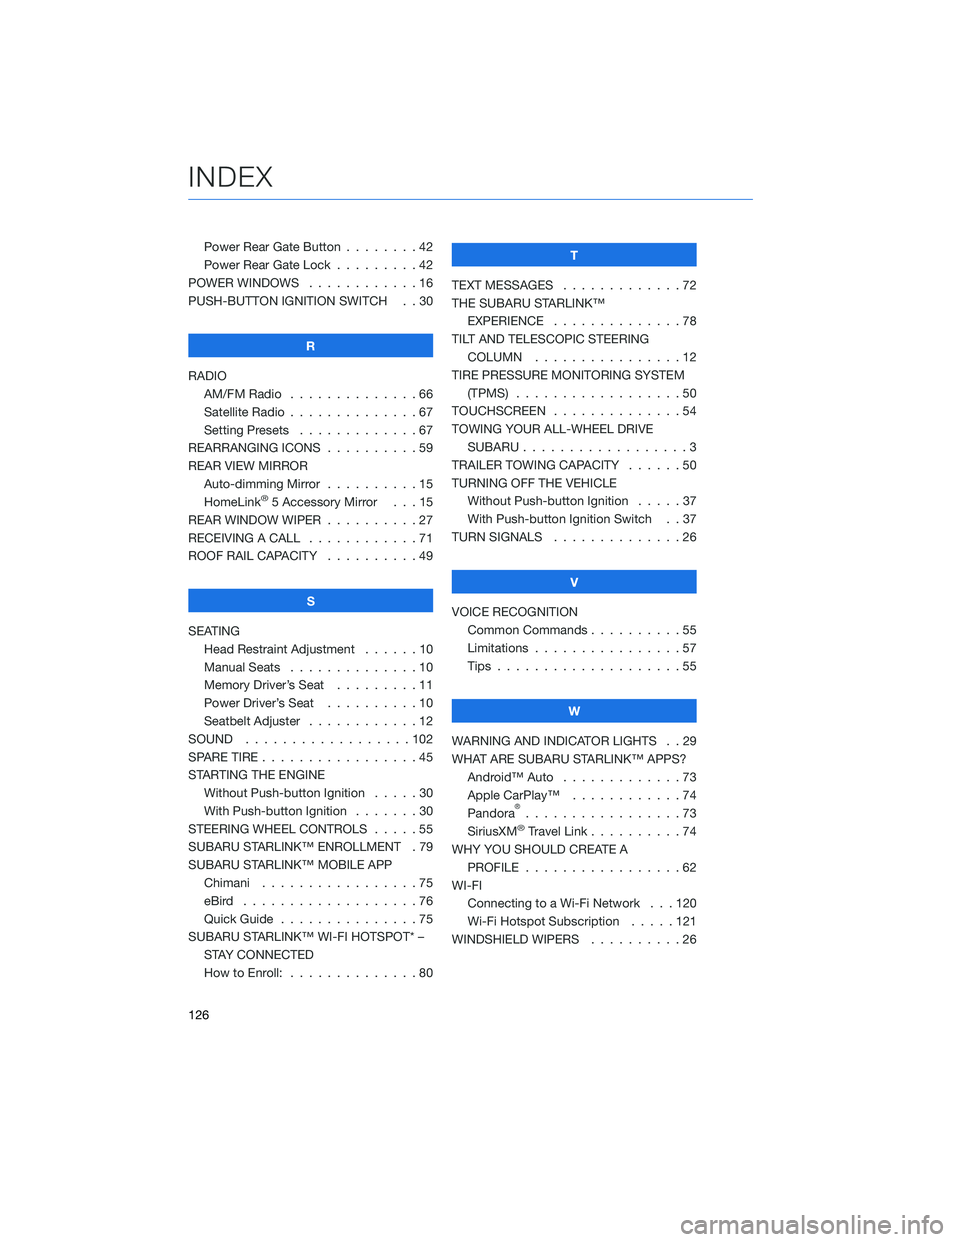
Power Rear Gate Button . . . . . . . . 42
Power Rear Gate Lock . . .......42
POWER WINDOWS . . . . . . ......16
PUSH-BUTTON IGNITION SWITCH . . 30
R
RADIO AM/FM Radio . . . . . . . . . . ....66
Satellite Radio . . . . . . . . . . . . . . 67
Setting Presets . . . . . . . ......67
REARRANGING ICONS . . . . . . ....59
REAR VIEW MIRROR Auto-dimming Mirror . . . . ......15
HomeLink
®5 Accessory Mirror . . . 15
REAR WINDOW WIPER . . . . . .....27
RECEIVING A CALL . . . . . . . .....71
ROOF RAIL CAPACITY . . . . . .....49
S
SEATING Head Restraint Adjustment . . . . . . 10
Manual Seats . . . . . . . . . .....10
Memory Driver’s Seat . . . . . . . . . 11
Power Driver’s Seat . . . . . .....10
Seatbelt Adjuster . . . . . .......12
SOUND ..................102
SPARE TIRE . . . . . . . . . . . . . . . . . 45
STARTING THE ENGINE Without Push-button Ignition .....30
With Push-button Ignition . . . ....30
STEERING WHEEL CONTROLS . . . . . 55
SUBARU STARLINK™ ENROLLMENT . 79
SUBARU STARLINK™ MOBILE APP Chimani .................75
eBird ...................76
Quick Guide ...............75
SUBARU STARLINK™ WI-FI HOTSPOT* – STAY CONNECTED
How to Enroll: . . . . . . . . . . . . . . 80 T
TEXT MESSAGES . . . . . . . . . . . . . 72
THE SUBARU STARLINK™ EXPERIENCE ..............78
TILT AND TELESCOPIC STEERING COLUMN . . . . . . . . . . . . . . . . 12
TIRE PRESSURE MONITORING SYSTEM (TPMS) . . . ...............50
TOUCHSCREEN ..............54
TOWING YOUR ALL-WHEEL DRIVE SUBARU . . . ...............3
TRAILER TOWING CAPACITY . . . . . . 50
TURNING OFF THE VEHICLE Without Push-button Ignition . . . . . 37
With Push-button Ignition Switch . . 37
TURN SIGNALS . . . . ..........26
V
VOICE RECOGNITION Common Commands . . . . . . . . . . 55
Limitations ................57
Tips . . . .................55
W
WARNING AND INDICATOR LIGHTS . . 29
WHAT ARE SUBARU STARLINK™ APPS? Android™ Auto .............73
Apple CarPlay™ . . . .........74
Pandora
®.................73
SiriusXM®Travel Link . . . . . .....74
WHY YOU SHOULD CREATE A PROFILE . . . . . ............62
WI-FI Connecting to a Wi-Fi Network . . . 120
Wi-Fi Hotspot Subscription . . . . . 121
WINDSHIELD WIPERS . . . . . . . . . . 26
INDEX
126