Page 3 of 132
2PURPOSE OF THIS GUIDE
4 ENTRY AND EXIT
8 INSTRUMENT PANEL
10 GETTING COMFORTABLE
24 CONTROLS
29 GAUGES AND WARNING LIGHTS
30 OPERATING THE VEHICLE
38 REFUELING
39 PASSENGER/CARGO AREAS
46 ENGINE COMPARTMENT
49 ADDITIONAL SPECIFICATIONS
52 STARLINK OVERVIEW
58 STARLINK HOME
62 CREATING A DRIVER PROFILE
66 MULTIMEDIA
69 PHONE
73 APPS
78 SUBARU STARLINK™ SAFETY AND SECURITY
81 MAPS(IF EQUIPPED)
100 SETTINGS AND UPDATES
110 APPENDIX: HOW TO
124 INDEX
TABLE OF CONTENTS
Page 6 of 132

KEYLESS ENTRY
1Lock/Arm
• Pressing this button will lock all doors, rear gate and fuel door and activate the security alarm.
• If any of the doors or the rear gate are not fully closed, five rapid chirps will sound and the hazard warning flashers will
flash.
• Pressing this button three times (within five seconds) will activate the vehicle finder function. If you are within 30 feet
of your Subaru, the horn will sound once, and the hazard
warning flashers will flash three times.
2 Unlock/Disarm
• Pressing this button once will unlock the driver’s door and fuel door if set to do so in the Touchscreen.
• Pressing this button twice (within five seconds) will unlock all doors and rear gate.
• When you press this button, the interior lights will illuminate, if set to the “DOOR” position on the overhead console
switch.
3 Rear Gate
• Pressing this button will unlock the rear gate.
• If equipped with a power rear gate, pressing and holding this button will open or close the rear gate.
4 Panic Alarm
• Pressing this button will sound the horn and flash the hazard warning lights.
• Press any button on the access key fob or transmitter to deactivate.
Access Key Fob
Transmitter
ENTRY AND EXIT
4
Page 17 of 132

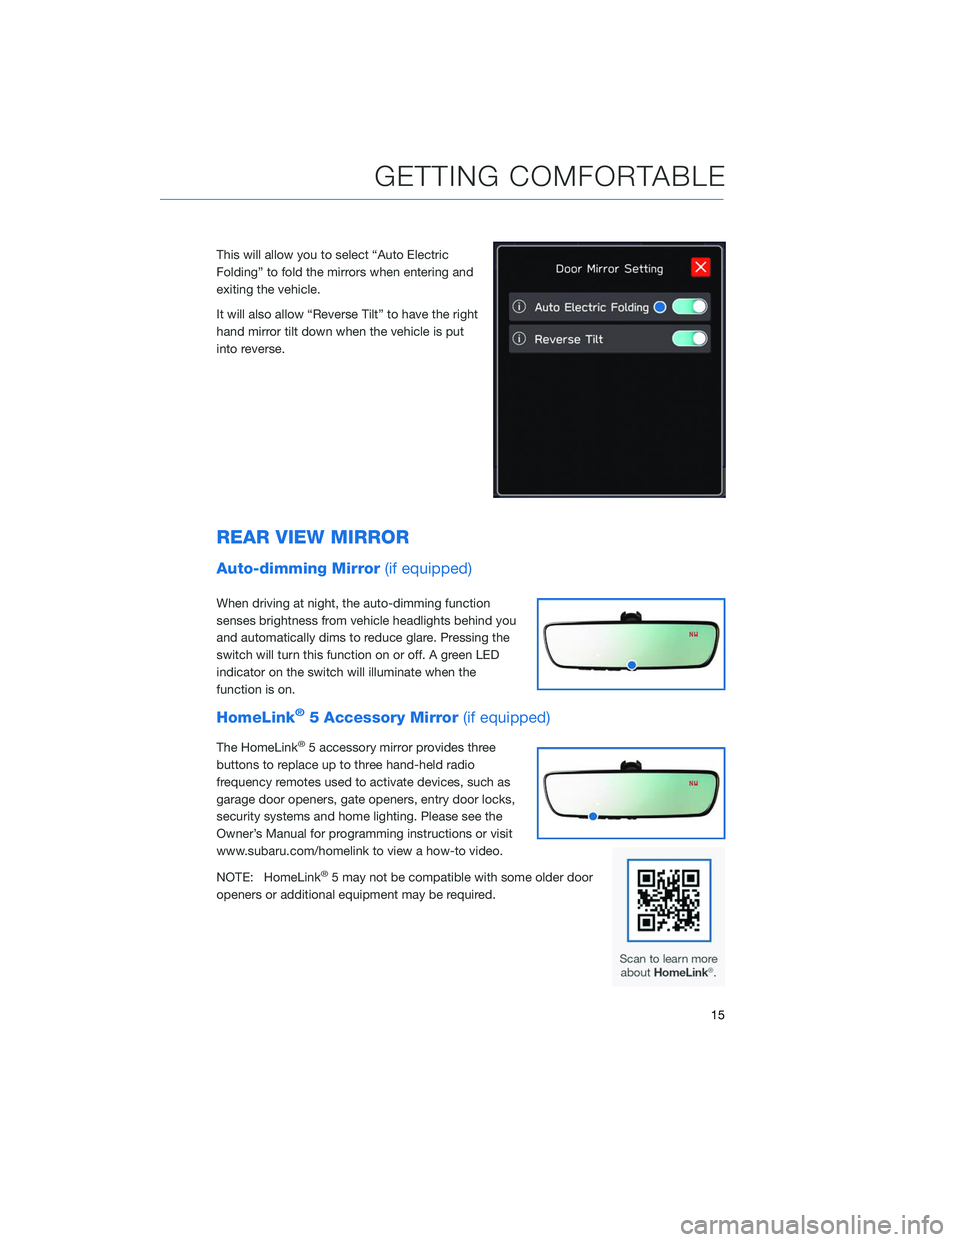
This will allow you to select “Auto Electric
Folding” to fold the mirrors when entering and
exiting the vehicle.
It will also allow “Reverse Tilt” to have the right
hand mirror tilt down when the vehicle is put
into reverse.
REAR VIEW MIRROR
Auto-dimming Mirror(if equipped)
When driving at night, the auto-dimming function
senses brightness from vehicle headlights behind you
and automatically dims to reduce glare. Pressing the
switch will turn this function on or off. A green LED
indicator on the switch will illuminate when the
function is on.
HomeLink®5 Accessory Mirror(if equipped)
The HomeLink®5 accessory mirror provides three
buttons to replace up to three hand-held radio
frequency remotes used to activate devices, such as
garage door openers, gate openers, entry door locks,
security systems and home lighting. Please see the
Owner’s Manual for programming instructions or visit
www.subaru.com/homelink to view a how-to video.
NOTE: HomeLink
®5 may not be compatible with some older door
openers or additional equipment may be required.
GETTING COMFORTABLE
15
Page 27 of 132

I SWITCH
Used to view important messages when red "i"
appears in the Combination Meter Display
(CMD). Pull and hold this switch to access the
important messages. Pull the arrows to move
up or down through the messages.
LIGHT CONTROLS
1AUTO: If equipped, rotate the end of the
lever to automatically turn your headlights
on or off, depending on the level of
outside light.
2 Daytime Running Lights: Rotate the end
of the lever to turn on the instrument
panel lights, parking lights, side marker
lights, tail lights, and license plate lights.
3 Headlights: Rotate the end of the lever to
turn on the headlights, instrument panel lights, parking lights, side marker lights, tail
lights, and license plate lights.
4 High Beams: Push the lever forward to change from low beam to high beam. Pull the
lever back to center to return to low beam. If equipped, this also activates the High
Beam Assist (HBA) system.
5 Fog Lights: If equipped, rotate the dial to turn on the fog lights.
Illumination Brightness
While the light switch is on, rotating the dial on the instrument panel
upward will make the illumination brighter. When the dial is fully
rotated upward (dots aligned), the instrument panel illumination
stays at full brightness. Rotating the dial downward dims the
instrument panel illumination.
For map equipped vehicles this setting also affects the day/night
view and illumination level.
CONTROLS
25
Page 28 of 132

Daytime Running Lights
The daytime running lights automatically turn on when the engine has started, the parking
brake is fully released, the light switch is in the Off, “AUTO” (if equipped) or “
”
position, and the select lever is not in the “P” position. Always turn on the headlights when
it’s dark outside by rotating the dial to the “
” or “AUTO” position.
TURN SIGNALS
Push slightly up for right lane change or fully
up for right turn signal. Push slightly down for
left lane change or fully down for left turn
signal.
WINDSHIELD WIPERS
To turn on the wipers, press the wiper control
lever down one position for intermittent, two
positions for low speed, or three positions for
high speed. To turn the wipers off, return the
lever to the “OFF” position. For a single wipe,
move the lever up one position.
When the lever is in the intermittent position,
rotate the dial to adjust the operating interval
of the wipers.
Pull the lever toward you to spray washer fluid.
The washer will spray until you release the lever, then wipe twice.
CONTROLS
26
Page 30 of 132

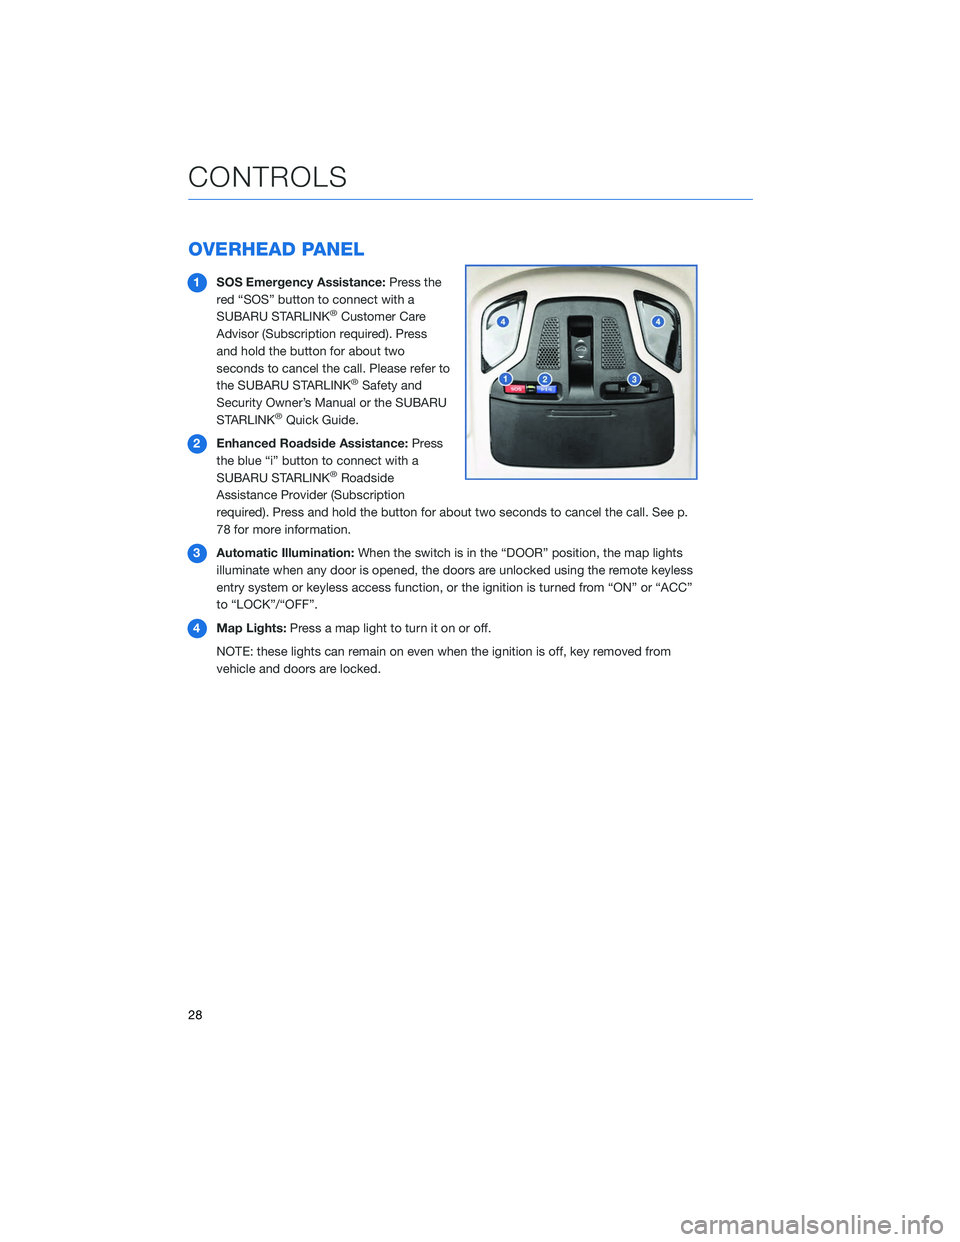
OVERHEAD PANEL
1SOS Emergency Assistance: Press the
red “SOS” button to connect with a
SUBARU STARLINK
®Customer Care
Advisor (Subscription required). Press
and hold the button for about two
seconds to cancel the call. Please refer to
the SUBARU STARLINK
®Safety and
Security Owner’s Manual or the SUBARU
STARLINK
®Quick Guide.
2 Enhanced Roadside Assistance: Press
the blue “i” button to connect with a
SUBARU STARLINK
®Roadside
Assistance Provider (Subscription
required). Press and hold the button for about two seconds to cancel the call. See p.
78 for more information.
3 Automatic Illumination: When the switch is in the “DOOR” position, the map lights
illuminate when any door is opened, the doors are unlocked using the remote keyless
entry system or keyless access function, or the ignition is turned from “ON” or “ACC”
to “LOCK”/“OFF”.
4 Map Lights: Press a map light to turn it on or off.
NOTE: these lights can remain on even when the ignition is off, key removed from
vehicle and doors are locked.
CONTROLS
28
Page 31 of 132
GAUGES
1Tachometer
2 Combination Meter Display (CMD)
3 Speedometer
4 Fuel gauge 5
Trip meter and odometer
6 Select lever/gear position indicator
7 Engine coolant temperature gauge
WARNING AND INDICATOR LIGHTS
Red lights indicate immediate attention is required. Some examples are:
Seatbelt
warningDoor
openBrake system
Yellow lights indicate caution. Some examples are:
Low fuelEngine oil
level warning lightTire pressurewarning light
Green and blue lights are for information. Some examples are:
Headlight indicator lightAuto VehicleHold ONHigh beamindicator light
GAUGES AND WARNING LIGHTS
29
Page 77 of 132
SUBARU STARLINK™ MOBILE APP
There are several key applications that can be
loaded to your phone and used while in your
Subaru to help you while you drive. You must
also download and log in to the SUBARU
STARLINK™ app on your phone to use these
apps.
To download the SUBARU STARLINK™ app,
go to the Apple App Store or the Google Play
Store and search for SUBARU STARLINK™ in
the menu.
Below are a few apps that you may find helpful.
Quick Guide
Quick Guide is the digital version of the
original printed Quick Guides that are standard
in all new Subaru vehicles. The app features
In-Vehicle Help (IVH) that provides an
interactive, searchable, model-specific
concierge through the Touchscreen.
Chimani
Get the most comprehensive guide to all 417 national parks in the United States. Quickly
learn about each park’s history and highlights.
APPS
75