Page 17 of 124

6Climate Control Button: This button will show another screen that allows you to
control fan speed, air flow, Max A/C, auto and recirculation modes.
7 Fan Speed Button: Push the “Fan Up”
button to increase fan speed or “Fan
Down” button to decrease fan speed on
the main screen. You can also touch the
Climate Control Button to open the
climate control window so you to adjust
fan speed. The fan speed can be
adjusted from 1 to 7.
8 MAX A/C Button: Press this button for
quickest cooling.
9 Automatic Control Button: This system
automatically controls all of the climate
system except defogging. Press “AUTO”
to activate automatic control of
everything except the fan speed. Press a
second time for “Full Auto” mode to allow
the system to control the fan speed as
well.
10 Recirculated/Outside Air Button: Press
this button to prevent outside air from
entering your Subaru. Press the button again to allow outside air into your Subaru.
NOTE: To prevent windshield fogging, do not remain in the recirculated mode for an
extended period of time.
11 Airflow Mode Selection Buttons: Press the button to select the desired airflow
mode. The selected mode air flow is shown on the display.
ICON MODE FUNCTION
VentilationInstrument panel outlets
Ventilation 2Instrument panel outlets and less foot outlets than
bi-level
Bi-Level Instrument panel outlets and foot outlets
FeetFoot outlets, both side outlets of the instrument panel
and some through windshield defroster outlets
Feet-Defrost Windshield defroster outlets, foot outlets and both side
outlets of the instrument panel
Defrost Windshield defroster outlets and both side outlets of
the instrument panel
GETTING COMFORTABLE
15
Page 18 of 124
12Driver’s Climate Button: Touching this
button will bring up another window that
will allow you to adjust the air
temperature, turn the heated/cooled
seats on or off and allow you to SYNC
(15) the passenger’s side air temp with
the driver’s temperature.
NOTE: The temperature bar only adjusts
the air temperature, it does not adjust the
seat temperature.
13 Driver Heated Seat Button: Pushing this
button will turn the heated driver seat on
High. Pushing it a second time will turn it
on Medium, third push for Low and fourth
time to turn Off.
14 Driver Vented Seat Button: Pushing this
button will turn the vented driver seat on
High. Pushing it a second time will turn it
on Medium, third push for Low and fourth
time to turn Off.
GETTING COMFORTABLE
16
Page 19 of 124

15SYNC Button: Press the button to synchronize the driver’s and passenger’s
temperatures to the driver’s temperature control dial. This will make the Driver control
the master temperature control.
16 Passengers’s Climate Button: Touching
this button will bring up another window
that will allow you to adjust the
temperature, turn the heated/cooled
seats on or off and allow you to SYNC
(15) the passenger’s side temp with the
driver’s temperature.
17 Passenger Heated Seat Button:
Pushing this button will turn the
passenger heated seat on High. Pushing
it a second time will turn it on Medium,
third push for Low and fourth time to turn
Off.
18 Passenger Vented Seat Button:
Pushing this button will turn the
passenger vented seat on High. Pushing
it a second time will turn it on Medium,
third push for Low and fourth time to turn
Off.
Auto Mode
When using automatic mode, the fan speed, airflow distribution, air-inlet control and air
conditioning compressor are controlled automatically. To activate:
1. Press the “AUTO” button. The “FULL AUTO” indicator light illuminates on the climate control display.
2. Set the preferred temperature using the temperature control arrows. Another method would be to touch the climate control button, then use the touch buttons or slide bar to
adjust the temperature.
If you operate any of the buttons other than “ON/OFF”, rear window defogger, front
defroster, “SYNC”, or the temperature buttons, the “FULL” indicator light will turn off, the
"Auto" will display in the screen button. You can then manually control the system as
desired. Press the “AUTO” button to change back to “FULL AUTO” mode if the
customizable button is programmed to “Auto”.
GETTING COMFORTABLE
17
Page 20 of 124
Dual 7–Inch Automatic Climate Control System
This is the Dual 7 inch display. The climate
control buttons will be on the bottom display
and will be similar to the 11.6 inch display.
Remote Engine Start with Climate Control
You can remotely start your Subaru and adjust the temperature
using the Starlink Safety and Security features through the
MySubaruapp (subscription required). Please refer to STARLINK
owner's manual for a list of required vehicle conditions for this
feature.
GETTING COMFORTABLE
18
Page 21 of 124

Press the ventilated seat button located on the
climate control screen. There is a separate button for
the driver and passenger. Each time you press the
switch, the mode")
Ventilated Seats(if equipped)
Press the ventilated seat button located on the
climate control screen. There is a separate button for
the driver and passenger. Each time you press the
switch, the mode will change as follows: High, Mid,
Low, Off. Blue indicators will illuminate indicating the
level.
Heated Seats
Press the front seat heater button located on the
climate control screen. There is a separate button for
the driver and passenger. Each time you press the
button, the mode will change as follows: High, Mid,
Low, Off. Yellow indicators will illuminate indicating
the level.
Rear Seat Heater (if equipped)
Press the rear seat heater switch located on
the rear of the center console. There is a
button for each of the seats. Each time you
press the switch, the mode will change as
follows: High, Low, Off. Yellow indicators will
illuminate indicating the level.
Heated Steering Wheel (if equipped)
To activate, pull the heated steering wheel switch
while the ignition is “ON”. The indicator light on the
switch will illuminate. To deactivate, pull the switch
again. The heater will stay on for approximately 30
minutes.
GETTING COMFORTABLE
19
Page 22 of 124

Power outlets (12V) are located in the front center console. Electrical power is available for
use with in-vehicle electrical appliances with a
maximum power")
ACCESSORY CONNECTIONS
Power Outlets (12V)
Power outlets (12V) are located in the front center console. Electrical power is available for
use with in-vehicle electrical appliances with a
maximum power rating of 120W.
1.Auxiliary Input Jack
The 3.5mm auxiliary input jack is located in
the front of the center console. You can
connect a portable music player to the
auxiliary jack and hear the music stored on
it through your Subaru’s speakers. Press
the “Source” button located on the steering
wheel or the “Media” button on the
Touchscreen to select the auxiliary mode.
For more information, please refer to the SUBARU STARLINK™ Owner’s Manual.
2. USB Ports
The USB ports are located in the front of the center console and the rear seat areas.
You can connect a variety of USB-equipped devices to the front center console ports,
such as portable music players or smartphones, to enjoy your favorite music through
your STARLINK Multimedia System. All ports provide charging (5V, 2.1A) to devices. For
more information, please refer to the SUBARU STARLINK™ Owner’s Manual.
GETTING COMFORTABLE
20
Page 23 of 124
AUDIO CONTROLS
For more information please refer to the
SUBARU STARLINK™ Owner’s Manual or
page 46.1 Presets/Skip
2 Volume
3 Source
4 Voice recognition
5 Hands-free calling
ADVANCED ADAPTIVE CRUISE CONTROL
For more information, please refer to the
EyeSight®Owner’s Manual.
1 Adaptive Cruise Control
2 Lane Centering
3 Decrease Distance
4 Increase Distance
5 Resume/Set
CONTROLS
21
Page 24 of 124
. Pull and hold this switch to access the
important messages. Pull the arrows to move
up or")
I SWITCH
Used to view important messages when red "i"
appears in the Combination Meter Display
(CMD). Pull and hold this switch to access the
important messages. Pull the arrows to move
up or down through the messages.
LIGHT CONTROLS
1AUTO: If equipped, rotate the end of the
lever to automatically turn your headlights
on or off, depending on the level of
outside light.
2 Daytime Running Lights: Rotate the end
of the lever to turn on the instrument
panel lights, parking lights, side marker
lights, tail lights, and license plate lights.
3 Headlights: Rotate the end of the lever to
turn on the headlights, instrument panel lights, parking lights, side marker lights, tail
lights, and license plate lights.
4 High Beams: Push the lever forward to change from low beam to high beam. Pull the
lever back to center to return to low beam. If equipped, this also activates the High
Beam Assist (HBA) system.
5 Fog Lights: If equipped, rotate the dial to turn on the fog lights.
Illumination Brightness
While the light switch is on, rotating the dial on the instrument panel
upward will make the illumination brighter. When the dial is fully
rotated upward (dots aligned), the instrument panel illumination
stays at full brightness. Rotating the dial downward dims the
instrument panel illumination.
For map equipped vehicles this setting also affects the day/night
view and illumination level.
CONTROLS
22
 1
1 2
2 3
3 4
4 5
5 6
6 7
7 8
8 9
9 10
10 11
11 12
12 13
13 14
14 15
15 16
16 17
17 18
18 19
19 20
20 21
21 22
22 23
23 24
24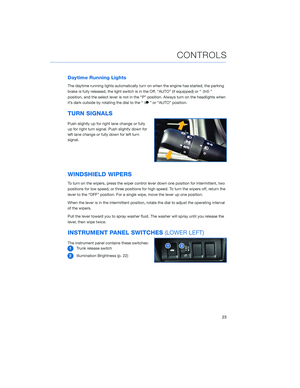 25
25 26
26 27
27 28
28 29
29 30
30 31
31 32
32 33
33 34
34 35
35 36
36 37
37 38
38 39
39 40
40 41
41 42
42 43
43 44
44 45
45 46
46 47
47 48
48 49
49 50
50 51
51 52
52 53
53 54
54 55
55 56
56 57
57 58
58 59
59 60
60 61
61 62
62 63
63 64
64 65
65 66
66 67
67 68
68 69
69 70
70 71
71 72
72 73
73 74
74 75
75 76
76 77
77 78
78 79
79 80
80 81
81 82
82 83
83 84
84 85
85 86
86 87
87 88
88 89
89 90
90 91
91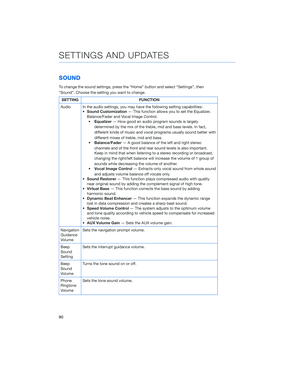 92
92 93
93 94
94 95
95 96
96 97
97 98
98 99
99 100
100 101
101 102
102 103
103 104
104 105
105 106
106 107
107 108
108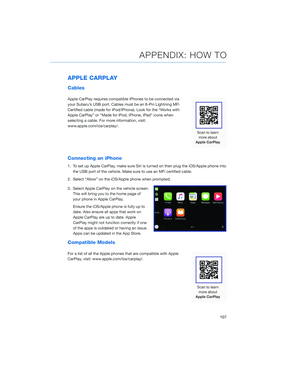 109
109 110
110 111
111 112
112 113
113 114
114 115
115 116
116 117
117 118
118 119
119 120
120 121
121 122
122 123
123 the")

