2020 Ram ProMaster ESP
[x] Cancel search: ESPPage 202 of 264

200MULTIMEDIA
Display
After pressing the Display button on the touchscreen, the following settings will be available:
Setting Name Selectable Options
Display ModeAuto Manual
Display Brightness With Headlights
ON Up Arrow Button
Down Arrow Button
NOTE:
This feature is only available in Manual Display Mode.
Display Brightness With the
Headlights Off Up Arrow Button
Down Arrow Button
NOTE:
This feature is only available in Manual Display Mode.
Language List Of Selectable Language
NOTE:
When the “Language” feature is selected, you may select one of multiple languages (English/Français/Español) for all display nomenclature including
the trip functions and the navigation system (if equipped). Press the Set Language button on the touchscreen, then press the desired language button
on the touchscreen until a check-mark appears next to the language, showing that setting has been selected.
Touchscreen Beep On Off
Display Trip B On Off
20_VF_OM_EN_US_t.book Page 200
Page 203 of 264

MULTIMEDIA201
Units — If Equipped
After pressing the Units button on the touchscreen, the following settings will be available:
Voice
After pressing the Voice button on the touchscreen, the following settings will be available:
Setting Name Selectable Options
UnitsUSMetricCustom
NOTE:
The “Custom” option allows you to set the “Distance” (mi, or km), “Fuel Consumption” [MPG (US), MPG (UK), L/100 km, or km/L] (if equipped), and
“Temperature” (°C, or °F) units of measurement independently (if equipped).
Setting Name Selectable Options
Voice Response LengthBriefLong
Show Command List Neverw/ HelpAlways
NOTE:
This setting will display the possible options while in a voice session.
9
20_VF_OM_EN_US_t.book Page 201
Page 210 of 264
208MULTIMEDIA
SAFETY AND GENERAL INFORMATION
Safety Guidelines
Ensure that all persons read this manual care -
fully before using the system. It contains
instructions on how to use the system in a safe
and effective manner.
Do NOT attach any object to the touchscreen.
Doing so can result in damage to the touch -
screen.
Please read and follow these safety precau -
tions. Failure to do so may result in injury or
property damage.
Glance at the screen only when safe to do so.
If prolonged viewing of the screen is required,
park in a safe location and set the parking
brake.
Stop use immediately if a problem occurs.
Failure to do so may cause injury or damage
to the product. Return it to an authorized
dealer for repair.
Ensure the volume level of the system is set
to a level that still allows you to hear outside
traffic and emergency vehicles.
Safe Usage Of The Uconnect System
Read all instructions in this manual carefully
before using your system to ensure proper
usage.
The Uconnect system is a sophisticated elec -
tronic device. Do not let young children use
the system.
Permanent hearing loss may occur if you play
your music or the system at loud volumes.
Exercise caution when setting the volume on
the system.
Keep drinks, rain and other sources of mois -
ture away from the system. Besides damage
to the system, moisture can cause electric
shocks as with any electronic device. NOTE:
Many features of this system are speed depen
-
dent. For your own safety, it is not possible to
use some of the touchscreen features while the
vehicle is in motion.
Exposure To Radio Frequency Radiation
The internal wireless radio operates within
guidelines found in radio frequency safety stan -
dards and recommendations, which reflect the
consensus of the scientific community. The
radio manufacturer believes the internal wire -
less radio is safe for use by consumers. The
level of energy emitted is far less than the elec -
tromagnetic energy emitted by wireless devices
such as mobile phones. However, the use of
wireless radios may be restricted in some situa-
tions or environments, such as aboard
airplanes. If you are unsure of restrictions, you
are encouraged to ask for authorization before
turning on the wireless radio.
WARNING!
ALWAYS drive safely with your hands on the
steering wheel. You have full responsibility
and assume all risks related to the use of the
Uconnect features and applications in this
vehicle. Only use Uconnect when it is safe to
do so. Failure to do so may result in an
accident involving serious injury or death.
20_VF_OM_EN_US_t.book Page 208
Page 211 of 264
MULTIMEDIA209
Care And Maintenance
Touchscreen
Do not press the touchscreen with any hard
or sharp objects (pen, USB stick, jewelry,
etc.), which could scratch the touchscreen
surface!
Do not spray any liquid or caustic chemicals
directly on the screen! Use a clean and dry
microfiber lens cleaning cloth in order to
clean the touchscreen.
If necessary, use a lint-free cloth dampened
with a cleaning solution, such as isopropyl
alcohol or an isopropyl alcohol and water
solution ratio of 50:50. Be sure to follow the
solvent manufacturer's precautions and
directions.
UCONNECT 3/3 NAV WITH 5-INCH DISPLAY
Introduction To The Uconnect 3/3 NAV With
5-Inch Display System
There are a few quick ways for you to identify
your radio. For a more complete description,
please refer to the User Guide in your glove box
or visit DriveUconnect.com (US Residents) or
DriveUconnect.ca (Canadian Residents).
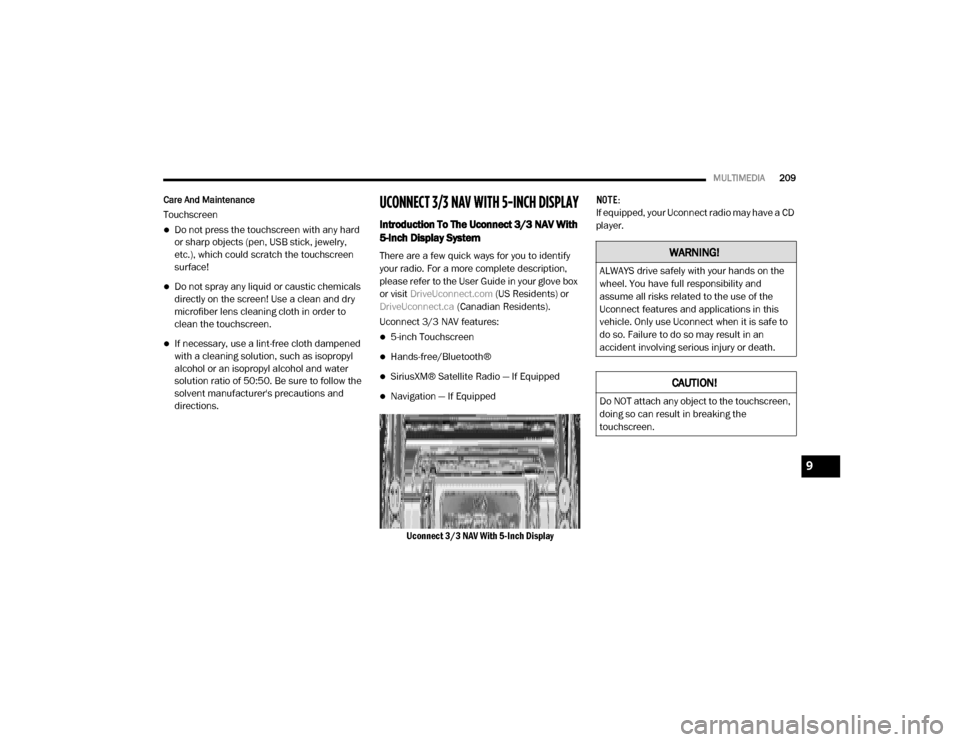
Uconnect 3/3 NAV features:
5-inch Touchscreen
Hands-free/Bluetooth®
SiriusXM® Satellite Radio — If Equipped
Navigation — If Equipped
Uconnect 3/3 NAV With 5-Inch Display NOTE:
If equipped, your Uconnect radio may have a CD
player.
WARNING!
ALWAYS drive safely with your hands on the
wheel. You have full responsibility and
assume all risks related to the use of the
Uconnect features and applications in this
vehicle. Only use Uconnect when it is safe to
do so. Failure to do so may result in an
accident involving serious injury or death.
CAUTION!
Do NOT attach any object to the touchscreen,
doing so can result in breaking the
touchscreen.
9
20_VF_OM_EN_US_t.book Page 209
Page 212 of 264
210MULTIMEDIA
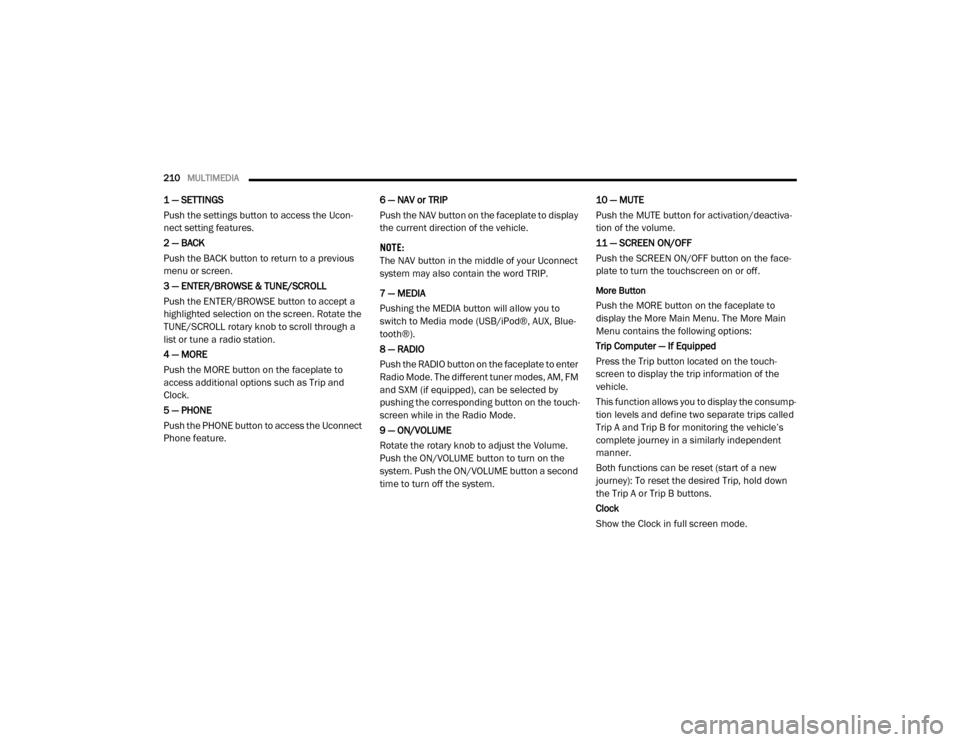
1 — SETTINGS
Push the settings button to access the Ucon -
nect setting features.
2 — BACK
Push the BACK button to return to a previous
menu or screen.
3 — ENTER/BROWSE & TUNE/SCROLL
Push the ENTER/BROWSE button to accept a
highlighted selection on the screen. Rotate the
TUNE/SCROLL rotary knob to scroll through a
list or tune a radio station.
4 — MORE
Push the MORE button on the faceplate to
access additional options such as Trip and
Clock.
5 — PHONE
Push the PHONE button to access the Uconnect
Phone feature. 6 — NAV or TRIP
Push the NAV button on the faceplate to display
the current direction of the vehicle.
NOTE:
The NAV button in the middle of your Uconnect
system may also contain the word TRIP.
7 — MEDIA
Pushing the MEDIA button will allow you to
switch to Media mode (USB/iPod®, AUX, Blue
-
tooth®).
8 — RADIO
Push the RADIO button on the faceplate to enter
Radio Mode. The different tuner modes, AM, FM
and SXM (if equipped), can be selected by
pushing the corresponding button on the touch -
screen while in the Radio Mode.
9 — ON/VOLUME
Rotate the rotary knob to adjust the Volume.
Push the ON/VOLUME button to turn on the
system. Push the ON/VOLUME button a second
time to turn off the system. 10 — MUTE
Push the MUTE button for activation/deactiva
-
tion of the volume.
11 — SCREEN ON/OFF
Push the SCREEN ON/OFF button on the face -
plate to turn the touchscreen on or off.
More Button
Push the MORE button on the faceplate to
display the More Main Menu. The More Main
Menu contains the following options:
Trip Computer — If Equipped
Press the Trip button located on the touch-
screen to display the trip information of the
vehicle.
This function allows you to display the consump -
tion levels and define two separate trips called
Trip A and Trip B for monitoring the vehicle’s
complete journey in a similarly independent
manner.
Both functions can be reset (start of a new
journey): To reset the desired Trip, hold down
the Trip A or Trip B buttons.
Clock
Show the Clock in full screen mode.
20_VF_OM_EN_US_t.book Page 210
Page 213 of 264
MULTIMEDIA211
Radio Mode
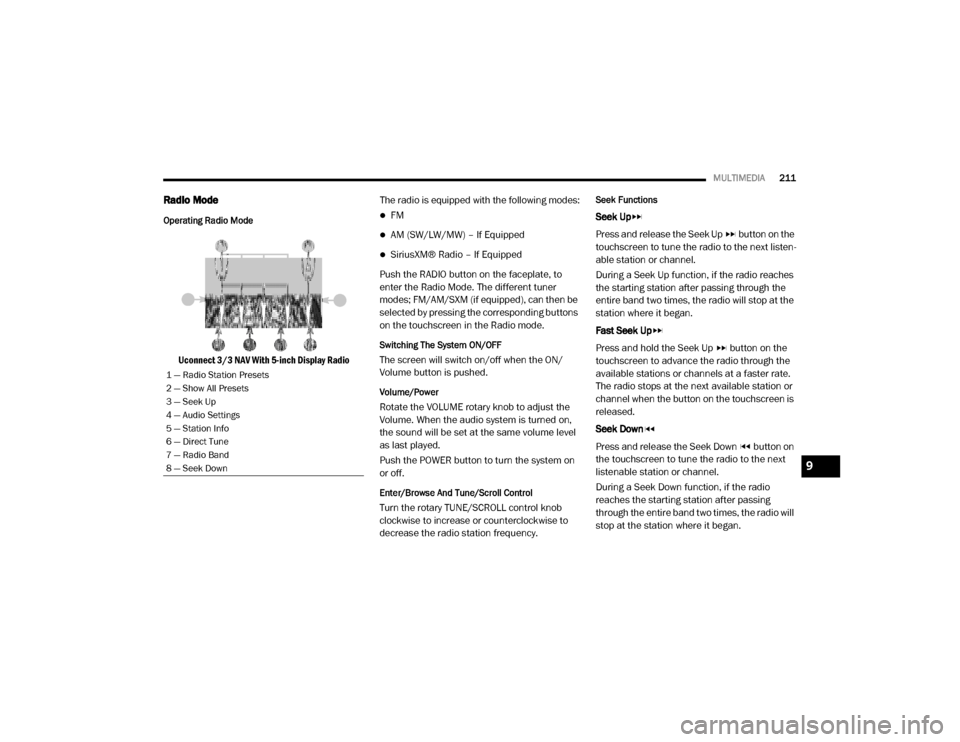
Operating Radio Mode
Uconnect 3/3 NAV With 5-inch Display Radio The radio is equipped with the following modes:
FM
AM (SW/LW/MW) – If Equipped
SiriusXM® Radio – If Equipped
Push the RADIO button on the faceplate, to
enter the Radio Mode. The different tuner
modes; FM/AM/SXM (if equipped), can then be
selected by pressing the corresponding buttons
on the touchscreen in the Radio mode.
Switching The System ON/OFF
The screen will switch on/off when the ON/
Volume button is pushed.
Volume/Power
Rotate the VOLUME rotary knob to adjust the
Volume. When the audio system is turned on,
the sound will be set at the same volume level
as last played.
Push the POWER button to turn the system on
or off.
Enter/Browse And Tune/Scroll Control
Turn the rotary TUNE/SCROLL control knob
clockwise to increase or counterclockwise to
decrease the radio station frequency.
Seek Functions
Seek Up
Press and release the Seek Up button on the
touchscreen to tune the radio to the next listen -
able station or channel.
During a Seek Up function, if the radio reaches
the starting station after passing through the
entire band two times, the radio will stop at the
station where it began.
Fast Seek Up
Press and hold the Seek Up button on the
touchscreen to advance the radio through the
available stations or channels at a faster rate.
The radio stops at the next available station or
channel when the button on the touchscreen is
released.
Seek Down
Press and release the Seek Down button on
the touchscreen to tune the radio to the next
listenable station or channel.
During a Seek Down function, if the radio
reaches the starting station after passing
through the entire band two times, the radio will
stop at the station where it began.
1 — Radio Station Presets
2 — Show All Presets
3 — Seek Up
4 — Audio Settings
5 — Station Info
6 — Direct Tune
7 — Radio Band
8 — Seek Down
9
20_VF_OM_EN_US_t.book Page 211
Page 220 of 264
218MULTIMEDIA
NOTE:
The priority is determined according to the
order of connection for mobile phones which
are not set as favorite. The last phone
connected will have the highest priority.
For more assistance on pairing your phone,
contact Uconnect customer support:
US residents — visit UconnectPhone.com
for phone compatibility, pairing instruc-
tions and details or call 1-877-855-8400
Canadian residents — visit Uconnect-
Phone.com for phone compatibility,
pairing instructions and details or call
1-800-465-2001 (English) or 1-800-387-9983 (French)
Storing Names/Numbers in The Mobile Phone
Before pairing your mobile phone, you must
make sure you have stored the names you want
to contact in the phonebook on your mobile
phone so that you can call them using the
vehicle's hands-free system.
If your phonebook does not contain any names,
enter new names for the most frequently used
numbers.
For further details, refer to your mobile phone
owner's handbook. NOTE:
The names in the phonebook which do not
contain phone numbers or where both fields
(name and surname) are empty will not be
displayed.
Connection
The system connects automatically to the
paired mobile phone with the highest priority.
To choose a specific mobile phone or Blue
-
tooth® audio device, proceed as follows:
Access the Settings menu
Select Phone/Bluetooth®
Select the Paired Phones or Paired Audio list
using the corresponding button on the
display
Select the specific device (mobile phone or
Bluetooth® device)
Press the Connect button
During the connection stage a screen is
displayed showing the progress of the opera -
tion
The device connected is highlighted in the list
Disconnection
To disconnect a specific mobile phone or Blue -
tooth® audio device, proceed as follows:
Access the Settings menu
Select Phone/Bluetooth®
Select the Paired Phones or Paired Audio list
using the corresponding button on the
display
Select the specific device (mobile phone or
Bluetooth® device)
Press the Disconnect button
Downloading A Phonebook From Your Mobile
Phone
If equipped and specifically supported by your
phone, Uconnect Phone asks you if you want to
download names (text names) and number
entries from your mobile phone’s phonebook.
Specific Bluetooth®-enabled phones with
Phone Book Access Profile may support this
feature. See UconnectPhone.com for supported
phones.
20_VF_OM_EN_US_t.book Page 218
Page 222 of 264
220MULTIMEDIA
Answering An Incoming Call
Call Controls
The buttons on the display allow the following
phone call functions to be managed:
Answer
End
Ignore
Put on hold/resume
Deactivate/activate the microphone
Transfer the call
Switch from one call to the other
Conference/merge two active calls
Answering Or Ignoring A Call With No Call
Currently In Progress
When an incoming call rings or is announced on
Uconnect, push the Answer button on the touch -
screen or push the PHONE button on the
steering wheel. Answering Or Ignoring An Incoming Call With A
Call Currently In Progress
When an incoming call rings or is announced on
Uconnect, push the Answer button on the touch
-
screen or push the PHONE button on the
steering wheel to answer the call and put the
ongoing call on hold.
NOTE:
Not all mobile phones may support the manage -
ment of an incoming call when another phone
conversation is active.
Ending A Call
Press the End button on the touchscreen or the
PHONE button on the steering wheel controls to
end a call in progress.
Only the ongoing call is ended and any call on
hold becomes the new active call.
Depending on the type of mobile phone, if the
ongoing call is ended by the caller, the call on
hold may not be activated automatically.
Uconnect Phone Features
Mute/Unmute
1. During a call, push the Voice Recognition (VR) button on the steering wheel.
2. After the BEEP, say “mute” (or “mute off”).
Reading Messages
The system can read the messages received by
the mobile phone.
To use this function the mobile phone must
support the SMS exchange function via Blue -
tooth®.
If this function is not supported by the phone,
the corresponding message button is deacti -
vated (grayed out) or may only accept incoming
messages.
When a text message is received, the display
will show a screen where the options "Listen",
"Call" or "Ignore" can be selected.
Press the message button to access the list of
SMS messages received by the mobile phone
(the list displays a maximum of 60 messages
received).
20_VF_OM_EN_US_t.book Page 220