Page 54 of 308

52
Ease of use and comfort
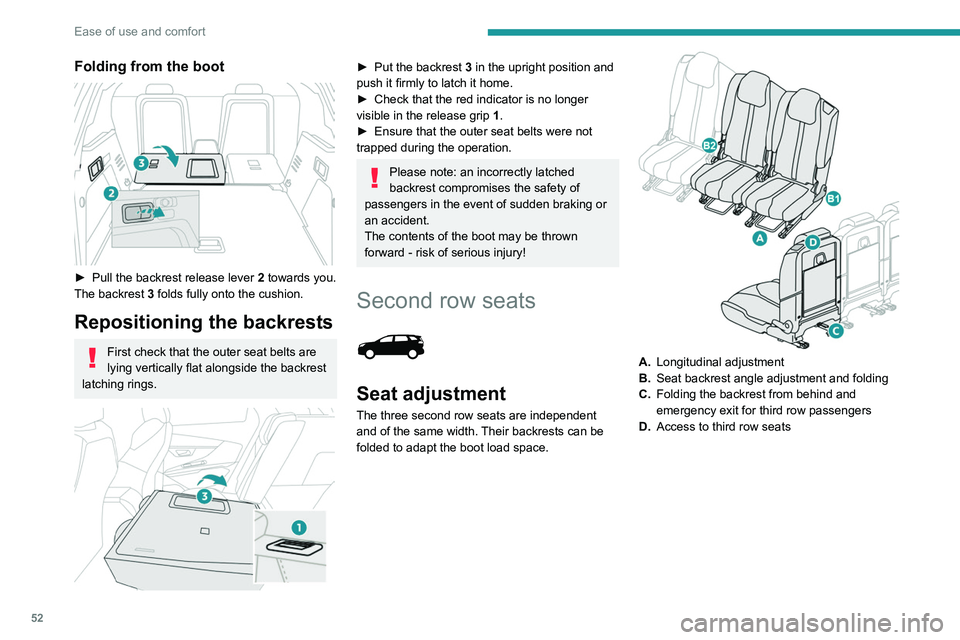
Folding from the boot
► Pull the backrest release lever 2 towards you.
The backrest 3 folds fully onto the cushion.
Repositioning the backrests
First check that the outer seat belts are
lying vertically flat alongside the backrest
latching rings.
► Put the backrest 3 in the upright position and
push it firmly to latch it home.
►
Check that the red indicator is no longer
visible in the release grip 1
.
►
Ensure that the outer seat belts were not
trapped during the operation.
Please note: an incorrectly latched
backrest compromises the safety of
passengers in the event of sudden braking or
an accident.
The contents of the boot may be thrown
forward - risk of serious injury!
Second row seats
Seat adjustment
The three second row seats are independent
and of the same width. Their backrests can be
folded to adapt the boot load space.
A. Longitudinal adjustment
B. Seat backrest angle adjustment and folding
C. Folding the backrest from behind and
emergency exit for third row passengers
D. Access to third row seats
Page 160 of 308

158
Driving
Obstacles may appear further away than
they actually are.
It is important to monitor the sides of the
vehicle during the manoeuvre, using the
mirrors.
Parking sensors also provide additional
information about the area around the vehicle.
180° view
The 180° view facilitates reversing out of a
parking space, making it possible to see the
approach of vehicles, pedestrians and cyclists.
This view is not recommended for carrying out a
complete manoeuvre.
It features 3 areas: left A, centre B and right C.
the system is activated when the vehicle has
already moved, the view from above can be fully
displayed.
Visiopark 1
Rear vision
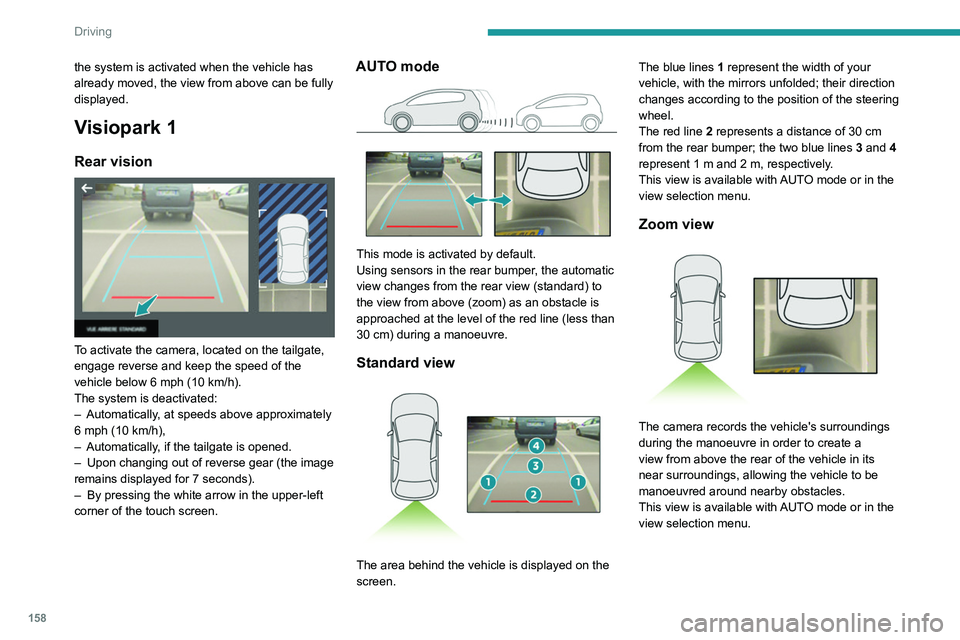
To activate the camera, located on the tailgate,
engage reverse and keep the speed of the
vehicle below 6 mph (10
km/h).
The system is deactivated:
–
Automatically
, at speeds above approximately
6 mph (10
km/h),
–
Automatically
, if the tailgate is opened.
–
Upon changing out of reverse gear (the image
remains displayed for 7
seconds).
–
By pressing the white arrow in the upper-left
corner of the touch screen.
AUTO mode
This mode is activated by default.
Using sensors in the rear bumper, the automatic
view changes from the rear view (standard) to
the view from above (zoom) as an obstacle is
approached at the level of the red line (less than
30
cm) during a manoeuvre.
Standard view
The area behind the vehicle is displayed on the
screen. The blue lines
1 represent the width of your
vehicle, with the mirrors unfolded; their direction
changes according to the position of the steering
wheel.
The red line 2 represents a distance of 30 cm
from the rear bumper; the two blue lines 3 and 4
represent 1 m and 2 m, respectively.
This view is available with AUTO mode or in the
view selection menu.
Zoom view
The camera records the vehicle's surroundings
during the manoeuvre in order to create a
view from above the rear of the vehicle in its
near surroundings, allowing the vehicle to be
manoeuvred around nearby obstacles.
This view is available with AUTO mode or in the
view selection menu.
Page 162 of 308

160
Driving
180° view
The 180° view assists with exiting from a parking
space in forward gear, making it possible to
see the approach of vehicles, pedestrians and
cyclists.
This view is not recommended for carrying out a
complete manoeuvre.
It consists of 3 areas: left A, centre B and right
C.
This view is available only from the view
selection menu.
Park Assist
Refer to the General recommendations on the
use of driving and manoeuvring aids .
gear engaged, or with rear vision, if reverse is
engaged.
The system is deactivated:
–
Automatically above about 19 mph (30
km/h)
(the image disappears temporarily from 12 mph
(20
km/h)).
–
By pressing the white arrow in the upper-left
corner of the touch screen.
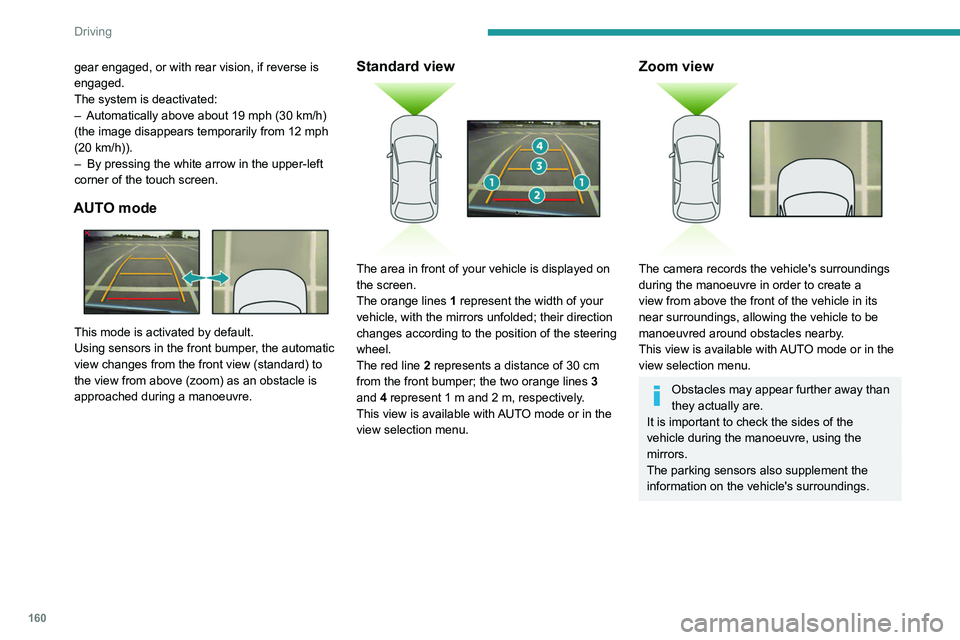
AUTO mode
This mode is activated by default.
Using sensors in the front bumper, the automatic
view changes from the front view (standard) to
the view from above (zoom) as an obstacle is
approached during a manoeuvre.
Standard view
The area in front of your vehicle is displayed on
the screen.
The orange lines 1 represent the width of your
vehicle, with the mirrors unfolded; their direction
changes according to the position of the steering
wheel.
The red line 2 represents a distance of 30 cm
from the front bumper; the two orange lines 3
and 4 represent 1 m and 2 m, respectively.
This view is available with AUTO mode or in the
view selection menu.
Zoom view
The camera records the vehicle's surroundings
during the manoeuvre in order to create a
view from above the front of the vehicle in its
near surroundings, allowing the vehicle to be
manoeuvred around obstacles nearby.
This view is available with AUTO mode or in the
view selection menu.
Obstacles may appear further away than
they actually are.
It is important to check the sides of the
vehicle during the manoeuvre, using the
mirrors.
The parking sensors also supplement the
information on the vehicle's surroundings.