2020 PEUGEOT 5008 sensor
[x] Cancel search: sensorPage 164 of 308
162
Driving
When several successive spaces are
found, the vehicle will be directed
towards the last one.
► Move forwards slowly until a message
is displayed, accompanied by an audible
signal, asking you to engage reverse gear.
► Engage reverse gear, release the
steering wheel and move without
exceeding the speed of 5 mph (7 km/h).
The assisted parking manoeuvre is in progress.
7► Without exceeding 5 mph (7 km/h),
follow the instructions and the warnings
from the "Parking sensors" system, until the end
of the manoeuvre is indicated.
The end of the manoeuvre is confirmed by a message and an audible signal.
The system is deactivated: it is possible to retake
control.
During a "bay" parking manoeuvre, the
Park Assist system is automatically
deactivated once the rear of the vehicle is
within 50 cm of an obstacle.
Assistance with "parallel" parking exit manoeuvres
► To leave a "parallel" parking space, switch
the engine on.
becomes continuous when the obstacle is
less than 30 centimetres away.
If the Parking sensors function has
been deactivated, it will be automatically
reactivated during the assisted manoeuvring
phases.
During parking and exit from parking
manoeuvres, the Visiopark 1 - Visiopark
2 functions may come into operation. They
allow better monitoring of the surroundings of
the vehicle, by displaying additional
information in the touch screen.
For more information on the Visiopark
1 - Visiopark 2
functions, refer to the
corresponding section.
In some circumstances, the sensors may
not detect small obstacles located in their
blind spots.
Any object exceeding the size of the vehicle
(e.g.
roof ladder, towball) is not taken
into account by the Park Assist during a
manoeuvre.
Always check the surroundings of the vehicle before starting a manoeuvre.
If the lateral distance between the vehicle and
the space is too great, the system may not be
able to measure the space.
During manoeuvring phases, the steering
wheel performs rapid turns: do not hold
the steering wheel or put your hands between
the spokes of the steering wheel.
Beware of any object likely to block the
manoeuvre (e.g.
loose clothing, scarves, ties)
- risk of injury!
Assistance with "parallel" parking manoeuvres
► When parking, select " Park Assist " in
the Driving/Vehicle touch screen menu
to activate the function.
► Limit the vehicle speed to a maximum
of 12 mph (20 km/h) and select “ Enter
parallel parking space” on the touch screen.
To enter a parking space, the system does not identify spaces that are clearly
smaller or larger than the vehicle.
► Operate the direction indicator on the
parking side chosen to activate the
measurement function.
The vehicle should drive
at a distance of between 0.5
m and 1.5 m from
the row of parked vehicles.
20► Drive at a speed below 12 mph (20
km/h) following the instructions until the
system finds an available space.
► Move forwards slowly until a message
is displayed, accompanied by an audible
signal, asking you to engage reverse gear
.
► Engage reverse gear, release the
steering wheel and move without
exceeding the speed of 5 mph (7 km/h).
The assisted parking manoeuvre is in progress.
7► Without exceeding 5 mph (7 km/h),
move forwards and backwards, aided by
the warnings from the "Parking sensors" system,
until the end of the manoeuvre is indicated.
The end of the manoeuvre is confirmed by a message and an audible signal.
The system is deactivated: it is possible to retake
control.
Assistance with "bay" parking manoeuvres
► When parking, select “ Park Assist ” in
the Driving/Vehicle touch screen menu
to activate the function.
► Limit the vehicle speed to a maximum
of 12 mph (20 km/h) and select “ Enter
bay parking space” on the touch screen.
► Operate the direction indicator on the
parking side chosen to activate the
measurement function.
The vehicle should drive
at a distance of between 0.5
m and 1.5 m from
the row of parked vehicles.
20► Drive at a speed below 12 mph (20
km/h) following the instructions until the
system finds an available space.
Page 165 of 308
163
Driving
6When several successive spaces are
found, the vehicle will be directed
towards the last one.
► Move forwards slowly until a message
is displayed, accompanied by an audible
signal, asking you to engage reverse gear
.
► Engage reverse gear, release the
steering wheel and move without
exceeding the speed of 5 mph (7 km/h).
The assisted parking manoeuvre is in progress.
7► Without exceeding 5 mph (7 km/h),
follow the instructions and the warnings
from the "Parking sensors" system, until the end
of the manoeuvre is indicated.
The end of the manoeuvre is confirmed by a message and an audible signal.
The system is deactivated: it is possible to retake
control.
During a "bay" parking manoeuvre, the
Park Assist system is automatically
deactivated once the rear of the vehicle is
within 50
cm of an obstacle.
Assistance with "parallel" parking exit manoeuvres
► To leave a "parallel" parking space, switch
the engine on.
► With the vehicle stationary , select
"Park Assist" in the Driving/Vehicle
touch screen menu to activate the function.
► Press " Exit parking slot " on the touch
screen.
► Operate the direction indicator for the
exit side chosen.
► Engage reverse or forward gear
and release the steering wheel.
The assisted parking manoeuvre is in progress.
5► Without exceeding 3 mph (5 km/h),
move forwards and backwards, aided by
the warnings from the "Parking sensors" system,
until the end of the manoeuvre is indicated.
The manoeuvre is complete when the vehicle's
front wheels are clear of the parking space.
The end of the manoeuvre is confirmed by a message and an audible signal.
The system is deactivated: it is possible to retake
control.
Deactivation
The system is deactivated via the Driving /
V ehicle touch screen menu.
The system is automatically deactivated:
–
when the ignition is switched off.
–
if the engine stalls.
–
if the driver's seat belt is not fastened.
–
on opening the driver's door
.
–
if no manoeuvre is performed within 5 minutes
of selecting the type of manoeuvre.
– after a prolonged stop of the vehicle during a
manoeuvre.
–
if the wheel anti-slip regulation (ASR) is
triggered.
–
if the speed of the vehicle exceeds the
authorised limit.
–
when the driver interrupts the rotation of the
steering wheel.
–
after 4 manoeuvring cycles.
–
if one of the front wheels encounters an
obstacle.
Deactivation is confirmed by a message and an
audible signal.
The driver should then take back control of the
vehicle's steering.
If the system is deactivated during a
manoeuvre, the driver should reactivate
it to repeat the measurement.
Deactivation
The system is automatically deactivated:
– when towing a trailer , connected electrically;
–
if the driver's door is opened;
–
if the speed of the vehicle is above 43 mph
(70 km/h).
T
o switch the system off for a prolonged period,
contact a PEUGEOT dealer or a qualified
workshop.
Page 166 of 308
164
Driving
Malfunctions
If the parking sensor malfunction occurs
during use, indicated by this warning lamp
coming on, it causes the function to deactivate.
In the event of a malfunction, have the system
checked by a PEUGEOT dealer or a qualified
workshop.
In the event of a power steering
malfunction, this warning lamp is
displayed on the instrument panel, accompanied
by a warning message.
You must stop as soon as it is safe to do so.
Contact a PEUGEOT dealer or a qualified
workshop.
Page 189 of 308
187
Practical information
7The system only registers AdBlue® top-ups of
5
litres or more.
If the AdBlue® tank is completely empty
– which is confirmed by the message
"Top up
AdBlue: Starting impossible" – it is
essential to add at least 5 litres.
Free-wheeling
In certain situations, you must allow the vehicle
to free-wheel (while being towed, on a rolling
road, in an automatic car wash, or being
transported by rail or sea freight, etc.).
The procedure varies according to the type of
gearbox and parking brake.
With a manual gearbox and
electric parking brake
/
Release procedure
► With the engine running and while depressing
the brake pedal, move the gear selector to the
neutral position.
►
While depressing the brake pedal, switch off
the ignition.
►
Release the brake pedal, then switch on the
ignition again.
►
While depressing the brake pedal, press the
control lever to release the parking brake. ►
Release the brake pedal, then switch off the
ignition.
Reverting to normal operation
► While depressing the brake pedal, start the
engine.
With an automatic gearbox
and electric parking brake
/
Release procedure
► With the vehicle stationary and the engine
running, select mode N and switch off the
ignition.
Within 5
seconds:
►
Switch on the ignition again.
►
While depressing the brake pedal, move the
push selector forwards or backwards to confirm
mode
N.
►
While depressing the brake pedal, press the
control lever to release the parking brake.
►
Release the brake pedal, switch off the
ignition.
If the 5-second time limit is exceeded, the
gearbox engages mode P
; it is then necessary to
restart the procedure.
Reverting to normal operation
► While depressing the brake pedal, restart the
engine.
Keyless Entry and Starting
You must not depress the brake pedal
while switching the ignition on or off. If you do,
the engine will start, requiring you to restart
the procedure.
Advice on care and maintenance
General recommendations
Observe the following recommendations to avoid
damaging your vehicle.
Exterior
Never use a high-pressure jet wash in
the engine compartment, due to the risk
of damaging electrical components.
Do not wash the vehicle in strong sunshine or
extremely cold conditions.
When washing the vehicle at an
automatic roller-brush car wash, be sure
to lock the doors and, depending on version,
remove the electronic key and deactivate the
“hands-free” function (“Hands-Free Tailgate
Access”).
When using a pressure washer, hold the
lance at least 30 cm from the vehicle
(particularly when cleaning areas containing
chipped paint, sensors or seals).
Page 208 of 308

206
In the event of a breakdown
► Open the glove box.
► Press on the central handle of the fusebox
cover
.
►
Lower the cover completely
.
►
T
ake the tweezers from their housing.
Changing a fuse
Before changing a fuse:
► Identify the cause of the fault and fix it.
►
Stop all power consumption.
►
Immobilise the vehicle and switch the ignition
off.
►
Identify the defective fuse using the current
allocation tables and diagrams.
T
o replace a fuse, it is essential to:
►
Use the special tweezers to extract the fuse
from its housing and check the condition of its
filament.
►
Always replace the failed fuse with a fuse of
the same rating (same colour); use of a different
rating may cause malfunctions - risk of fire!
If the fault recurs after replacing a fuse, have
the electrical system checked by a PEUGEOT
dealer or a qualified workshop.
The fuse allocation tables and the corresponding diagrams are available
from a PEUGEOT dealer or from a qualified
workshop.
The replacement of a fuse not shown in the allocation tables may cause a serious
malfunction of your vehicle. Contact a
PEUGEOT dealer or a qualified workshop.
Good
Failed
Tweezers
Installing electrical accessories
Your vehicle's electrical system is
designed to operate with standard or optional
equipment.
Before installing other electrical equipment
or accessories on your vehicle, contact a
PEUGEOT dealer or a qualified workshop.
PEUGEOT accepts no responsibility for
the cost incurred in repairing your vehicle
or for rectifying malfunctions resulting from
the installation of accessories not supplied
and not recommended by PEUGEOT and not
installed in accordance with specifications, in
particular when the combined power
consumption of all of the additional equipment
connected exceeds 10 milliamperes.
Fuses in the dashboard
The fusebox is located in the lower dashboard
(left-hand side).
To access the fuses, follow the same procedure
as described for accessing the fuse replacement
tools.
Version 1 (Full)
Box 1
Fuse N° Rating (A)Functions
F1 3 AKeyless Entry and Starting.
F2 5 AMultifunction screen.
F5 5 AReversing camera - Parking sensors.
F7 10 AHi-Fi amplifier.
F8 20 ARear wiper.
F10 30 ALocks.
F 11 30 ALocks.
F17 10 ABoot 12 V accessory socket.
F18 5 AEmergency and assistance calls.
F22 3 AGlove box lighting.
F26 3 ASeat belts not fastened warning lamps display.
F27 3 ARain/sunshine sensor.
F31 5 AAirbags.
F33 15 AFront 12 V accessory socket.
F35 5 AInstrument panel.
F36 20 AAudio system - Touch screen - CD player - Audio/navigation system.
Box 2 Fuse N° Rating (A)Functions
F17 10 AMemorising driving positions.
Page 209 of 308
207
In the event of a breakdown
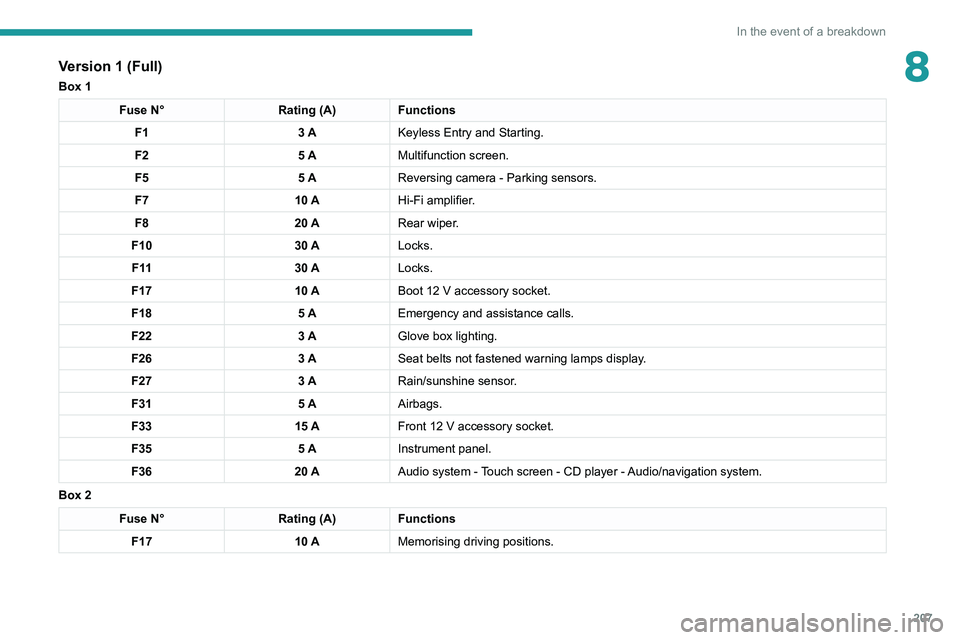
8Version 1 (Full)
Box 1
Fuse N°Rating (A)Functions
F1 3 AKeyless Entry and Starting.
F2 5 AMultifunction screen.
F5 5 AReversing camera - Parking sensors.
F7 10 AHi-Fi amplifier.
F8 20 ARear wiper.
F10 30 ALocks.
F 11 30 ALocks.
F17 10 ABoot 12
V accessory socket.
F18 5 AEmergency and assistance calls.
F22 3 AGlove box lighting.
F26 3 ASeat belts not fastened warning lamps display.
F27 3 ARain/sunshine sensor.
F31 5 AAirbags.
F33 15 AFront 12
V accessory socket.
F35 5 AInstrument panel.
F36 20 AAudio system - Touch screen - CD player - Audio/navigation system.
Box 2
Fuse N° Rating (A)Functions
F17 10 AMemorising driving positions.
Page 210 of 308
208
In the event of a breakdown
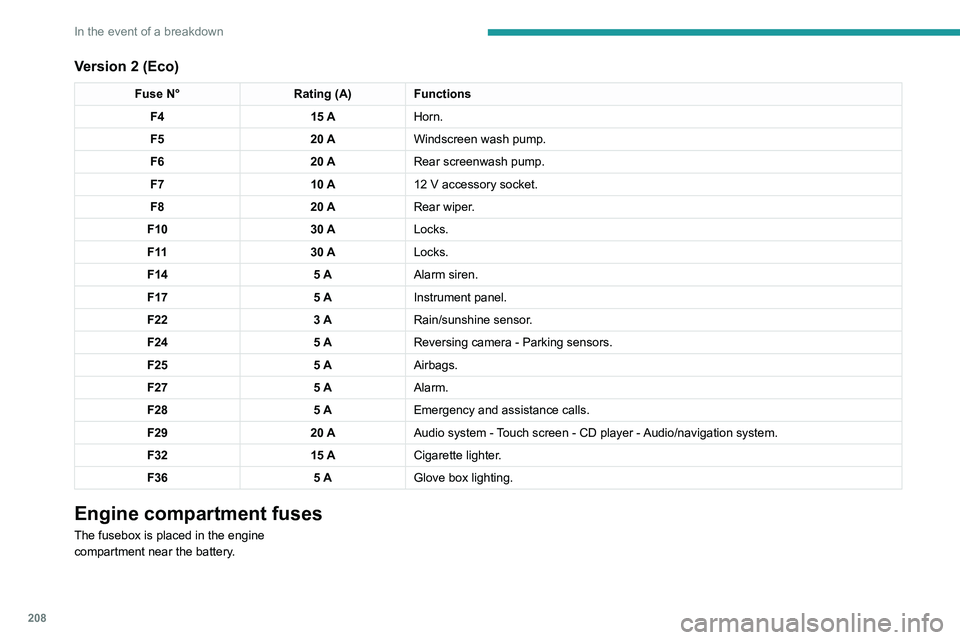
Version 2 (Eco)
Fuse N°Rating (A)Functions
F4 15 AHorn.
F5 20 AWindscreen wash pump.
F6 20 ARear screenwash pump.
F7 10 A12
V accessory socket.
F8 20 ARear wiper.
F10 30 ALocks.
F 11 30 ALocks.
F14 5 AAlarm siren.
F17 5 AInstrument panel.
F22 3 ARain/sunshine sensor.
F24 5 AReversing camera - Parking sensors.
F25 5 AAirbags.
F27 5 AAlarm.
F28 5 AEmergency and assistance calls.
F29 20 AAudio system - Touch screen - CD player - Audio/navigation system.
F32 15 ACigarette lighter.
F36 5 AGlove box lighting.
Engine compartment fuses
The fusebox is placed in the engine
compartment near the battery.
Accessing the fuses
Version 1 (Full)
Box 1
Fuse N° Rating (A)Functions
F14 15 AScreenwash pump.
F15 5 APower steering.
F20 25 AScreenwash pump.
F22 15 AHorn.
F23 15 ARight-hand main beam headlamp.
F24 15 ALeft-hand main beam headlamp.
Box 2 Fuse N° Rating (A)Functions
F8 30 ADiesel emissions control system (AdBlue)
F12 15 AAutomatic gearbox.
F14 5 AAutomatic gearbox.
Page 281 of 308

279
Alphabetical index
180° rear vision 159
A
ABS 90
Accelerated charging unit (Wallbox)
169
Accessories
87
Active Safety Brake
146–148
AdBlue®
18, 185
AdBlue® tank
186
Additive, Diesel
182–183
Adjusting headlamps
80
Adjusting head restraints
46
Adjusting seat
45, 47, 52–54
Adjusting the air distribution
60, 62–63
Adjusting the air flow
62–63
Adjusting the date
23–24, 251, 275
Adjusting the height and reach of
the steering wheel
49
Adjusting the lumbar support
45, 47
Adjusting the seat belt height
95
Adjusting the temperature
60–61
Adjusting the time
23–24, 251, 275
Advanced Grip Control
92
Advice on care and maintenance
168, 187
Advice on driving
7, 113
Airbags
97–101
Airbags, curtain
99–100
Airbags, front
98–99, 102
Airbags, lateral
98–99
Air conditioning
58–60, 63
Air conditioning, automatic 64
Air conditioning, digital
61, 64
Air conditioning, dual-zone automatic
61, 64
Air conditioning, manual
59, 64
Air conditioning, mono-zone
59, 64
Air intake
62, 64
Air vents
58
Alarm
34–35
Amplifier, audio
67
Android Auto connection
266
Anti-lock braking system (ABS)
90
Antitheft / Immobiliser
29
Apple CarPlay connection
247, 265
Applications
266
Armrest, front
68
Armrest, rear
71
Assistance call
88
Assistance, emergency braking
90, 148
Audible warning
88
Audio streaming (Bluetooth)
234, 246, 270
B
Backrest, folding 46
Battery
179
Battery, 12 V
183, 210–214
Battery, ancillaries
213
Battery, charging
167, 171, 211, 214
Battery (Hybrid)
168, 171
Battery, remote control
33–34
Blanking screen (snow shield)
178
Blind 42–43
Blind spot monitoring system, active
155
Blind spot sensors
154–155
Blinds, side
72
BlueHDi
18, 20, 182, 190
Bluetooth (hands-free)
234–235,
248–249, 271–272
Bluetooth (telephone)
248–249, 271–272
Bodywork
188
Bonnet
179–180
Boot
36–37, 40, 77
Boot (fittings)
73
Brake discs
184
Brake lamps
204
Brakes
184
Braking
125
Braking assistance system
90
Braking, automatic emergency
146–148
Braking, dynamic emergency
119–120
Brightness
250
Bulbs
203
Bulbs (changing)
201–202, 204–205
C
Cable, audio 270
Cable, Jack
270
Capacity, fuel tank
166
Cap, fuel filler
166
Care of the bodywork
188
CD
233, 246