2020 PEUGEOT 5008 tailgate
[x] Cancel search: tailgatePage 176 of 308
174
Practical information
After use
When travelling without a trailer or
load carrier, remove the towball and fit the
protective plug into the carrier, to provide
clear visibility of the number plate and/or its
lighting.
Fitting the towball
► Below the rear bumper, remove the protective
plug 2 from the carrier 1.
► Insert the end of the towball 5 into the carrier
1 and push it upwards; it will lock into position
automatically.
Vehicle equipped with motorised
tailgate with "Hands-Free Tailgate
Access" function
To avoid unwanted opening of the tailgate
when using the towing device:
–
deactivate this function in advance in your
vehicle's configuration menu,
–
or move the electronic key away from the
recognition zone, with the tailgate closed.
Towing device with quickly detachable towball
Presentation
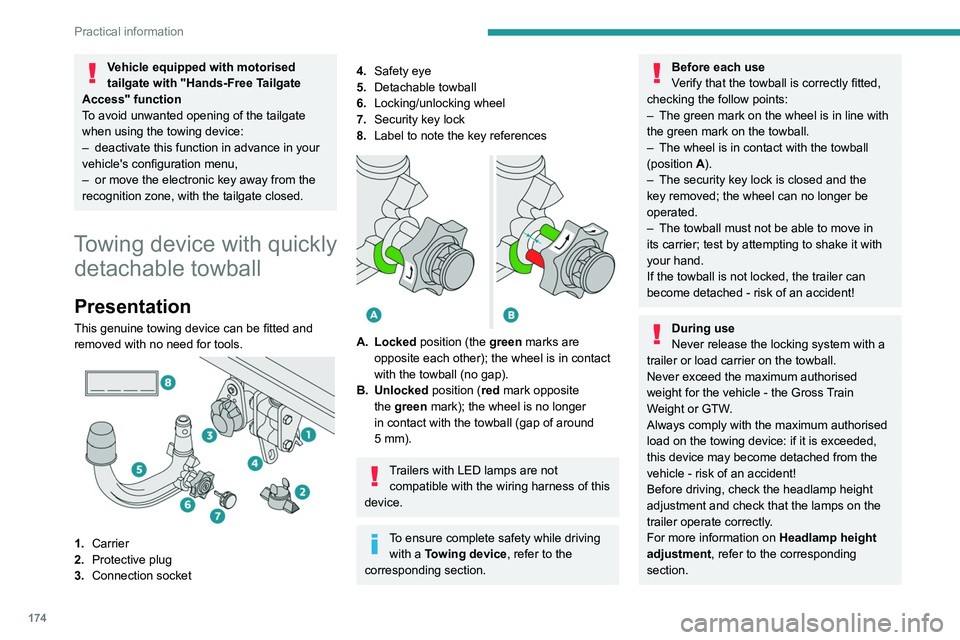
This genuine towing device can be fitted and
removed with no need for tools.
1. Carrier
2. Protective plug
3. Connection socket
4.Safety eye
5. Detachable towball
6. Locking/unlocking wheel
7. Security key lock
8. Label to note the key references
A. Locked position (the green marks are
opposite each other); the wheel is in contact
with the towball (no gap).
B. Unlocked position (red mark opposite the green mark); the wheel is no longer
in contact with the towball (gap of around
5
mm).
Trailers with LED lamps are not compatible with the wiring harness of this
device.
To ensure complete safety while driving with a Towing device , refer to the
corresponding section.
Before each use
Verify that the towball is correctly fitted,
checking the follow points:
–
The green mark on the wheel is in line with
the green mark on the towball.
–
The wheel is in contact with the towball
(position A
).
–
The security key lock is closed and the
key removed; the wheel can no longer be
operated.
–
The towball must not be able to move in
its carrier; test by attempting to shake it with
your hand.
If the towball is not locked, the trailer can
become detached - risk of an accident!
During use
Never release the locking system with a
trailer or load carrier on the towball.
Never exceed the maximum authorised
weight for the vehicle - the Gross Train
Weight or GTW.
Always comply with the maximum authorised
load on the towing device: if it is exceeded,
this device may become detached from the
vehicle - risk of an accident!
Before driving, check the headlamp height
adjustment and check that the lamps on the
trailer operate correctly.
For more information on Headlamp height
adjustment, refer to the corresponding
section.
Page 189 of 308
187
Practical information
7The system only registers AdBlue® top-ups of
5
litres or more.
If the AdBlue® tank is completely empty
– which is confirmed by the message
"Top up
AdBlue: Starting impossible" – it is
essential to add at least 5 litres.
Free-wheeling
In certain situations, you must allow the vehicle
to free-wheel (while being towed, on a rolling
road, in an automatic car wash, or being
transported by rail or sea freight, etc.).
The procedure varies according to the type of
gearbox and parking brake.
With a manual gearbox and
electric parking brake
/
Release procedure
► With the engine running and while depressing
the brake pedal, move the gear selector to the
neutral position.
►
While depressing the brake pedal, switch off
the ignition.
►
Release the brake pedal, then switch on the
ignition again.
►
While depressing the brake pedal, press the
control lever to release the parking brake. ►
Release the brake pedal, then switch off the
ignition.
Reverting to normal operation
► While depressing the brake pedal, start the
engine.
With an automatic gearbox
and electric parking brake
/
Release procedure
► With the vehicle stationary and the engine
running, select mode N and switch off the
ignition.
Within 5
seconds:
►
Switch on the ignition again.
►
While depressing the brake pedal, move the
push selector forwards or backwards to confirm
mode
N.
►
While depressing the brake pedal, press the
control lever to release the parking brake.
►
Release the brake pedal, switch off the
ignition.
If the 5-second time limit is exceeded, the
gearbox engages mode P
; it is then necessary to
restart the procedure.
Reverting to normal operation
► While depressing the brake pedal, restart the
engine.
Keyless Entry and Starting
You must not depress the brake pedal
while switching the ignition on or off. If you do,
the engine will start, requiring you to restart
the procedure.
Advice on care and maintenance
General recommendations
Observe the following recommendations to avoid
damaging your vehicle.
Exterior
Never use a high-pressure jet wash in
the engine compartment, due to the risk
of damaging electrical components.
Do not wash the vehicle in strong sunshine or
extremely cold conditions.
When washing the vehicle at an
automatic roller-brush car wash, be sure
to lock the doors and, depending on version,
remove the electronic key and deactivate the
“hands-free” function (“Hands-Free Tailgate
Access”).
When using a pressure washer, hold the
lance at least 30 cm from the vehicle
(particularly when cleaning areas containing
chipped paint, sensors or seals).
Page 192 of 308
190
In the event of a breakdown
Warning triangle
As a safety precaution, before leaving your
vehicle to set up and install the triangle, switch
on the hazard warning lamps and put on your
high visibility vest.
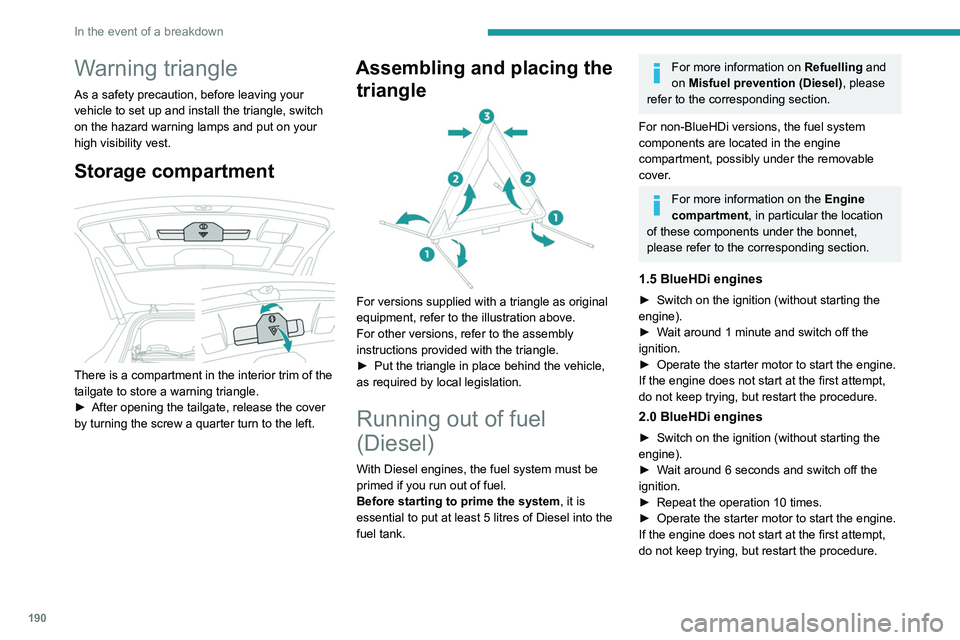
Storage compartment
There is a compartment in the interior trim of the
tailgate to store a warning triangle.
►
After opening the tailgate, release the cover
by turning the screw a quarter turn to the left.
Assembling and placing the triangle
For versions supplied with a triangle as original
equipment, refer to the illustration above.
For other versions, refer to the assembly
instructions provided with the triangle.
►
Put the triangle in place behind the vehicle,
as required by local legislation.
Running out of fuel
(Diesel)
With Diesel engines, the fuel system must be
primed if you run out of fuel.
Before starting to prime the system, it is
essential to put at least 5 litres of Diesel into the
fuel tank.
For more information on Refuelling and
on Misfuel prevention (Diesel), please
refer to the corresponding section.
For non-BlueHDi versions, the fuel system
components are located in the engine
compartment, possibly under the removable
cover.
For more information on the Engine
compartment, in particular the location
of these components under the bonnet,
please refer to the corresponding section.
1.5 BlueHDi engines
► Switch on the ignition (without starting the
engine).
►
W
ait around 1 minute and switch off the
ignition.
►
Operate the starter motor to start the engine.
If the engine does not start at the first attempt,
do not keep trying, but restart the procedure.
2.0 BlueHDi engines
► Switch on the ignition (without starting the
engine).
►
W
ait around 6 seconds and switch off the
ignition.
►
Repeat the operation 10
times.
►
Operate the starter motor to start the engine.
If the engine does not start at the first attempt,
do not keep trying, but restart the procedure.
2.0 HDi engines
► Open the bonnet and then, if necessary,
unclip the cover to access the priming pump.
► Loosen the degassing bolt.
► Operate the priming pump until fuel
appears in the transparent tube.
► Retighten the degassing bolt.
► Operate the starter motor until the engine
starts (if the engine does not start at the first
attempt, wait around 15 seconds before trying
again).
► If the engine does not start after a few
attempts, operate the priming pump again, then
the starter motor.
► Put the cover back in place and clip it in, then
close the bonnet.
Tool kit
Set of tools supplied with the vehicle.
Its content depends on your vehicle's equipment:
– Temporary puncture repair kit.
– Spare wheel.
Accessing the tools
Page 206 of 308
204
In the event of a breakdown
To replace this type of bulb, you can also contact a PEUGEOT dealer or a qualified
workshop.
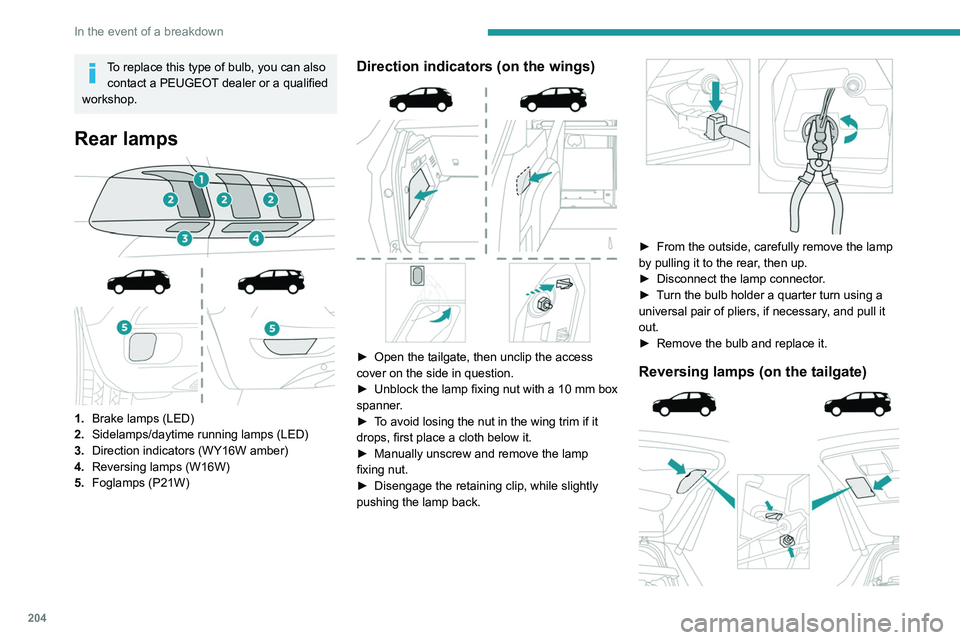
Rear lamps
1. Brake lamps (LED)
2. Sidelamps/daytime running lamps (LED)
3. Direction indicators (WY16W amber)
4. Reversing lamps (W16W)
5. Foglamps (P21W)
Direction indicators (on the wings)
► Open the tailgate, then unclip the access
cover on the side in question.
►
Unblock the lamp fixing nut with a 10
mm box
spanner.
►
T
o avoid losing the nut in the wing trim if it
drops, first place a cloth below it.
►
Manually unscrew and remove the lamp
fixing nut.
►
Disengage the retaining clip, while slightly
pushing the lamp back.
► From the outside, carefully remove the lamp
by pulling it to the rear , then up.
►
Disconnect the lamp connector
.
►
T
urn the bulb holder a quarter turn using a
universal pair of pliers, if necessary, and pull it
out.
►
Remove the bulb and replace it.
Reversing lamps (on the tailgate)
Page 207 of 308
205
In the event of a breakdown
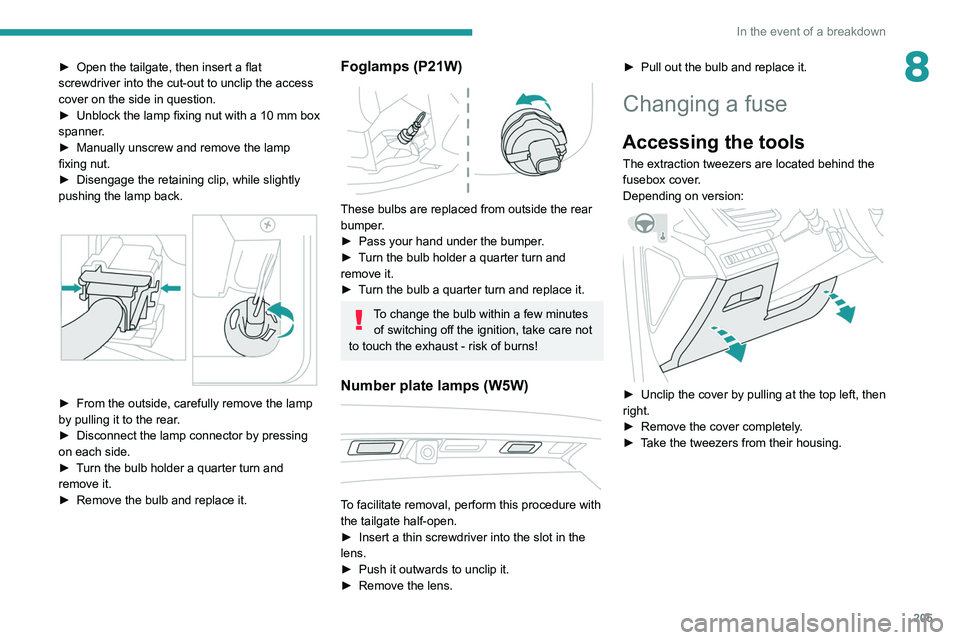
8► Open the tailgate, then insert a flat
screwdriver into the cut-out to unclip the access
cover on the side in question.
►
Unblock the lamp fixing nut with a 10
mm box
spanner.
►
Manually unscrew and remove the lamp
fixing nut.
►
Disengage the retaining clip, while slightly
pushing the lamp back.
► From the outside, carefully remove the lamp
by pulling it to the rear .
►
Disconnect the lamp connector by pressing
on each side.
►
T
urn the bulb holder a quarter turn and
remove it.
►
Remove the bulb and replace it.
Foglamps (P21W)
These bulbs are replaced from outside the rear
bumper.
►
Pass your hand under the bumper
.
►
T
urn the bulb holder a quarter turn and
remove it.
►
T
urn the bulb a quarter turn and replace it.
To change the bulb within a few minutes of switching off the ignition, take care not
to touch the exhaust - risk of burns!
Number plate lamps (W5W)
To facilitate removal, perform this procedure with
the tailgate half-open.
►
Insert a thin screwdriver into the slot in the
lens.
►
Push it outwards to unclip it.
►
Remove the lens. ►
Pull out the bulb and replace it.
Changing a fuse
Accessing the tools
The extraction tweezers are located behind the
fusebox cover.
Depending on version:
► Unclip the cover by pulling at the top left, then
right.
►
Remove the cover completely
.
►
T
ake the tweezers from their housing.
Page 283 of 308
281
Alphabetical index
Electric windows 41
Electronic brake force distribution (EBFD)
90
Emergency braking assistance (EBA)
90
Emergency call
88
Emergency switching off
117–118
Emergency warning lamps
87, 190
Emissions control system, SCR
19, 185
Energy economy mode
179
Energy flows
26
Energy recovery
20, 125
Engine
184
Engine compartment
179–180
Engine, Diesel
166, 180, 190, 222
Engine, petrol
126, 180, 220
Engines
219–220, 222
Environment
7, 34
e-Save function (energy reserve)
26
ESC (electronic stability control)
90
F
Fatigue detection 149
Filling the AdBlue® tank
182, 186
Filling the fuel tank
166–167
Filter, air
183
Filter, oil
183
Filter, particle
182–183
Filter, passenger compartment
58, 183
Fitting a wheel
199–200
Fitting roof bars
176–177
Fittings, boot
73
Fittings, front 66
Fittings, interior
66
Fittings, rear
70
Flap, charging
168, 171–173
Flap, fuel filler
166–167
Flashing indicators
79, 203
Flat bed (recovery)
216
Floor, boot, adjustable
76
Floor, concertina
55
Fluid, brake
182
Fluid, engine coolant
182
Foglamps, front
78, 82, 202–203
Foglamps, rear
78, 205
Folding the rear seats
51–54
Four-wheel drive (4WD)
127, 178
Frequency (radio)
268–269
Fuel
7, 166
Fuel consumption
7, 20
Fuel tank
166–167
Fusebox, dashboard
206
Fusebox, engine compartment
206, 208–209
Fuses
205–206, 208–209
G
Gauge, fuel 166
Gearbox, automatic
121–126, 128, 184, 211
Gearbox, manual
120, 125–126, 128, 184
Gear lever, automatic gearbox
122
Gear lever, manual gearbox
120
Gear shift indicator ~ Gear efficiency
indicator
127
Glove box
66
G.P.S.
262
Grab handles
66
H
Hands-free access 39
Hands-free tailgate
37, 39–40
Hazard warning lamps
87, 190
headlamp adjustment
80
Headlamp adjustment
80
Headlamps, automatic dipping
81–82
Headlamps, automatic illumination
80
Headlamps, dipped beam
202–203
Headlamps, halogen
80, 202–203
Headlamps, main beam
202–203
Head restraints, front
46–47
Head restraints, rear
50–52
Heating
58–59
Heating, programmable
27, 65
Hi-Fi system
67
Hill Assist Descent Control (HADC)
93
Hill start assist
125
Histogramme, fuel consumption
26–27
Horn
88
Horn for pedestrians
88
Hybrid
26, 116, 167, 225
Hybrid engine
225
Page 285 of 308
283
Alphabetical index
Mirrors, door 49–50, 65, 154
Mirror, vanity
66
Misfuel prevention
167
Modularity, seats
57
Motor, electric
126, 167, 225
Motorised tailgate
37–38, 40
Mountings, ISOFIX
105
MP3 CD
233
N
Navigation 260–262
Navigation, connected
263–265
Net
73–74
Net, high load retaining
75–76
Number plate lamps
205
O
Obstacle detection 155
Oil change
181
Oil consumption
181
OIl, engine
181
On-board tools
76, 191–193
Opening the bonnet
179–180
Opening the boot
30, 36
Opening the doors
30, 36
Opening the windows
28
P
Pads, brake 184
Paint
188, 227
Paint colour code
227
Paint, matt
188
Parcel shelf, rear
71, 73
Park Assist
161–162
Parking brake, electric
118–120, 184
Parking sensors, audible and visual
155
Parking sensors, front
156
Parking sensors, rear
155
Personalisation
10
Plates, identification
227
Player, Apple®
234, 246, 270
Player, MP3 CD
233
Player, USB
232, 245, 270
Port, USB
67, 232, 245, 265, 270
Power
20
Power indicator
20
Pressures, tyres
184, 196, 227
Pre-tensioning seat belts
97
Priming pump
191
Priming the fuel system
190
Profiles
250, 274
Protecting children
98, 100–103,
105, 107, 110–111
Puncture
193–194, 196
Q
Quiet vehicle warning sound 88
R
Radar (warnings) 131
Radio
230–231, 243–244, 246, 268
Radio, digital (Digital Audio
Broadcasting - DAB)
231, 245, 269
Range, AdBlue®
18, 182
RDS
244, 268–269
READY lamp
179
Rear air blower
63
Rear screen, demisting
65
Rechargeable hybrid system
5, 26, 116, 126,
167
Recharging the battery
211, 214
Recirculation, air
62, 64
Recorder, total distance
20
Recovery
215–218
Recovery of the vehicle
216
Reduction of electrical load
179
Regeneration of the particle filter
183
Regenerative braking (deceleration
by engine braking)
125
Reinitialisation of the under-inflation
detection system
130
Reinitialising the remote control
34
Reminder, key in ignition
11 6
Reminder, lighting on
79
Page 287 of 308

285
Alphabetical index
Tailgate 36
Tank, fuel
166–167
Technical data
220, 222, 225
Telephone
67, 234–237, 248–250, 271–273
Telephone, Bluetooth with voice recognition
237
Temperature, coolant
18
Textured Paint
188
Thermal preconditioning of the passenger
compartment
27, 65
Ticket holder
66
Time (setting)
23–24, 251, 275
TMC (Traffic info)
262
Tool box
76
Tools
191–193, 197–198
Topping-up AdBlue®
186
Total distance recorder
20–21
Touch screen
21, 24, 26, 65
Towball, quickly detachable
174–176
Towbar
91, 173
Towbar with quickly detachable
towball
174–176
Towed loads
219–220, 222, 225
Towing another vehicle
215–218
Traction control (ASR)
90–92
Traffic information (TA)
230
Traffic information (TMC)
262
Trailer
91, 173
Trailer stability assist (TSA)
91
Trajectory control systems
90
Triangle, warning
190
Trip computer
22–23
Trip distance recorder
21
Tyres
184, 227Tyre under-inflation detection 129, 196
U
Under-inflation (detection) 129
Unlocking
28, 30
Unlocking from the inside
32
Unlocking the boot
29–30
Unlocking the doors
32
Unlocking the tailgate
29–30
Updating the date
251, 275
Updating the time
251, 275
USB
232, 245–246, 265, 270
V
Ventilation 58
Video
270
Visibility
64
Vision, 180° forward
159
Visiopark 1
158
Visiopark 1 - Visiopark 2
157, 159
Voice commands
257–260
W
Wallbox 169
Warning and indicator lamps
11
Warning lamp, driver''s seat belt
not fastened
96
Warning lamps 11, 20
Warning lamp, seat belts
96
Warnings and indicators
11
Washing
131
Washing (advice)
168, 187–188
Weights
219–220, 222
Welcome lighting
29, 81
Wheel, spare
184, 191–193, 196–198
Windscreen, heated
64–65
Windscreen wipers
83, 85
Wiper blades (changing)
84–85
Wiper, rear
84
Wipers
83, 86
Wipers, automatic rain sensitive
85–86