2020 PEUGEOT 3008 lock
[x] Cancel search: lockPage 124 of 308
122
Driving
Engaging reverse gear
► Slow down until you come to a stop.
► Depress the brake pedal, then press the
Unlock button.
► While maintaining the presses, select
mode R.
Manual mode
Entering the mode:
► With mode D initially selected.
► Press button M; the green indicator lamp in
the button comes on.
Exiting the mode:
► Push forwards once to return to D.
or
► Press button M; the indicator lamp in the
button goes off.
Switching off the ignition
To switch off the ignition, the vehicle must be
stationary.
Changing to free-wheeling
For more information on Changing to free-
wheeling , refer to the corresponding section.
If you open the driver's door while mode
N is engaged, an audible signal will
sound. It will stop when you close the driver's
door again.
Special aspects of automatic mode
The gearbox selects the gear that offers optimum
performance, taking into account the outside
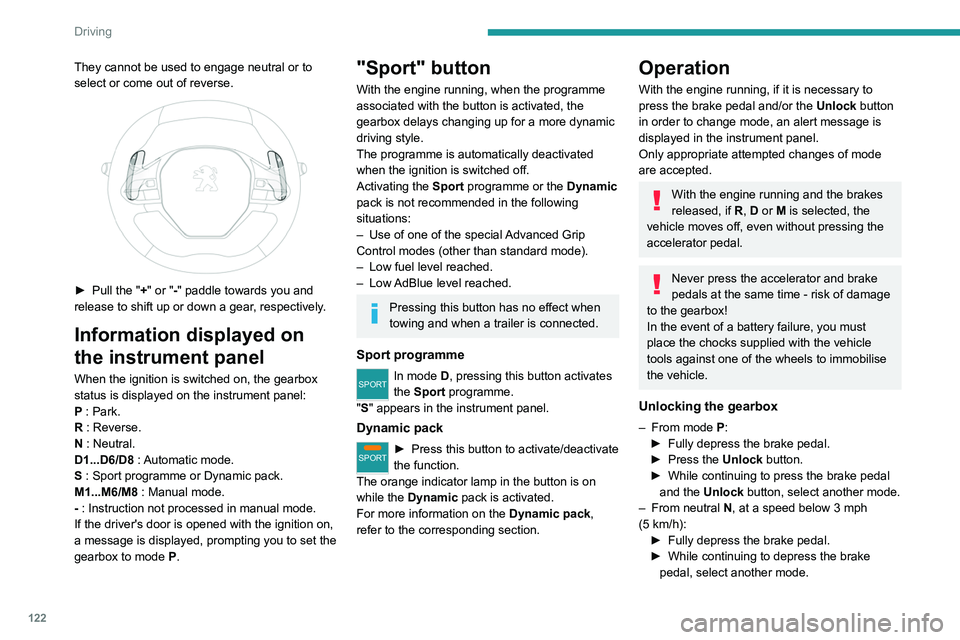
They cannot be used to engage neutral or to
select or come out of reverse.
► Pull the " +" or "-" paddle towards you and
release to shift up or down a gear, respectively.
Information displayed on
the instrument panel
When the ignition is switched on, the gearbox
status is displayed on the instrument panel:
P : Park.
R : Reverse.
N : Neutral.
D1...D6/D8 : Automatic mode.
S : Sport programme or Dynamic pack.
M1...M6/M8 : Manual mode.
- : Instruction not processed in manual mode.
If the driver's door is opened with the ignition on,
a message is displayed, prompting you to set the
gearbox to mode P.
"Sport" button
With the engine running, when the programme
associated with the button is activated, the
gearbox delays changing up for a more dynamic
driving style.
The programme is automatically deactivated
when the ignition is switched off.
Activating the Sport programme or the Dynamic
pack is not recommended in the following
situations:
–
Use of one of the special
Advanced Grip
Control
modes (other than standard mode).
–
Low fuel level reached.
–
Low
AdBlue level reached.
Pressing this button has no effect when
towing and when a trailer is connected.
Sport programme
SPORTIn mode D, pressing this button activates
the Sport programme.
"S" appears in the instrument panel.
Dynamic pack
SPORT► Press this button to activate/deactivate
the function.
The orange indicator lamp in the button is on
while the Dynamic
pack is activated.
For more information on the Dynamic pack,
refer to the corresponding section.
Operation
With the engine running, if it is necessary to
press the brake pedal and/or the Unlock button
in order to change mode, an alert message is
displayed in the instrument panel.
Only appropriate attempted changes of mode
are accepted.
With the engine running and the brakes
released, if R, D or M is selected, the
vehicle moves off, even without pressing the
accelerator pedal.
Never press the accelerator and brake
pedals at the same time - risk of damage
to the gearbox!
In the event of a battery failure, you must
place the chocks supplied with the vehicle
tools against one of the wheels to immobilise
the vehicle.
Unlocking the gearbox
– From mode P:
► Fully depress the brake pedal.
►
Press the
Unlock button.
►
While continuing to press the brake pedal
and the
Unlock button, select another mode.
–
From neutral
N, at a speed below 3 mph
(5
km/h):
►
Fully depress the brake pedal.
►
While continuing to depress the brake
pedal, select another mode.
Page 125 of 308
123
Driving
6Engaging reverse gear
► Slow down until you come to a stop.
► Depress the brake pedal, then press the
Unlock
button.
►
While maintaining the presses, select
mode
R.
Manual mode
Entering the mode:
► With mode D initially selected.
►
Press button
M; the green indicator lamp in
the button comes on.
Exiting the mode:
►
Push forwards once to return to
D.
or
►
Press button
M; the indicator lamp in the
button goes off.
Switching off the ignition
To switch off the ignition, the vehicle must be
stationary.
Changing to free-wheeling
For more information on Changing to free-
wheeling , refer to the corresponding section.
If you open the driver's door while mode
N is engaged, an audible signal will
sound. It will stop when you close the driver's
door again.
Special aspects of automatic mode
The gearbox selects the gear that offers optimum
performance, taking into account the outside temperature, the profile of the road, the load on
the vehicle and the style of driving.
For maximum acceleration without touching the
selector, press the accelerator fully down (kick-
down). The gearbox changes down automatically
or holds the selected gear until the maximum
engine speed is reached.
The steering-mounted controls allow the driver
to temporarily select a gear, if the vehicle speed
and engine speed conditions permit.
Special aspects of manual mode
The gearbox only changes from one gear to
another if the vehicle speed and engine speed
conditions permit.
Starting the vehicle
From mode P:
►
Fully depress the brake pedal.
►
Start the engine.
►
Maintaining pressure on the brake pedal,
press the
Unlock button.
►
Push once or twice rearwards to select
the automatic mode
D, or forwards to engage
reverse
R.
From neutral
N:
►
Fully depress the brake pedal.
►
Start the engine.
►
Maintaining pressure on the brake pedal,
push rearwards to select the automatic mode
D
,
or forwards, while pressing the Unlock
button to
engage reverse
R
.
Then, from
D or R:
► Release the brake pedal.
► Accelerate gradually to automatically release
the electric parking brake.
The vehicle moves off immediately
.
In severe wintry conditions (temperature
below -23°C), it is recommended that the
engine be allowed to run for a few minutes
before moving off, to ensure correct operation
and durability of the engine and gearbox.
With an automatic gearbox, never try to
start the engine by pushing the vehicle.
Stopping the vehicle
Whatever the state of the gearbox, when the
ignition is switched off, mode P is engaged
automatically and immediately.
However, in mode N, mode P will be engaged
after a delay of 5 seconds (allowing for the
process of putting the vehicle into free-wheeling
mode).
Check that mode
P has been engaged and
that the electric parking brake was applied
automatically; if not, apply it manually.
The corresponding indicator lamps in the selector and the electric parking brake
control lever must be on, as well as those in the
instrument panel.
Page 126 of 308
124
Driving
N: neutral.
D1 to D8: automatic forward gear.
B1 to B8: automatic forward gear with
regenerative braking function activated.
In all-electric driving, the gear engaged is not
indicated.
The state of the gearbox remains displayed in
the instrument panel for a few seconds after
switching off the ignition.
Regenerative braking
The regenerative braking function emulates
engine braking, slowing the vehicle with no need
to depress the brake pedal. When the driver
releases the accelerator pedal, the vehicle slows
down more quickly and recharges the battery.
► From mode D/B, moving the push selector
backwards activates/deactivates the function.
The D on the instrument panel is replaced with
a B.
The state of the function is not saved when the
ignition is switched off.
The driver must always be ready to use the brake pedal: in certain situations (e.g.
full battery, extreme temperatures), the
regenerative braking level may be temporarily
limited and deceleration may be reduced.
Hill start assist
This system keeps your vehicle briefly stationary
(for approximately 2 seconds) when making a hill
Gearbox malfunction
This warning lamp comes on, accompanied by an audible signal and the
display of a message.
Visit a PEUGEOT dealer or a qualified workshop.
Do not drive faster than 62
mph (100 km/h),
keeping to the speed limit.
The gearbox switches to back-up mode: mode
D
is locked in third gear, the steering-mounted
control paddles are inoperative, mode
M
is no
longer available. You may feel a significant jolt
on engaging reverse gear. This will not damage
the gearbox.
Selector malfunction
Minor malfunction
This warning lamp comes on, accompanied by the display of a message
and an audible signal.
Drive cautiously and visit a PEUGEOT dealer or
a qualified workshop.
In certain cases, the selector indicator lamps
may no longer come on, but the gearbox state is
still displayed on the instrument panel.
Major malfunction
This warning lamp comes on, accompanied by the display of a
message.
Stop as soon as it is safe to do so, away
from traffic, and call a PEUGEOT dealer
or a qualified workshop.
e-EAT8 electric automatic
gearbox (Hybrid)
Automatic 8-speed gearbox with a push selector and regenerative braking function.
With the exception of manual mode, the
“Sport” button and the regenerative braking,
the operation is identical to that of other EAT8
gearboxes.
For more information on the Operation or the
Malfunctions of the EAT8 gearbox, refer to the
corresponding sections.
Gearbox selector positions
P. Car park
For parking the vehicle: the front wheels
are blocked.
R. Reverse gear
N. Neutral
For moving the vehicle with the ignition
off: in certain car washing machines,
when towing the vehicle, etc.
D/B. Automatic forward gear ( D) or automatic
forward gear with regenerative braking
(B)
The gearbox manages gear changes
according to the style of driving, the road
profile and the vehicle load. With the
regenerative braking function activated,
the gearbox also controls braking when
the accelerator pedal is released.
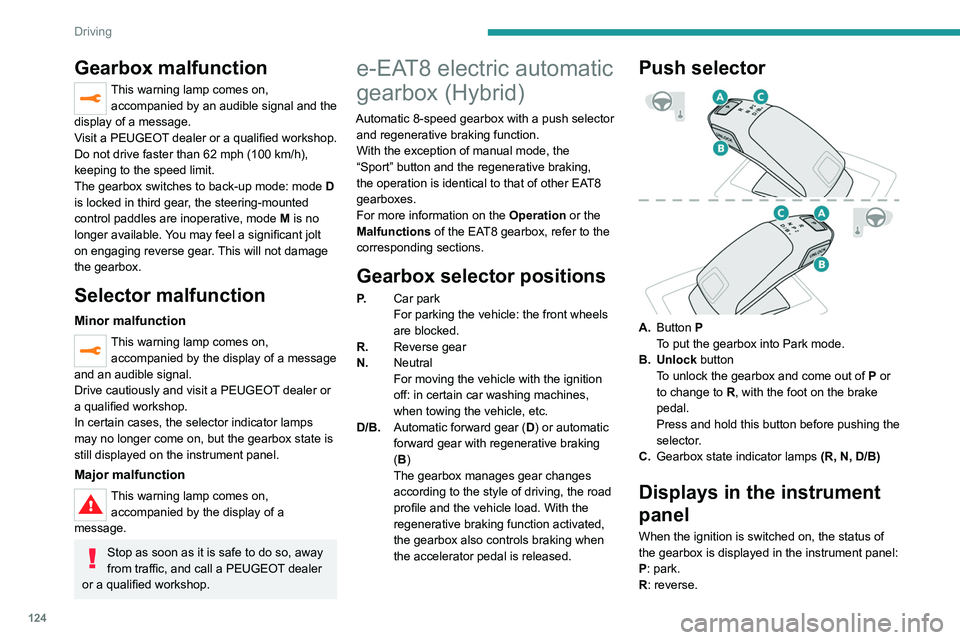
Push selector
A. Button P
To put the gearbox into Park mode.
B. Unlock button To unlock the gearbox and come out of
P
or
to change to
R, with the foot on the brake
pedal.
Press and hold this button before pushing the
selector.
C. Gearbox state indicator lamps (R, N, D/B)
Displays in the instrument
panel
When the ignition is switched on, the status of
the gearbox is displayed in the instrument panel:
P: park.
R: reverse.
Page 164 of 308
162
Driving
When several successive spaces are
found, the vehicle will be directed
towards the last one.
► Move forwards slowly until a message
is displayed, accompanied by an audible
signal, asking you to engage reverse gear.
► Engage reverse gear, release the
steering wheel and move without
exceeding the speed of 5 mph (7 km/h).
The assisted parking manoeuvre is in progress.
7► Without exceeding 5 mph (7 km/h),
follow the instructions and the warnings
from the "Parking sensors" system, until the end
of the manoeuvre is indicated.
The end of the manoeuvre is confirmed by a message and an audible signal.
The system is deactivated: it is possible to retake
control.
During a "bay" parking manoeuvre, the
Park Assist system is automatically
deactivated once the rear of the vehicle is
within 50 cm of an obstacle.
Assistance with "parallel" parking exit manoeuvres
► To leave a "parallel" parking space, switch
the engine on.
becomes continuous when the obstacle is
less than 30 centimetres away.
If the Parking sensors function has
been deactivated, it will be automatically
reactivated during the assisted manoeuvring
phases.
During parking and exit from parking
manoeuvres, the Visiopark 1 - Visiopark
2 functions may come into operation. They
allow better monitoring of the surroundings of
the vehicle, by displaying additional
information in the touch screen.
For more information on the Visiopark
1 - Visiopark 2
functions, refer to the
corresponding section.
In some circumstances, the sensors may
not detect small obstacles located in their
blind spots.
Any object exceeding the size of the vehicle
(e.g.
roof ladder, towball) is not taken
into account by the Park Assist during a
manoeuvre.
Always check the surroundings of the vehicle before starting a manoeuvre.
If the lateral distance between the vehicle and
the space is too great, the system may not be
able to measure the space.
During manoeuvring phases, the steering
wheel performs rapid turns: do not hold
the steering wheel or put your hands between
the spokes of the steering wheel.
Beware of any object likely to block the
manoeuvre (e.g.
loose clothing, scarves, ties)
- risk of injury!
Assistance with "parallel" parking manoeuvres
► When parking, select " Park Assist " in
the Driving/Vehicle touch screen menu
to activate the function.
► Limit the vehicle speed to a maximum
of 12 mph (20 km/h) and select “ Enter
parallel parking space” on the touch screen.
To enter a parking space, the system does not identify spaces that are clearly
smaller or larger than the vehicle.
► Operate the direction indicator on the
parking side chosen to activate the
measurement function.
The vehicle should drive
at a distance of between 0.5
m and 1.5 m from
the row of parked vehicles.
20► Drive at a speed below 12 mph (20
km/h) following the instructions until the
system finds an available space.
► Move forwards slowly until a message
is displayed, accompanied by an audible
signal, asking you to engage reverse gear
.
► Engage reverse gear, release the
steering wheel and move without
exceeding the speed of 5 mph (7 km/h).
The assisted parking manoeuvre is in progress.
7► Without exceeding 5 mph (7 km/h),
move forwards and backwards, aided by
the warnings from the "Parking sensors" system,
until the end of the manoeuvre is indicated.
The end of the manoeuvre is confirmed by a message and an audible signal.
The system is deactivated: it is possible to retake
control.
Assistance with "bay" parking manoeuvres
► When parking, select “ Park Assist ” in
the Driving/Vehicle touch screen menu
to activate the function.
► Limit the vehicle speed to a maximum
of 12 mph (20 km/h) and select “ Enter
bay parking space” on the touch screen.
► Operate the direction indicator on the
parking side chosen to activate the
measurement function.
The vehicle should drive
at a distance of between 0.5
m and 1.5 m from
the row of parked vehicles.
20► Drive at a speed below 12 mph (20
km/h) following the instructions until the
system finds an available space.
Page 169 of 308
167
Practical information
7
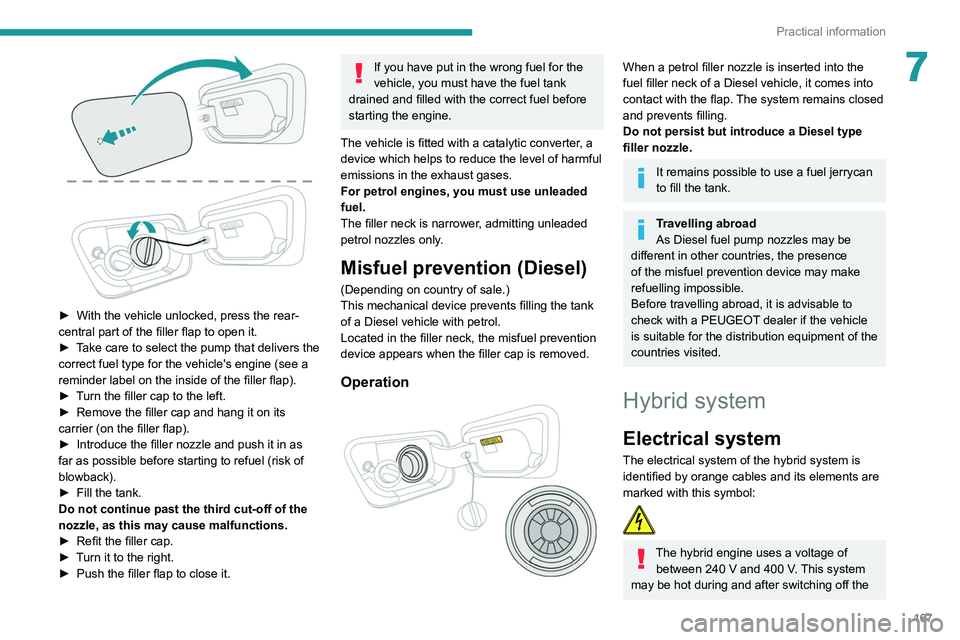
► With the vehicle unlocked, press the rear-
central part of the filler flap to open it.
►
T
ake care to select the pump that delivers the
correct fuel type for the vehicle's engine (see a
reminder label on the inside of the filler flap).
►
T
urn the filler cap to the left.
►
Remove the filler cap and hang it on its
carrier (on the filler flap).
►
Introduce the filler nozzle and push it in as
far as possible before starting to refuel (risk of
blowback).
►
Fill the tank.
Do not continue past the third cut-off of the
nozzle, as this may cause malfunctions.
►
Refit the filler cap.
►
T
urn it to the right.
►
Push the filler flap to close it.
If you have put in the wrong fuel for the
vehicle, you must have the fuel tank
drained and filled with the correct fuel before
starting the engine.
The vehicle is fitted with a catalytic converter, a
device which helps to reduce the level of harmful
emissions in the exhaust gases.
For petrol engines, you must use unleaded
fuel.
The filler neck is narrower, admitting unleaded
petrol nozzles only.
Misfuel prevention (Diesel)
(Depending on country of sale.)
This mechanical device prevents filling the tank
of a Diesel vehicle with petrol.
Located in the filler neck, the misfuel prevention
device appears when the filler cap is removed.
Operation
When a petrol filler nozzle is inserted into the
fuel filler neck of a Diesel vehicle, it comes into
contact with the flap. The system remains closed
and prevents filling.
Do not persist but introduce a Diesel type
filler nozzle.
It remains possible to use a fuel jerrycan
to fill the tank.
Travelling abroad
As Diesel fuel pump nozzles may be
different in other countries, the presence
of the misfuel prevention device may make
refuelling impossible.
Before travelling abroad, it is advisable to
check with a PEUGEOT dealer if the vehicle
is suitable for the distribution equipment of the
countries visited.
Hybrid system
Electrical system
The electrical system of the hybrid system is
identified by orange cables and its elements are
marked with this symbol:
The hybrid engine uses a voltage of between 240 V and 400 V. This system
may be hot during and after switching off the
Page 171 of 308

169
Practical information
7
1.Deferred charge activation button
2. Nozzle locking indicator lamp
Red: nozzle positioned correctly and locked
in the connector.
3. Charging connector
4. Light guides
Status of light
guides Meaning
Fixed white Welcome lighting when flap
is opened.
Fixed blue Deferred charge.
Flashing green Charging.
Fixed green Charging finished.
Fixed red Malfunction.
In case of impact, even light, against the
charging flap, do not use it.
Do not remove or modify the charging
connector - risk of fire!
Contact a PEUGEOT dealer or a qualified
workshop.
Charging cable
The battery can be charged using several types
of cables.
The charging cable supplied with the vehicle is
compatible with the electrical installations of the
country of sale. If you are travelling abroad, refer
to the following table to check the compatibility
of local electrical installations with the charging
cable.
Contact a PEUGEOT dealer or a qualified
workshop to obtain the appropriate charging
cable(s).
Cable type CompatibilitySpecifications
Mode 2 charging cable with integrated control
unit
Conventional electrical socket.
Vehicle can be recharged overnight (6.5 hours to
7 hours).
Charge limited to a maximum of 8 A.
“Green Up” type socket.
Vehicle can be recharged in half a day (3.5 hours
to 4 hours).
Charge limited to a maximum of 14
A.
Page 173 of 308
171
Practical information
7
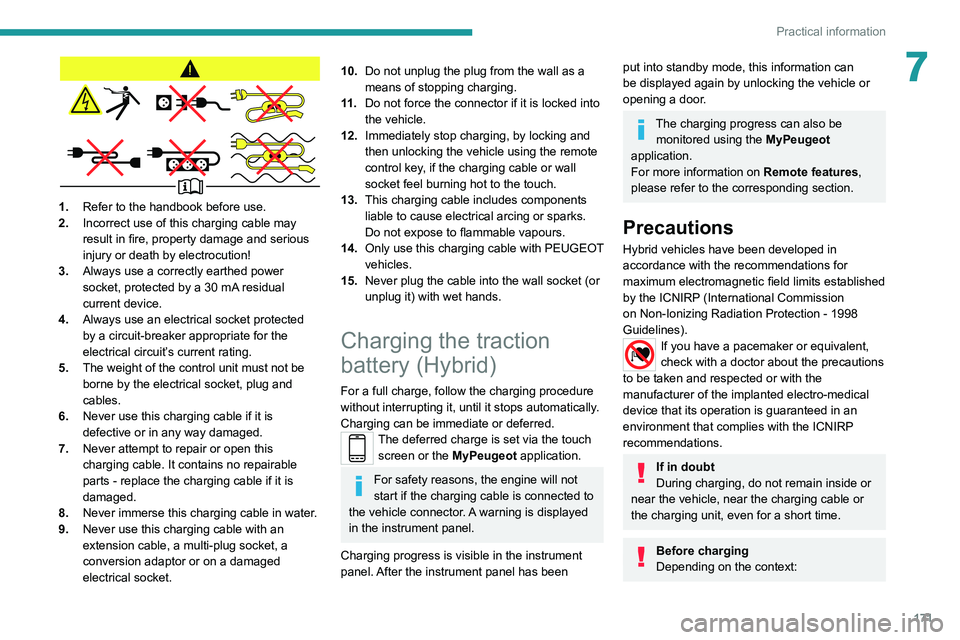
1.Refer to the handbook before use.
2. Incorrect use of this charging cable may
result in fire, property damage and serious
injury or death by electrocution!
3. Always use a correctly earthed power
socket, protected by a 30
mA residual
current device.
4. Always use an electrical socket protected
by a circuit-breaker appropriate for the
electrical circuit’s current rating.
5. The weight of the control unit must not be
borne by the electrical socket, plug and
cables.
6. Never use this charging cable if it is
defective or in any way damaged.
7. Never attempt to repair or open this
charging cable. It contains no repairable
parts - replace the charging cable if it is
damaged.
8. Never immerse this charging cable in water.
9. Never use this charging cable with an
extension cable, a multi-plug socket, a
conversion adaptor or on a damaged
electrical socket.
10.Do not unplug the plug from the wall as a
means of stopping charging.
11 . Do not force the connector if it is locked into
the vehicle.
12. Immediately stop charging, by locking and
then unlocking the vehicle using the remote
control key, if the charging cable or wall
socket feel burning hot to the touch.
13. This charging cable includes components
liable to cause electrical arcing or sparks.
Do not expose to flammable vapours.
14. Only use this charging cable with PEUGEOT
vehicles.
15. Never plug the cable into the wall socket (or
unplug it) with wet hands.
Charging the traction
battery (Hybrid)
For a full charge, follow the charging procedure
without interrupting it, until it stops automatically.
Charging can be immediate or deferred.
The deferred charge is set via the touch
screen or the MyPeugeot application.
For safety reasons, the engine will not
start if the charging cable is connected to
the vehicle connector. A warning is displayed
in the instrument panel.
Charging progress is visible in the instrument
panel. After the instrument panel has been
put into standby mode, this information can
be displayed again by unlocking the vehicle or
opening a door.
The charging progress can also be monitored using the MyPeugeot
application.
For more information on Remote features,
please refer to the corresponding section.
Precautions
Hybrid vehicles have been developed in
accordance with the recommendations for
maximum electromagnetic field limits established
by the ICNIRP (International Commission
on Non-Ionizing Radiation Protection - 1998
Guidelines).
If you have a pacemaker or equivalent,
check with a doctor about the precautions
to be taken and respected or with the
manufacturer of the implanted electro-medical
device that its operation is guaranteed in an
environment that complies with the ICNIRP
recommendations.
If in doubt
During charging, do not remain inside or
near the vehicle, near the charging cable or
the charging unit, even for a short time.
Before charging
Depending on the context:
Page 174 of 308
172
Practical information
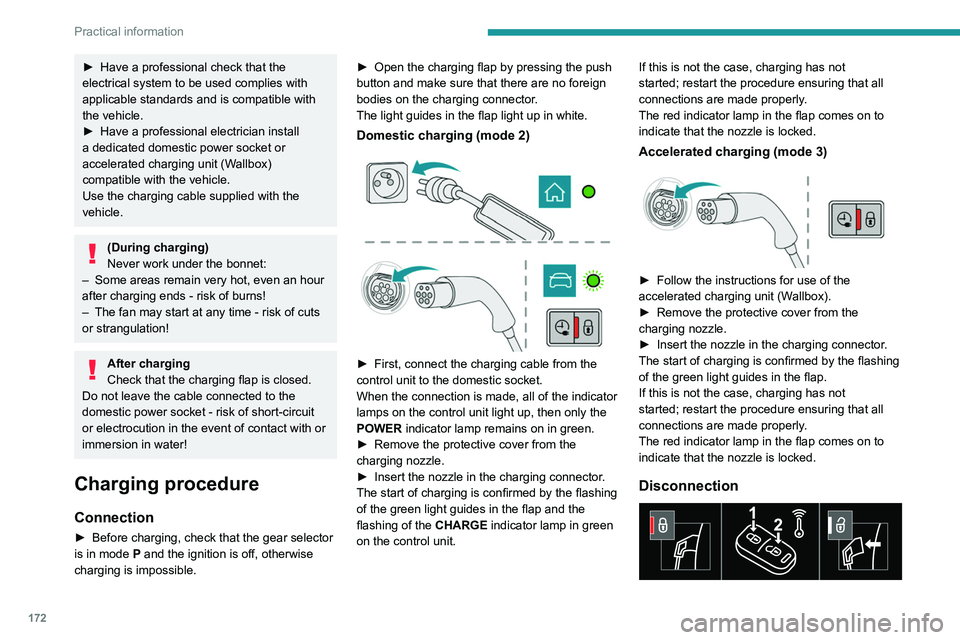
Before disconnecting the nozzle from the
charging connector:
► If the vehicle is unlocked, lock it and then
unlock it .
► If the vehicle is locked, unlock it.
The red indicator lamp in the flap goes out to
confirm that the charging nozzle is unlocked.
► Within 30 seconds, remove the charging
nozzle.
Domestic charging (mode 2)
The end of charging is confirmed by the fixed
lighting of the green CHARGE indicator lamp on
the control unit and by the fixed lighting of the
green light guides in the flap.
► After disconnection, remove the protective
cover from the nozzle and close the charging
flap.
► Disconnect the control unit's charging cable
from the domestic socket.
Accelerated charging (mode 3)
The end of charging is confirmed by the
accelerated charging unit (Wallbox) and by the
fixed lighting of the green light guides in the flap.
► After disconnection, replace the nozzle on the
charging unit and close the charging flap.
Deferred charging
By default, charging begins when the nozzle
is connected. Deferred charging can be
programmed.
► Have a professional check that the
electrical system to be used complies with
applicable standards and is compatible with
the vehicle.
►
Have a professional electrician install
a dedicated domestic power socket or
accelerated charging unit (W
allbox)
compatible with the vehicle.
Use the charging cable supplied with the
vehicle.
(During charging)
Never work under the bonnet:
–
Some areas remain very hot, even an hour
after charging ends - risk of burns!
–
The fan may start at any time - risk of cuts
or strangulation!
After charging
Check that the charging flap is closed.
Do not leave the cable connected to the
domestic power socket - risk of short-circuit
or electrocution in the event of contact with or
immersion in water!
Charging procedure
Connection
► Before charging, check that the gear selector
is in mode P and the ignition is off, otherwise
charging is impossible. ►
Open the charging flap by pressing the push
button and make sure that there are no foreign
bodies on the charging connector
.
The light guides in the flap light up in white.
Domestic charging (mode 2)
► First, connect the charging cable from the
control unit to the domestic socket.
When the connection is made, all of the indicator
lamps on the control unit light up, then only the
POWER
indicator lamp remains on in green.
►
Remove the protective cover from the
charging nozzle.
►
Insert the nozzle in the charging connector
.
The start of charging is confirmed by the flashing
of the green light guides in the flap and the
flashing of the
CHARGE indicator lamp in green
on the control unit. If this is not the case, charging has not
started; restart the procedure ensuring that all
connections are made properly.
The red indicator lamp in the flap comes on to
indicate that the nozzle is locked.
Accelerated charging (mode 3)
► Follow the instructions for use of the
accelerated charging unit (W allbox).
►
Remove the protective cover from the
charging nozzle.
►
Insert the nozzle in the charging connector
.
The start of charging is confirmed by the flashing
of the green light guides in the flap.
If this is not the case, charging has not
started; restart the procedure ensuring that all
connections are made properly.
The red indicator lamp in the flap comes on to
indicate that the nozzle is locked.
Disconnection