2020 PEUGEOT 3008 child lock
[x] Cancel search: child lockPage 55 of 308

53
Ease of use and comfort
3Longitudinal adjustment
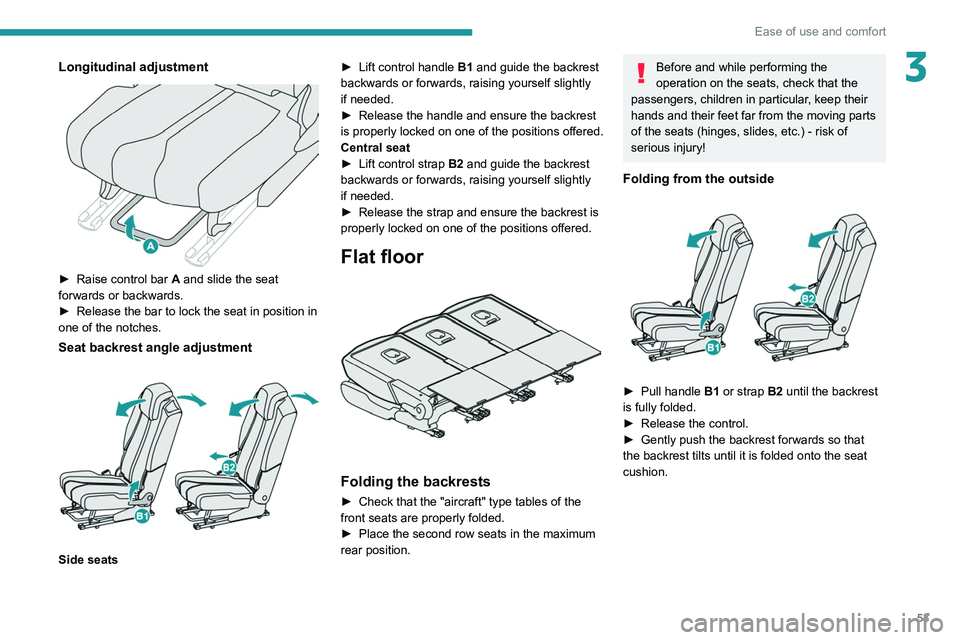
► Raise control bar A and slide the seat
forwards or backwards.
►
Release the bar to lock the seat in position in
one of the notches.
Seat backrest angle adjustment
Side seats ►
Lift control handle
B1
and guide the backrest
backwards or forwards, raising yourself slightly
if needed.
►
Release the handle and ensure the backrest
is
properly locked on one of the positions offered.
Central seat
►
Lift control strap
B2 and guide the backrest
backwards or forwards, raising yourself slightly
if needed.
►
Release the strap and ensure the backrest is
properly locked on one of the positions offered.
Flat floor
Folding the backrests
► Check that the "aircraft" type tables of the
front seats are properly folded.
►
Place the second row seats in the maximum
rear position.
Before and while performing the
operation on the seats, check that the
passengers, children in particular, keep their
hands and their feet far from the moving parts
of the seats (hinges, slides, etc.) - risk of
serious injury!
Folding from the outside
► Pull handle B1 or strap B2 until the backrest
is fully folded.
►
Release the control.
►
Gently push the backrest forwards so that
the backrest tilts until it is folded onto the seat
cushion.
Page 56 of 308

54
Ease of use and comfort
Folding from the boot
When loading, for example, or from the third row
seats:
►
Pull strap
C to unlock the desired seat and
give the backrest a slight push forwards.
Repositioning the seat
► Place the continuity panels of the 2nd row
seats back against the backrests.
► Straighten the backrest until it locks.
Before performing any operations on the
rear seats, to avoid damage to the seat
belts, check that the lateral seat belts are
properly tensioned. The central seat belt must
be stored in the headlining.
Continuity panels
Each seat has a continuity panel at the bottom of
the backrest, which, once unfolded:
–
allows for a continuous loading surface in the
boot, whatever the position of the seats,
–
prevents objects from sliding beneath the 2nd
row seats.
The continuity panels are held against the
backrests with a magnetic fixing element.
These continuity panels are not designed to support a weight greater than 30 kg.
Before deploying the continuity panels,
check that the 2nd row seats are pulled as
far back as possible.
Accessing third row seats
The third row seats are accessed via the second
row side seats.
From the outside or from the third row seats:
► Check that the "aircraft" type tables of the
front seats are properly folded up.
►
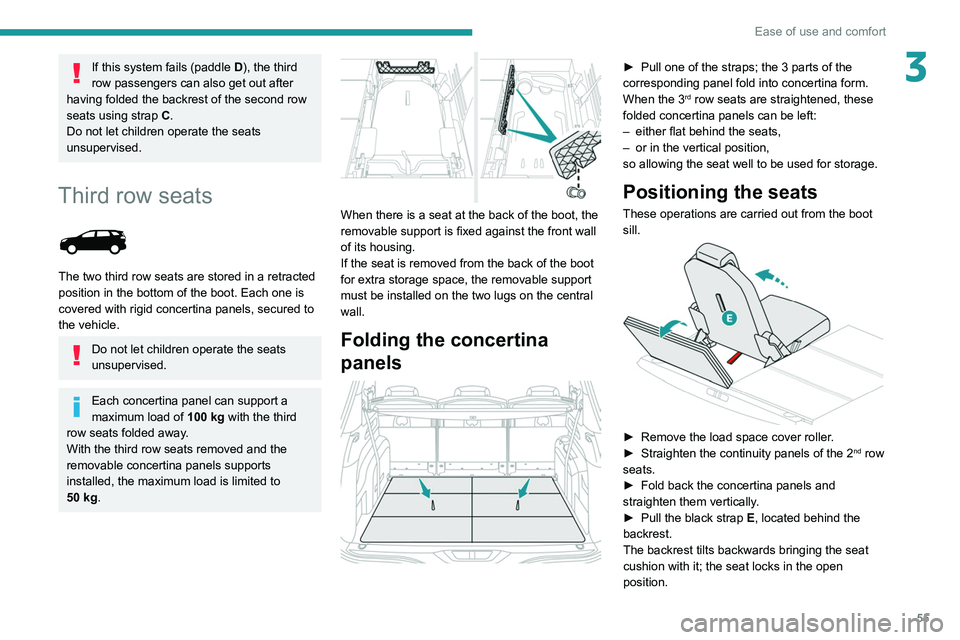
Pull paddle D
and guide the backrest
forwards to tilt it and move the seat forwards.
To put the seat back in place:
►
Straighten the backrest until the seat locks.
Whatever the initial position of the seat, it is
placed automatically a third of the way along
the longitudinal adjustment range in order to
preserve enough space for passengers in the
third row seats.
If this system fails (paddle D), the third
row passengers can also get out after
having folded the backrest of the second row
seats using strap C.
Do not let children operate the seats
unsupervised.
Third row seats
The two third row seats are stored in a retracted
position in the bottom of the boot. Each one is
covered with rigid concertina panels, secured to
the vehicle.
Do not let children operate the seats
unsupervised.
Each concertina panel can support a
maximum load of 100 kg with the third
row seats folded away.
With the third row seats removed and the
removable concertina panels supports
installed, the maximum load is limited to
50 kg.
Page 57 of 308

55
Ease of use and comfort
3If this system fails (paddle D), the third
row passengers can also get out after
having folded the backrest of the second row
seats using strap C.
Do not let children operate the seats
unsupervised.
Third row seats
The two third row seats are stored in a retracted
position in the bottom of the boot. Each one is
covered with rigid concertina panels, secured to
the vehicle.
Do not let children operate the seats
unsupervised.
Each concertina panel can support a
maximum load of 100
kg with the third
row seats folded away.
With the third row seats removed and the
removable concertina panels supports
installed, the maximum load is limited to
50
kg.
When there is a seat at the back of the boot, the
removable support is fixed against the front wall
of its housing.
If the seat is removed from the back of the boot
for extra storage space, the removable support
must be installed on the two lugs on the central
wall.
Folding the concertina
panels
► Pull one of the straps; the 3 parts of the
corresponding panel fold into concertina form.
When the 3
rd row seats are straightened, these
folded concertina panels can be left:
–
either flat behind the seats,
–
or in the vertical position,
so allowing the seat well to be used for storage.
Positioning the seats
These operations are carried out from the boot
sill.
► Remove the load space cover roller .
► Straighten the continuity panels of the 2nd row
seats.
►
Fold back the concertina panels and
straighten them vertically
.
►
Pull the black strap E
, located behind the
backrest.
The backrest tilts backwards bringing the seat
cushion with it; the seat locks in the open
position.
Page 102 of 308

100
Safety
– a child alone and unattended in a vehicle,
– a child or an animal in a vehicle which is
exposed to the sun, with the windows closed,
– the keys within reach of children inside the
vehicle.
Child seat at the rear
"Forward facing" or "Rearward
facing"
► Move the vehicle's front seat forward and
straighten the backrest so that the legs of the
child in the "forward facing" child seat or the
"rearward facing" child seat itself do not touch
the vehicle's front seat.
► Verify that the backrest of the "forward facing"
child seat is as close as possible to the backrest
of the vehicle's rear seat, and is ideally in contact
with it.
In the presence of a dog guard, it
is essential that booster seat type
Do not sit with the upper part of the body any
nearer to the door than necessary.
The vehicle's front door panels include side
impact sensors.
A damaged door or any unauthorised or
incorrectly executed work (modification or
repair) on the front doors or their interior trim
could compromise the operation of these
sensors - risk of malfunction of the lateral
airbags!
Such work must only be done by a PEUGEOT
dealer or a qualified workshop.
Curtain airbags
Do not fix or attach anything to the roof,
as this could cause head injuries when the
curtain airbag is deployed.
Do not remove the grab handles installed on
the roof, as they play a part in securing the
curtain airbags.
Child seats
The regulations on carrying children are specific to each country. Refer to the
legislation in force in your country.
For maximum safety, please observe the
following recommendations:
–
In accordance with European regulations, all
children under the age of 12 or less than 4
ft 1
1” (150 cm) tall must travel in approved
child seats suited to their weight , on seats
fitted with a seat belt or ISOFIX mountings.
–
Statistically
, the safest seats in your
vehicle for carrying children are the rear
seats.
–
Children weighing less than 9 kg must
travel in the "rear facing" position, whether in
the front or rear of the vehicle.
It is recommended that children travel
on the rear seats of the vehicle:
–
‘rear facing’ up to the age of 3,
–
‘forward facing’ over the age of 3.
Make sure that the seat belt is correctly
positioned and tightened.
For child seats with a support leg, ensure that
the support leg is in firm and steady contact
with the floor.
Advice
An incorrectly installed child seat compromises the child's safety in the
event of an accident.
Ensure that there is no seat belt or seat belt
buckle under the child seat, as this could
destabilise it.
Remember to fasten the seat belts or the
harness of child seats, keeping the slack
relative to the child's body to a minimum,
even for short journeys.
When installing a child seat using the seat
belt, ensure that the seat belt is tightened
correctly on the child seat and that it secures
the child seat firmly on the seat of the vehicle.
If the passenger seat is adjustable, move it
forwards if necessary.
Remove the head restraint before
installing a child seat with a backrest on a
passenger seat.
Ensure that the head restraint is stored or
attached securely to prevent it from being
thrown around the vehicle in the event of
sharp braking. Refit the head restraint once
the child seat has been removed.
Installing a booster seat
The chest part of the seat belt must be
positioned on the child's shoulder without
touching the neck.
Ensure that the lap part of the seat belt
passes correctly over the child's thighs.
Use a booster seat with backrest, equipped
with a belt guide at shoulder level.
Additional protections
To prevent accidental opening of the
doors and rear windows, use the "Child lock".
Take care not to open the rear windows by
more than one third.
To protect young children from the rays of the
sun, fit side blinds on the rear windows.
As a safety precaution, do not leave:
Page 114 of 308

11 2
Safety
Manual child lock
This system prevents opening of a rear door
using its interior handle.
The control, red in colour, is located on the edge
of each rear door (marked by a label).
Locking / Unlocking
► To lock, turn the red control as far as it will go
using the integral key:•
T
o the right on the left-hand rear door.
•
T
o the left on the right-hand rear door.
►
T
o unlock, turn it in the opposite direction.
Do not confuse the child lock control,
which is red, with the back-up locking
control, which is black.
Electric child lock
This remote control system prevents the opening
of the rear doors using their interior handles and
the use of the rear electric windows.
Activation/Deactivation
► With the ignition on, press this button to
activate/deactivate the child lock.
When the indicator lamp is on, the child lock is
activated.
This system is independent and in no circumstances does it take the place of
the central locking control.
Check the status of the child lock each time
you switch on the ignition.
Always keep the electronic key with you when
leaving the vehicle, even for a short time.
In the event of a serious impact, the electric
child lock is switched off automatically to
permit the exit of the rear passengers.
Page 120 of 308

11 8
Driving
Never leave a child alone inside the
vehicle, as they could release the parking
brake.
When the vehicle is parked: on a
steep slope, heavily loaded or during
towing
With a manual gearbox, turn the wheels
toward the pavement and engage a gear.
With an automatic gearbox, turn the wheels
toward the pavement and select mode P.
When towing, the vehicle is approved for
parking on slopes of up to 12%.
Manual operation
Manual release
With the ignition on or engine running:
► Depress the brake pedal.
► While maintaining pressure on the brake
pedal, briefly push the control lever.
If you push the control lever without
pressing the brake pedal, the parking
brake is not released and a message is
displayed.
Manual application
With the vehicle stationary:
► Pull briefly on the control lever.
The control lever indicator lamp flashes to
confirm the application request.
Back-up switch-off
If the electronic key is not detected or is no
longer in the recognition zone, a message
appears in the instrument panel when closing a
door or trying to switch off the engine.
►
T
o confirm the instruction to switch off the
engine, press the " START/STOP" button for
approximately 5
seconds.
In the event of a fault with the electronic key,
contact a PEUGEOT dealer or a qualified
workshop.
Emergency switch-off
In the event of an emergency only, the engine
can be switched off without conditions (even
when driving).
►
Press the "
START/STOP" button for about
5
seconds.
In this case, the steering column locks as soon
as the vehicle stops. On certain versions with automatic gearbox
(EAT6 / EAT8), the steering column does not
lock.
Electric parking brake
In automatic mode, this system applies the
parking brake when the engine is switched off
and releases it when the vehicle moves off.
At any time, with the engine running:
► to apply the parking brake, briefly
pull the
control lever;
►
to release it, briefly
push the control lever
while pressing the brake pedal.
Automatic mode is activated by default.
Indicator lamp
This indicator lamp comes on on the instrument panel and on the control lever
to confirm the application of the parking brake,
accompanied by the display of the message
"Parking brake applied".
The indicator lamp goes out to confirm the
release of the parking brake, accompanied
by the display of the message "Parking brake
released".
The indicator lamp flashes in response to a
manual request to apply or release the brake.
In the event of a battery failure, the
electric parking brake will not operate.
As a safety measure, with a manual gearbox,
if the parking brake is not applied, immobilise
the vehicle by engaging a gear.
As a safety measure, with an automatic
gearbox, if the parking brake is not applied,
immobilise the vehicle by placing the supplied
chocks against one of the wheels.
Contact a PEUGEOT dealer or a qualified
workshop.
Before leaving the vehicle, check that the
parking brake is applied: the indicator
lamps on the instrument panel and the control
lever must be on fixed.
If the parking brake is not applied, there is an
audible signal and a message is displayed on
opening the driver's door.
Page 121 of 308

11 9
Driving
6Never leave a child alone inside the
vehicle, as they could release the parking
brake.
When the vehicle is parked: on a
steep slope, heavily loaded or during
towing
With a manual gearbox, turn the wheels
toward the pavement and engage a gear.
With an automatic gearbox, turn the wheels
toward the pavement and select mode
P
.
When towing, the vehicle is approved for
parking on slopes of up to 12%.
Manual operation
Manual release
With the ignition on or engine running:
► Depress the brake pedal.
►
While maintaining pressure on the brake
pedal, briefly push the control lever
.
If you push the control lever without
pressing the brake pedal, the parking
brake is not released and a message is
displayed.
Manual application
With the vehicle stationary:
► Pull briefly on the control lever .
The control lever indicator lamp flashes to
confirm the application request.
Automatic operation
Automatic release
First ensure that the engine is running and that
the driver's door is properly closed.
The electric parking brake gradually releases
automatically as the vehicle moves off.
With a manual gearbox
►
Fully depress the clutch pedal and engage
first gear or reverse.
►
Depress the accelerator pedal and release
the clutch pedal.
W
ith an automatic gearbox
►
Depress the brake pedal.
►
Select mode
D, M or R.
►
Release the brake pedal and depress the
accelerator pedal.
If the brake does not release
automatically, check that the front doors
are fully closed.
When stationary with the engine running,
do not depress the accelerator pedal
unnecessarily. Risk of parking brake release.
Automatic application
With the vehicle stationary, the parking brake
is automatically applied when the engine is
switched off .
It is not applied automatically if the
engine stalls or enters STOP mode
of
Stop & Start.
With automatic operation, it is also
possible to manually apply or release the
parking brake using the control lever.
Special cases
Immobilising the vehicle with the
engine running
To immobilise the vehicle with the engine
running, briefly pull the control lever.
Parking the vehicle with the brake
released
In very cold conditions (ice), applying the
parking brake is not recommended.
To immobilise the vehicle, engage a gear or
place the chocks against one of the wheels.
With an automatic gearbox, mode P is
automatically selected when the ignition
is switched off. The wheels are blocked.
For more information on Free-wheeling, refer
to the corresponding section.
With an automatic gearbox, while mode
N is selected, opening the driver’s door
Page 188 of 308

186
Practical information
The system only registers AdBlue® top-ups of
5 litres or more.
If the AdBlue® tank is completely empty
– which is confirmed by the message
"Top up AdBlue: Starting impossible" – it is
essential to add at least 5 litres.
Free-wheeling
In certain situations, you must allow the vehicle
to free-wheel (while being towed, on a rolling
road, in an automatic car wash, or being
transported by rail or sea freight, etc.).
The procedure varies according to the type of
gearbox and parking brake.
With a manual gearbox and
electric parking brake
/
Release procedure
► With the engine running and while depressing
the brake pedal, move the gear selector to the
neutral position.
► While depressing the brake pedal, switch off
the ignition.
► Release the brake pedal, then switch on the
ignition again.
► While depressing the brake pedal, press the
control lever to release the parking brake.
Precautions for use
AdBlue® is a urea-based solution. This fluid is
non-flammable, colourless and odourless (when
kept in a cool place).
In the event of contact with the skin, wash the
affected area with soap and running water. In the
event of contact with the eyes, immediately rinse
the eyes with large amounts of water or with an
eye wash solution for at least 15 minutes. Seek
medical attention if you feel a persistent burning
sensation or irritation.
If swallowed, immediately wash out the mouth
with clean water and then drink plenty of water.
In certain conditions (high temperature, for
example), the risk of release of ammonia cannot
be excluded: do not inhale the fluid. Ammonia
vapours have an irritant effect on mucous
membranes (eyes, nose and throat).
Store AdBlue® out of the reach of
children, in its original container.
Procedure
Before starting the top-up procedure, ensure that
the vehicle is parked on a flat and level surface.
In wintry conditions, ensure that the temperature
of the vehicle is above -11
°C. Otherwise the
AdBlue
® may be frozen and so cannot be poured
into its tank. Park the vehicle in a warmer area
for a few hours to allow the top-up to be carried
out.
Never put the AdBlue® into the Diesel
fuel tank.
If any AdBlue® is splashed, or if there are
any spillages on the bodywork, rinse
immediately with cold water or wipe with a
damp cloth.
If the fluid has crystallised, clean it off using a
sponge and hot water.
Important: in the event of a top-up after
a breakdown because of a lack of
AdBlue, it is essential to wait around 5
minutes before switching on the ignition,
without opening the driver’s door,
unlocking the vehicle, introducing the key
into the ignition switch, or introducing the
key of the “Keyless Entry and Starting
”
system into the passenger compartment
.
Switch on the ignition, then wait for 10
seconds before starting the engine.
►
Switch off the ignition and remove the key
from the switch to switch off the engine.
or
►
With Keyless Entry and Starting, press the
"
START/STOP" button to switch off the engine.
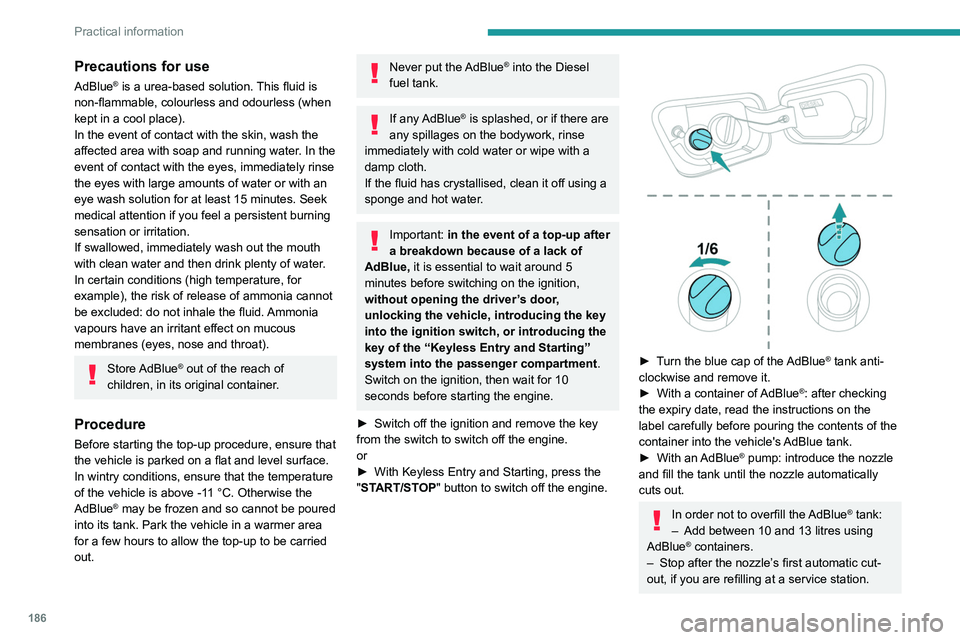
► Turn the blue cap of the AdBlue® tank anti-
clockwise and remove it.
►
With a container of
AdBlue
®: after checking
the expiry date, read the instructions on the
label carefully before pouring the contents of the
container
into the vehicle's AdBlue tank.
►
With an
AdBlue® pump: introduce the nozzle
and fill the tank until the nozzle automatically
cuts out.
In order not to overfill the AdBlue® tank:
–
Add between 10 and 13 litres using
AdBlue® containers.
–
Stop after the nozzle’ s first automatic cut-
out, if you are refilling at a service station.