2020 NISSAN ROGUE SPORT lights
[x] Cancel search: lightsPage 140 of 492

2-58Instruments and controls
JVI1591X
TURN SIGNAL SWITCH
Turn signal
Move the lever up or down to signal the
turning direction. When the turn is com-
pleted, the turn signals cancel automati-
cally.
Lane change signal
Move the lever up or down until the turn
signal begins to flash, but the lever does
not latch, to signal a lane change. Hold
the lever until the lane change is com-
pleted.
Move the lever up or down until the turn
signal begins to flash, but the lever does
not latch, and release the lever. The turnsignal will automatically flash three times.
Choose the appropriate method to signal
a lane change based on road and traffic
conditions.
JVI0980X
FOG LIGHT SWITCH (if so equipped)
To turn the fog lights on, turn the head-
light switch to theposition, then turn
the fog light switch to theposition.
To turn the fog lights on with the head-
light switch in the AUTO position, the
headlights must be on, then turn the fog
light switch to the
position.
To turn them off, turn the fog light switch
to the OFF position.
The headlights must be on for the fog
lights to operate. The fog lights automa-
tically turn off when the high beam
headlights are selected.
Page 147 of 492

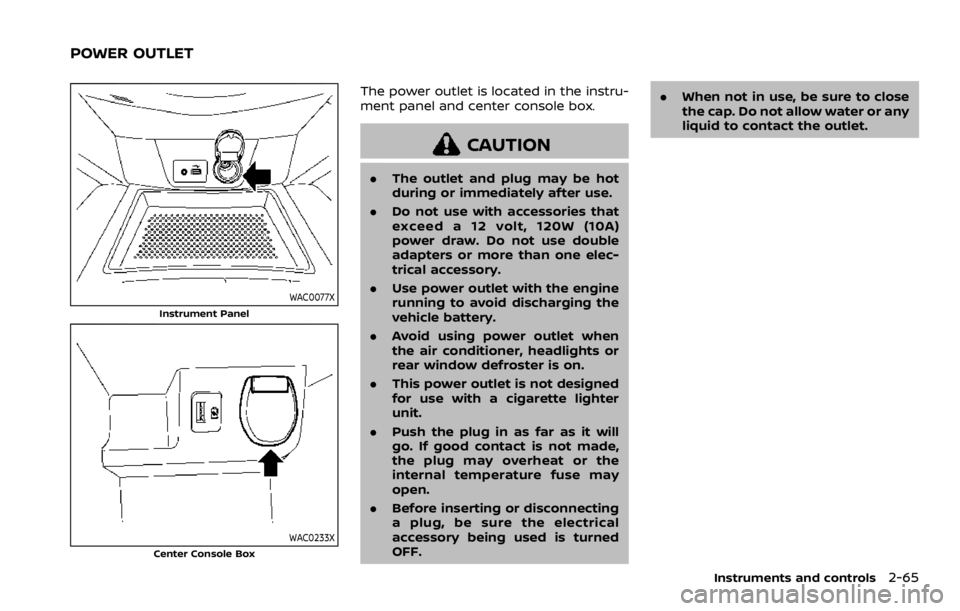
WAC0077X
Instrument Panel
WAC0233XCenter Console Box
The power outlet is located in the instru-
ment panel and center console box.
CAUTION
.The outlet and plug may be hot
during or immediately after use.
. Do not use with accessories that
exceed a 12 volt, 120W (10A)
power draw. Do not use double
adapters or more than one elec-
trical accessory.
. Use power outlet with the engine
running to avoid discharging the
vehicle battery.
. Avoid using power outlet when
the air conditioner, headlights or
rear window defroster is on.
. This power outlet is not designed
for use with a cigarette lighter
unit.
. Push the plug in as far as it will
go. If good contact is not made,
the plug may overheat or the
internal temperature fuse may
open.
. Before inserting or disconnecting
a plug, be sure the electrical
accessory being used is turned
OFF. .
When not in use, be sure to close
the cap. Do not allow water or any
liquid to contact the outlet.
Instruments and controls2-65
POWER OUTLET
Page 160 of 492

2-78Instruments and controls
CAUTION
.Do not leave the light switch on
when the engine is not running
for extended periods of time to
prevent the battery from being
discharged.
. Turn off the lights when you leave
the vehicle.
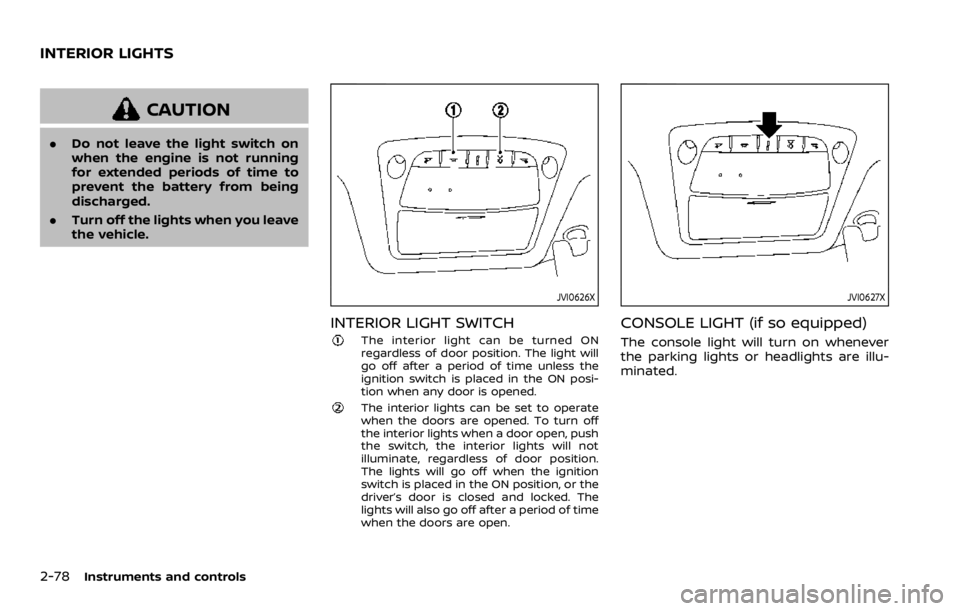
JVI0626X
INTERIOR LIGHT SWITCH
The interior light can be turned ON
regardless of door position. The light will
go off after a period of time unless the
ignition switch is placed in the ON posi-
tion when any door is opened.
The interior lights can be set to operate
when the doors are opened. To turn off
the interior lights when a door open, push
the switch, the interior lights will not
illuminate, regardless of door position.
The lights will go off when the ignition
switch is placed in the ON position, or the
driver’s door is closed and locked. The
lights will also go off after a period of time
when the doors are open.
JVI0627X
CONSOLE LIGHT (if so equipped)
The console light will turn on whenever
the parking lights or headlights are illu-
minated.
INTERIOR LIGHTS
Page 161 of 492

JVI0628X
MAP LIGHTS
Push the button to turn the map lights
on. To turn them off, push the button
again.
SIC2063A
ROOM LIGHT
The room light has a three-position
switch.
When the switch is in the ON position
,
the room light illuminates.
When the switch is in the DOOR position
, the room light illuminates when a door
is opened.
The interior light timer will keep the room
light on for approximately 15 seconds
when:
. The key is removed from the ignition
switch with the driver’s door closed.
(model without Intelligent Key system) .
The ignition switch is placed in the
OFF position. (model with Intelligent
Key system)
The interior light timer will be cancelled
when:
. The driver’s door is locked.
. The ignition switch is placed in the ON
position.
When the switch is in the OFF position
,
the room light does not illuminate, re-
gardless of any condition.
Instruments and controls2-79
Page 162 of 492

2-80Instruments and controls
SIC3869
VANITY MIRROR LIGHT (if so
equipped)
The light on the vanity mirror will turn on
when the cover on the vanity mirror is
opened.
When the cover is closed, the light will
turn off.
The lights will also turn off after a
period of time when the lights remain
illuminated to prevent the battery from
becoming discharged.
CARGO LIGHT
The cargo lights illuminate when the
liftgate is opened. When the liftgate is
closed, the lights will turn off.
The light will also turn off after a period
of time when the light remains illumi-
nated after the ignition switch has been
pushed to the OFF position to prevent
the battery from becoming discharged.
The HomeLink® Universal Transceiver
provides a convenient way to consolidate
the functions of up to three individual
hand-held transmitters into one built-in
device.
HomeLink® Universal Transceiver:
.Will operate most Radio Frequency
(RF) devices such as garage doors,
gates, home and office lighting, entry
door locks and security systems.
. Is powered by your vehicle’s battery.
No separate batteries are required. If
the vehicle’s battery is discharged or is
disconnected, HomeLink® will retain
all programming.
When the HomeLink® Universal Trans-
ceiver is programmed, retain the origi-
nal transmitter for future programming
procedures (Example: new vehicle pur-
chases). Upon sale of the vehicle, the
programmed HomeLink® Universal
Transceiver buttons should be erased
for security purposes. For additional
information, refer to “Programming
HomeLink®” (P.2-81).
WARNING
. Do not use the HomeLink® Uni-
versal Transceiver with any gar-
age door opener that lacks safety
HomeLink® UNIVERSAL
TRANSCEIVER (if so equipped)
Page 167 of 492

3 Pre-driving checks and adjustments
Keys ........................................................................\
................................. 3-2NISSAN Vehicle Immobilizer System key (if
so equipped) ........................................................................\
...... 3-2
Intelligent Key (if so equipped) ................................... 3-3
Doors ........................................................................\
.............................. 3-5 Locking with key .................................................................... 3-5
Locking with inside lock knob ..................................... 3-6
Locking with power door lock switch ................... 3-7
Automatic door locks ......................................................... 3-7
Child safety rear door lock ............................................. 3-7
Remote keyless entry system (if so equipped) ...... 3-8 How to use remote keyless entry system ......... 3-9
Intelligent Key system (if so equipped) .................... 3-11
Intelligent Key operating range .............................. 3-13
Door locks/unlocks precaution ............................... 3-13
Intelligent Key operation .............................................. 3-14
Battery saver system ....................................................... 3-16
Warning lights and audible reminders .............. 3-16
Troubleshooting guide ................................................... 3-17
How to use remote keyless entry function ...... 3-19
Remote engine start (if so equipped) ....................... 3-23 Remote engine start operating range ............... 3-23 Remote starting the engine .................................... 3-23
Extending engine run time ....................................... 3-24
Canceling a remote engine start ........................ 3-24
Conditions the remote engine start will
not work ........................................................................\
.......... 3-24
Hood ........................................................................\
............................ 3-25
Liftgate ........................................................................\
...................... 3-26 Liftgate release lever ..................................................... 3-27
Fuel-filler door ........................................................................\
..... 3-28 Opening the fuel-filler door ...................................... 3-28
Fuel-filler cap ....................................................................... 3-28
Tilt/telescopic steering ........................................................ 3-30 Tilt or telescopic operation ...................................... 3-31
Sun visors ........................................................................\
................ 3-31
Mirrors ........................................................................\
...................... 3-32 Inside mirror ........................................................................\
. 3-32
Outside mirrors .................................................................. 3-33
Vanity mirror ........................................................................\
3-34
Automatic Drive Positioner (if so equipped) ....... 3-34 Memory storage function .......................................... 3-35
Entry/Exit function .......................................................... 3-35
System operation ............................................................. 3-36
Page 175 of 492

JVP0308X
Jackknife type key release buttonLOCK buttonUNLOCK buttonPANIC buttonBattery indicator light
HOW TO USE REMOTE KEYLESS
ENTRY SYSTEM
Welcome light and farewell light
function
When you lock or unlock the doors or the
liftgate, the daytime running lights, park-
ing lights and the tail lights will illuminate
for a period of time. The welcome light
and farewell light function can be dis-
abled. For information about disablingthe welcome light and farewell light
function, see “Vehicle Settings” (P.2-23).
Locking doors
1. Remove the key from the ignition
switch.
2. Close all the doors.
3. Push the LOCK
buttonon the
key fob.
4. All the doors will lock. All of the doors will lock when the
LOCK
button is pushed even
though a door remains open.
5. The hazard indicator flashes twice and the horn chirps once.
. When the LOCK
button is pushed
with all doors locked, the hazard
indicator flashes twice and the horn
chirps once as a reminder that the
doors are already locked.
. Operate the door handles to confirm
that the doors have been securely
locked.
Unlocking doors
1. Push the UNLOCKbuttonon
the key fob.
.The driver’s door unlocks..The hazard indicator flashes once if
all doors are completely closed. 2. Push the UNLOCK
button again
within 5 seconds.
.All the doors and the liftgate unlock..The hazard indicator flashes once if all doors are completely closed.
All doors will be locked automatically
unless one of the following operations is
performed within 1 minute of pushing the
UNLOCK
button.
. Any door or liftgate is opened.
. The ignition switch is placed in the ON
position.
NOTE:
The unlocking operation can be chan-
ged in selective unlock in the Vehicle
Settings of the vehicle information dis-
play. For additional information, refer to
“Vehicle Settings” (P.2-23).
Using panic alarm
If you are near your vehicle and feel
threatened, you may activate the alarm
to call attention as follows:
1. Push the PANIC
buttonon the
key fob for more than 0.5 seconds.
2. The theft warning alarm and head- lights will stay on for 25 seconds.
3. The panic alarm stops when:
.It has run for 25 seconds, or
Pre-driving checks and adjustments3-9
Page 181 of 492

Welcome light and farewell light
function
When you lock or unlock the doors or the
liftgate, the daytime running lights, park-
ing lights and the tail lights will illuminate
for a period of time. The welcome light
and farewell light function can be dis-
abled. For information about disabling
the welcome light and farewell light
function, see “Vehicle Settings” (P.2-23).
Locking doors
1. Move the shift lever to the P (Park)position (Continuously Variable Trans-
mission (CVT) models), or the shift
lever in the N (Neutral) position (Man-
ual Transmission (MT) models), place
the ignition switch in the OFF position
and make sure you carry the Intelli-
gent Key with you.
2. Close all doors.
3. Push any door handle request switch while carrying the Intelligent Key with
you.
4. All doors and the liftgate will lock.
5. The hazard indicator lights flash twice and the outside buzzer sounds twice.
NOTE:
. Request switches for all doors and
the liftgate can be deactivated when
the I-Key Door Lock setting is turned off in the Vehicle Settings of the
vehicle information display. For ad-
ditional information, see “Vehicle
Settings” (P.2-23).
. Doors lock with the door handle
request switch while the ignition
switch is not in the LOCK position.
. Doors do not lock by pushing the
door handle request switch while
any door is open. However, doors
lock with the mechanical key even if
any door is open.
. Doors do not lock with the door
handle request switch with the In-
telligent Key inside the vehicle and a
beep sounds to warn you. However,
when an Intelligent Key is inside the
vehicle, doors can be locked with
another Intelligent Key.
CAUTION
.After locking the doors using the
request switch, make sure that
the doors have been securely
locked by operating the door
handles or the liftgate opener
switch.
. When locking the doors using the
request switch, make sure to
have the Intelligent Key in your possession before operating the
request switch to prevent the
Intelligent Key from being left in
the vehicle.
. The request switch is operational
only when the Intelligent Key has
been detected by the Intelligent
Key system.
Unlocking doors
1. Push the door handle request switchor the liftgate request switchwhile carrying the Intelligent Key with
you.
2. The hazard indicator flashes once and outside chime sounds once. The cor-
responding door or the liftgate will
unlock.
3. Push the request switch again within 1 minute.
4. The hazard indicator flashes once and outside chime sounds once again. All
the doors and the liftgate will unlock.
All doors will be locked automatically
unless one of the following operations is
performed within 1 minute after pushing
the request switch while the doors are
locked.
. Opening any door.
Pre-driving checks and adjustments3-15