2020 NISSAN ROGUE SPORT ECO mode
[x] Cancel search: ECO modePage 385 of 492
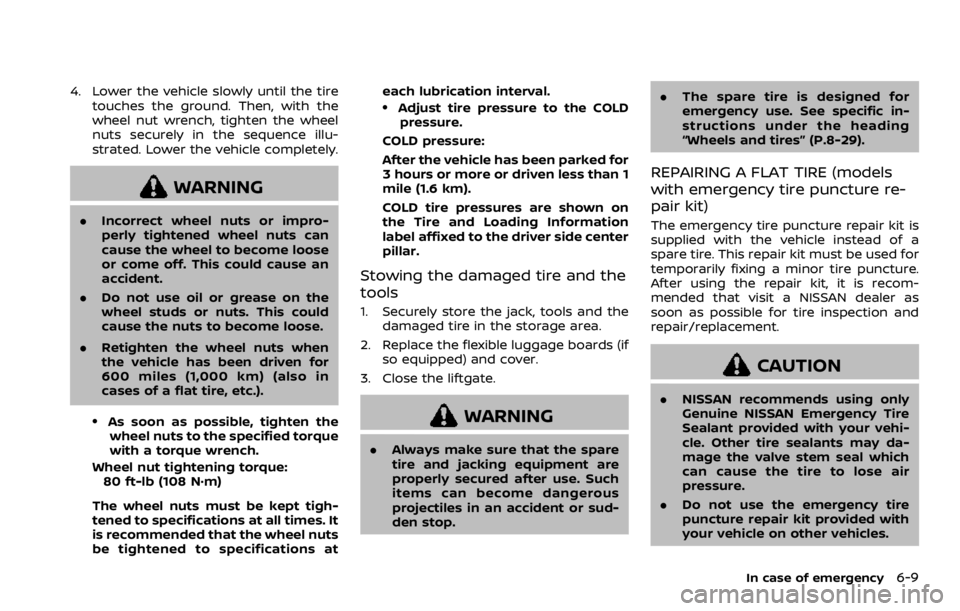
4. Lower the vehicle slowly until the tiretouches the ground. Then, with the
wheel nut wrench, tighten the wheel
nuts securely in the sequence illu-
strated. Lower the vehicle completely.
WARNING
.Incorrect wheel nuts or impro-
perly tightened wheel nuts can
cause the wheel to become loose
or come off. This could cause an
accident.
. Do not use oil or grease on the
wheel studs or nuts. This could
cause the nuts to become loose.
. Retighten the wheel nuts when
the vehicle has been driven for
600 miles (1,000 km) (also in
cases of a flat tire, etc.).
.As soon as possible, tighten the
wheel nuts to the specified torque
with a torque wrench.
Wheel nut tightening torque: 80 ft-lb (108 N·m)
The wheel nuts must be kept tigh-
tened to specifications at all times. It
is recommended that the wheel nuts
be tightened to specifications at each lubrication interval.
.Adjust tire pressure to the COLD
pressure.
COLD pressure:
After the vehicle has been parked for
3 hours or more or driven less than 1
mile (1.6 km).
COLD tire pressures are shown on
the Tire and Loading Information
label affixed to the driver side center
pillar.
Stowing the damaged tire and the
tools
1. Securely store the jack, tools and the damaged tire in the storage area.
2. Replace the flexible luggage boards (if so equipped) and cover.
3. Close the liftgate.
WARNING
. Always make sure that the spare
tire and jacking equipment are
properly secured after use. Such
items can become dangerous
projectiles in an accident or sud-
den stop. .
The spare tire is designed for
emergency use. See specific in-
structions under the heading
“Wheels and tires” (P.8-29).
REPAIRING A FLAT TIRE (models
with emergency tire puncture re-
pair kit)
The emergency tire puncture repair kit is
supplied with the vehicle instead of a
spare tire. This repair kit must be used for
temporarily fixing a minor tire puncture.
After using the repair kit, it is recom-
mended that visit a NISSAN dealer as
soon as possible for tire inspection and
repair/replacement.
CAUTION
.NISSAN recommends using only
Genuine NISSAN Emergency Tire
Sealant provided with your vehi-
cle. Other tire sealants may da-
mage the valve stem seal which
can cause the tire to lose air
pressure.
. Do not use the emergency tire
puncture repair kit provided with
your vehicle on other vehicles.
In case of emergency6-9
Page 386 of 492
6-10In case of emergency
.Do not use the emergency tire
puncture repair kit for a purpose
other than to inflate and check
the tire pressure for the vehicle.
. Use the emergency tire puncture
repair kit only on DC12V.
. Keep water and dust off the
emergency tire puncture repair
kit.
. Do not disassemble or modify the
emergency tire puncture repair
kit.
. Do not drop the kit or allow hard
impacts to the kit.
. Do not use the emergency tire
puncture repair kit under the
following conditions. It is recom-
mended that contact a NISSAN
dealer or professional road assis-
tance.
— when the sealant has passed
its expiration date (shown on
the label attached to the bot-
tle)
— when the cut or the puncture is approximately 0.2 in (5 mm)
or longer
— when the side of the tire is damaged — when the vehicle has been
driven with a considerable
loss of air from the tire
— when the tire is completely displaced inside or outside
the rim
— when the tire rim is damaged
— when two or more tires are flat
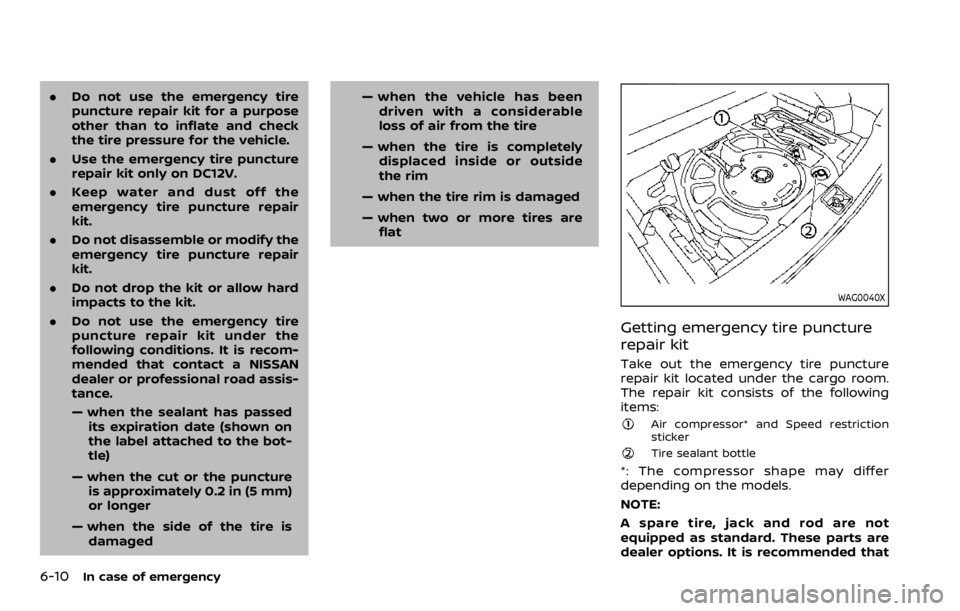
WAG0040X
Getting emergency tire puncture
repair kit
Take out the emergency tire puncture
repair kit located under the cargo room.
The repair kit consists of the following
items:
Air compressor* and Speed restriction
sticker
Tire sealant bottle
*: The compressor shape may differ
depending on the models.
NOTE:
A spare tire, jack and rod are not
equipped as standard. These parts are
dealer options. It is recommended that
Page 392 of 492
6-16In case of emergency
any other metal.
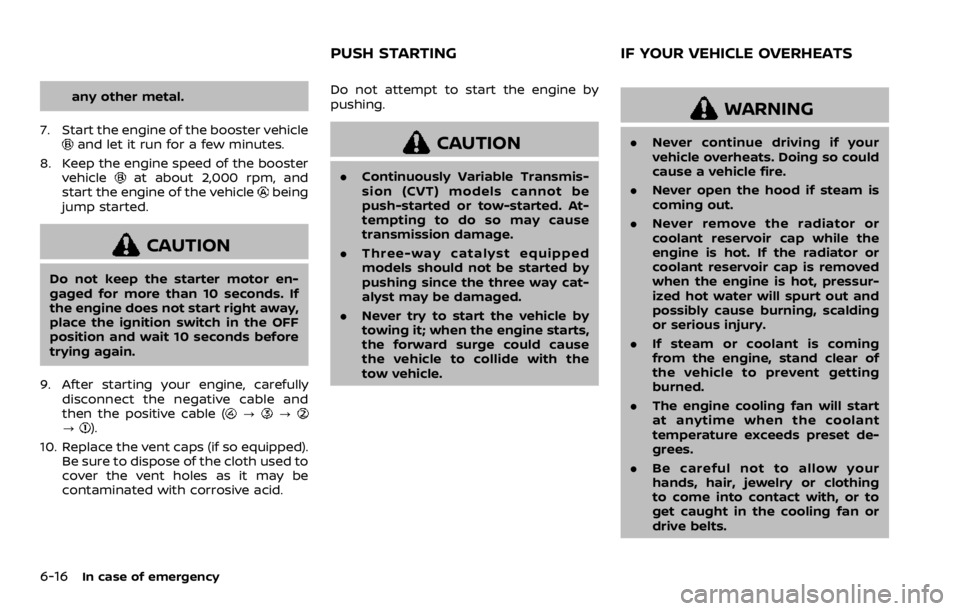
7. Start the engine of the booster vehicle
and let it run for a few minutes.
8. Keep the engine speed of the booster vehicle
at about 2,000 rpm, and
start the engine of the vehiclebeing
jump started.
CAUTION
Do not keep the starter motor en-
gaged for more than 10 seconds. If
the engine does not start right away,
place the ignition switch in the OFF
position and wait 10 seconds before
trying again.
9. After starting your engine, carefully disconnect the negative cable and
then the positive cable (
???).
10. Replace the vent caps (if so equipped). Be sure to dispose of the cloth used to
cover the vent holes as it may be
contaminated with corrosive acid. Do not attempt to start the engine by
pushing.
CAUTION
.
Continuously Variable Transmis-
sion (CVT) models cannot be
push-started or tow-started. At-
tempting to do so may cause
transmission damage.
. Three-way catalyst equipped
models should not be started by
pushing since the three way cat-
alyst may be damaged.
. Never try to start the vehicle by
towing it; when the engine starts,
the forward surge could cause
the vehicle to collide with the
tow vehicle.
WARNING
.Never continue driving if your
vehicle overheats. Doing so could
cause a vehicle fire.
. Never open the hood if steam is
coming out.
. Never remove the radiator or
coolant reservoir cap while the
engine is hot. If the radiator or
coolant reservoir cap is removed
when the engine is hot, pressur-
ized hot water will spurt out and
possibly cause burning, scalding
or serious injury.
. If steam or coolant is coming
from the engine, stand clear of
the vehicle to prevent getting
burned.
. The engine cooling fan will start
at anytime when the coolant
temperature exceeds preset de-
grees.
. Be careful not to allow your
hands, hair, jewelry or clothing
to come into contact with, or to
get caught in the cooling fan or
drive belts.
PUSH STARTING IF YOUR VEHICLE OVERHEATS
Page 393 of 492
If your vehicle is overheating (indicated by
an extremely high temperature gauge
reading), or if you feel a lack of engine
power, detect abnormal noise, etc., take
the following steps:
1. Move the vehicle safely off the roadand apply the parking brake.
2. Continuously Variable Transmission
(CVT) models:
Move the shift lever to the P (Park)
position.
Manual Transmission (MT) models:
Move the shift lever to the N (Neutral)
position.
Do not stop the engine.
3. Turn off the air conditioner (if so equipped). Open all the windows,
move the heater or air conditioner
temperature control to maximum hot
and fan control to high speed.
4. Get out of the vehicle. Look and listen for steam or coolant escaping from
the radiator before opening the hood.
(If steam or coolant is escaping, turn
off the engine.) Do not open the hood
further until no steam or coolant can
be seen. 5. Open the engine hood.
WARNING
If steam or water is coming from the
engine, stand clear to prevent get-
ting burned.
6. Visually check the drive belt for da- mage or looseness. Also check if the
cooling fan is running. The radiator
hoses and radiator should not leak
water. If coolant is leaking or the
cooling fan does not run, stop the
engine.
WARNING
Be careful not to allow your hands,
hair, jewelry or clothing to come into
contact with, or get caught in, engine
belts or the engine cooling fan. The
engine cooling fan can start at any
time.
7. After the engine cools down, check the coolant level in the reservoir with
the engine running. Add coolant to
the reservoir if necessary. Have your
vehicle repaired. It is recommended you visit a NISSAN dealer for this
service.
In case of emergency6-17
Page 395 of 492
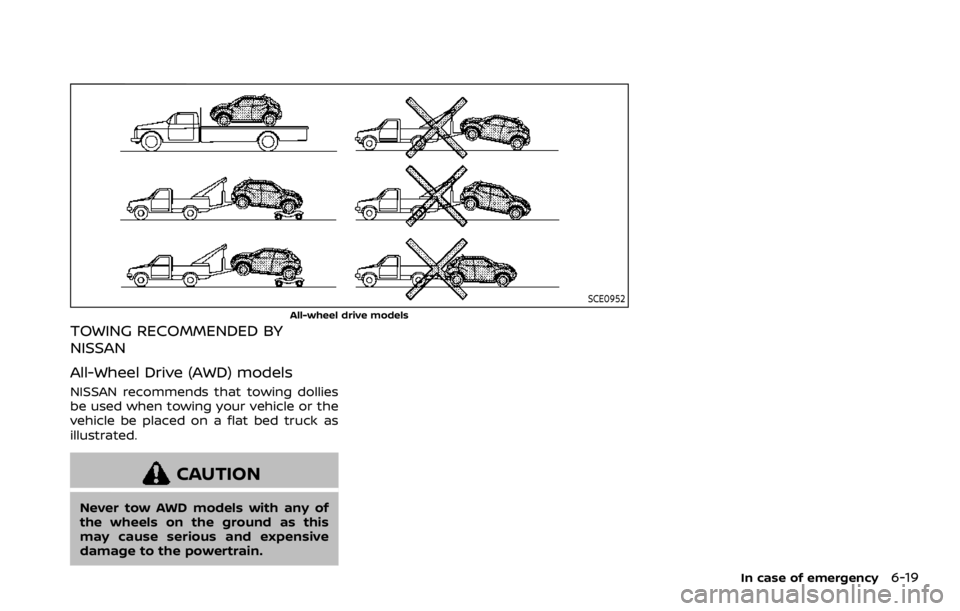
SCE0952
All-wheel drive models
TOWING RECOMMENDED BY
NISSAN
All-Wheel Drive (AWD) models
NISSAN recommends that towing dollies
be used when towing your vehicle or the
vehicle be placed on a flat bed truck as
illustrated.
CAUTION
Never tow AWD models with any of
the wheels on the ground as this
may cause serious and expensive
damage to the powertrain.
In case of emergency6-19
Page 396 of 492
6-20In case of emergency
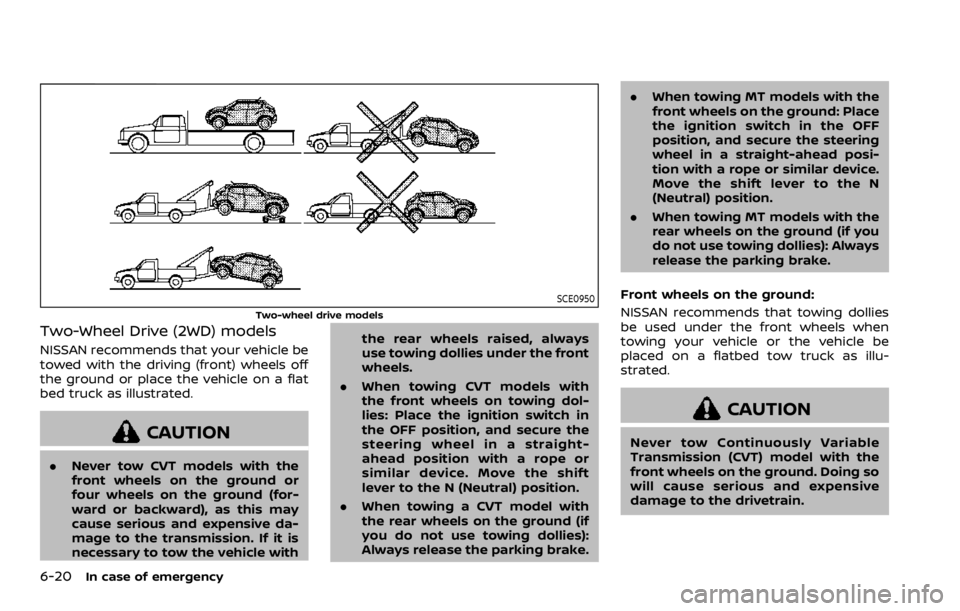
SCE0950
Two-wheel drive models
Two-Wheel Drive (2WD) models
NISSAN recommends that your vehicle be
towed with the driving (front) wheels off
the ground or place the vehicle on a flat
bed truck as illustrated.
CAUTION
.Never tow CVT models with the
front wheels on the ground or
four wheels on the ground (for-
ward or backward), as this may
cause serious and expensive da-
mage to the transmission. If it is
necessary to tow the vehicle with the rear wheels raised, always
use towing dollies under the front
wheels.
. When towing CVT models with
the front wheels on towing dol-
lies: Place the ignition switch in
the OFF position, and secure the
steering wheel in a straight-
ahead position with a rope or
similar device. Move the shift
lever to the N (Neutral) position.
. When towing a CVT model with
the rear wheels on the ground (if
you do not use towing dollies):
Always release the parking brake. .
When towing MT models with the
front wheels on the ground: Place
the ignition switch in the OFF
position, and secure the steering
wheel in a straight-ahead posi-
tion with a rope or similar device.
Move the shift lever to the N
(Neutral) position.
. When towing MT models with the
rear wheels on the ground (if you
do not use towing dollies): Always
release the parking brake.
Front wheels on the ground:
NISSAN recommends that towing dollies
be used under the front wheels when
towing your vehicle or the vehicle be
placed on a flatbed tow truck as illu-
strated.
CAUTION
Never tow Continuously Variable
Transmission (CVT) model with the
front wheels on the ground. Doing so
will cause serious and expensive
damage to the drivetrain.
Page 397 of 492
Manual Transmission (MT) model:
1. Place the ignition switch in the OFFposition.
2. Secure the steering wheel in a straight-ahead position with rope or
a similar device.
3. Move the shift lever to the N (Neutral) position.
4. Release the parking brake.
5. Attach the safety chains whenever towing.
Rear wheels on the ground:
1. Place the ignition switch in the OFF position.
2. Move the shift lever to the N (Neutral) position.
3. Release the parking brake.
4. Attach safety chains whenever tow- ing.
All four wheels on the ground:
NISSAN recommends that the vehicle be
placed on a flatbed tow truck as illu-
strated.
CAUTION
Never tow CVT model with all four
wheels on the ground. Doing so will
cause serious and expensive da-
mage to the drivetrain.
Manual Transmission (MT) model:
1. Place the ignition switch in the OFF position.
2. Move the shift lever to the N (Neutral) position.
3. Release the parking brake.
VEHICLE RECOVERY (freeing a stuck
vehicle)
WARNING
To avoid vehicle damage, serious
personal injury or death when reco-
vering a stuck vehicle:
. Contact a professional towing
service to recover the vehicle if
you have any questions regard-
ing the recovery procedure.
. Tow chains or cables must be
attached only to main structural
members of the vehicle. .
Do not use the vehicle tie-downs
to tow or free a stuck vehicle.
. Only use devices specifically de-
signed for vehicle recovery and
follow the manufacturer’s in-
structions.
. Always pull the recovery device
straight out from the front of the
vehicle. Never pull at an angle.
. Route recovery devices so they
do not touch any part of the
vehicle except the attachment
point.
If your vehicle is stuck in sand, snow, mud,
etc., use a tow strap or other device
designed specifically for vehicle recovery.
Always follow the manufacturer’s instruc-
tions for the recovery device.Rocking a stuck vehicle
WARNING
. Stand clear of a stuck vehicle.
. Do not spin your tires at high
speed. This could cause them to
explode and result in serious in-
jury. Parts of your vehicle could
also overheat and be damaged.
In case of emergency6-21
Page 403 of 492
may damage the lens cover.
AIR FRESHENERS
Most air fresheners use a solvent that
could affect the vehicle interior. If you use
an air freshener, take the following pre-
cautions:
.Hanging-type air fresheners can
cause permanent discoloration when
they contact vehicle interior surfaces.
Place the air freshener in a location
that allows it to hang free and not
contact an interior surface.
. Liquid-type air fresheners typically clip
on the vents. These products can
cause immediate damage and disco-
loration when spilled on interior sur-
faces.
Carefully read and follow the manufac-
turer’s instructions before using air fresh-
eners.
FLOOR MATS
WARNING
To avoid potential pedal interference
that may result in a collision, injury
or death: .
NEVER place a floor mat on top of
another floor mat in the driver
front position or install them up-
side down or backwards.
. It is recommended that you use
only genuine NISSAN floor mats
specifically designed for use in
your vehicle model and model
year.
. Properly position the mats in the
floorwell using the floor mat po-
sitioning hooks. See “Floor mat
installation” (P.7-5).
. Make sure the floor mat does not
interfere with pedal operation.
. Periodically check the floor mats
to make sure they are properly
installed.
. After cleaning the vehicle interior,
check the floor mats to make
sure they are properly installed.
The use of genuine NISSAN floor mats can
extend the life of your vehicle carpet and
make it easier to clean the interior. Mats
should be maintained with regular clean-
ing and replaced if they become exces-
sively worn.
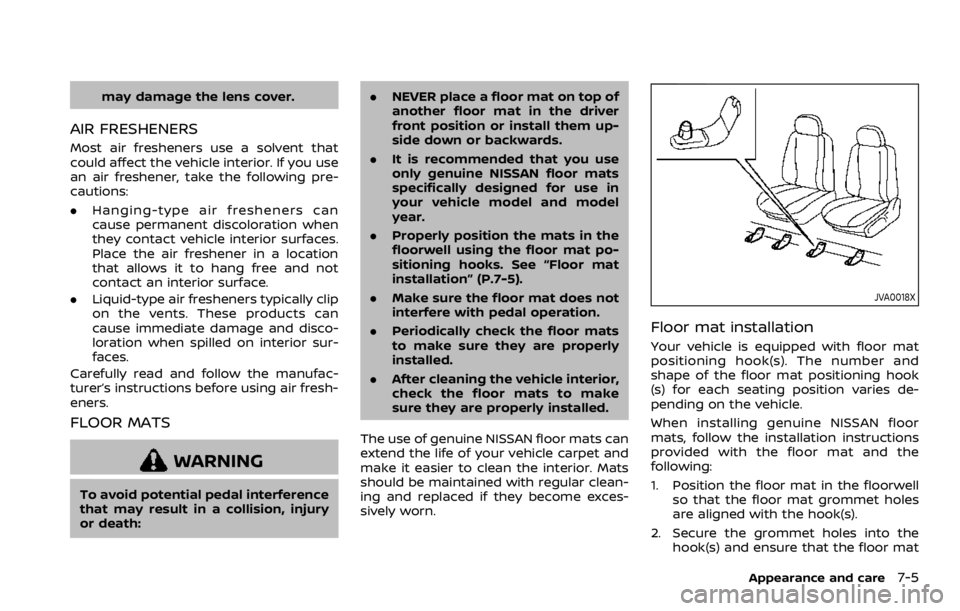
JVA0018X
Floor mat installation
Your vehicle is equipped with floor mat
positioning hook(s). The number and
shape of the floor mat positioning hook
(s) for each seating position varies de-
pending on the vehicle.
When installing genuine NISSAN floor
mats, follow the installation instructions
provided with the floor mat and the
following:
1. Position the floor mat in the floorwell so that the floor mat grommet holes
are aligned with the hook(s).
2. Secure the grommet holes into the hook(s) and ensure that the floor mat
Appearance and care7-5