Page 289 of 482

R (Reverse)
CAUTION
To prevent transmission damage, use
the R (Reverse) position only when the
vehicle is completely stopped.
Use the R (Reverse) position to back up. Make
sure the vehicle is completely stopped be-
fore selecting the R (Reverse) position.The
brake pedal must be depressed and the
shif t lever button pressed to move the
shif t lever from P (Park), N (Neutral) or any
drive position to R (Reverse).
N (Neutral)
Neither forward nor reverse gear is en-
gaged. The engine can be started in this
position. You may shif t to N (Neutral) and
restart a stalled engine while the vehicle is
moving.
D (Drive)
Use this position for all normal forward
driving.
L(Low)
Use this position for engine braking on
steep downhill gradients/climbing steep
slopes and whenever approaching sharp
bends. Do not use the L (Low) position in
any other circumstances.
Shif t lock release
If the battery charge is low or discharged,
the shif t lever may not be moved from the
P (Park) position even with the brake pedal
depressed and the shif t lever button
pressed. To move the shif t lever, perform
the following procedure:
1. Place the ignition switch in the OFF or LOCK position.
2. Apply the parking brake.
3. Remove the shif t lock release cover
A
using a suitable tool. 4. Push down the shif t lock release
B
using a suitable tool.
5. Press the shif t lever button
Cand
move the shif t lever to the N (Neutral)
position
Dwhile holding down the
shif t lock release. The vehicle may be
moved to the desired location. Replace
the removed shif t lock release cover
af ter the operation. If the shif t lever
cannot be moved out of the P (Park)
position, have the Continuously Vari-
able Transmission system checked as
soon as possible. It is recommended
that you visit a NISSAN dealer for this
service.
WARNING
If the shif t lever cannot be moved from
the P (Park) position while the engine is
running and the brake pedal is de-
pressed, the stop lights may not work.
Malfunctioning stop lights could cause
an accident injuring yourself and
others.
LSD2128
Starting and driving5-19
Page 290 of 482

Overdrive (O/D) OFF switch
When the O/D OFF switch is pushed with
the shif t lever in the D (Drive) position,
the
indicator light in the instrument
panel illuminates. For additional informa-
tion, refer to “Overdrive OFF indicator light”
in the “Instruments and controls” section of
this manual.
Use the overdrive OFF mode when you
need improved engine braking.
To turn off the overdrive OFF mode, push
the O/D OFF switch again. The
indi-
cator light will turn off. Each time the engine is started, or when
the shif t lever is moved to any position
other than D (Drive), the overdrive OFF
mode will be automatically turned off.
Accelerator downshif t
— in D (Drive) position —
For passing or hill climbing, depress the
accelerator pedal to the floor. This shif ts
the transmission down into a lower gear,
depending on the vehicle speed.
High fluid temperature protection
mode
This transmission has a high fluid tem-
perature protection mode. If the fluid tem-
perature becomes too high (for example,
when climbing steep grades in high tem-
peratures with heavy loads, such as when
towing a trailer), engine power and, under
some conditions, vehicle speed will be de-
creased automatically to reduce the
chance of transmission damage. Vehicle
speed can be controlled with the accelera-
tor pedal, but the engine and vehicle speed
may be limited.
Fail-safe
If the vehicle is driven under extreme
conditions, such as excessive wheel
spinning and subsequent hard braking,
the fail-safe system may be activated.
The Malfunction Indicator Light (MIL)
may come on to indicate the fail-safe
mode is activated. For additional infor-
mation, refer to “Malfunction Indicator
Light (MIL)” in the “Instruments and con-
trols” section of this manual. This will oc-
cur even if all electrical circuits are func-
tioning properly. In this case, place the
ignition switch in the OFF position and
wait for 10 seconds. Then push the
switch back to the ON position. The ve-
hicle should return to its normal operat-
ing condition. If it does not return to its
normal operating condition, have the
transmission checked and repaired, if
necessary. It is recommended that you
visit a NISSAN dealer for this service.
LSD2246
5-20Starting and driving
Page 291 of 482

WARNING
When the high fluid temperature pro-
tection mode or fail-safe operation oc-
curs, vehicle speed may be gradually re-
duced. The reduced speed may be lower
than other traffic, which could increase
the chance of a collision. Be especially
careful when driving. If necessary, pull
to the side of the road at a safe place
and allow the transmission to return to
normal operation, or have it repaired if
necessary.
WARNING
∙ Be sure the parking brake is fully re-leased before driving. Failure to do so
can cause brake failure and lead to an
accident.
∙ Do not release the parking brake from outside the vehicle.
∙ Do not use the shif t lever in place of the parking brake. When parking, be
sure the parking brake is fully
engaged.
∙ To help avoid risk of injury or death through unintended operation of the
vehicle and/or its systems, do not
leave children, people who require the
assistance of others or pets unat-
tended in your vehicle. Additionally,
the temperature inside a closed ve-
hicle on a warm day can quickly be-
come high enough to cause a signifi-
cant risk of injury or death to people
and pets. To engage:
Firmly depress the parking
brake.
To release:
1. Firmly apply the foot brake.
2. Move the shif t lever to the P (Park) po- sition.
3. Firmly depress the parking brake pedal and it will release.
4. Before driving, be sure the brake warn- ing light goes out.
LSD0158
PARKING BRAKE
Starting and driving5-21
Page 292 of 482

WARNING
Failure to follow the warnings and in-
structions for proper use of the BSW
system could result in serious injury or
death.
∙ The BSW system is not a replacementfor proper driving procedures and is
not designed to prevent contact with
vehicles or objects. When changing
lanes, always use the side and rear
mirrors and turn and look in the direc-
tion your vehicle will move to ensure it
is safe to change lanes. Never rely
solely on the BSW system.
The BSW system helps alert the driver of
other vehicles in adjacent lanes when
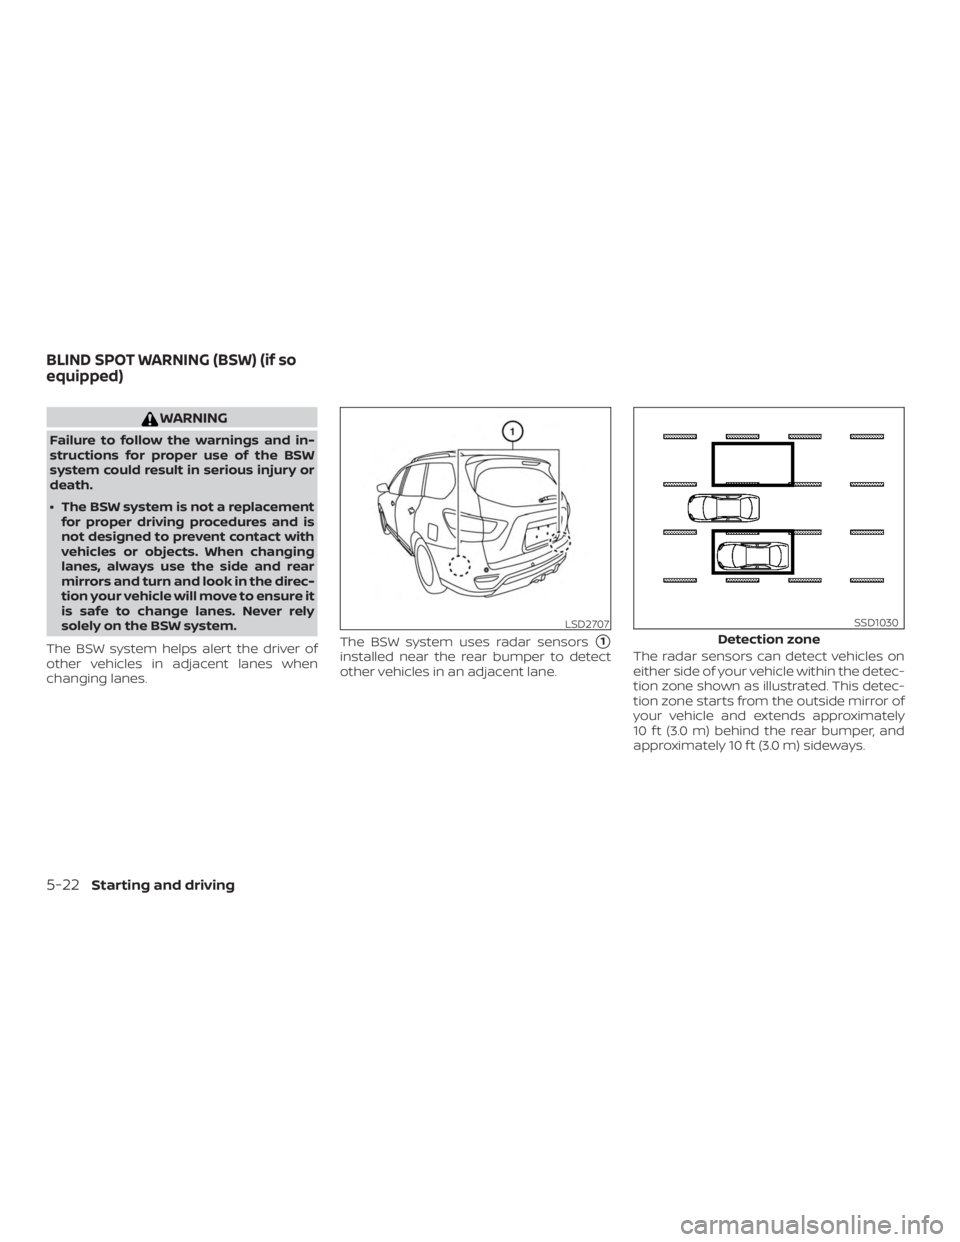
changing lanes. The BSW system uses radar sensors
1
installed near the rear bumper to detect
other vehicles in an adjacent lane.
The radar sensors can detect vehicles on
either side of your vehicle within the detec-
tion zone shown as illustrated. This detec-
tion zone starts from the outside mirror of
your vehicle and extends approximately
10 f t (3.0 m) behind the rear bumper, and
approximately 10 f t (3.0 m) sideways.
LSD2707
Detection zone
SSD1030
BLIND SPOT WARNING (BSW) (if so
equipped)
5-22Starting and driving
Page 293 of 482

1. Side BSW/RCTA Indicator Light
2. BSW/RCTA Indicator
BSW SYSTEM OPERATION
The BSW system operates above approxi-
mately 20 mph (32km/h).
If the radar sensors detect a vehicle in the
detection zone, the side BSW/RCTA indica-
tor light (1) illuminates. If the turn signal is
then activated, the system chimes (twice)
and the side BSW/RCTA indicator light
flashes. The side BSW/RCTA indicator light
continues to flash until the detected ve-
hicles leaves the detection zone.
The side BSW/RCTA indicator light illumi-
nates for a few seconds when the ignition
switch is placed in the ON position.
The brightness of the side BSW/RCTA indi-
cator light is adjusted automatically de-
pending on the brightness of the ambient
light.
If a vehicle comes into the detection zone
af ter the driver activates the turn signal,
then only the side BSW/RCTA indicator light
flashes and no chime sounds. For addi-
tional information, refer to “BSW driving
situations” in this section.
LSD2765
Starting and driving5-23
Page 294 of 482
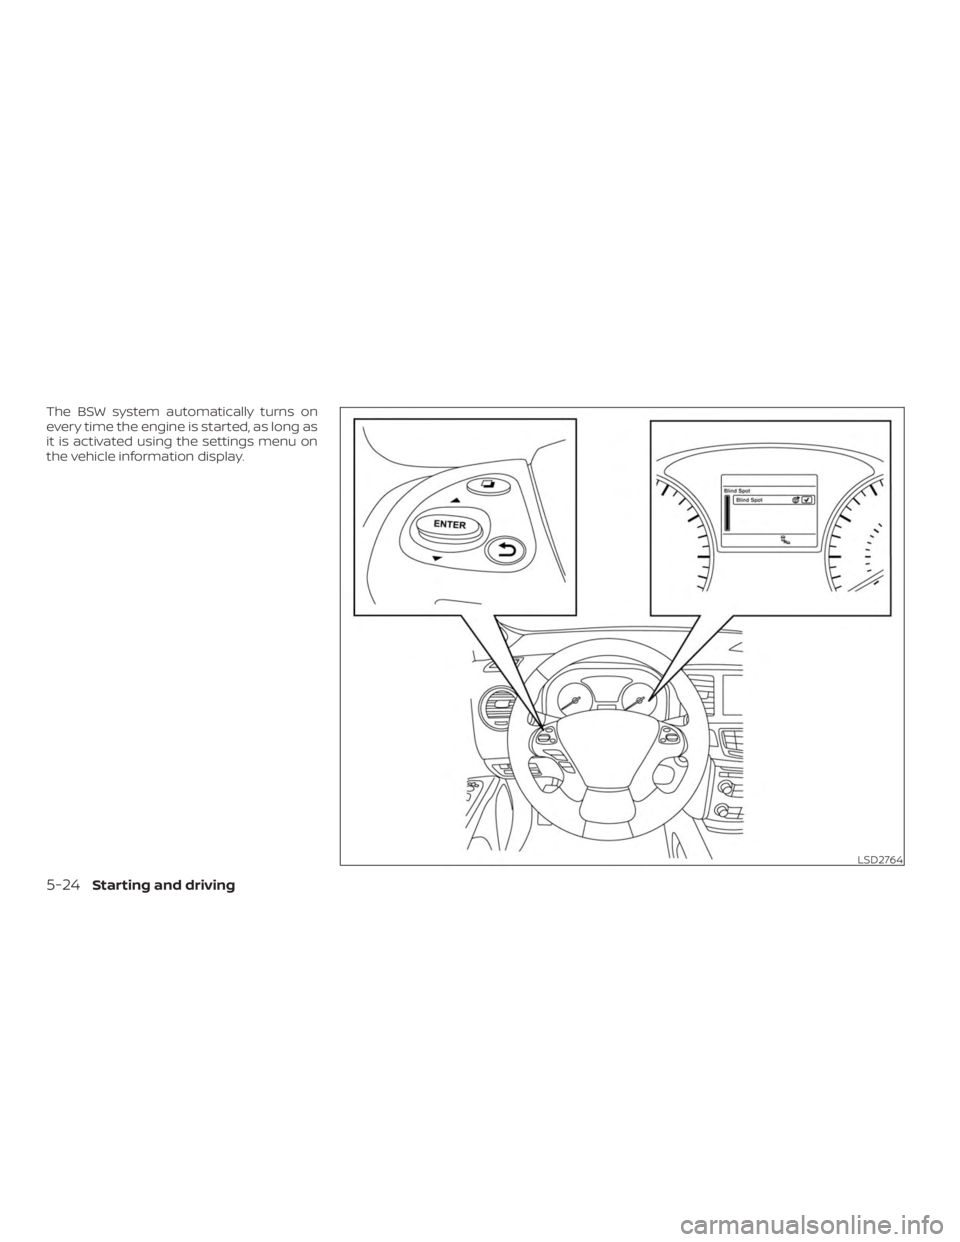
The BSW system automatically turns on
every time the engine is started, as long as
it is activated using the settings menu on
the vehicle information display.
LSD2764
5-24Starting and driving
Page 295 of 482

HOW TO ENABLE/DISABLE THE
BSW SYSTEM
When the BSW system is enabled in the
vehicle information display, the system can
be turned off by pushing the warning sys-
tems switch. For additional information, re-
fer to “Warning systems switch” in the “In-
struments and controls” section of this
manual.
Perform the following steps to enable or
disable the BSW system.1. Press the
button until “Settings”
displays in the vehicle information dis-
play. Use the
button to select
“Driver Assistance.” Then press the EN-
TER button.
2. Select “Driving Aids” and press the EN- TER button.
3. Select “Blind Spot” and press the ENTER button.
4. Use the ENTER button to turn the sys- tem on or off.
NOTE: ∙ When enabling/disabling the system,
the system will retain current set-
tings even if the engine is restarted. ∙
The RCTA system (if so equipped) is
integrated into the BSW system.
There is not a separate selection in
the vehicle information display for
the RCTA system. When the BSW is
disabled, the RCTA system is also dis-
abled.
∙ When the BSW system is turned on,
the BSW/RCTA indicator (white) in the
vehicle information display illumi-
nates.
BSW SYSTEM LIMITATIONS
WARNING
Listed below are the system limitations
for the BSW system. Failure to operate
the vehicle in accordance with these
system limitations could result in seri-
ous injury or death.
∙ The BSW system cannot detect all ve- hicles under all conditions.
∙ The radar sensors may not be able to detect and activate BSW when certain
objects are present such as:
– Pedestrian, bicycles, animals. – Vehicles such as motorcycles, low
height vehicles, or high ground
clearance vehicles.
– Oncoming vehicles.
– Vehicles remaining in the detec- tion zone when you accelerate
from a stop.
– A vehicle merging into an adjacent lane at a speed approximately the
same as your vehicle.
– A vehicle approaching rapidly from behind.
– A vehicle which your vehicle over- takes rapidly.
– A vehicle that passes through the detection zone quickly.
– When overtaking several vehicles in a row, the vehicles af ter the first
vehicle may not be detected if they
are traveling close together.
Starting and driving5-25
Page 296 of 482

∙ The radar sensors’ detection zone isdesigned based on a standard lane
width. When driving in a wider lane,
the radar sensors may not detect ve-
hicles in an adjacent lane. When driv-
ing in a narrow lane, the radar sensors
may detect vehicles driving two lanes
away.
∙ The radar sensors are designed to ig- nore most stationary objects; how-
ever, objects such as guardrails, walls,
foliage and parked vehicles may oc-
casionally be detected. This is a nor-
mal operation condition.
∙ The following conditions may reduce the ability of the radar to detect other
vehicles:
– Severe weather
– Road spray
– Ice/frost/snow/dirt build-up on the vehicle
∙ Do not attach stickers (including transparent material), install accesso-
ries or apply additional paint near the
radar sensors. These conditions may
reduce the ability of the radar to de-
tect other vehicles. ∙ Excessive noise (for example, audio
system volume, open vehicle window)
will interfere with the chime sound,
and it may not be heard.
BSW DRIVING SITUATIONS
Indicator on
Indicator off
Indicator flashing
Illustration 1 – Approaching from behind
LSD2299
5-26Starting and driving