2020 NISSAN MURANO ECU
[x] Cancel search: ECUPage 169 of 518

ROOF RACK
WARNING
• Always install the crossbars onto the
roof side rails before loading cargo of
any kind. Loading cargo directly onto
the roof side rails or the vehicle’s roof
may cause vehicle damage.
• Roof rack cross bars should be evenly
distributed.
• Do not exceed maximum roof rack
crossbars load capacity and always
distribute the load uniformly. •
Heavy loading of the crossbars has
the potential to affect the vehicle
stability and handling during sudden
or unusual handling maneuvers.
• Properly secure all cargo with ropes
or straps to help prevent it from slid-
ing or shif ting. In a sudden stop or
collision, unsecured cargo could
cause personal injury.
• Drive extra carefully when the vehicle
is loaded at or near the cargo carry-
ing capacity, especially if the signifi-
cant portion of that load is carried on
the crossbars.CAUTION
• Use care when placing or removing
items from the roof rack. If you can-
not comfortably lif t the items onto
the roof rack from the ground, use a
ladder or a stool. Do not apply any load directly to the roof
side rails
OA. CrossbarsOBmust be in-
stalled before applying load/cargo/
luggage to the roof of the vehicle.
Genuine NISSAN accessory crossbars may
be available through a NISSAN dealer. It is
recommended that you visit a NISSAN
dealer for additional information.
The service load capacity for the roof side
rails is 165 lbs. (74 kg.), however do not ex-
ceed the crossbars load capacity.
Be careful that your vehicle does not ex-
ceed the Gross Vehicle Weight Rating
(GVWR) or its Gross Axle Weight Rating
(GAWR front and rear).
For additional information regarding GVWR
and GAWR, refer to:
• F.M.V.S.S. or C.M.V.S.S. certification label (lo- cated on the driver’s door pillar).
LIC4202
Instruments and controls2-61
Page 176 of 518
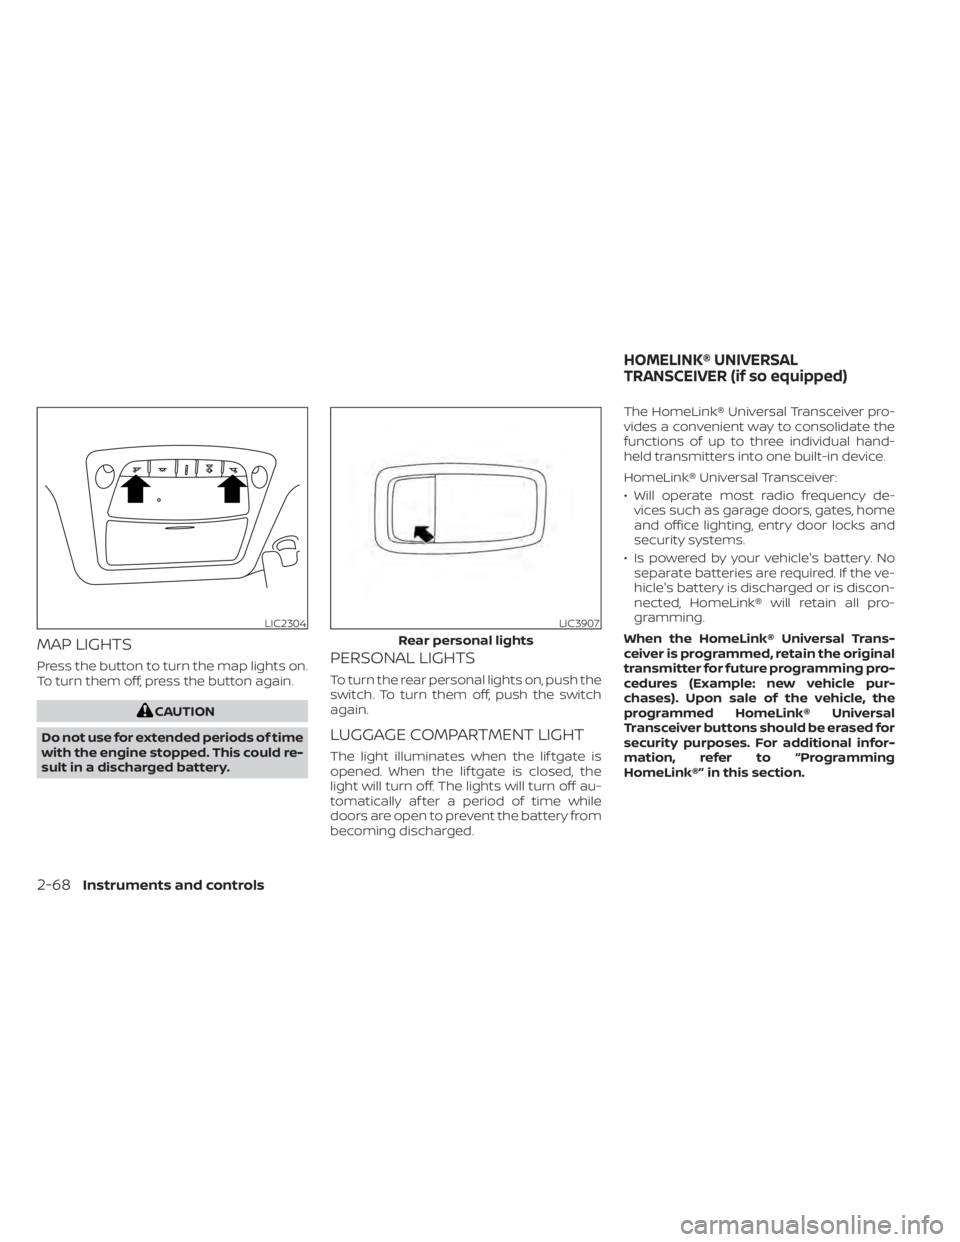
MAP LIGHTS
Press the button to turn the map lights on.
To turn them off, press the button again.
CAUTION
Do not use for extended periods of time
with the engine stopped. This could re-
sult in a discharged battery.
PERSONAL LIGHTS
To turn the rear personal lights on, push the
switch. To turn them off, push the switch
again.
LUGGAGE COMPARTMENT LIGHT
The light illuminates when the lif tgate is
opened. When the lif tgate is closed, the
light will turn off. The lights will turn off au-
tomatically af ter a period of time while
doors are open to prevent the battery from
becoming discharged. The HomeLink® Universal Transceiver pro-
vides a convenient way to consolidate the
functions of up to three individual hand-
held transmitters into one built-in device.
HomeLink® Universal Transceiver:
• Will operate most radio frequency de-
vices such as garage doors, gates, home
and office lighting, entry door locks and
security systems.
• Is powered by your vehicle's battery. No separate batteries are required. If the ve-
hicle's battery is discharged or is discon-
nected, HomeLink® will retain all pro-
gramming.
When the HomeLink® Universal Trans-
ceiver is programmed, retain the original
transmitter for future programming pro-
cedures (Example: new vehicle pur-
chases). Upon sale of the vehicle, the
programmed HomeLink® Universal
Transceiver buttons should be erased for
security purposes. For additional infor-
mation, refer to “Programming
HomeLink®” in this section.
LIC2304LIC3907
Rear personal lights
HOMELINK® UNIVERSAL
TRANSCEIVER (if so equipped)
2-68Instruments and controls
Page 177 of 518

WARNING
• Your vehicle's engine should be
turned off while programming the
HomeLink® Universal Transceiver. For
additional information, refer to
“Push-button ignition switch” in the
“Starting and driving” section of this
manual. Do not breathe exhaust
gases; they contain colorless and
odorless carbon monoxide. Carbon
monoxide is dangerous. It can cause
unconsciousness or death.
• Do not use the HomeLink® Universal
Transceiver with any garage door
opener that lacks safety stop and re-
verse features as required by federal
safety standards. (These standards
became effective for opener models
manufactured af ter April 1, 1982.) A
garage door opener which cannot
detect an object in the path of a clos-
ing garage door and then automati-
cally stop and reverse does not meet
current federal safety standards. Us-
ing a garage door opener without
these features increases the risk of
serious injury or death. •
During the programming procedure
your garage door or security gate will
open and close (if the transmitter is
within range). Make sure that people
or objects are clear of the garage
door, gate, etc., that you are
programming.
PROGRAMMING HOMELINK®
If you have any questions or are having
difficulty programming your HomeLink®
buttons, refer to the HomeLink® web site at:
www.homelink.com or call 1-800-355-3515.
NOTE:
Place the ignition switch in the ON or ACC
position (without starting the engine)
when programming HomeLink®. It is also
recommended that a new battery be
placed in the hand-held transmitter of
the device being programmed to
HomeLink® for quicker programming
and accurate transmission of the radio
frequency. 1. Position the end of your hand-held
transmitter 1–3 in (2–8 cm) away from
the HomeLink® surface, keeping the
HomeLink® indicator light
O1in view.
LIC2365
Instruments and controls2-69
Page 187 of 518
When the doors are locked using one of the
following methods, the doors cannot be
opened using the inside or outside door
handles. The doors must be unlocked to
open the doors.
WARNING
• Always have the doors locked while
driving. Along with the use of seat
belts, this provides greater safety in
the event of an accident by helping to
prevent persons from being thrown
from the vehicle. This also helps keep
children and others from uninten-
tionally opening the doors, and will
help keep out intruders.
• Before opening any door, always look
for and avoid oncoming traffic. •
To help avoid risk of injury or death
through unintended operation of the
vehicle and/or its systems, including
entrapment in windows or inadver-
tent door lock activation, do not
leave children, people who require
the assistance of others or pets unat-
tended in your vehicle. Additionally,
the temperature inside a closed ve-
hicle on a warm day can quickly be-
come high enough to cause a signifi-
cant risk of injury or death to people
and pets.
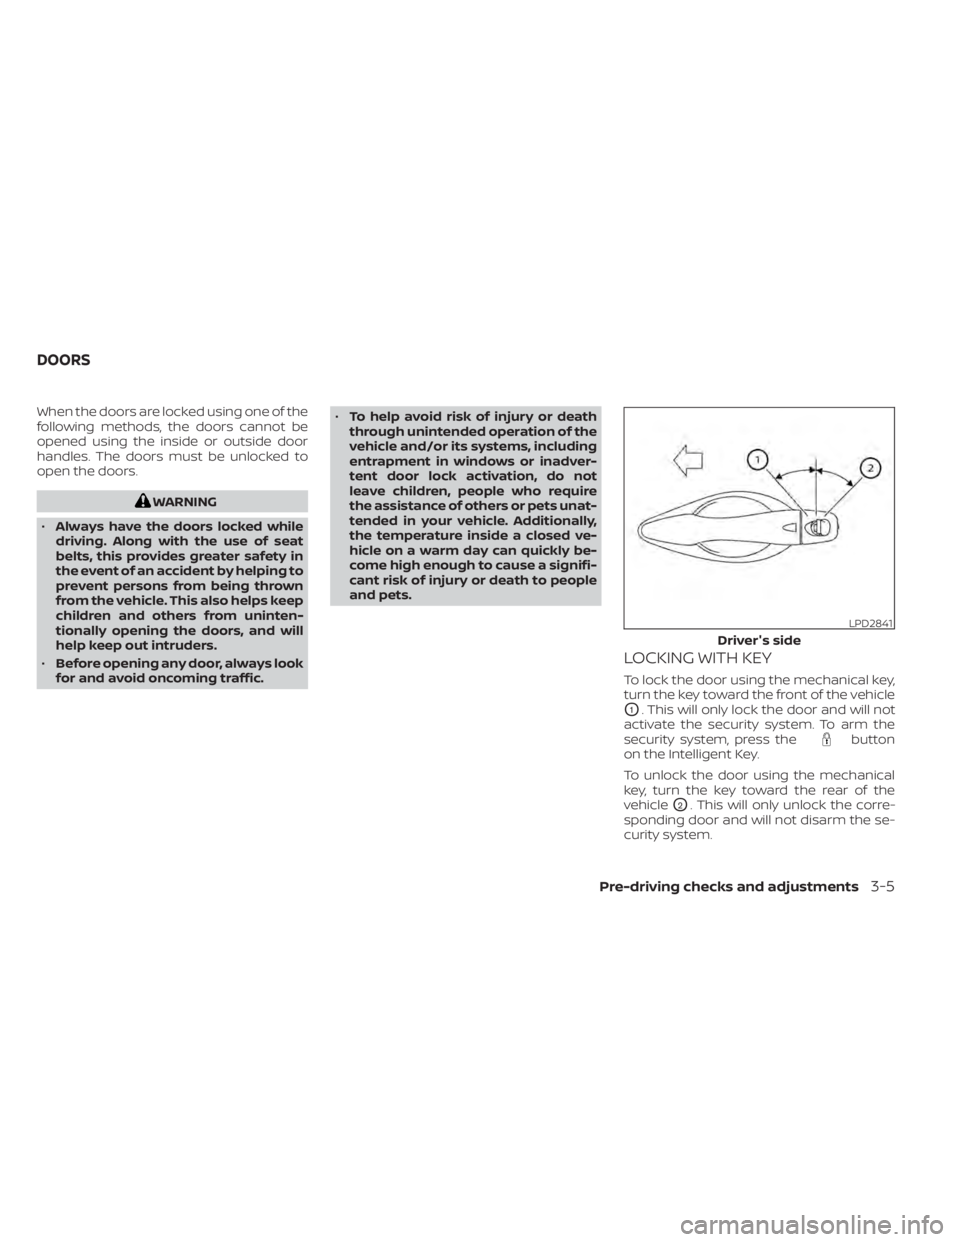
LOCKING WITH KEY
To lock the door using the mechanical key,
turn the key toward the front of the vehicle
O1. This will only lock the door and will not
activate the security system. To arm the
security system, press the
button
on the Intelligent Key.
To unlock the door using the mechanical
key, turn the key toward the rear of the
vehicle
O2. This will only unlock the corre-
sponding door and will not disarm the se-
curity system.
LPD2841
Driver's side
DOORS
Pre-driving checks and adjustments3-5
Page 188 of 518
For additional information, refer to “Security
systems” in the “Instruments and controls”
section of this manual
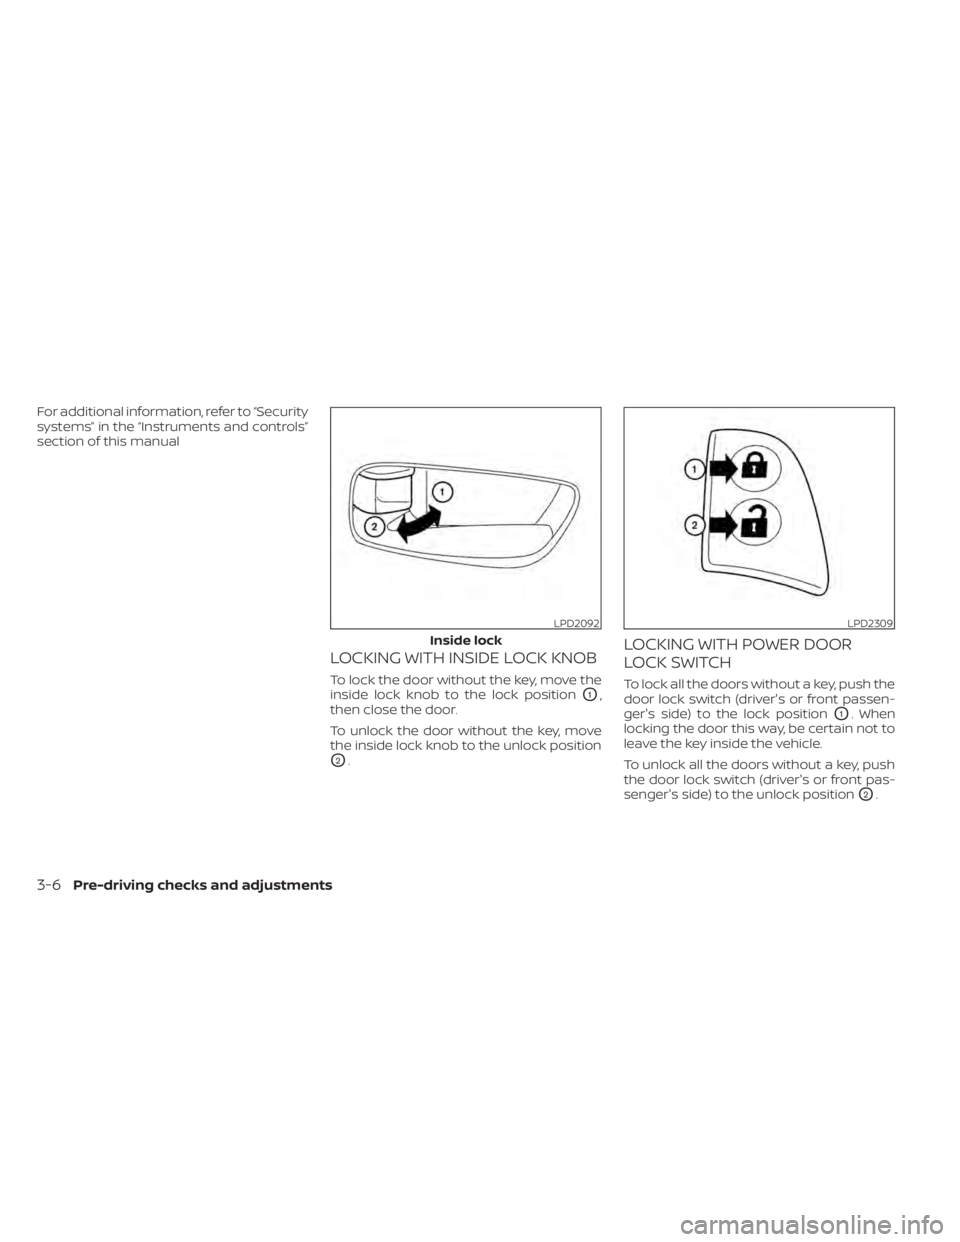
LOCKING WITH INSIDE LOCK KNOB
To lock the door without the key, move the
inside lock knob to the lock position
O1,
then close the door.
To unlock the door without the key, move
the inside lock knob to the unlock position
O2.
LOCKING WITH POWER DOOR
LOCK SWITCH
To lock all the doors without a key, push the
door lock switch (driver's or front passen-
ger's side) to the lock position
O1. When
locking the door this way, be certain not to
leave the key inside the vehicle.
To unlock all the doors without a key, push
the door lock switch (driver's or front pas-
senger's side) to the unlock position
O2.
LPD2092
Inside lock
LPD2309
3-6Pre-driving checks and adjustments
Page 193 of 518
• Doors do not lock by pushing the doorhandle request switch while the driv-
er’s door is open. However, doors lock
with the mechanical key even if any
door is open.
• Doors do not lock with the door handle request switch with the Intelligent Key
inside the vehicle and a beep sounds to
warn you. However, when an Intelligent
Key is inside the vehicle, doors can be
locked with another Intelligent Key.
WARNING
Af ter locking the doors using the re-
quest switch, make sure that the doors
have been securely locked by operat-
ing the door handles. Failure to follow
these instructions may result in inad-
vertently unlocking the doors, which
may decrease the safety and security
of your vehicle.
CAUTION
• When locking the doors using the re-
quest switch, make sure to have the
Intelligent Key in your possession
before operating the request switch
to prevent the Intelligent Key from
being lef t in the vehicle.
• The request switch is operational
only when the Intelligent Key has
been detected by the Intelligent Key
system.
Lockout protection
To prevent the Intelligent Key from being
accidentally locked in the vehicle, lockout
protection is equipped with the Intelligent
Key system.
When any door is open, the doors are
locked, and then the Intelligent Key is put
inside the vehicle and all the doors are
closed, a warning chime will sound and the
doors will automatically unlock.
NOTE:
The doors may not lock when the Intelli-
gent Key is in the same hand that is op-
erating the request switch to lock the
door. Put the Intelligent Key in a purse,
pocket or your other hand.
CAUTION
The lockout protection may not func-
tion under the following conditions:
• When the Intelligent Key is placed on
top of the instrument panel.
• When the Intelligent Key is placed in-
side the glove box or a storage bin.
• When the Intelligent Key is placed in-
side the door pockets.
• When the Intelligent Key is placed in-
side or near metallic materials.
Pre-driving checks and adjustments3-11
Page 196 of 518
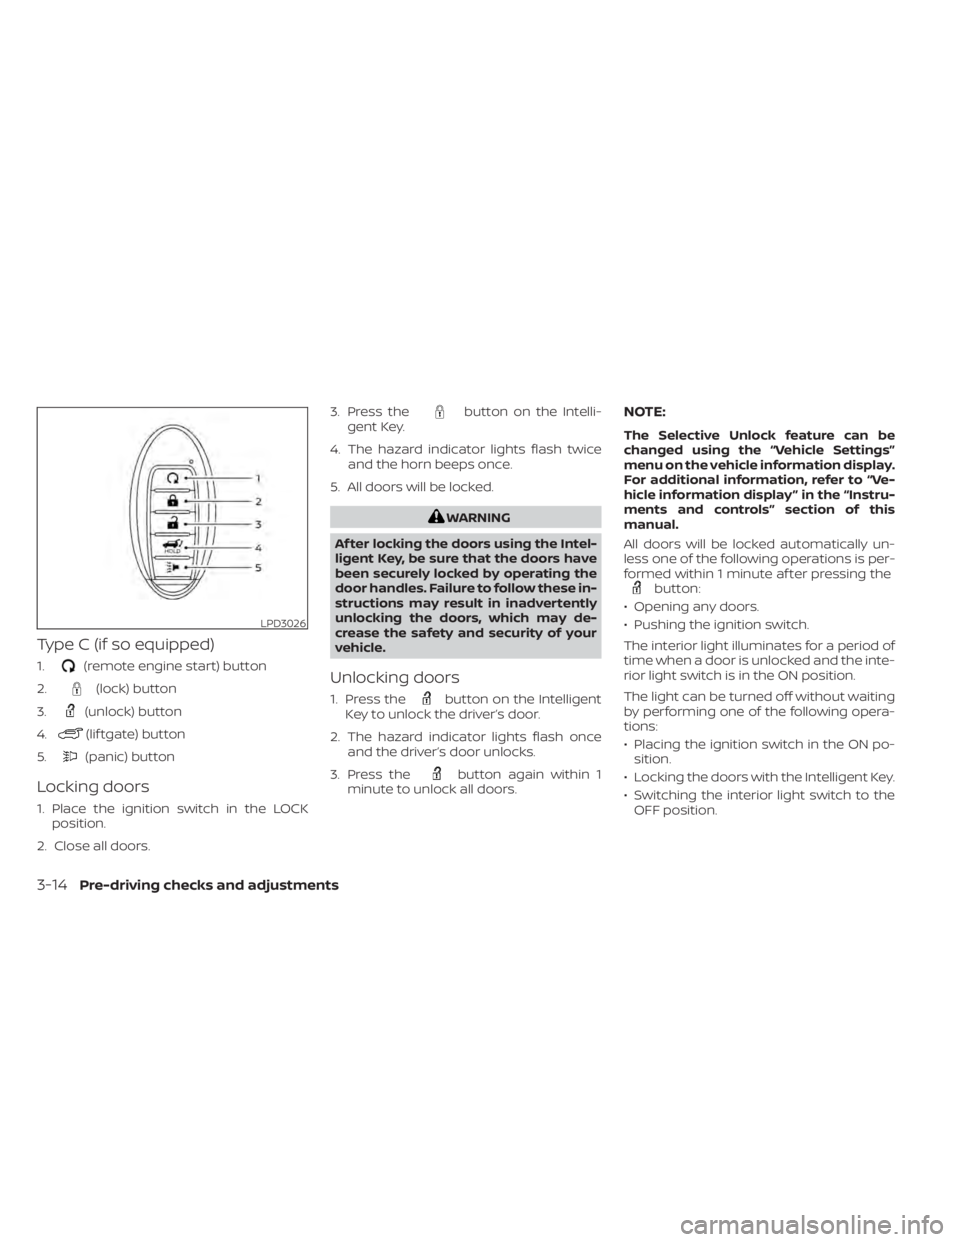
Type C (if so equipped)
1.(remote engine start) button
2.
(lock) button
3.
(unlock) button
4.
(lif tgate) button
5.
(panic) button
Locking doors
1. Place the ignition switch in the LOCK position.
2. Close all doors. 3. Press the
button on the Intelli-
gent Key.
4. The hazard indicator lights flash twice and the horn beeps once.
5. All doors will be locked.
WARNING
Af ter locking the doors using the Intel-
ligent Key, be sure that the doors have
been securely locked by operating the
door handles. Failure to follow these in-
structions may result in inadvertently
unlocking the doors, which may de-
crease the safety and security of your
vehicle.
Unlocking doors
1. Press thebutton on the Intelligent
Key to unlock the driver’s door.
2. The hazard indicator lights flash once and the driver’s door unlocks.
3. Press the
button again within 1
minute to unlock all doors.
NOTE:
The Selective Unlock feature can be
changed using the “Vehicle Settings”
menu on the vehicle information display.
For additional information, refer to “Ve-
hicle information display ” in the “Instru-
ments and controls” section of this
manual.
All doors will be locked automatically un-
less one of the following operations is per-
formed within 1 minute af ter pressing the
button:
• Opening any doors.
• Pushing the ignition switch.
The interior light illuminates for a period of
time when a door is unlocked and the inte-
rior light switch is in the ON position.
The light can be turned off without waiting
by performing one of the following opera-
tions:
• Placing the ignition switch in the ON po- sition.
• Locking the doors with the Intelligent Key.
• Switching the interior light switch to the OFF position.
LPD3026
3-14Pre-driving checks and adjustments
Page 203 of 518

CONDITIONS THE REMOTE ENGINE
START WILL NOT WORK
The Remote Engine Start will not operate if
any of the following conditions are present:
• The ignition switch is placed in the ONposition.
• The hood is not securely closed.
• The hazard indicator lights are on.
• The engine is still running. The engine must be completely stopped. Wait at
least 6 seconds if the engine goes from
running to off. This is not applicable when
extending engine run time.
• The
button is not pressed and held
for at least 2 seconds.
• The
button is not pressed and held
within 5 seconds of pressing the lock but-
ton.
• The brake is pressed.
• The doors are not closed and locked.
• The lif tgate is open.
• The Key System Fault warning light re- mains solid is in the vehicle information
display.
• The alarm sounds due to illegal entry into the vehicle. • Two Remote Engine Starts, or a single
Remote Engine Start with an extension,
have already been used.
• The vehicle is not in P (Park).
• There is a detected registered key already inside of the vehicle.
• The Remote Engine Start function has been switched to the OFF position in Ve-
hicle Settings of the vehicle information
display. For additional information, refer
to “Vehicle information display” in the “In-
struments and controls” section of this
manual.
The Remote Engine Start may display a
warning or indicator in the vehicle informa-
tion display. For additional information, re-
fer to “Vehicle information display” in the
“Instruments and controls” section of this
manual.
Pre-driving checks and adjustments3-21