Page 398 of 518

CHANGING A FLAT TIRE
If you have a flat tire, follow the instructions
below:
Stopping the vehicle
1. Safely move the vehicle off the road andaway from traffic.
2. Turn on the hazard warning flashers.
3. Park on a level surface and apply the parking brake. Move the shif t lever to P
(Park).
4. Turn off the engine.
5. Raise the hood to warn other traffic and to signal professional road assistance
personnel that you need assistance.
6. Have all passengers get out of the ve- hicle and stand in a safe place, away
from traffic and clear of the vehicle.
WARNING
• Make sure the parking brake is se-
curely applied and the shif t lever is
shif ted into P (Park).
• Never change tires when the vehicle
is on a slope, ice or slippery areas.
This is hazardous.
• Never change tires if oncoming traf-
fic is close to your vehicle. Wait for
professional road assistance.
Blocking wheels
Place suitable blocks at both the front and
back of the wheel diagonally opposite the
flat tire to prevent the vehicle from moving
when it is jacked up.
WARNING
Be sure to block the wheel as the ve-
hicle may move and result in personal
injury.
LCE2142
A. Blocks
B. Flat tire
6-4In case of emergency
Page 399 of 518
Getting the spare tire and tools
1. Open the rear lif tgate.
2. Pull up on the handle to lif t the carpetedfloorboard and attach the hook as
shown. 3. Open the storage compartment
OAby
pulling on the strap to locate the jack
and tools
OB.
4. Remove the jack and tools from the storage area. 5. To remove the spare tire, loosen the bolt
by turning counterclockwise.
6. Once free, remove the bolt.
7. Remove the spare tire.
8. Once the flat tire is exchanged with the spare tire, store the flat tire where the
spare tire was located.
9. Turn the bolt clockwise to tighten and place the carpeted floorboard back over
the tire.
LCE2397LCE2386
WCE0188
In case of emergency6-5
Page 400 of 518
Changing the spare tire with
BOSE® subwoofer (if so equipped)
1. To loosen the bolt, turncounterclockwise.
2. Once free, remove the bolt. 3. Place the sub-woofer in the lower lef t
corner of the cargo area, leaning against
the driver side wall.
4. Remove the spare tire.
5. Once the flat tire is exchanged with the spare tire, store the flat tire where the
spare was located.
NOTE:You may need to remove the wheel cap
in order to secure the damaged tire us-
ing the spare tire clamp.
6. Place the sub-woofer inside the flat tire. 7. Turn the bolt clockwise to tighten and
place the carpeted floorboard back over
the tire.
LCE2109LCE2398
6-6In case of emergency
Page 401 of 518
Jacking up vehicle and removing
the damaged tireWARNING
• Never get under the vehicle while it is
supported only by the jack. If it is nec-
essary to work under the vehicle,
support it with safety stands. •
Use only the jack provided with your
vehicle to lif t the vehicle. Do not use
the jack provided with your vehicle
on other vehicles. The jack is de-
signed for lif ting only your vehicle
during a tire change.
• Use the correct jack-up points. Never
use any other part of the vehicle for
jack support.
• Never jack up the vehicle more than
necessary.
• Never use blocks on or under the
jack.
• Do not start or run the engine while
vehicle is on the jack. It may cause
the vehicle to move. This is especially
true for vehicles with limited slip
differentials.
• Do not allow passengers to stay in
the vehicle while it is on the jack.
• Never run the engine with a wheel(s)
off the ground. It may cause the ve-
hicle to move.
LCE2184
In case of emergency6-7
Page 402 of 518

Always refer to the illustrations for the cor-
rect placement and jack-up points for your
specific vehicle model and jack type.
Carefully read the caution label attached
to the jack body and the following in-
structions.
1. Loosen each wheel nut 1 or 2 turns byturning counterclockwise with the wheel
nut wrench. Do not remove the wheel
nuts until the tire is off the ground. 2. Place the jack directly under the jack-up
point as illustrated so the top of the jack
contacts the vehicle at the jack-up point.
Align the jack head between the 2
notches in the front or the rear as
shown. Also fit the groove of the jack
head between the notches as shown.
The jack should be used on firm and
level ground.
3. To lif t the vehicle, securely hold the jack lever and rod with both hands. Carefully
raise the vehicle until the tire clears the
ground. Remove the wheel nuts, and
then remove the tire.Installing the spare tire
The spare tire is designed for emergency
use. For additional information, refer to
“Wheels and tires” in the “Do-it-yourself ”
section of this manual.
1. Clean any mud or dirt from the surfacebetween the wheel and hub.
2. Carefully put the spare tire on and tighten the wheel nuts finger tight.
3. With the wheel nut wrench, tighten wheel nuts alternately and evenly in the
sequence illustrated (
OA,OB,OC,OD,OE)
until they are tight.
SCE0002WCE0056
6-8In case of emergency
Page 408 of 518

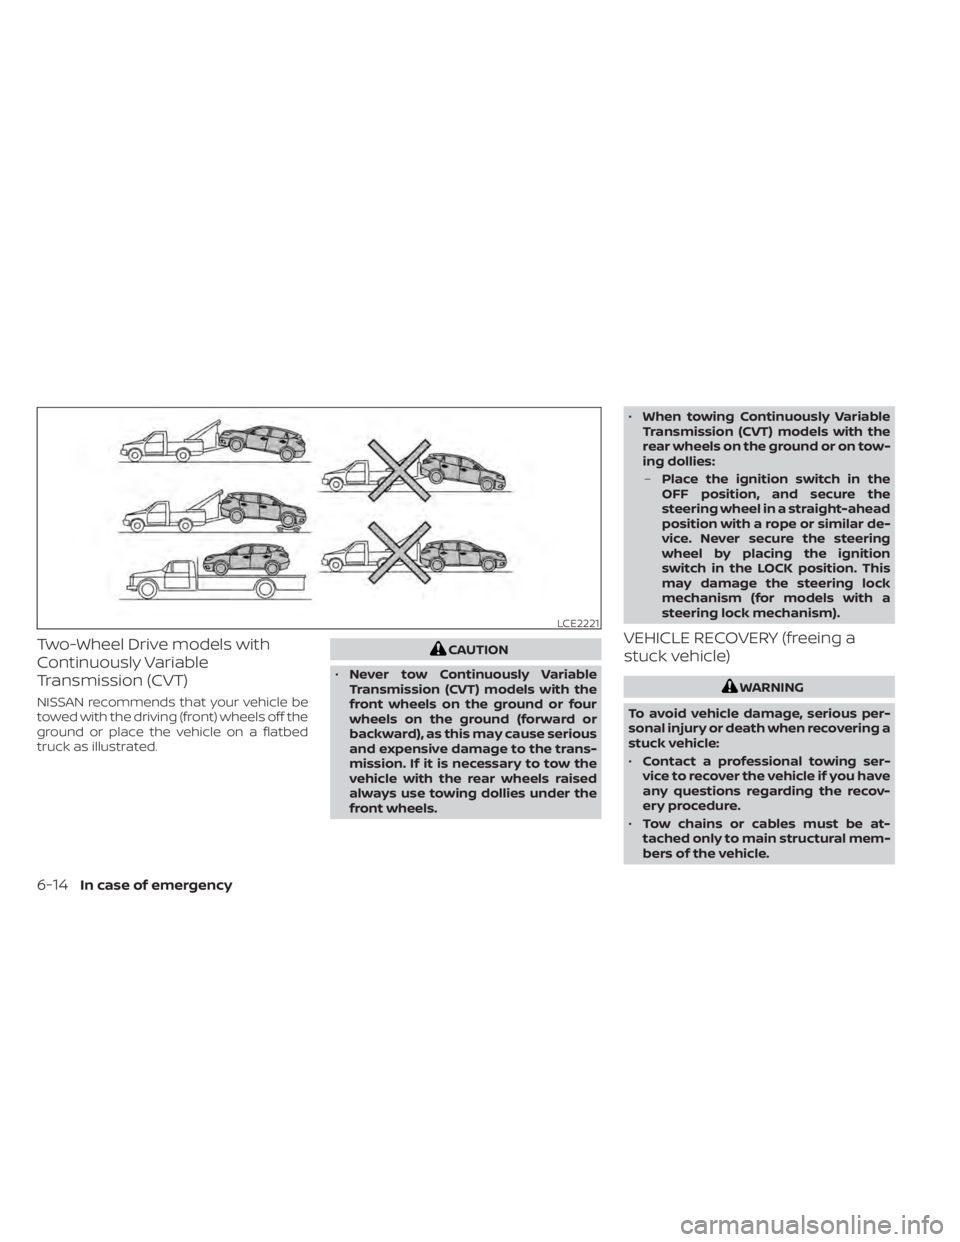
Two-Wheel Drive models with
Continuously Variable
Transmission (CVT)
NISSAN recommends that your vehicle be
towed with the driving (front) wheels off the
ground or place the vehicle on a flatbed
truck as illustrated.
CAUTION
• Never tow Continuously Variable
Transmission (CVT) models with the
front wheels on the ground or four
wheels on the ground (forward or
backward), as this may cause serious
and expensive damage to the trans-
mission. If it is necessary to tow the
vehicle with the rear wheels raised
always use towing dollies under the
front wheels. •
When towing Continuously Variable
Transmission (CVT) models with the
rear wheels on the ground or on tow-
ing dollies:
– Place the ignition switch in the
OFF position, and secure the
steering wheel in a straight-ahead
position with a rope or similar de-
vice. Never secure the steering
wheel by placing the ignition
switch in the LOCK position. This
may damage the steering lock
mechanism (for models with a
steering lock mechanism).VEHICLE RECOVERY (freeing a
stuck vehicle)
WARNING
To avoid vehicle damage, serious per-
sonal injury or death when recovering a
stuck vehicle:
• Contact a professional towing ser-
vice to recover the vehicle if you have
any questions regarding the recov-
ery procedure.
• Tow chains or cables must be at-
tached only to main structural mem-
bers of the vehicle.
LCE2221
6-14In case of emergency
Page 420 of 518

When performing any inspection or main-
tenance work on your vehicle, always take
care to prevent serious accidental injury to
yourself or damage to the vehicle. The fol-
lowing are general precautions which
should be closely observed.
WARNING
• Park the vehicle on a level surface,
apply the parking brake securely and
block the wheels to prevent the ve-
hicle from moving. Move the shif t le-
ver to P (Park).
• Be sure the ignition switch is in the
OFF or LOCK position when perform-
ing any parts replacement or repairs.
• If you must work with the engine run-
ning, keep your hands, clothing, hair
and tools away from moving fans,
belts and any other moving parts.
• It is advisable to secure or remove
any loose clothing and remove any
jewelry, such as rings, watches, etc.
before working on your vehicle.
• Always wear eye protection when-
ever you work on your vehicle.
•
Your vehicle is equipped with an auto-
matic engine cooling fan. It may come
on at any time without warning, even if the ignition switch is in the OFF posi-
tion and the engine is not running. To
avoid injury, always disconnect the
negative battery cable before working
near the fan.
•
If you must run the engine in an en-
closed space such as a garage, be
sure there is proper ventilation for
exhaust gases to escape.
• Never get under the vehicle while it is
supported only by a jack. If it is nec-
essary to work under the vehicle,
support it with safety stands.
• Keep smoking materials, flame and
sparks away from the fuel tank and
battery.
• Because the fuel lines on gasoline
engine models are under high pres-
sure even when the engine is off, it is
recommended that you visit a
NISSAN dealer for service of the fuel
filter or fuel lines.
CAUTION
• Do not work under the hood while
the engine is hot. Turn the engine off
and wait until it cools down. •
Avoid contact with used engine oil and
coolant. Improperly disposed engine
oil, engine coolant and/or other ve-
hicle fluids can damage the environ-
ment. Always conform to local regula-
tions for disposal of vehicle fluid.
• Never leave the engine or Continu-
ously Variable Transmission (CVT) re-
lated component harnesses discon-
nected while the ignition switch is in
the ON position.
• Never connect or disconnect the bat-
tery or any transistorized compo-
nent while the ignition switch is in
the ON position.
This “Do-it-yourself ” section gives instruc-
tions regarding only those items which are
relatively easy for an owner to perform.
A Genuine NISSAN service manual is also
available. For additional information, refer
to “Owner's Manual/Service Manual order
information” in the “Technical and con-
sumer information” section of this manual.
You should be aware that incomplete or
improper servicing may result in operating
difficulties or excessive emissions, and
could affect warranty coverage. If in doubt
about any servicing, it is recommended
that you have it done by a NISSAN dealer.
MAINTENANCE PRECAUTIONS
8-2Do-it-yourself
Page 427 of 518

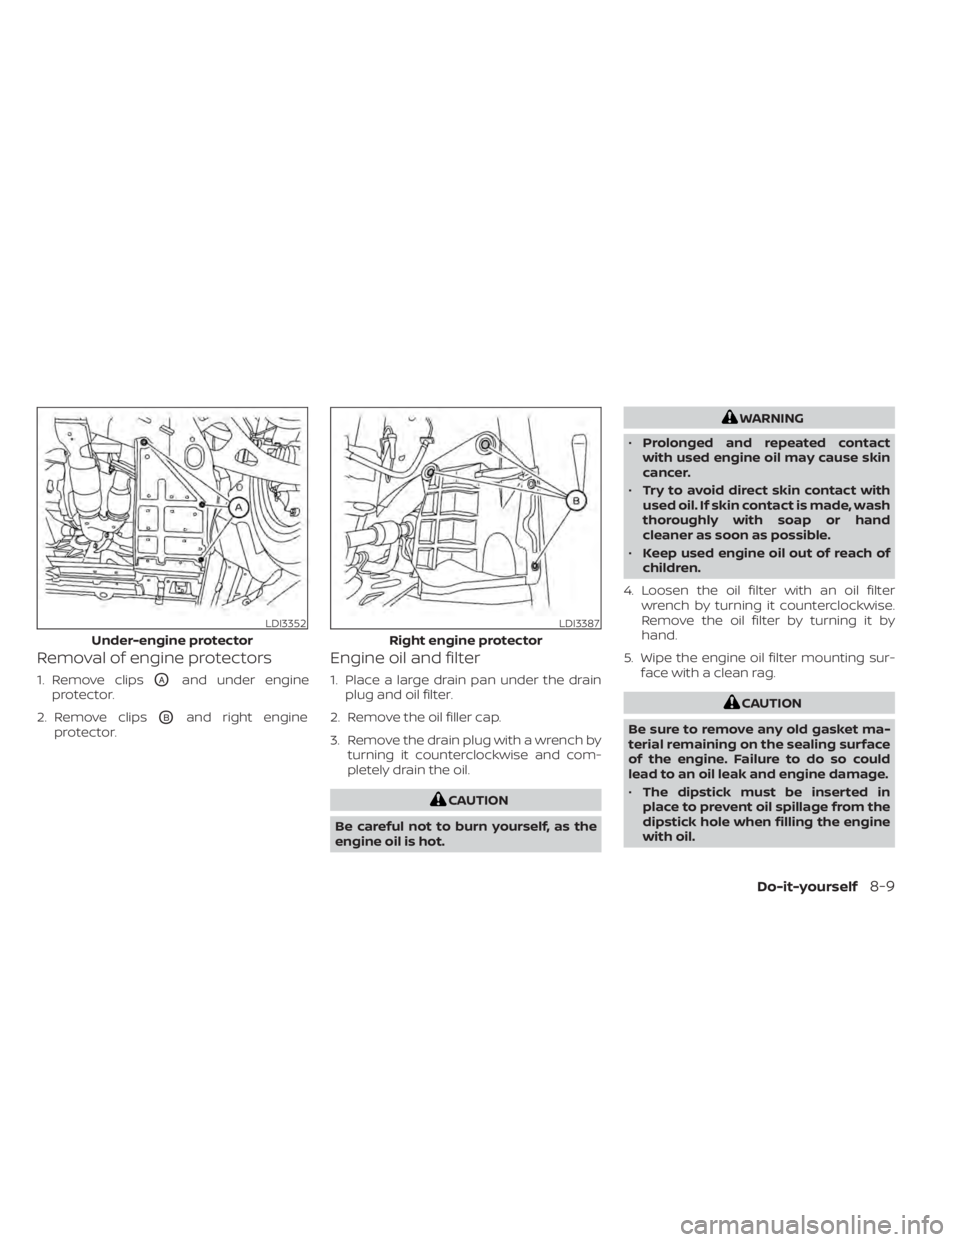
Removal of engine protectors
1. Remove clipsOAand under engine
protector.
2. Remove clips
OBand right engine
protector.
Engine oil and filter
1. Place a large drain pan under the drain plug and oil filter.
2. Remove the oil filler cap.
3. Remove the drain plug with a wrench by turning it counterclockwise and com-
pletely drain the oil.
CAUTION
Be careful not to burn yourself, as the
engine oil is hot.
WARNING
• Prolonged and repeated contact
with used engine oil may cause skin
cancer.
• Try to avoid direct skin contact with
used oil. If skin contact is made, wash
thoroughly with soap or hand
cleaner as soon as possible.
• Keep used engine oil out of reach of
children.
4. Loosen the oil filter with an oil filter wrench by turning it counterclockwise.
Remove the oil filter by turning it by
hand.
5. Wipe the engine oil filter mounting sur- face with a clean rag.
CAUTION
Be sure to remove any old gasket ma-
terial remaining on the sealing surface
of the engine. Failure to do so could
lead to an oil leak and engine damage.
• The dipstick must be inserted in
place to prevent oil spillage from the
dipstick hole when filling the engine
with oil.
LDI3352
Under-engine protector
LDI3387
Right engine protector
Do-it-yourself8-9