2020 NISSAN MURANO display
[x] Cancel search: displayPage 303 of 518

Malfunction
If the BSW system malfunctions, it will turn
off automatically. The BSW/RCTA indicator
(orange) will appear in the vehicle informa-
tion display.
NOTE:
If the BSW system stops working, the
RCTA system (if so equipped) will also
stop working.
Action to take:
Stop the vehicle in a safe location, place the
vehicle in the P (Park) position, turn the en-
gine off and restart the engine. If the mes-
sage continues to appear, have the system
checked. It is recommended that you visit a
NISSAN dealer for this service.
SYSTEM MAINTENANCE
The two radar sensorsO1for the BSW and
RCTA systems are located near the rear
bumper. Always keep the area near the ra-
dar sensors clean.
The radar sensors may be blocked by tem-
porary ambient conditions such as splash-
ing water, mist or fog.
The blocked condition may also be caused
by objects such as ice, frost or dirt ob-
structing the radar sensors.
Check for and remove objects obstructing
the area around the radar sensors. Do not attach stickers (including transpar-
ent material), install accessories or apply
additional paint near the radar sensors.
Do not strike or damage the area around
the radar sensors. It is recommended that
you visit a NISSAN dealer if the area around
the radar sensors is damaged due to a
collision.
Radio frequency statement
For USA
FCC ID: OAYSRR2B or OAYSRR3B
This device complies with Part 15 of the FCC
Rules.
Operation is subject to the following two
conditions:
1. This device may not cause harmful inter-
ference, and
2. This device must accept any interfer- ence received, including interference
that may cause undesired operation.
FCC Warning
Changes or modifications not expressly
approved by the party responsible for
compliance could void the user’s authority
to operate the equipment.
LSD2223
Starting and driving5-47
Page 307 of 518
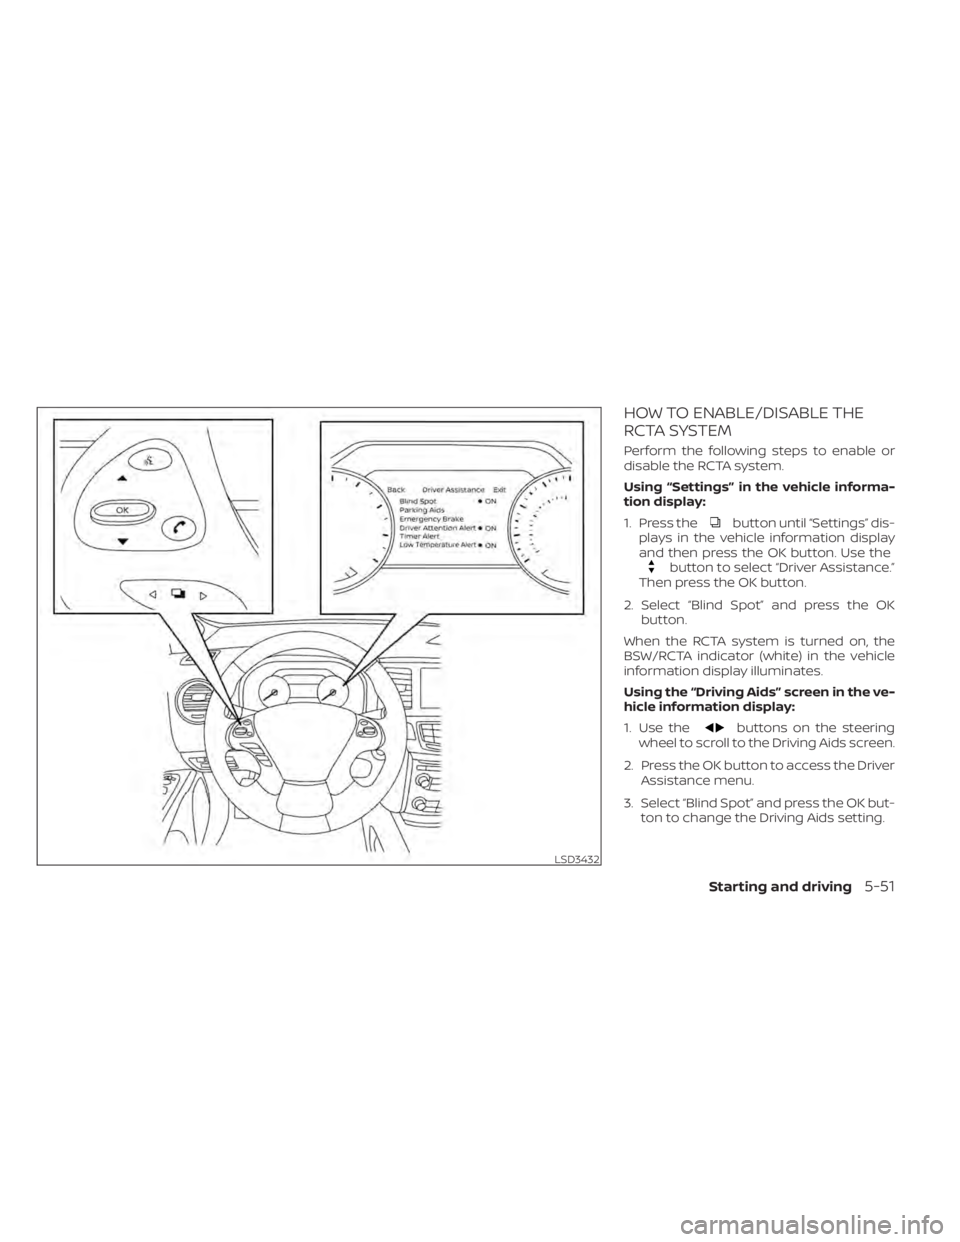
HOW TO ENABLE/DISABLE THE
RCTA SYSTEM
Perform the following steps to enable or
disable the RCTA system.
Using “Settings” in the vehicle informa-
tion display:
1. Press the
button until “Settings” dis-
plays in the vehicle information display
and then press the OK button. Use the
button to select “Driver Assistance.”
Then press the OK button.
2. Select “Blind Spot” and press the OK button.
When the RCTA system is turned on, the
BSW/RCTA indicator (white) in the vehicle
information display illuminates.
Using the “Driving Aids” screen in the ve-
hicle information display:
1. Use the
buttons on the steering
wheel to scroll to the Driving Aids screen.
2. Press the OK button to access the Driver Assistance menu.
3. Select “Blind Spot” and press the OK but- ton to change the Driving Aids setting.
LSD3432
Starting and driving5-51
Page 308 of 518
NOTE:
• The RCTA system is integrated into theBSW system. There is not a separate
selection in the vehicle information
display for the RCTA system. When the
BSW is disabled, the RCTA system is
also disabled.
• When enabling/disabling the system, the system setting will be retained
even if the engine is restarted.
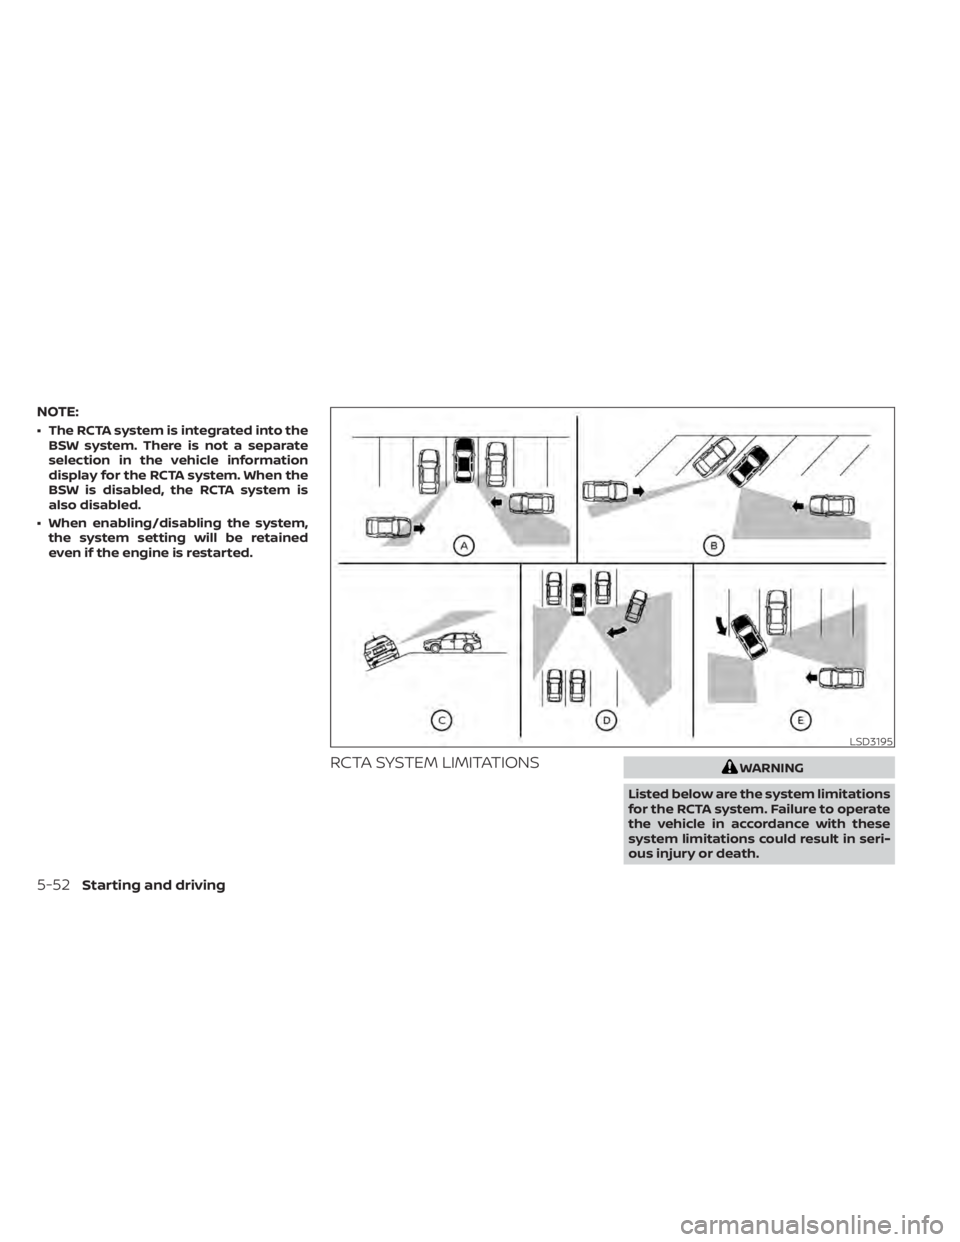
RCTA SYSTEM LIMITATIONSWARNING
Listed below are the system limitations
for the RCTA system. Failure to operate
the vehicle in accordance with these
system limitations could result in seri-
ous injury or death.
LSD3195
5-52Starting and driving
Page 311 of 518

SYSTEM TEMPORARILY
UNAVAILABLE
When radar blockage is detected, the sys-
tem will be deactivated automatically. The
“Unavailable: Side Radar Obstruction”
warning message will appear and the
BSW/RCTA indicator (white) will blink
OAin
the vehicle information display.
The systems are not available until the
conditions no longer exist.
The radar sensors may be blocked by tem-
porary ambient conditions such as splash-
ing water, mist or fog.
The blocked condition may also be caused
by objects such as ice, frost or dirt ob-
structing the radar sensors.
NOTE:
If the BSW system stops working, the
RCTA system (if so equipped) will also
stop working.
Action to take
When the above conditions no longer exist,
the system will resume automatically.
Malfunction
When the RCTA system malfunctions, it will
turn off automatically. The BSW/RCTA indi-
cator (orange) will appear in the vehicle in-
formation display.
NOTE:
If the BSW system stops working, the
RCTA system (if so equipped) will also
stop working.
Action to take
Stop the vehicle in a safe location, place the
vehicle in the P (Park) position, turn the en-
gine off and restart the engine. If the mes-
sage continues to appear, have the system
checked. It is recommended that you visit a
NISSAN dealer for this service.
SYSTEM MAINTENANCE
The two radar sensorsO1for the BSW and
RCTA systems are located near the rear
bumper. Always keep the area near the ra-
dar sensors clean.
The radar sensors may be blocked by tem-
porary ambient conditions such as splash-
ing water, mist or fog.
The blocked condition may also be caused
by objects such as ice, frost or dirt ob-
structing the radar sensors.
Check for and remove objects obstructing
the area around the radar sensors.
LSD2223
Starting and driving5-55
Page 313 of 518
PRECAUTIONS ON CRUISE
CONTROL
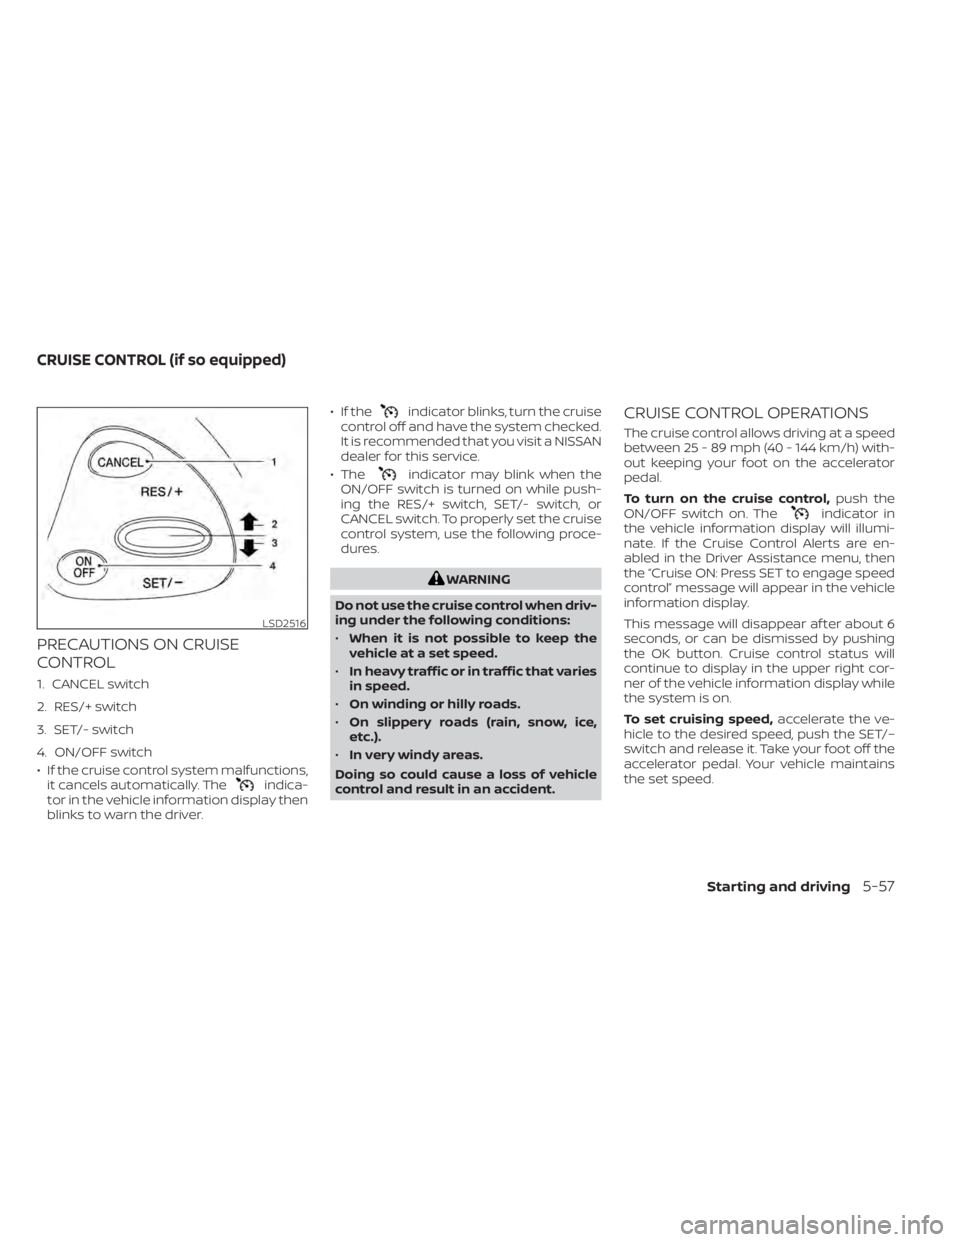
1. CANCEL switch
2. RES/+ switch
3. SET/- switch
4. ON/OFF switch
• If the cruise control system malfunctions,it cancels automatically. The
indica-
tor in the vehicle information display then
blinks to warn the driver. • If the
indicator blinks, turn the cruise
control off and have the system checked.
It is recommended that you visit a NISSAN
dealer for this service.
• The
indicator may blink when the
ON/OFF switch is turned on while push-
ing the RES/+ switch, SET/- switch, or
CANCEL switch. To properly set the cruise
control system, use the following proce-
dures.
WARNING
Do not use the cruise control when driv-
ing under the following conditions:
• When it is not possible to keep the
vehicle at a set speed.
• In heavy traffic or in traffic that varies
in speed.
• On winding or hilly roads.
• On slippery roads (rain, snow, ice,
etc.).
• In very windy areas.
Doing so could cause a loss of vehicle
control and result in an accident.
CRUISE CONTROL OPERATIONS
The cruise control allows driving at a speed
between 25 - 89 mph (40 - 144 km/h) with-
out keeping your foot on the accelerator
pedal.
To turn on the cruise control, push the
ON/OFF switch on. The
indicator in
the vehicle information display will illumi-
nate. If the Cruise Control Alerts are en-
abled in the Driver Assistance menu, then
the “Cruise ON: Press SET to engage speed
control” message will appear in the vehicle
information display.
This message will disappear af ter about 6
seconds, or can be dismissed by pushing
the OK button. Cruise control status will
continue to display in the upper right cor-
ner of the vehicle information display while
the system is on.
To set cruising speed, accelerate the ve-
hicle to the desired speed, push the SET/–
switch and release it. Take your foot off the
accelerator pedal. Your vehicle maintains
the set speed.
LSD2516
CRUISE CONTROL (if so equipped)
Starting and driving5-57
Page 314 of 518
If the Cruise Control Alerts are enabled in
the Driver Assistance menu, then the “Tar-
get Speed SET. Press + or – to adjust” mes-
sage will appear in the vehicle information
display when the SET/– switch is pushed.
This message will disappear af ter about 6
seconds, or can be dismissed by pushing
the OK button. Cruise control status will
continue to display in the upper right cor-
ner of the vehicle information display while
the system is on.
•To pass another vehicle, depress the ac-
celerator pedal. When you release the
pedal, the vehicle returns to the previ-
ously set speed.
• The vehicle may not maintain the set speed when going up or down steep hills.
If this happens, drive without the cruise
control.
To cancel the preset speed, use one of the
following three methods:
• Push the CANCEL switch.
• Tap the brake pedal.
• Push the ON/OFF switch off. The
indicator in the vehicle information dis-
play goes out. The cruise control is automatically can-
celed if:
• You depress the brake pedal while push-
ing the RES/+ or SET/– switch. The preset
speed is deleted from memory.
• The vehicle slows down more than 8 mph (13 km/h) below the set speed.
• You move the shif t lever to N (Neutral).
If the Cruise Control Alerts are enabled in
the Driver Assistance menu, the “Cruise ON:
Press SET to engage speed control” mes-
sage will reappear in the vehicle informa-
tion display to let you know the cruise con-
trol system is still on if you set the target
speed again.
To reset at a faster cruising speed, use
one of the following three methods:
• Depress the accelerator pedal. When the vehicle attains the desired speed, push
and release the SET/– switch.
• Push and hold the RES/+ switch. When the vehicle attains the speed you desire,
release the switch.
• Push and release the RES/+ switch. Each time you do this, the set speed increases
by about 1 mph (1.6 km/h). To reset at a slower cruising speed,
use
one of the following three methods:
• Lightly tap the brake pedal. When the ve- hicle attains the desired speed, push the
SET/– switch and release it.
• Push and hold the SET/– switch. Release the switch when the vehicle slows to the
desired speed.
• Push and release the SET/– switch. Each time you do this, the set speed decreases
by about 1 mph (1.6 km/h).
To resume the preset speed, push and
release the RES/+ switch. The vehicle re-
turns to the last set cruising speed when
the vehicle speed is over 25 mph (40 km/h).
To turn off the cruise control, use one of
the following three methods:
• Push the CANCEL switch.
• Tap the brake pedal.
• Push the ON/OFF switch off. The
indicator in the vehicle information dis-
play goes out.
5-58Starting and driving
Page 316 of 518
•In the conventional (fixed speed)
cruise control mode, a warning
chime will not sound to warn you if
you are too close to the vehicle
ahead. Pay special attention to the
distance between your vehicle and
the vehicle ahead of you or a collision
could occur.
The ICC system maintains a selected dis-
tance from the vehicle in front of you within
the speed range of 0 to 90 mph (0 to 144
km/h) up to the set speed. The set speed
can be selected by the driver between 20 to
90 mph (32 to 144 km/h).
The vehicle travels at a set speed when the
road ahead is clear.
The ICC system can be set to one of two
cruise control modes:
• Vehicle-to-vehicle distance control
mode: For maintaining a selected dis-
tance between your vehicle and the ve-
hicle in front of you up to the preset speed
• Conventional (fixed speed) cruise con-
trol mode: For cruising at a preset speed Push the CRUISE ON/OFF switchOAto
choose the cruise control mode between
the vehicle-to-vehicle distance control
mode and the conventional (fixed speed)
cruise control mode.
Once a control mode is activated, it cannot
be changed to the other cruise control
mode. To change the mode, push the
CRUISE ON/OFF switch
OAonce to turn the
system off. Then push the CRUISE ON/OFF
switch
OAagain to turn the system back on
and select the desired cruise control mode.
Always confirm the setting in the ICC sys-
tem display.
For the vehicle-to-vehicle distance control
mode, refer to “Vehicle-to-vehicle distance
control mode” in this section.
For the conventional (fixed speed) cruise
control mode, refer to “Conventional (fixed
speed) cruise control mode” in this section.
5-60Starting and driving
Page 321 of 518
3.SET/- switch:
Sets desired cruise speed or reduces
speed incrementally.
4. DISTANCE
switch:
Changes the vehicle’s following dis-
tance: • Long
• Middle
• Short
5. CRUISE ON/OFF Switch:
Master switch to activate the system.
Vehicle-to-vehicle distance
control mode display and
indicators
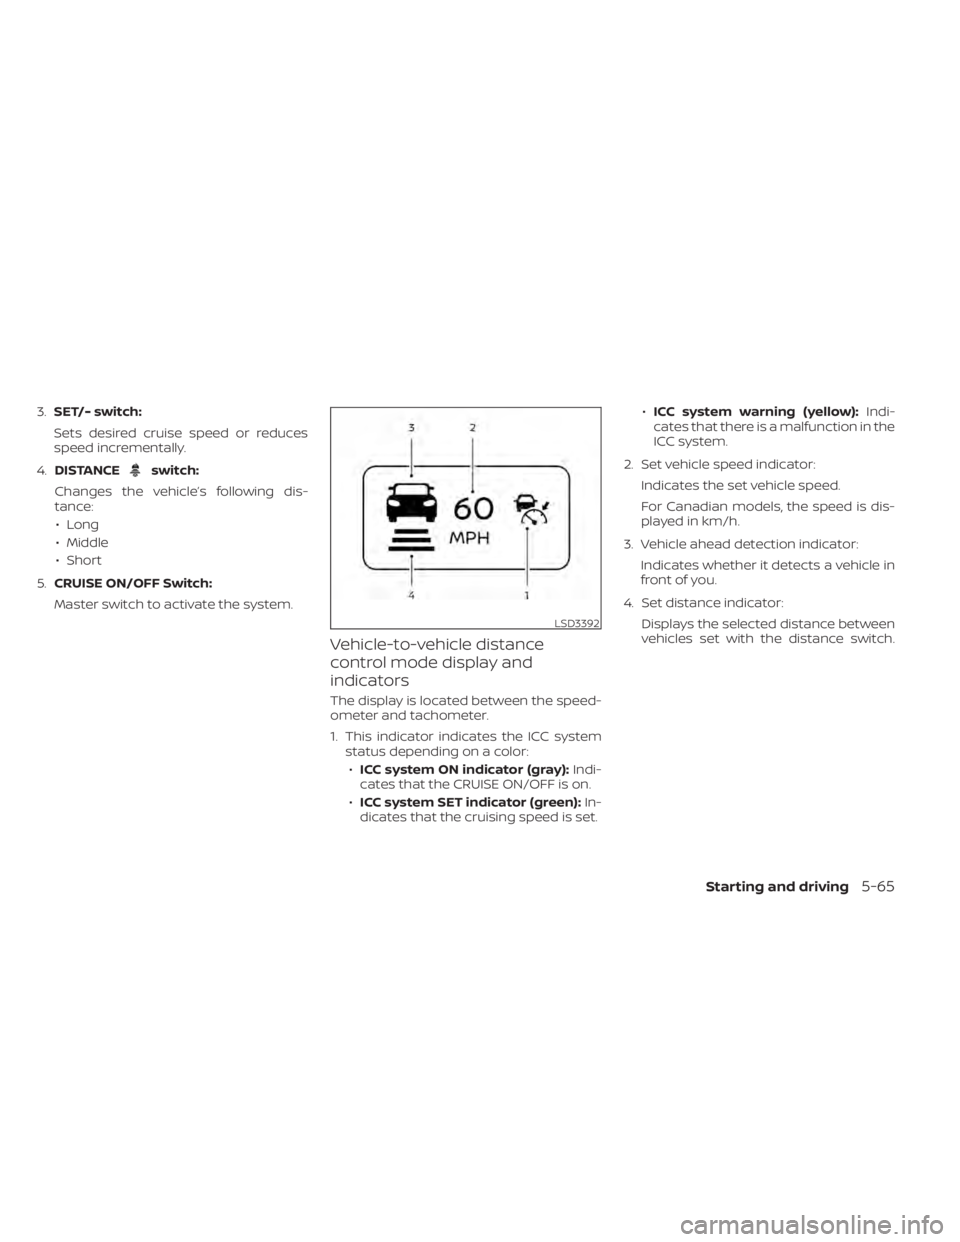
The display is located between the speed-
ometer and tachometer.
1. This indicator indicates the ICC system status depending on a color:
• ICC system ON indicator (gray): Indi-
cates that the CRUISE ON/OFF is on.
• ICC system SET indicator (green): In-
dicates that the cruising speed is set. •
ICC system warning (yellow): Indi-
cates that there is a malfunction in the
ICC system.
2. Set vehicle speed indicator: Indicates the set vehicle speed.
For Canadian models, the speed is dis-
played in km/h.
3. Vehicle ahead detection indicator: Indicates whether it detects a vehicle in
front of you.
4. Set distance indicator: Displays the selected distance between
vehicles set with the distance switch.
LSD3392
Starting and driving5-65