Page 52 of 346
7. Check to make sure the child restraintis properly secured prior to each use. If
the child restraint is loose, repeat
steps 1 through 6.
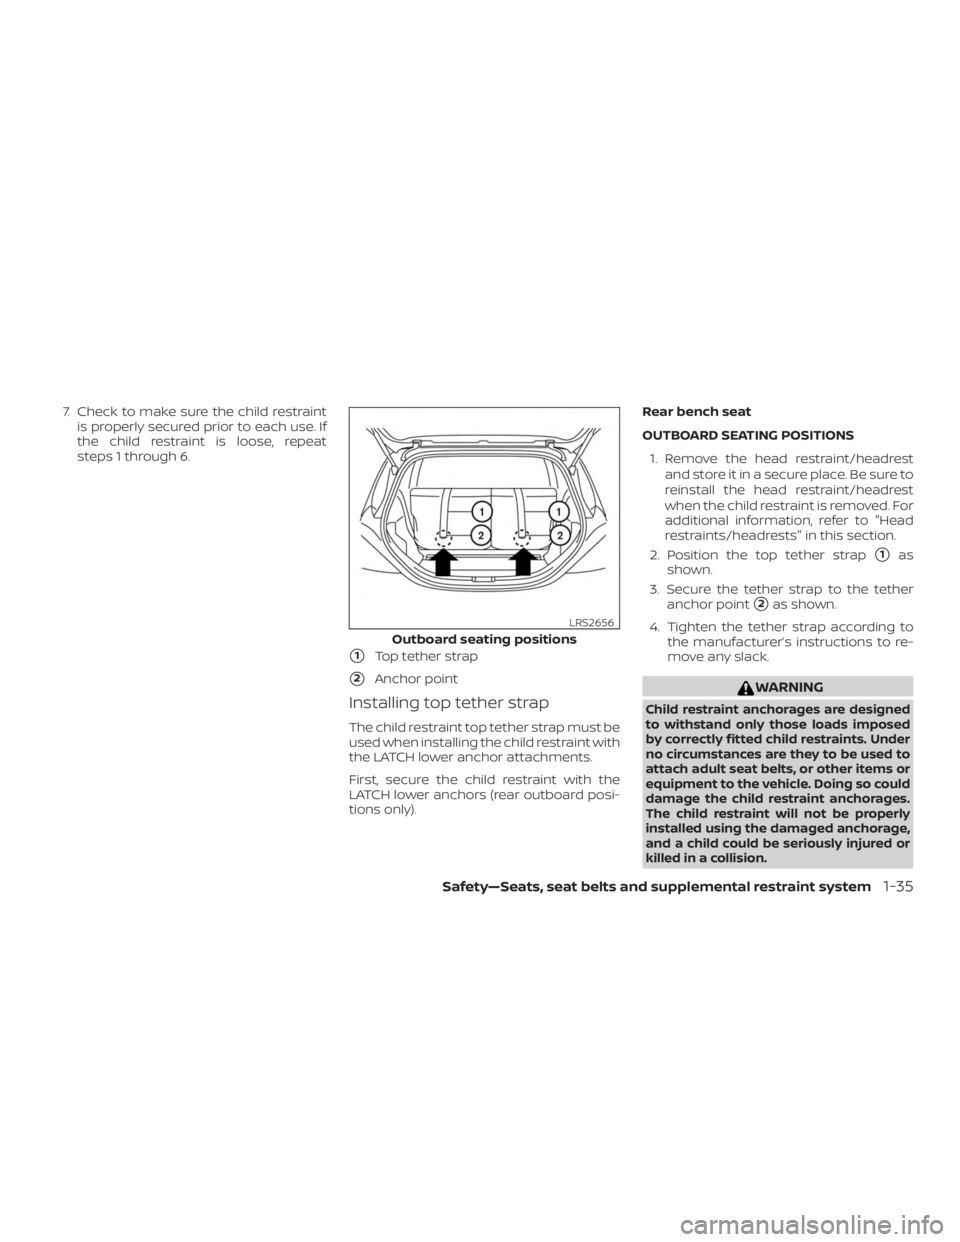
�1Top tether strap
�2Anchor point
Installing top tether strap
The child restraint top tether strap must be
used when installing the child restraint with
the LATCH lower anchor attachments.
First, secure the child restraint with the
LATCH lower anchors (rear outboard posi-
tions only). Rear bench seat
OUTBOARD SEATING POSITIONS
1. Remove the head restraint/headrest and store it in a secure place. Be sure to
reinstall the head restraint/headrest
when the child restraint is removed. For
additional information, refer to "Head
restraints/headrests" in this section.
2. Position the top tether strap
�1as
shown.
3. Secure the tether strap to the tether anchor point
�2as shown.
4. Tighten the tether strap according to the manufacturer’s instructions to re-
move any slack.
Page 91 of 346
Door open warning light
This light comes on when any of the doors
are not closed securely while the ignition
switch is placed in the ON position.
Page 121 of 346
WARNING
The rear hatch must be closed securely
before driving. An open rear hatch could
allow dangerous exhaust gases to be
drawn inside the vehicle. For additional
information, refer to “Exhaust gas (car-
bon monoxide)” in the “Starting and
driving” section of this manual.
OPENING THE REAR HATCH
To open the rear hatch, unlock it with one of
the following operations, then pull on the
handle.∙ Push the power door lock switch to the unlock position.
∙ Unlock all doors using the key
�A(if so
equipped).
∙ Press the
Page 122 of 346
OPENER OPERATION
The fuel-filler door release is located below
the instrument panel. To open the fuel-filler
door, pull the release. To lock, close the fuel-
filler door securely.
FUEL-FILLER CAP
The fuel-filler cap is a detachable type. Turn
the cap counterclockwise
�1to remove. To
tighten, turn the cap clockwise
�2until a
single click is heard.
Put the fuel-filler cap on the cap holder
while refueling.
Page 201 of 346
WARNING
∙ Do not leave children or adults whowould normally require the assis-
tance of others alone in your vehicle.
Pets should also not be lef t alone.
They could accidentally injure them-
selves or others through inadvertent
operation of the vehicle. Also, on hot,
sunny days, temperatures in a closed
vehicle could quickly become high
enough to cause severe or possibly
fatal injuries to people or animals.
∙ Properly secure all cargo to help pre- vent it from sliding or shif ting. Do not
place cargo higher than the seat-
backs. In a sudden stop or collision,
unsecured cargo could cause per-
sonal injury.
EXHAUST GAS (carbon monoxide)
Page 235 of 346

∙ Use the correct jack-up points. Neveruse any other part of the vehicle for
jack support.
∙ Never jack up the vehicle more than necessary.
∙ Never use blocks on or under the jack.
∙ Do not start or run the engine while vehicle is on the jack. It may cause the
vehicle to move. This is especially true
for vehicles with limited slip
differentials.
∙ Do not allow passengers to stay in the vehicle while it is on the jack.
∙ Never run the engine with a wheel(s) off the ground. It may cause the ve-
hicle to move. Always refer to the proper illustrations for
the correct placement and jack-up points
for your specific vehicle model and jack
type.
Carefully read the caution label attached
to the jack body and the following in-
structions.
1. Loosen each wheel nut 1 or 2 turns by turning counterclockwise with the
wheel nut wrench. Do not remove the
wheel nuts until the tire is off the
ground. 2. Place the jack directly under the
jack-up point as illustrated so the top
of the jack contacts the vehicle at the
jack-up point. Align the jack head be-
tween the 2 notches in the front or the
rear. Also fit the groove of the jack head
between the notches.
The jack should be used on firm and
level ground.
3. To lif t the vehicle, securely hold the jack lever and rod with both hands. Carefully
raise the vehicle until the tire clears the
ground. Remove the wheel nuts, and
then remove the tire.
Page 236 of 346
Installing the spare tire
1. Clean any mud or dirt from the surfacebetween the wheel and hub.
2. Carefully put the spare tire on and tighten the wheel nuts finger tight.
3. With the wheel nut wrench, tighten wheel nuts alternately and evenly in the
sequence illustrated (
�A,�B,�C,�D) until
they are tight.
4. Lower the vehicle slowly until the tire touches the ground. Then, with the
wheel nut wrench, tighten the wheel nuts securely in the sequence illus-
trated (
�A,�B,�C,�D). Lower the vehicle
completely.
Page 239 of 346
∙ The spare tire is designed for emer-gency use. For additional information
refer to “Wheels and tires” in the “Do-
it-yourself ” section of this manual.
∙ When reinstalling the spare tire bas- ket under the vehicle af ter use, be
sure that the hook engages the bas-
ket from the inside. If the spare tire
basket hook is not engaged properly,
there is an increased risk of the spare
tire separating from the vehicle in a
crash and causing injury.
Stowing the damaged tire
Securely store the damaged tire in the
cargo area.
Securely store the jack and tools in the
storage area.
Return the spare tire basket back to its
original position in the reverse order of re-
moval. For additional information, refer to
“Getting the spare tire and tools” in this sec-
tion. NOTE:
The spare tire basket cannot be used to
store the conventional tire.