2020 NISSAN KICKS Gear oul
[x] Cancel search: Gear oulPage 289 of 500
CONTINUOUSLY VARIABLE
TRANSMISSION (CVT)
WARNING
• Do not depress the accelerator pedal
while shif ting from P (Park) or N (Neu-
tral) to R (Reverse), D (Drive) or L (Low).
Always depress the brake pedal until
shif ting is completed. Failure to do so
could cause you to lose control and
have an accident.
• Cold engine idle speed is high, so use
caution when shif ting into a forward
or reverse gear before the engine has
warmed up.
• Do not downshif t abruptly on slip-
pery roads. This may cause a loss of
control.
• Never shif t to either the P (Park) or R
(Reverse) position while the vehicle is
moving forward and P (Park) or D
(Drive) position while the vehicle is
reversing. This could cause an acci-
dent or damage the transmission.
CAUTION
• Except in an emergency, do not shif t
to the N (Neutral) position while driv-
ing. Coasting with the transmission
in the N (Neutral) position may cause
serious damage to the transmission.
• To avoid possible damage to your ve-
hicle, when stopping the vehicle on
an uphill grade, do not hold the ve-
hicle by depressing the accelerator
pedal. The foot brake should be used
for this purpose.
The CVT in your vehicle is electronically
controlled to produce maximum power
and smooth operation.
The recommended operating procedures
for this transmission are shown on the fol-
lowing pages. Follow these procedures for
maximum vehicle performance and driv-
ing enjoyment.
NOTE:
Engine power may be automatically re-
duced to protect the CVT if the engine
speed increases quickly when driving on
slippery roads or while being tested on
some dynamometers.
Starting the vehicle
1. Af ter starting the engine, fully depress the foot brake pedal before moving the
shif t lever out of the P (Park) position.
This Continuously Variable Transmis-
sion is designed so that the foot brake
pedal must be depressed before shif t-
ing from P (Park) to any driving posi-
tion while the ignition switch is in the
ON position.
The shif t lever cannot be moved out of
the P (Park) position and into any of
the other positions if the ignition
switch is placed in the LOCK or OFF
position.
2. Keep the foot brake pedal depressed and move the shif t lever to a driving
position.
3. Release the parking brake and foot brake pedal, and then gradually start the
vehicle in motion.
DRIVING THE VEHICLE
Starting and driving5-17
Page 290 of 500
WARNING
• Do not depress the accelerator pedal
while shif ting from P (Park) or N (Neu-
tral) to R (Reverse), D (Drive) or L (Low)
position. Always depress the brake
pedal until shif ting is completed.
Failure to do so could cause you to
lose control and have an accident.
• Cold engine idle speed is high, so use
caution when shif ting into a forward
or reverse gear before the engine has
warmed up.
• Do not downshif t abruptly on slip-
pery roads. This may cause a loss of
control.
• Never shif t to either the P (Park) or R
(Reverse) position while the vehicle is
moving forward and P (Park) or D
(Drive) position while the vehicle is
reversing. This could cause an acci-
dent or damage the transmission.CAUTION
• To avoid possible damage to your ve-
hicle, when stopping the vehicle on
an uphill grade, do not hold the ve-
hicle by depressing the accelerator
pedal. The foot brake should be used
for this purpose.
• Except in an emergency, do not shif t
to the N (Neutral) position while driv-
ing. Coasting with the transmission
in the N (Neutral) position may cause
serious damage to the transmission.
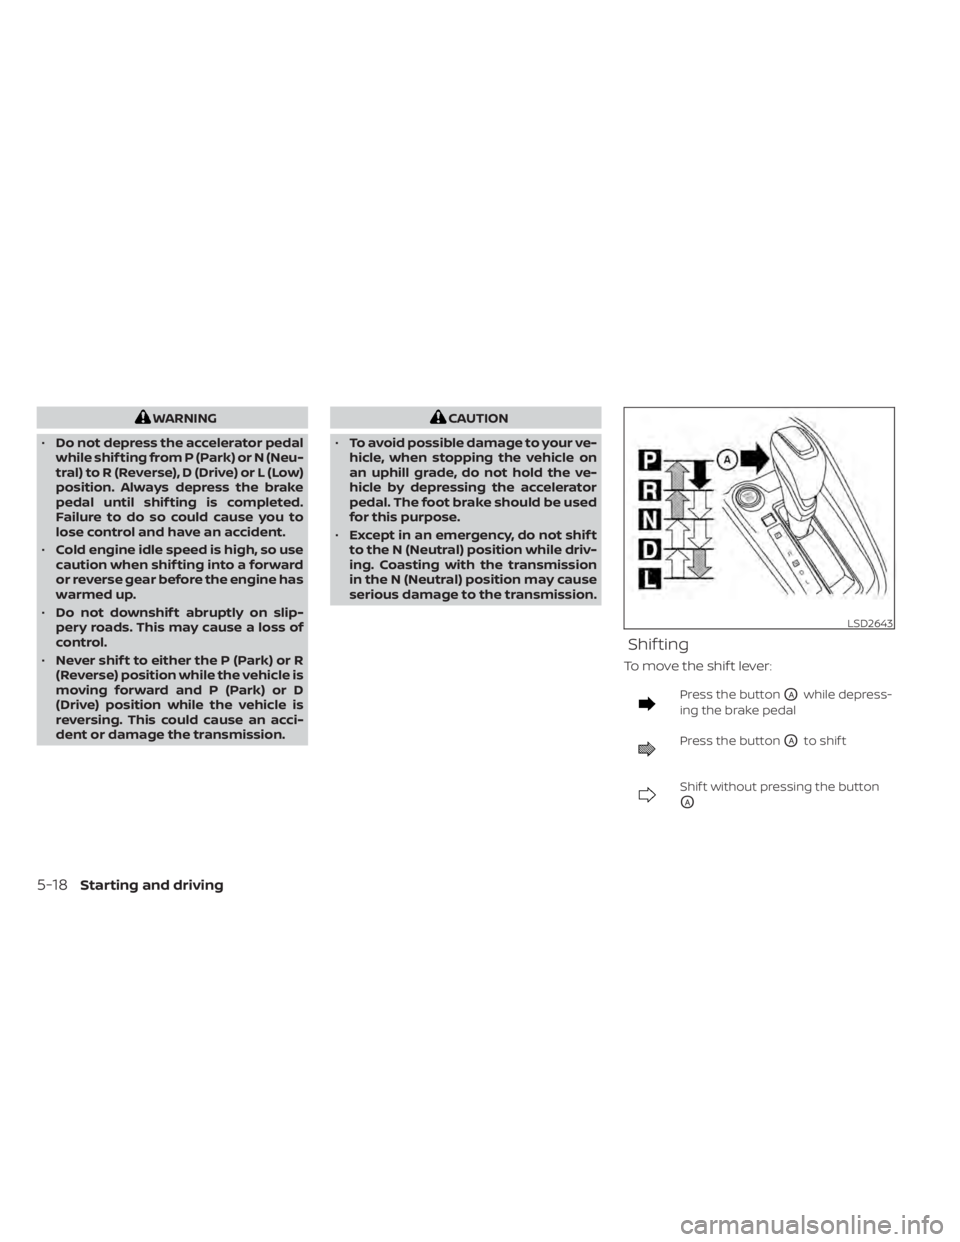
Shif ting
To move the shif t lever:
Press the buttonOAwhile depress-
ing the brake pedal
Press the buttonOAto shif t
Shif t without pressing the button
OA
LSD2643
5-18Starting and driving
Page 291 of 500
Af ter starting the engine, fully depress the
brake pedal and move the shif t lever from P
(Park) to any of the desired shif t positions.
WARNING
Apply the parking brake if the shif t le-
ver is in any position while the engine is
not running. Failure to do so could
cause the vehicle to move unexpect-
edly or roll away and result in serious
personal injury or property damage.
P (Park)
CAUTION
To prevent transmission damage, use
the P (Park) position only when the ve-
hicle is completely stopped.
Use the P (Park) shif t lever position when
the vehicle is parked or when starting the
engine. Make sure the vehicle is completely
stopped.
The brake pedal should be depressed to
move the shif t lever from N (Neutral) or
any drive position to P (Park).
Apply the parking brake. When parking on a
hill, apply the parking brake first, then move
the shif t lever into the P (Park) position.
R (Reverse)
CAUTION
To prevent transmission damage, use
the R (Reverse) position only when the
vehicle is completely stopped.
Use the R (Reverse) position to back up.
Make sure the vehicle is completely
stopped before selecting the R (Reverse)
position. The brake pedal must be de-
pressed in to move the shif t lever from P
(Park) or the shif t lever button pressed in
from N (Neutral) or any drive position to R
(Reverse).
N (Neutral)
Neither forward nor reverse gear is en-
gaged. The engine can be started in this
position. You may shif t to N (Neutral) and
restart a stalled engine while the vehicle is
moving.
D (Drive)
Use this position for all normal forward
driving.
L(Low)
Use this position for engine braking on
steep downhill gradients/climbing steep
slopes and whenever approaching sharp
bends. Do not use the L (Low) position in
any other circumstances.
Starting and driving5-19
Page 294 of 500
OFF position:
For normal driving and fuel economy, use
the OFF position.
ON position:
For driving up or down long slopes where
engine braking is necessary, or for powerful
acceleration, use the ON position. The
transmission will automatically select a dif-
ferent gear ratio, allowing the engine to
provide high output.
Remember not to drive at high speeds for
extended periods of time with the over-
drive OFF mode in the ON position. This
reduces fuel economy.
Accelerator downshif t
— in D (Drive) position —
For passing or hill climbing, depress the
accelerator pedal to the floor. This shif ts
the transmission down into a lower gear,
depending on the vehicle speed.
High fluid temperature protection
mode
This transmission has a high fluid tem-
perature protection mode. If the fluid tem-
perature becomes too high (for example,
when climbing steep grades in high tem-peratures with heavy loads, such as when
towing a trailer), engine power and, under
some conditions, vehicle speed will be de-
creased automatically to reduce the
chance of transmission damage. Vehicle
speed can be controlled with the accelera-
tor pedal, but the engine and vehicle speed
may be limited.
Fail-safe
If the vehicle is driven under extreme
conditions, such as excessive wheel
spinning and subsequent hard braking,
the fail-safe system may be activated.
The Malfunction Indicator Light (MIL)
may come on to indicate the fail-safe
mode is activated. For additional infor-
mation, refer to “Malfunction Indicator
Light (MIL)” in the “Instruments and con-
trols” section of this manual. This will oc-
cur even if all electrical circuits are func-
tioning properly. In this case, place the
ignition switch in the OFF position and
wait for 10 seconds. Then push the
switch back to the ON position. The ve-
hicle should return to its normal operat-
ing condition. If it does not return to its
normal operating condition, have the
transmission checked and repaired, if
necessary. It is recommended that you
visit a NISSAN dealer for this service.
WARNING
When the high fluid temperature pro-
tection mode or fail-safe operation oc-
curs, vehicle speed may be gradually
reduced. The reduced speed may be
lower than other traffic, which could in-
crease the chance of a collision. Be es-
pecially careful when driving. If neces-
sary, pull to the side of the road at a safe
place and allow the transmission to re-
turn to normal operation, or have it re-
paired if necessary.
5-22Starting and driving
Page 366 of 500
INTELLIGENT DRIVER ALERTNESS
(I-DA) SYSTEM LIMITATIONS
WARNING
Listed below are the system limitations
for the I–DA system. Failure to operate
the vehicle in accordance with these
system limitations could result in seri-
ous injury or death.
• The I-DA system may not operate
properly and may not provide an
alert in the following conditions:
– Poor road conditions such as an
uneven road surface or pot holes.
– Strong side wind.
– If you have adopted a sporty driv-
ing style with higher cornering
speeds or higher rates of
acceleration.
– Frequent lane changes or
changes to vehicle speed.
• The I–DA system will not provide an
alert in the following conditions:
– Vehicle speeds lower than 37 mph
(60 km/h).
– Short lapses of attention.
– Instantaneous distractions such
as dropping an object.
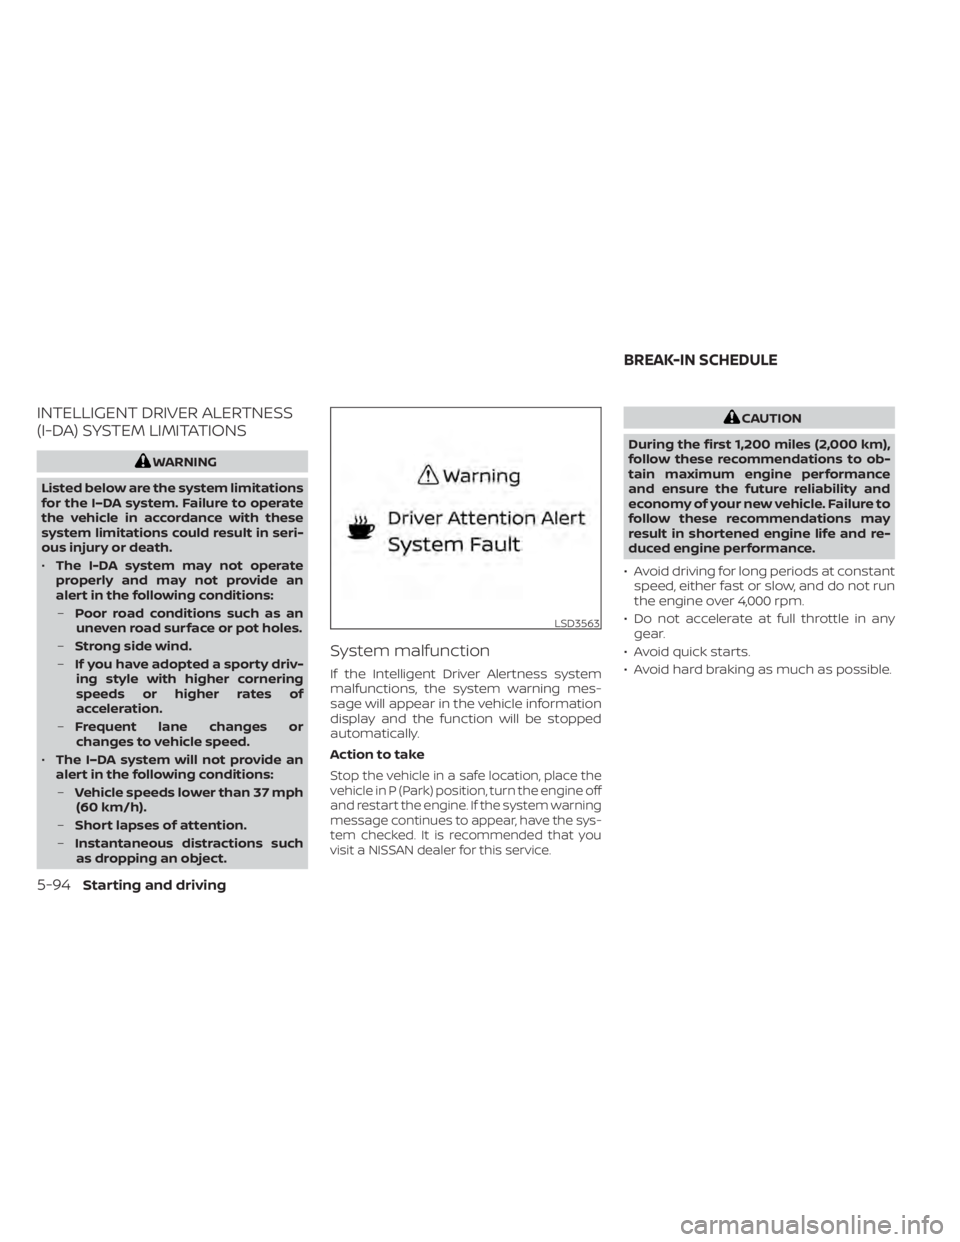
System malfunction
If the Intelligent Driver Alertness system
malfunctions, the system warning mes-
sage will appear in the vehicle information
display and the function will be stopped
automatically.
Action to take
Stop the vehicle in a safe location, place the
vehicle in P (Park) position, turn the engine off
and restart the engine. If the system warning
message continues to appear, have the sys-
tem checked. It is recommended that you
visit a NISSAN dealer for this service.
CAUTION
During the first 1,200 miles (2,000 km),
follow these recommendations to ob-
tain maximum engine performance
and ensure the future reliability and
economy of your new vehicle. Failure to
follow these recommendations may
result in shortened engine life and re-
duced engine performance.
• Avoid driving for long periods at constant speed, either fast or slow, and do not run
the engine over 4,000 rpm.
• Do not accelerate at full throttle in any gear.
• Avoid quick starts.
• Avoid hard braking as much as possible.
LSD3563
BREAK-IN SCHEDULE
5-94Starting and driving
Page 370 of 500
Avoid repeating such steering wheel op-
erations that could cause the power steer-
ing system to overheat.
You may hear a sound when the steering
wheel is operated quickly. However, this is
not a malfunction.
If the power steering warning light illumi-
nates while the engine is running, it may
indicate the power steering system is not
functioning properly and may need servic-
ing. Have the power steering system
checked. It is recommended that you visit a
NISSAN dealer for this service.
When the power steering warning light illu-
minates with the engine running, there will
be no power assist for the steering but you
will still have control of the vehicle. At this
time, greater steering effort is required to
operate the steering wheel, especially in
sharp turns and at low speeds.
For additional information, refer to “Power
steering warning light” in the “Instruments
and controls” section of this manual.The brake system has two separate hy-
draulic circuits. If one circuit malfunctions,
you will still have braking at two wheels.
BRAKE PRECAUTIONS
Vacuum assisted brakes
The brake booster aids braking by using
engine vacuum. If the engine stops, you
can stop the vehicle by depressing the
brake pedal. However, greater foot pres-
sure on the brake pedal will be required to
stop the vehicle and stopping distance will
be longer.
Using the brakes
Avoid resting your foot on the brake pedal
while driving. This will overheat the brakes,
wear out the brake pads faster, and reduce
gas mileage.
To help reduce brake wear and to prevent
the brakes from overheating, reduce speed
and downshif t to a lower gear before going
down a slope or long grade. Overheated
brakes may reduce braking performance
and could result in loss of vehicle control.
WARNING
• While driving on a slippery surface,
be careful when braking, accelerat-
ing or downshif ting. Abrupt braking
or accelerating could cause the
wheels to skid and result in an
accident.
• If the engine is not running or is
turned off while driving, the power
assist for the brakes will not work.
Braking will be harder.
Wet brakes
When the vehicle is washed or driven
through water, the brakes may get wet. As
a result, your braking distance will be lon-
ger and the vehicle may pull to one side
during braking.
To dry the brakes, drive the vehicle at a safe
speed while lightly pressing the brake
pedal to heat up the brakes. Do this until
the brakes return to normal. Avoid driving
the vehicle at high speeds until the brakes
function correctly.
BRAKE SYSTEM
5-98Starting and driving
Page 442 of 500
O6Term of “tubeless” or “tube type”
Indicates whether the tire requires
an inner tube (“tube type”) or not
(“tubeless”).
O7The word “radial”
The word “radial” is shown if the tire
has radial structure.
O8Manufacturer or brand name
Manufacturer or brand name is
shown.
Other Tire-related Terminology
In addition to the many terms that
are defined throughout this section,
Intended Outboard Sidewall is (1) the
sidewall that contains a whitewall,
bears white lettering or bears
manufacturer, brand, and/or model
name molding that is higher or
deeper than the same molding on
the other sidewall of the tire, or (2)
the outward facing sidewall of an
asymmetrical tire that has a particu- lar side that must always face out-
ward when mounted on a vehicle.
TYPES OF TIRES
WARNING
• When changing or replacing tires, be
sure all four tires are of the same type
(i.e., Summer, All Season or Snow)
and construction. A NISSAN dealer
may be able to help you with infor-
mation about tire type, size, speed
rating and availability.
• Replacement tires may have a lower
speed rating than the factory
equipped tires, and may not match
the potential maximum vehicle
speed. Never exceed the maximum
speed rating of the tire.
• Replacing tires with those not origi-
nally specified by NISSAN could af-
fect the proper operation of the low
tire pressure warning system. •
Always use tires of the same type,
size, brand, construction and tread
pattern on all four wheels. Failure to
do so may result in a circumference
difference between tires on the front
and rear axles which can cause the
Vehicle Dynamic Control (VDC) sys-
tem to malfunction resulting in per-
sonal injury or death, excessive tire
wear and may damage the transmis-
sion and differential gears.
• For additional information regarding
tires, refer to “Important Tire Safety
Information” (US) or “Tire Safety In-
formation” (Canada) in the Warranty
Information Booklet.
All season tires
NISSAN specifies All Season tires on some
models to provide good performance all
year, including snowy and icy road condi-
tions. All Season tires are identified by ALL
SEASON and/or M&S on the tire sidewall.
Snow tires have better snow traction than
All Season tires and may be more appropri-
ate in some areas.
8-34Do-it-yourself
Page 454 of 500

additional information on the proper mix-
ture for your area, refer to “Engine cooling
system” in the “Do-it-yourself ” section of
this manual.)
NOTE: Mixing any other type of coolant
or the use of non-distilled water may re-
duce the recommended service interval
of the coolant.
Engine oil and oil filter:Replace engine oil
and oil filter at the specified intervals. For
recommended oil grade and viscosity refer
to “Recommended fluids/lubricants and
capacities” in the “Technical and consumer
information” section of this manual.
Fuel lines*: Check the fuel hoses, piping
and connections for leaks, looseness, or
deterioration. Tighten connections or re-
place parts as necessary.
Spark plugs: Replace at specified intervals.
Install new plugs of the type as originally
equipped.
CHASSIS AND BODY
MAINTENANCE:
Brake lines and cables: Visually inspect for
proper installation. Check for chafing,
cracks, deterioration, and signs of leaking.
Replace any deteriorated or damaged
parts immediately. Brake pads, rotors, drums and linings:
Check for wear, deterioration and fluid
leaks. Replace any deteriorated or dam-
aged parts immediately.
Exhaust system:
Visually inspect the ex-
haust pipes, muffler and hangers for leaks,
cracks, deterioration, and damage. Tighten
connections or replace parts as necessary.
Steering gear and linkage, axle and sus-
pension parts, drive shaf t boots: Check
for damage, looseness, and leakage of oil
or grease. Under severe driving conditions,
inspect more frequently.
Tire rotation: Tires should be rotated every
7,500 miles (12,000 km) according to the in-
structions under “General maintenance” in
this section. When rotating tires, check for
damage and uneven wear. Replace if nec-
essary.
Transmission fluid/oil: Visually inspect for
signs of leakage at specified intervals.
If using a car-top carrier, or driving on
rough or muddy roads, replace the CVT
fluid every 60,000 miles (96,000 km) or re-
quest the dealer to inspect the fluid dete-
rioration data using a CONSULT. If the dete-
rioration data is more than 210000, replace
the CVT fluid. To help ensure smooth, safe and economi-
cal driving, NISSAN provides two mainte-
nance schedules that may be used, de-
pending upon the conditions in which you
usually drive. These schedules contain
both distance and time intervals, up to
120,000 miles (192,000 km)/96 months. For
most people, the odometer reading will in-
dicate when service is needed. However, if
you drive very little, your vehicle should be
serviced at the regular time intervals
shown in the schedule.
Af ter 120,000 miles (192,000 km)/96
months, continue maintenance at the
same mileage/time intervals.
MAINTENANCE SCHEDULES
9-6Maintenance and schedules