2020 NISSAN KICKS key
[x] Cancel search: keyPage 268 of 500
Received message screen
Touching the “Read” key on the incoming
message notification screen or selecting a
message from the message list will show
the details of the received message on the
display.
Available actions:
•Prev.Touch this key to read the previous mes-
sage. •Next
Touch this key to read the next message.
• Play/Stop Touch the “Play ” key to have the hands-
free phone system read out the received
message. Touch the “Stop” key to stop
reading.
• Call If the sender of the message is registered
in the phonebook, touch the “Call” key to
make a call to the sender.
• Reply A reply message can be selected from
the predefined list. Sending a text message (if so equipped)
This function may not be supported de-
pending on the cellular phone.
1. Press the
button on the control
panel.
2. Touch the “Text Message” key on the screen.
3. Touch the “Create Message” key on the screen.
The following items are available:
Available item Action
To Enter Number by Keypad Enter the phone number of the recipient using the keypad. Touch the “OK” key to confirm.
Quick Dial Select a recipient from the quick dial list.
Phonebook Select a recipient from the phonebook.
Call History Select a recipient/phone number from call history.
Select Text Touch to display a list of predefined text messages.
Send Touch to send the message.
4-80Monitor, climate, audio, phone and voice recognition systems
Page 269 of 500

BLUETOOTH® CONNECTIONS
SCREEN
1. “” (back) key
2. Bluetooth tab
3. Connections screen
4. “Add New” key
5. “
” (settings) key
6. “” (info) key
7. “” (Bluetooth® Audio connection)
key
8. “
” (Bluetooth® Hands-Free Phone
System connection) key
Access the Connections screen to change
settings and view Bluetooth® information.
To access the Connections screen press
the
MENU button on the control panel.
Touch the “Connections” key on the screen
then select the Bluetooth tab.
The paired phone will be added to the list
on the Bluetooth® connections screen.
Touching the name of another device on
the list will switch the connected device.
“”(back) key
Touch the “” key to go back to the
previous screen.
Connecting Bluetooth®
For additional information on connecting a
cellular phone or device to the Bluetooth®
Hands-Free Phone System, refer to “Con-
necting procedure” in this section.
NOTE:
Some cellular phones or other devices
may cause interference or a buzzing
noise to come from the audio system
speakers. Storing the device in a differ-
ent location may reduce or eliminate the
noise.
Bluetooth tab
This tab will display up to six Bluetooth®
devices. If six devices are already con-
nected, one of the devices must be deleted
before another device can be connected.
“Add New” key
Touch the “Add New” key on the screen to
connect a new Bluetooth® device. For ad-
ditional information, refer to “Connecting
procedure” in this section.
“” (Bluetooth® settings) key
Touch the “” key on the screen to
display a list of options.
• Bluetooth
Touch this key to turn the Bluetooth®
connection on or off
• Favorite (Connection first)
Touch this key to change which device
will be connected first when multiple de-
vices are connected to the vehicle.
Turn the “
” key on or off to make the
device a favorite connection.
Turn the “
” key on or off to make the
device a favorite connection.
LHA4716
Monitor, climate, audio, phone and voice recognition systems4-81
Page 270 of 500
•Pin
Touch this key to customize the PIN code.
Input a four digit number then touch the
“OK” key. The new PIN will be set.
“” (info) key
Touch the “” key on the screen to
display the information of the cellular
phone or to delete the device.
Touch the “Delete” key to remove a paired
device then select “Yes” when a message
appears.
“” (Bluetooth® Hands-Free
Phone System connection) key
A list of connected devices will be displayed
on the screen. Touch the “” key next to
the name to connect a device to the
Hands-Free Phone System. If the phone is
listed as a favorite, a star will appear on the
icon. Touch the key again to disconnect the
device. The device will not be removed
from the list. For additional information on
removing a device, refer to “
” (info) key
in this section.
“” (Bluetooth® Audio
connection) key
A list of connected devices will be displayed
on the screen. Touch the “” key next to
the name to connect a device to
Bluetooth® Audio. If the device is listed as a
favorite, a star will appear on the icon.
Touch the key again to disconnect the de-
vice. The device will not be removed from
the list. For additional information on re-
moving a device, refer to “
” (info) key in
this section.
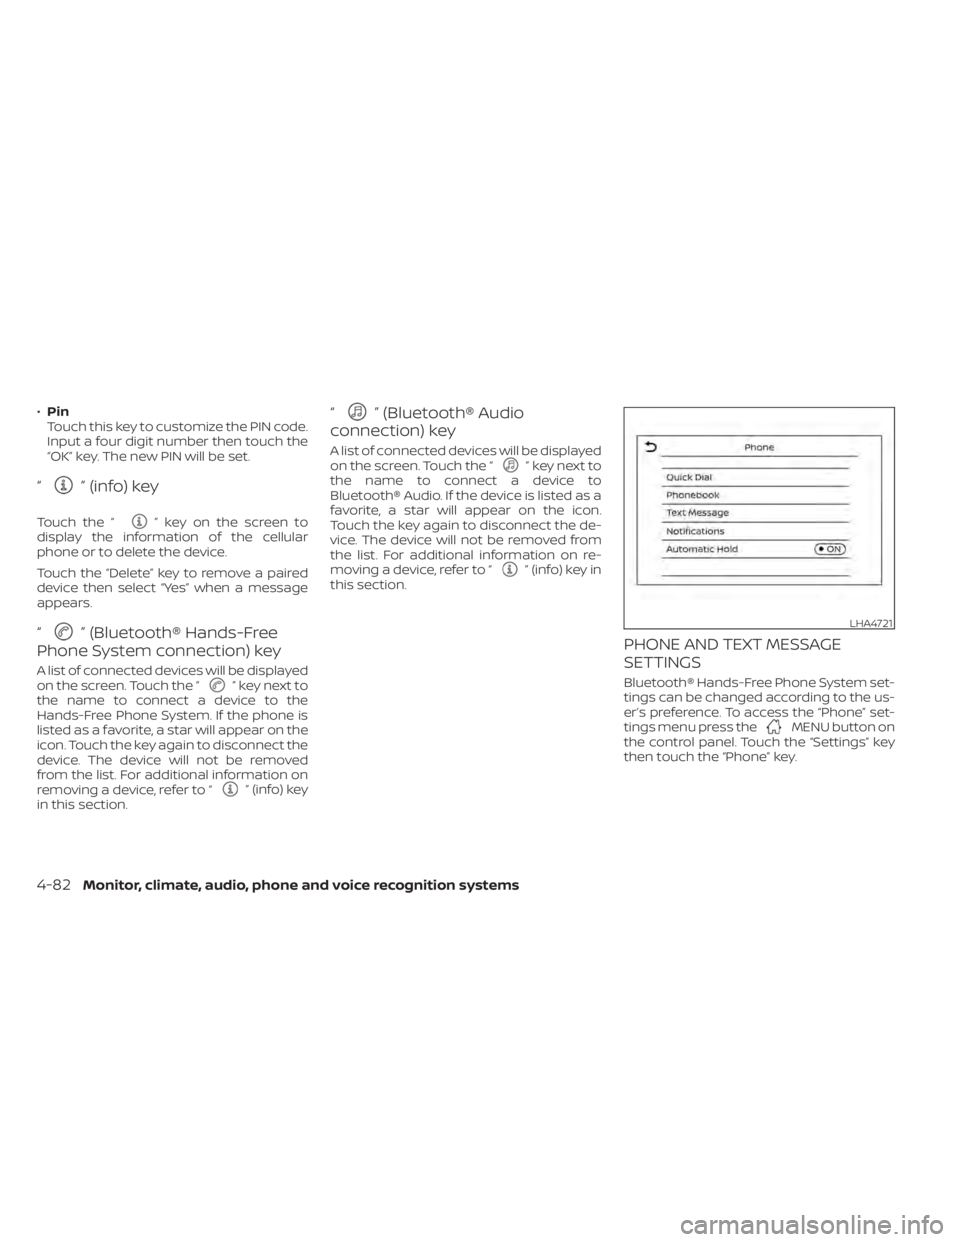
PHONE AND TEXT MESSAGE
SETTINGS
Bluetooth® Hands-Free Phone System set-
tings can be changed according to the us-
er’s preference. To access the “Phone” set-
tings menu press the
MENU button on
the control panel. Touch the “Settings” key
then touch the “Phone” key.
LHA4721
4-82Monitor, climate, audio, phone and voice recognition systems
Page 272 of 500
Volume & beeps
There are several methods to customize
the volume settings.
Volume & Beeps
The Volume & Beeps screen can be found
by pressing the
MENU button on the
control panel, touching the “Settings” key
on the screen and selecting “Volume &
Beeps”. To adjust the volume of the follow-
ing options, touch the “-” and “+” keys on the
screen.
The available settings are:
• Ringtone Adjust the volume level of the ringtone of
incoming calls.
• Outgoing Call Adjust the volume level of the outgoing
calls.
• Voice Prompt Vol. Adjust the volume level of the system
voice.
• Text-to-speech Vol. Adjust the volume of the replay voice for
text messaging.
• Button Beeps Turns on/off the button beep sounds and
alarm for prohibited operations. Volume Settings
The Volume settings screen can be found
by pressing the
button on the control
panel then touching the “Volume” key on
the screen. To adjust the volume of the
following options, touch the “-” and “+” keys
on the screen.
The available settings are:
• Ringtone Adjust the volume level of the ringtone of
incoming calls.
• Outgoing Call Adjust the volume level of the outgoing
calls. “Made for iPod”, “Made for iPhone” and
“Made for iPad” mean that an electronic
accessory has been designed to connect
specifically to iPod, iPhone or iPad, respec-
tively, and has been certified by the devel-
oper to meet Apple performance stan-
dards. Apple is not responsible for the
operation of this device or its compliance
with safety and regulatory standards.
Please note that the use of this accessory
with iPod, iPhone or iPad may affect wire-
less performance.
iPad, iPhone, iPod classic, iPod Nano, iPod
shuffle and iPod touch are trademarks of
Apple Inc., registered in the U.S. and other
countries. Lightning is a trademark of
Apple Inc.
iPod®/IPHONE®
4-84Monitor, climate, audio, phone and voice recognition systems
Page 273 of 500
5 Starting and driving
Precautions when starting and driving..........5-4
Exhaust gas (carbon monoxide) ..............5-4
Three-way catalyst ...........................5-4
Tire Pressure Monitoring System
(TPMS) .......................................5-5
On-pavement and off-road driving
precautions ..................................5-9
Avoiding collision and rollover ................5-9
Off-roadrecovery ............................5-9
Rapid air pressure loss ......................5-10
Drinking alcohol/drugs and driving ..........5-10
Push-button ignition switch .....................5-11
Operating range ............................ 5-12
Push-button ignition switch positions .......5-12
Emergency engine shut off ..................5-13
NISSAN Intelligent Key® battery
discharge ................................... 5-13
NISSAN Anti-Thef t System (NATS)
(if so equipped) .............................. 5-14
NISSAN Vehicle Immobilizer System .........5-14
Before starting the engine .....................5-15
Starting the engine ............................. 5-15
Remote Engine Start (if so equipped) ........5-16
Driving the vehicle .............................. 5-17
Continuously Variable Transmission
(CVT) ........................................ 5-17Parking brake
.................................. 5-23
Lane Departure Warning (LDW) .................5-23
LDW system operation ......................5-24
How to enable/disable the LDW system .....5-26
LDW system limitations .....................5-28
System temporarily unavailable .............5-29
System malfunction ......................... 5-29
System maintenance .......................5-29
Blind Spot Warning (BSW) (if so equipped) .......5-30
BSW system operation ......................5-33
How to enable/disable the BSW system .....5-34
BSW system limitations .....................5-35
BSW driving situations .......................5-36
System temporarily unavailable .............5-40
System maintenance ....................... 5-41
Rear Cross Traffic Alert (RCTA) (if so equipped) . . 5-42 RCTA system operation .....................5-43
How to enable/disable the RCTA
system ...................................... 5-46
R
CTA system limitations .....................5-48
System temporarily unavailable .............5-50
System maintenance ....................... 5-51
Cruise control .................................. 5-52
Precautions on cruise control ...............5-52
Cruise control operations ...................5-53
Page 284 of 500
Some indicators and warnings for opera-
tion are displayed on the vehicle informa-
tion display (if so equipped). For additional
information, refer to “Vehicle information
display” in the “Instruments and controls”
section of this manual.
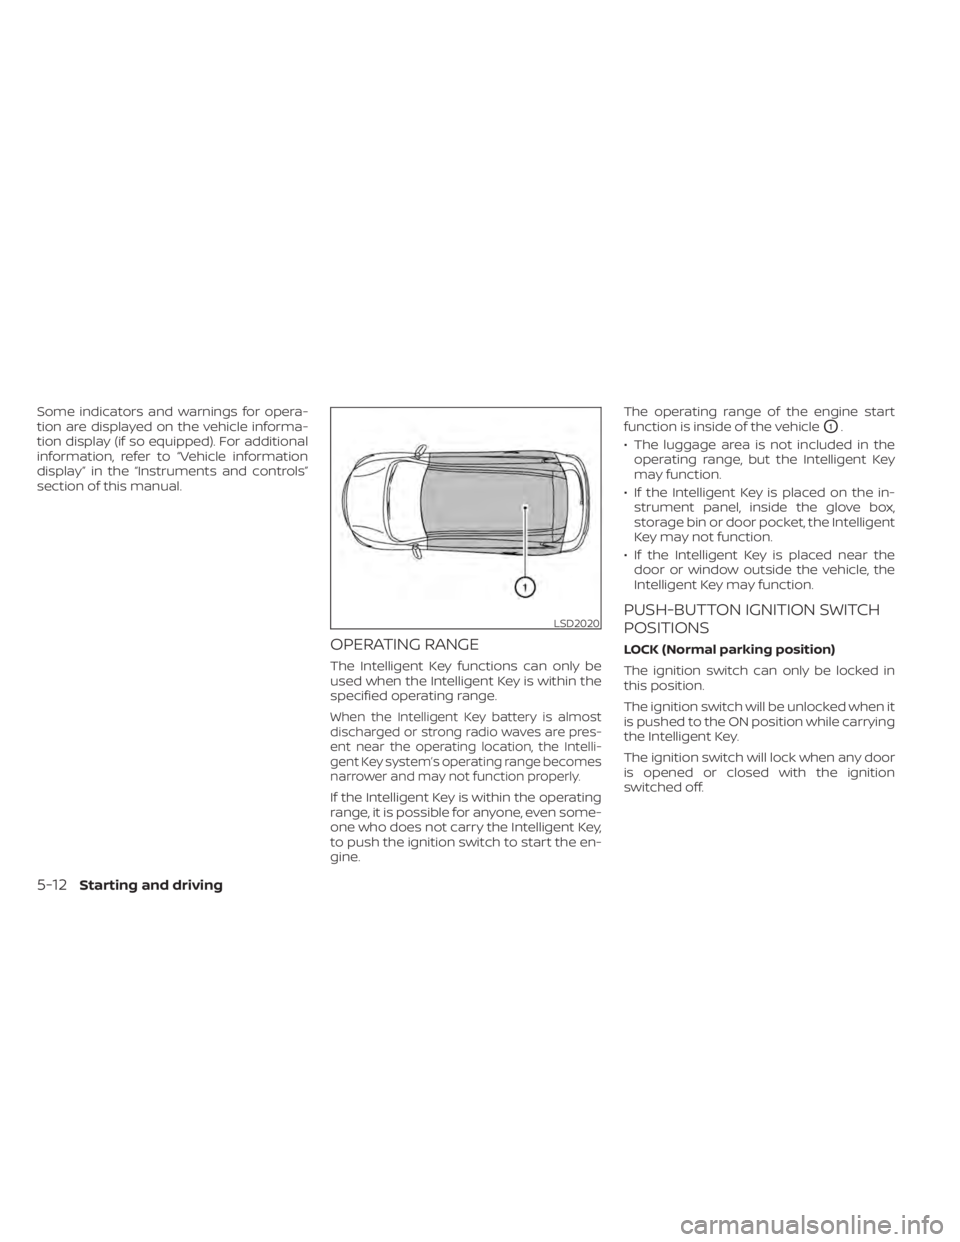
OPERATING RANGE
The Intelligent Key functions can only be
used when the Intelligent Key is within the
specified operating range.
When the Intelligent Key battery is almost
discharged or strong radio waves are pres-
ent near the operating location, the Intelli-
gent Key system’s operating range becomes
narrower and may not function properly.
If the Intelligent Key is within the operating
range, it is possible for anyone, even some-
one who does not carry the Intelligent Key,
to push the ignition switch to start the en-
gine.The operating range of the engine start
function is inside of the vehicle
O1.
• The luggage area is not included in the operating range, but the Intelligent Key
may function.
• If the Intelligent Key is placed on the in- strument panel, inside the glove box,
storage bin or door pocket, the Intelligent
Key may not function.
• If the Intelligent Key is placed near the door or window outside the vehicle, the
Intelligent Key may function.
PUSH-BUTTON IGNITION SWITCH
POSITIONS
LOCK (Normal parking position)
The ignition switch can only be locked in
this position.
The ignition switch will be unlocked when it
is pushed to the ON position while carrying
the Intelligent Key.
The ignition switch will lock when any door
is opened or closed with the ignition
switched off.
LSD2020
5-12Starting and driving
Page 285 of 500
ON (Normal operating position)
This position turns on the ignition system
and electrical accessories.
ON has a battery saver feature that will
place the ignition switch in the OFF posi-
tion, if the vehicle is not running, af ter some
time under the following conditions:
• The shif t lever is in P (Park).
• The hazard lamps are off.
• The turn signals are off.
The battery saver feature will be canceled if
any of the following occur:
• The shif t lever is moved out of the P (Park)position.
• The ignition switch changes position.
• The hazard lamps are turned on.
• The turn signals are turned on.
CAUTION
Do not leave the vehicle with the igni-
tion switch in the ON or AUTO ACC posi-
tion when the engine is not running for
an extended period. This can discharge
the battery. OFF
The ignition switch is in the OFF position
when the engine is turned off using the
ignition switch.
AUTO ACC:
With the vehicle in the P (Park) position, the
Intelligent Key with you, and the ignition
switch placed from the ON to the OFF po-
sition, the radio can still be used for a period
of time, or until the driver’s door is opened.
Af ter a period of time, functions such as
radio, navigation, and Bluetooth® Hands-
Free Phone System may be restarted by
pressing the “POWER button/VOLUME con-
trol knob” or the key fob unlock button. For
additional information, refer to “Monitor, cli-
mate, audio, phone and voice recognition
systems” in this manual.EMERGENCY ENGINE SHUT OFF
To shut off the engine in an emergency
situation while driving, perform the follow-
ing procedure:
• Rapidly push the ignition switch three
consecutive times in less than 1.5 sec-
onds, or
• Push and hold the ignition switch for more than 2 seconds.
NISSAN INTELLIGENT KEY®
BATTERY DISCHARGE
If the battery of the NISSAN Intelligent Key®
is discharged or environmental conditions
interfere with the Intelligent Key operation,
start the engine according to the following
procedure:
1. Place the shif t lever in the P (Park) position.
2. Firmly apply the foot brake.
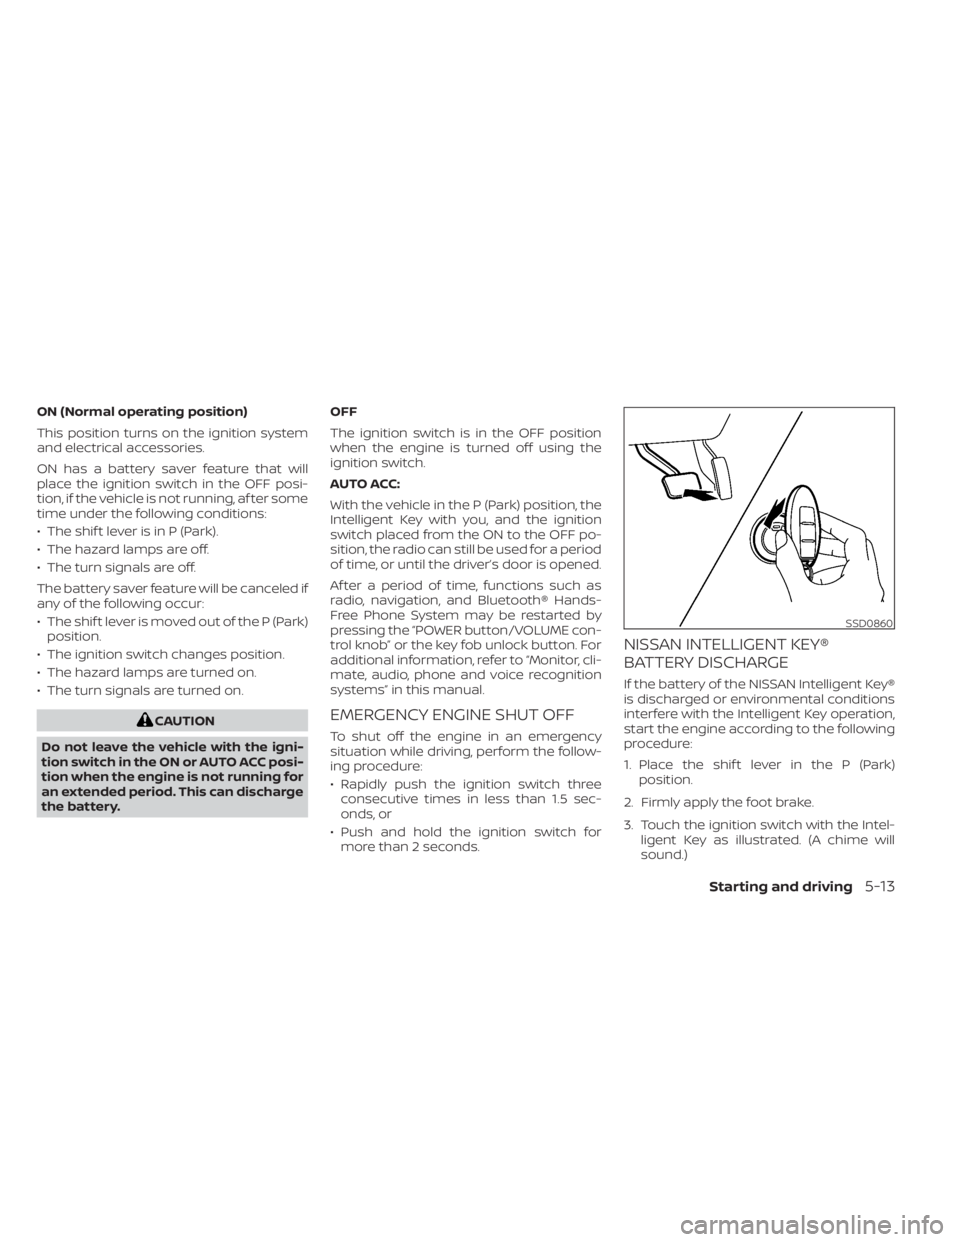
3. Touch the ignition switch with the Intel- ligent Key as illustrated. (A chime will
sound.)
SSD0860
Starting and driving5-13
Page 286 of 500
(Af ter step 3 is performed, when the ig-
nition switch is pushed without de-
pressing the brake pedal, the ignition
switch position will change to ON.)
4. Push the ignition switch while depress- ing the brake pedal within 10 seconds
af ter the chime sounds. The engine will
start.
NOTE:
• When the ignition switch is pushed tothe ON position or the engine is started
by the above procedure, the Intelligent
Key battery discharge indicator ap-
pears in the vehicle information dis-
play (if so equipped) even when the In-
telligent Key is inside the vehicle. This
is not a malfunction. To turn off the In-
telligent Key battery discharge indica-
tor, touch the ignition switch with the
Intelligent Key again.
• If the Intelligent Key battery discharge indicator appears, replace the battery
as soon as possible. For additional in-
formation, refer to “Battery replace-
ment” in the “Do-it-yourself ” section of
this manual.
NISSAN ANTI-THEFT SYSTEM
(NATS) (if so equipped)
The NISSAN Anti-Thef t System (NATS) will
not allow the engine to start without the
use of the registered NATS key.
If the engine does not start by using the
registered NATS key, it may be due to inter-
ference caused by:
• Another NATS key.
• An automated toll road device.
• An automated payment device.
• Other devices that transmit similar sig-nals.
Start the engine using the following proce-
dure:
1. Remove any items that may be causing the interference away from the NATS key.
2. Leave the ignition switch in the ON posi- tion for approximately 5 seconds.
3. Place the ignition switch in the OFF or LOCK position, and wait approximately
10 seconds.
4. Repeat steps 2 and 3.
5. Start the engine.
6. Repeat the steps above until all possible interferences are eliminated. If this procedure allows the engine to start,
NISSAN recommends placing the regis-
tered NATS key separate from other de-
vices to avoid interference.
NISSAN VEHICLE IMMOBILIZER
SYSTEM
The NISSAN Vehicle Immobilizer System
will not allow the engine to start without
the use of the registered key.
If the engine fails to start using a registered
key (for example, when interference is
caused by another registered key, an auto-
mated toll road device or automatic pay-
ment device on the key ring), restart the
engine using the following procedures:
1. Leave the ignition switch in the ON posi-
tion for approximately 5 seconds.
2. Turn the ignition switch to the OFF or LOCK position, and wait approximately
10 seconds.
3. Repeat steps 1 and 2.
4. Restart the engine while holding the de- vice (which may have caused the inter-
ference) separate from the registered
key.
5-14Starting and driving