2020 NISSAN KICKS phone
[x] Cancel search: phonePage 268 of 500
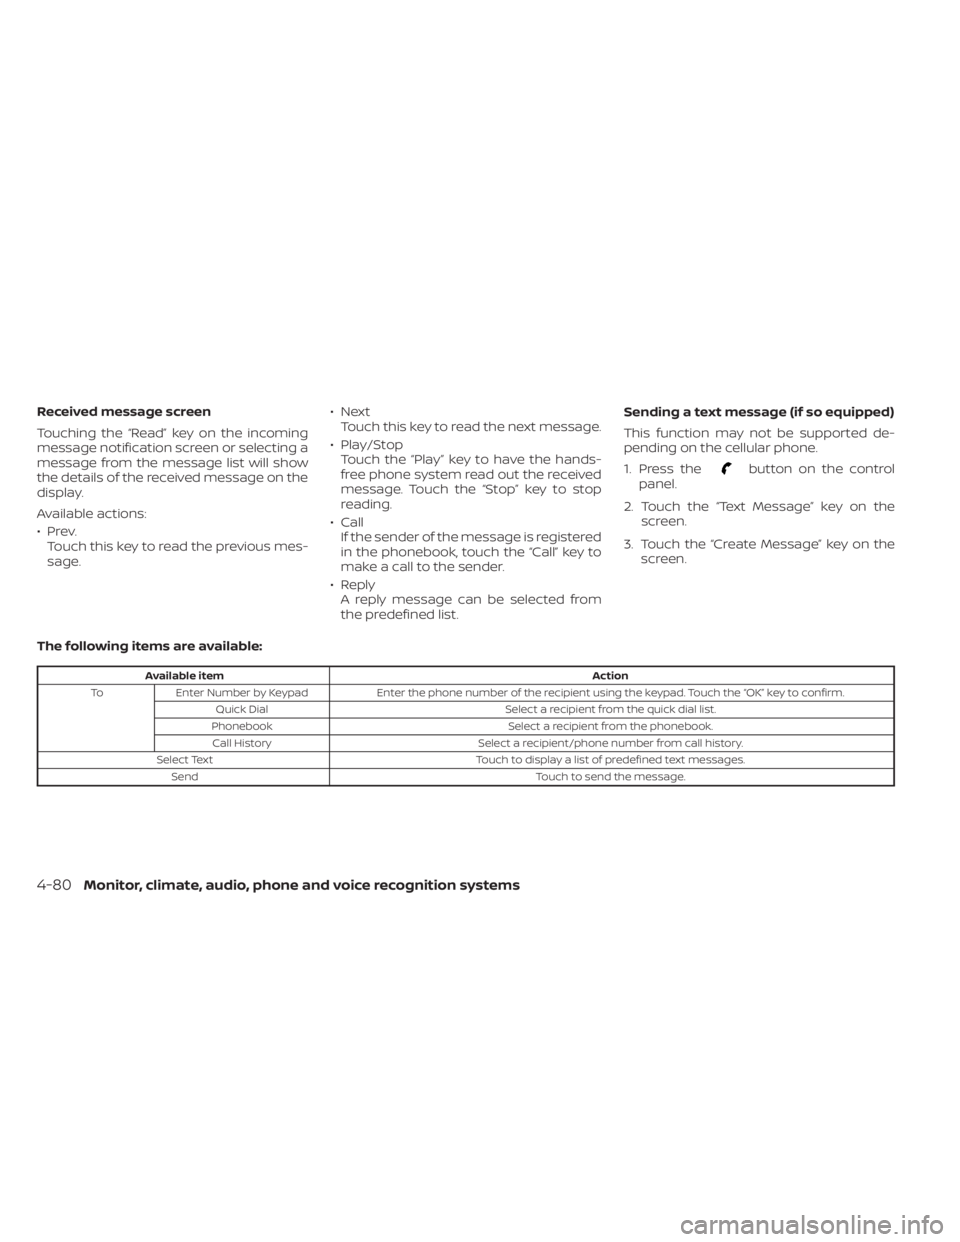
Received message screen
Touching the “Read” key on the incoming
message notification screen or selecting a
message from the message list will show
the details of the received message on the
display.
Available actions:
•Prev.Touch this key to read the previous mes-
sage. •Next
Touch this key to read the next message.
• Play/Stop Touch the “Play ” key to have the hands-
free phone system read out the received
message. Touch the “Stop” key to stop
reading.
• Call If the sender of the message is registered
in the phonebook, touch the “Call” key to
make a call to the sender.
• Reply A reply message can be selected from
the predefined list. Sending a text message (if so equipped)
This function may not be supported de-
pending on the cellular phone.
1. Press the
button on the control
panel.
2. Touch the “Text Message” key on the screen.
3. Touch the “Create Message” key on the screen.
The following items are available:
Available item Action
To Enter Number by Keypad Enter the phone number of the recipient using the keypad. Touch the “OK” key to confirm.
Quick Dial Select a recipient from the quick dial list.
Phonebook Select a recipient from the phonebook.
Call History Select a recipient/phone number from call history.
Select Text Touch to display a list of predefined text messages.
Send Touch to send the message.
4-80Monitor, climate, audio, phone and voice recognition systems
Page 269 of 500

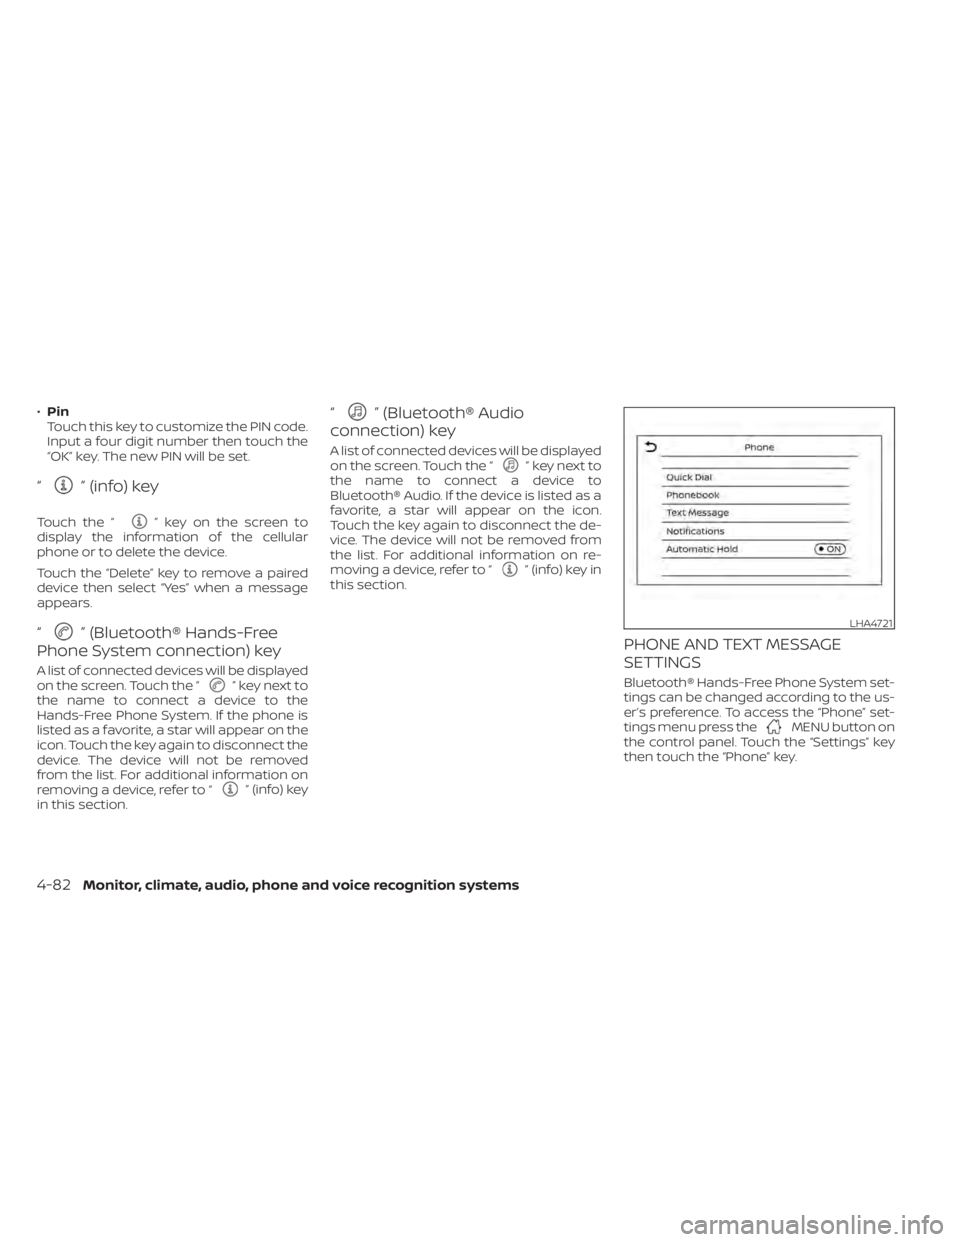
BLUETOOTH® CONNECTIONS
SCREEN
1. “” (back) key
2. Bluetooth tab
3. Connections screen
4. “Add New” key
5. “
” (settings) key
6. “” (info) key
7. “” (Bluetooth® Audio connection)
key
8. “
” (Bluetooth® Hands-Free Phone
System connection) key
Access the Connections screen to change
settings and view Bluetooth® information.
To access the Connections screen press
the
MENU button on the control panel.
Touch the “Connections” key on the screen
then select the Bluetooth tab.
The paired phone will be added to the list
on the Bluetooth® connections screen.
Touching the name of another device on
the list will switch the connected device.
“”(back) key
Touch the “” key to go back to the
previous screen.
Connecting Bluetooth®
For additional information on connecting a
cellular phone or device to the Bluetooth®
Hands-Free Phone System, refer to “Con-
necting procedure” in this section.
NOTE:
Some cellular phones or other devices
may cause interference or a buzzing
noise to come from the audio system
speakers. Storing the device in a differ-
ent location may reduce or eliminate the
noise.
Bluetooth tab
This tab will display up to six Bluetooth®
devices. If six devices are already con-
nected, one of the devices must be deleted
before another device can be connected.
“Add New” key
Touch the “Add New” key on the screen to
connect a new Bluetooth® device. For ad-
ditional information, refer to “Connecting
procedure” in this section.
“” (Bluetooth® settings) key
Touch the “” key on the screen to
display a list of options.
• Bluetooth
Touch this key to turn the Bluetooth®
connection on or off
• Favorite (Connection first)
Touch this key to change which device
will be connected first when multiple de-
vices are connected to the vehicle.
Turn the “
” key on or off to make the
device a favorite connection.
Turn the “
” key on or off to make the
device a favorite connection.
LHA4716
Monitor, climate, audio, phone and voice recognition systems4-81
Page 270 of 500
•Pin
Touch this key to customize the PIN code.
Input a four digit number then touch the
“OK” key. The new PIN will be set.
“” (info) key
Touch the “” key on the screen to
display the information of the cellular
phone or to delete the device.
Touch the “Delete” key to remove a paired
device then select “Yes” when a message
appears.
“” (Bluetooth® Hands-Free
Phone System connection) key
A list of connected devices will be displayed
on the screen. Touch the “” key next to
the name to connect a device to the
Hands-Free Phone System. If the phone is
listed as a favorite, a star will appear on the
icon. Touch the key again to disconnect the
device. The device will not be removed
from the list. For additional information on
removing a device, refer to “
” (info) key
in this section.
“” (Bluetooth® Audio
connection) key
A list of connected devices will be displayed
on the screen. Touch the “” key next to
the name to connect a device to
Bluetooth® Audio. If the device is listed as a
favorite, a star will appear on the icon.
Touch the key again to disconnect the de-
vice. The device will not be removed from
the list. For additional information on re-
moving a device, refer to “
” (info) key in
this section.
PHONE AND TEXT MESSAGE
SETTINGS
Bluetooth® Hands-Free Phone System set-
tings can be changed according to the us-
er’s preference. To access the “Phone” set-
tings menu press the
MENU button on
the control panel. Touch the “Settings” key
then touch the “Phone” key.
LHA4721
4-82Monitor, climate, audio, phone and voice recognition systems
Page 271 of 500
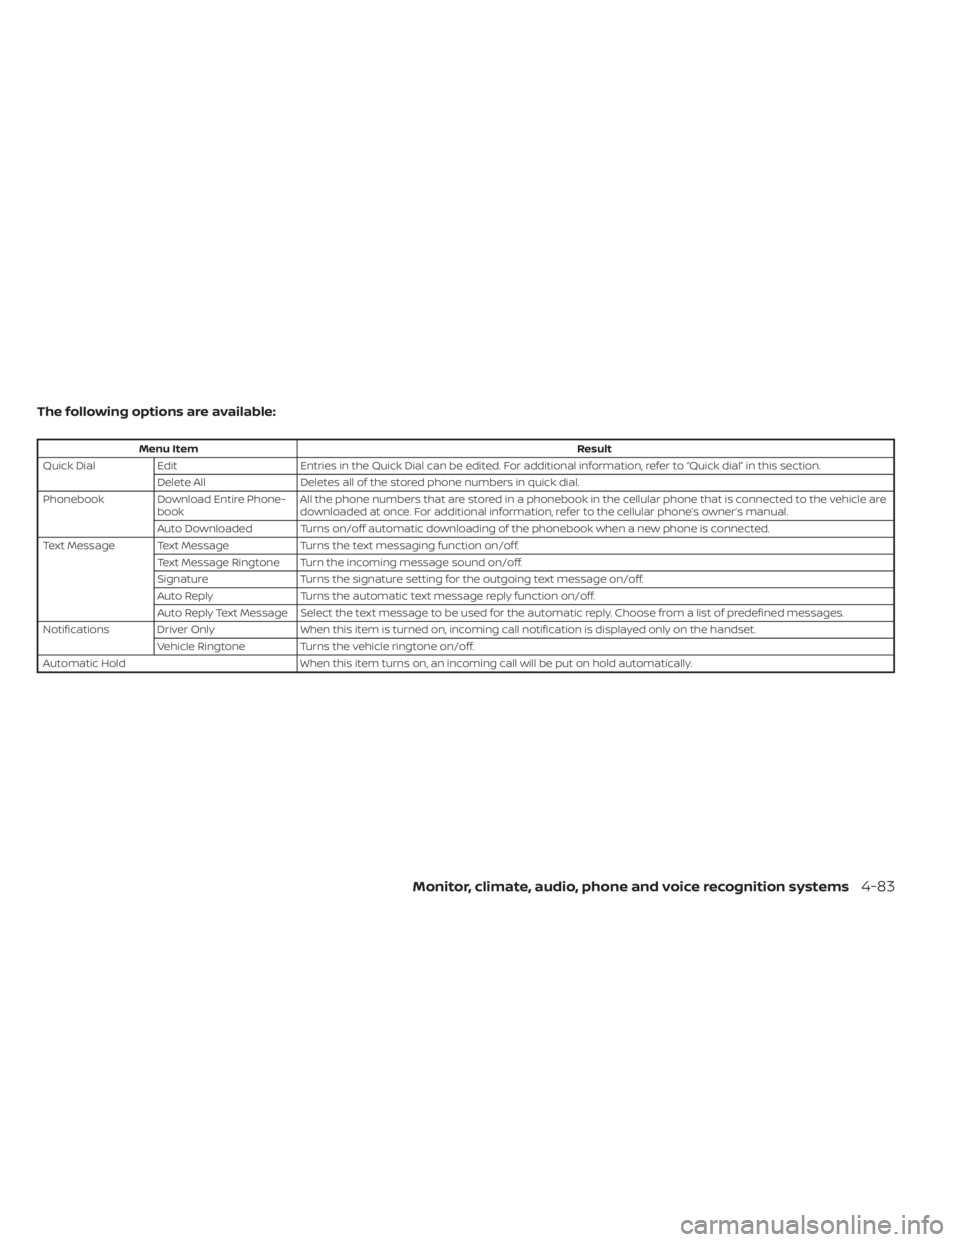
The following options are available:
Menu ItemResult
Quick Dial Edit Entries in the Quick Dial can be edited. For additional information, refer to “Quick dial” in this section.
Delete All Deletes all of the stored phone numbers in quick dial.
Phonebook Download Entire Phone- book All the phone numbers that are stored in a phonebook in the cellular phone that is connected to the vehicle are
downloaded at once. For additional information, refer to the cellular phone’s owner’s manual.
Auto Downloaded Turns on/off automatic downloading of the phonebook when a new phone is connected.
Text Message Text Message Turns the text messaging function on/off.
Text Message Ringtone Turn the incoming message sound on/off.
Signature Turns the signature setting for the outgoing text message on/off.
Auto Reply Turns the automatic text message reply function on/off.
Auto Reply Text Message Select the text message to be used for the automatic reply. Choose from a list of predefined messages.
Notifications Driver Only When this item is turned on, incoming call notification is displayed only on the handset.
Vehicle Ringtone Turns the vehicle ringtone on/off.
Automatic Hold When this item turns on, an incoming call will be put on hold automatically.
Monitor, climate, audio, phone and voice recognition systems4-83
Page 272 of 500
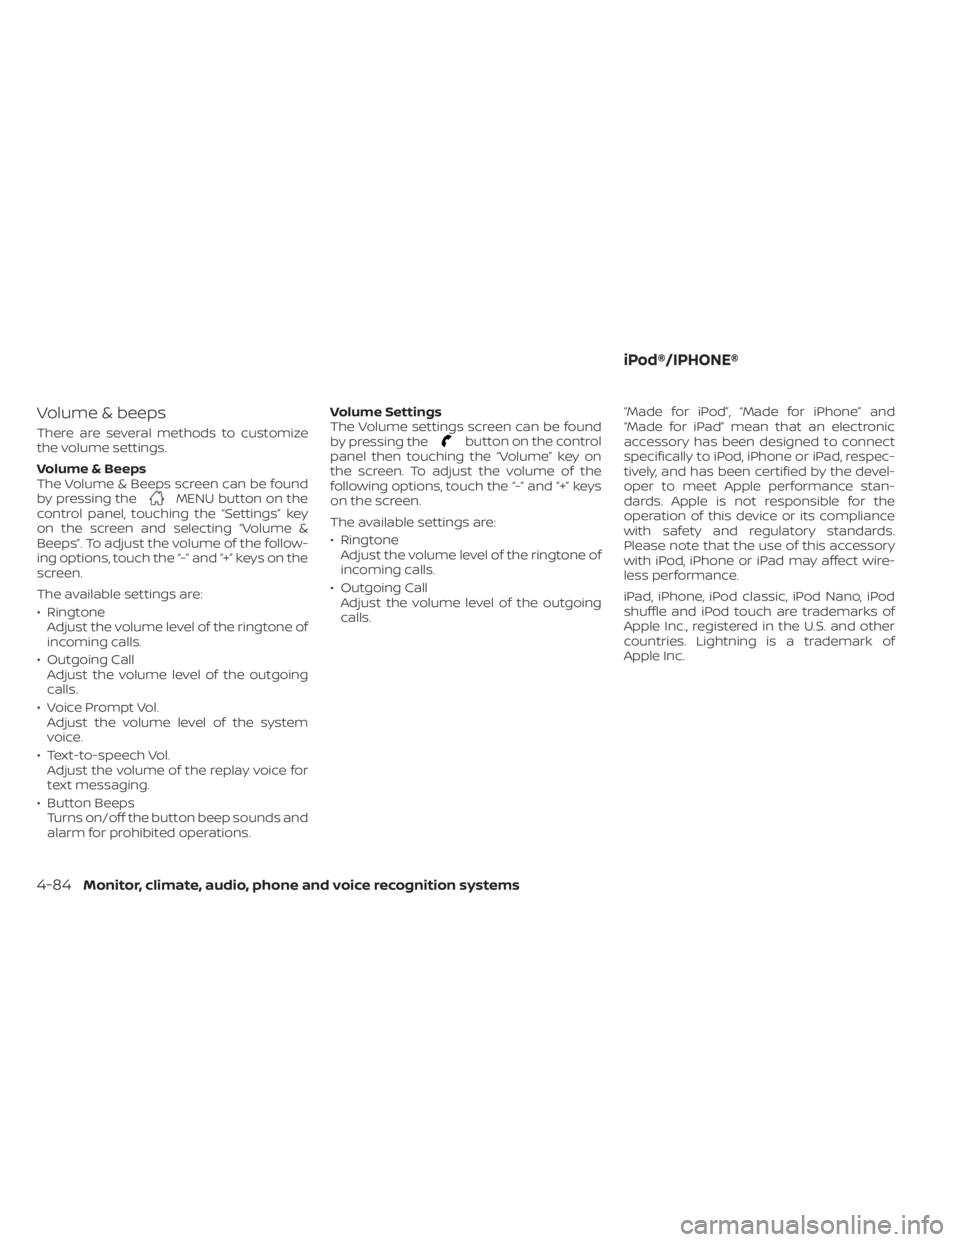
Volume & beeps
There are several methods to customize
the volume settings.
Volume & Beeps
The Volume & Beeps screen can be found
by pressing the
MENU button on the
control panel, touching the “Settings” key
on the screen and selecting “Volume &
Beeps”. To adjust the volume of the follow-
ing options, touch the “-” and “+” keys on the
screen.
The available settings are:
• Ringtone Adjust the volume level of the ringtone of
incoming calls.
• Outgoing Call Adjust the volume level of the outgoing
calls.
• Voice Prompt Vol. Adjust the volume level of the system
voice.
• Text-to-speech Vol. Adjust the volume of the replay voice for
text messaging.
• Button Beeps Turns on/off the button beep sounds and
alarm for prohibited operations. Volume Settings
The Volume settings screen can be found
by pressing the
button on the control
panel then touching the “Volume” key on
the screen. To adjust the volume of the
following options, touch the “-” and “+” keys
on the screen.
The available settings are:
• Ringtone Adjust the volume level of the ringtone of
incoming calls.
• Outgoing Call Adjust the volume level of the outgoing
calls. “Made for iPod”, “Made for iPhone” and
“Made for iPad” mean that an electronic
accessory has been designed to connect
specifically to iPod, iPhone or iPad, respec-
tively, and has been certified by the devel-
oper to meet Apple performance stan-
dards. Apple is not responsible for the
operation of this device or its compliance
with safety and regulatory standards.
Please note that the use of this accessory
with iPod, iPhone or iPad may affect wire-
less performance.
iPad, iPhone, iPod classic, iPod Nano, iPod
shuffle and iPod touch are trademarks of
Apple Inc., registered in the U.S. and other
countries. Lightning is a trademark of
Apple Inc.
iPod®/IPHONE®
4-84Monitor, climate, audio, phone and voice recognition systems
Page 285 of 500
ON (Normal operating position)
This position turns on the ignition system
and electrical accessories.
ON has a battery saver feature that will
place the ignition switch in the OFF posi-
tion, if the vehicle is not running, af ter some
time under the following conditions:
• The shif t lever is in P (Park).
• The hazard lamps are off.
• The turn signals are off.
The battery saver feature will be canceled if
any of the following occur:
• The shif t lever is moved out of the P (Park)position.
• The ignition switch changes position.
• The hazard lamps are turned on.
• The turn signals are turned on.
CAUTION
Do not leave the vehicle with the igni-
tion switch in the ON or AUTO ACC posi-
tion when the engine is not running for
an extended period. This can discharge
the battery. OFF
The ignition switch is in the OFF position
when the engine is turned off using the
ignition switch.
AUTO ACC:
With the vehicle in the P (Park) position, the
Intelligent Key with you, and the ignition
switch placed from the ON to the OFF po-
sition, the radio can still be used for a period
of time, or until the driver’s door is opened.
Af ter a period of time, functions such as
radio, navigation, and Bluetooth® Hands-
Free Phone System may be restarted by
pressing the “POWER button/VOLUME con-
trol knob” or the key fob unlock button. For
additional information, refer to “Monitor, cli-
mate, audio, phone and voice recognition
systems” in this manual.EMERGENCY ENGINE SHUT OFF
To shut off the engine in an emergency
situation while driving, perform the follow-
ing procedure:
• Rapidly push the ignition switch three
consecutive times in less than 1.5 sec-
onds, or
• Push and hold the ignition switch for more than 2 seconds.
NISSAN INTELLIGENT KEY®
BATTERY DISCHARGE
If the battery of the NISSAN Intelligent Key®
is discharged or environmental conditions
interfere with the Intelligent Key operation,
start the engine according to the following
procedure:
1. Place the shif t lever in the P (Park) position.
2. Firmly apply the foot brake.
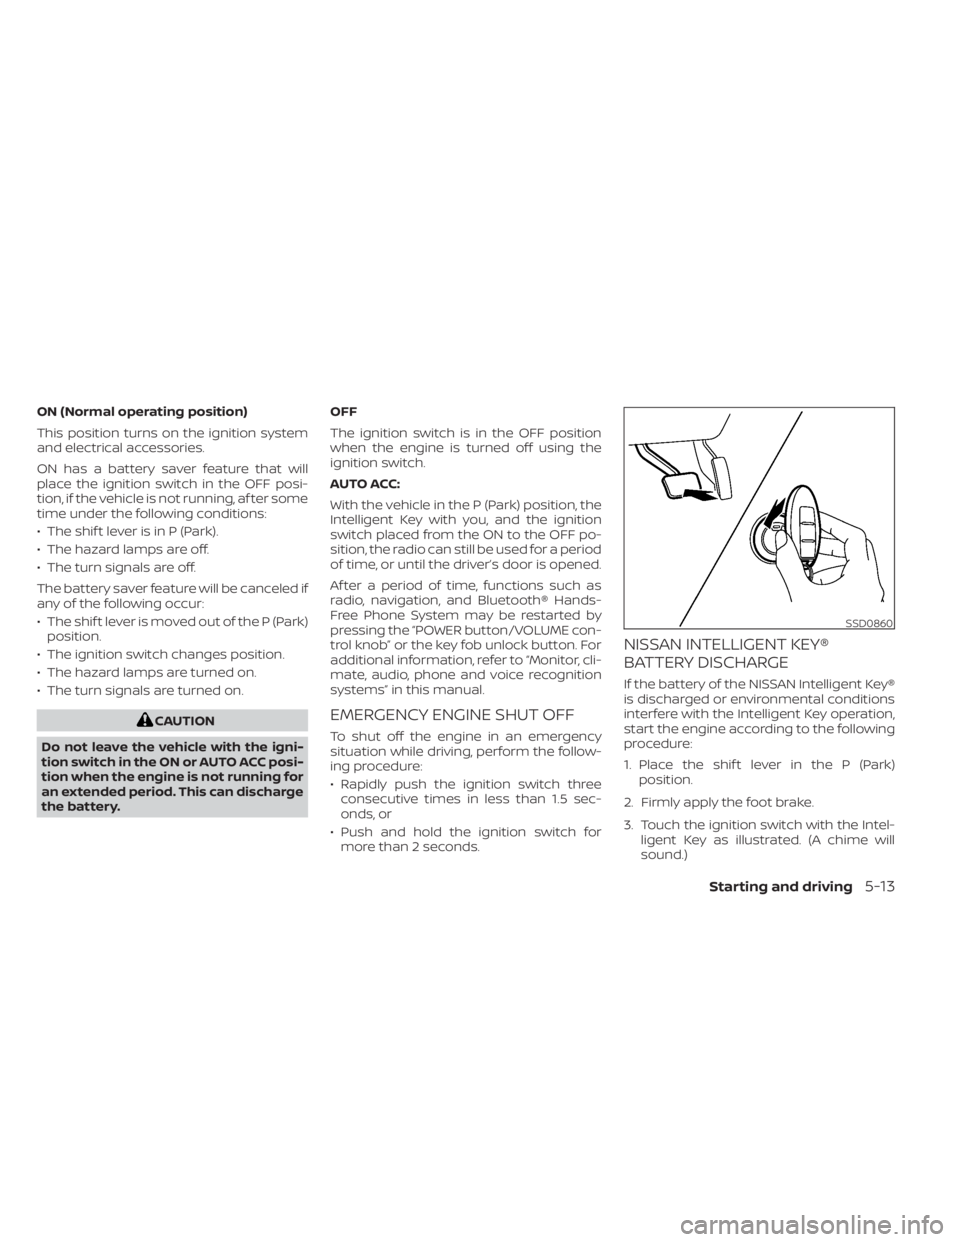
3. Touch the ignition switch with the Intel- ligent Key as illustrated. (A chime will
sound.)
SSD0860
Starting and driving5-13
Page 288 of 500
• If the engine is very hard to start be-cause it is flooded, depress the accel-
erator pedal all the way to the floor
and hold it. Push the ignition switch to
the ON position to start cranking the
engine. Af ter 5 or 6 seconds, stop
cranking by pushing the ignition
switch to LOCK. Af ter cranking the en-
gine, release the accelerator pedal.
Crank the engine with your foot off the
accelerator pedal by depressing the
brake pedal and pushing the ignition
switch to start the engine. If the engine
starts, but fails to run, repeat the
above procedure.
CAUTION
Do not operate the starter for more
than 15 seconds at a time. If the engine
does not start, push the ignition switch
to the OFF position and wait 10 seconds
before cranking again, otherwise the
starter could be damaged. 4.
Warm-up:
Allow the engine to idle for at least 30
seconds af ter starting. Do not race the
engine while warming it up. Drive at a
moderate speed for a short distance
first, especially in cold weather. In cold
weather, keep the engine running for a
minimum of2-3minutes before shut-
ting it off. Starting and stopping the en-
gine over a short period of time may
make the vehicle more difficult to start.
5. To stop the engine, move the shif t lever to the P (Park) position and push the
ignition switch to the OFF position.NOTE:
Care should be taken to avoid situa-
tions that can lead to potential bat-
tery discharge and potential no-start
conditions such as:
1. Installation or extended use of elec- tronic accessories that consume bat-
tery power when the engine is not
running (phone chargers, GPS, DVD
players, etc.).
2. The vehicle is not driven regularly and/or only driven short distances.
In these cases, the battery may need to
be charged to maintain battery health.
REMOTE ENGINE START (if so
equipped)
Vehicles started with the Remote Engine
Start require the ignition switch to be
placed in the ON position before the shif t
lever can be moved from the P (Park) posi-
tion. To place the ignition switch in the ON
position, follow these steps:
1. Make sure that the Intelligent Key is on you.
2. Apply the brake.
3. Push the ignition switch once to the ON position.
For additional information, refer to “NISSAN
Intelligent Key®” in the “Pre-driving checks
and adjustments” section of this manual.
5-16Starting and driving
Page 421 of 500
• If the battery is labeled “do not open” it ismaintenance free and battery fluid
should not be checked. It is recom-
mended that you visit a NISSAN dealer or
a qualified specialist workshop to con-
firm the battery’s performance.
• Keep the battery surface clean and dry. Clean the battery with a solution of bak-
ing soda and water.
• Make certain the terminal connections are clean and securely tightened.
• If the vehicle is not to be used for 30 days or longer, disconnect the negative (-) bat-
tery terminal cable to prevent discharge.
NOTE:
Care should be taken to avoid situations
that can lead to potential battery dis-
charge and potential no-start conditions
such as:
1. Installation or extended use of elec-
tronic accessories that consume bat-
tery power when the engine is not run-
ning (Phone chargers, GPS, DVD
players, etc.)
2. Vehicle is not driven regularly and/or
only driven short distances.
In these cases, the battery may need to
be charged to maintain battery health.
WARNING
• Do not expose the battery to flames,
an electrical spark or a cigarette. Hy-
drogen gas generated by the battery
is explosive. Explosive gases can
cause blindness or injury. Do not al-
low battery fluid to contact your skin,
eyes, fabrics or painted surfaces. Sul-
furic acid can cause blindness or in-
jury. Af ter touching a battery or bat-
tery cap, do not touch or rub your
eyes. Thoroughly wash your hands. If
the acid contacts your eyes, skin or
clothing, immediately flush with wa-
ter for at least 15 minutes and seek
medical attention.
• When working on or near a battery,
always wear suitable eye protection
and remove all jewelry.
• Battery posts, terminals and related
accessories contain lead and lead
compounds. Wash hands af ter
handling.
• Keep battery out of the reach of
children.
• Do not tip the battery.
NOTE:
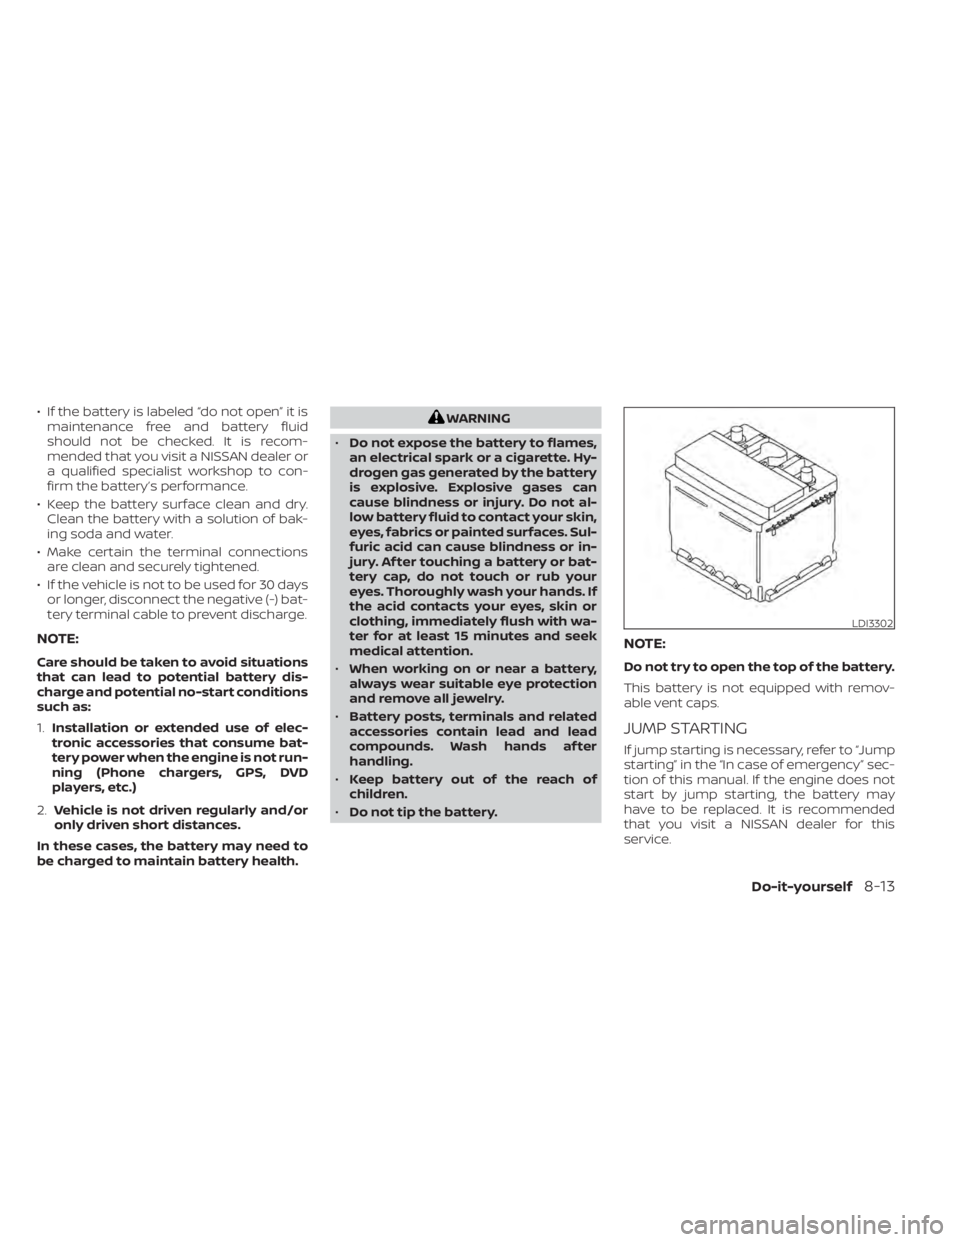
Do not try to open the top of the battery.
This battery is not equipped with remov-
able vent caps.
JUMP STARTING
If jump starting is necessary, refer to “Jump
starting” in the “In case of emergency” sec-
tion of this manual. If the engine does not
start by jump starting, the battery may
have to be replaced. It is recommended
that you visit a NISSAN dealer for this
service.
LDI3302
Do-it-yourself8-13