Page 457 of 559

When performing any inspection or main-
tenance work on your vehicle, always take
care to prevent serious accidental injury to
yourself or damage to the vehicle. The fol-
lowing are general precautions which
should be closely observed.
WARNING
∙ Park the vehicle on a level surface, ap-ply the parking brake securely and
block the wheels to prevent the ve-
hicle from moving. Move the shif t le-
ver to P (Park).
∙ Be sure the ignition key is in the OFF or LOCK position when performing any
parts replacement or repairs.
∙ If you must work with the engine run- ning, keep your hands, clothing, hair
and tools away from moving fans,
belts and any other moving parts.
∙ It is advisable to secure or remove any loose clothing and remove any jew-
elry, such as rings, watches, etc. be-
fore working on your vehicle.
∙ Always wear eye protection whenever you work on your vehicle. ∙
Your vehicle is equipped with an auto-
matic engine cooling fan. It may come on
at any time without warning, even if the
ignition key is in the OFF position and the
engine is not running. To avoid injury, al-
ways disconnect the negative battery
cable before working near the fan.
∙ If you must run the engine in an en- closed space such as a garage, be sure
there is proper ventilation for exhaust
gases to escape.
∙ Never get under the vehicle while it is supported only by a jack. If it is neces-
sary to work under the vehicle, sup-
port it with safety stands.
∙ Keep smoking materials, flame and sparks away from the fuel tank and
battery.
∙ On gasoline engine models, the fuel filter or fuel lines should be serviced. It
is recommended that you visit a
NISSAN dealer for this service because
the fuel lines are under high pressure
even when the engine is off.
CAUTION
∙ Do not work under the hood while the
engine is hot. Turn the engine off and
wait until it cools down. ∙
Avoid contact with used engine oil and
coolant. Improperly disposed engine
oil, engine coolant and/or other vehicle
fluids can damage the environment. Al-
ways conform to local regulations for
disposal of vehicle fluid.
∙ Never leave the engine or the trans- mission related component harness
connector disconnected while the ig-
nition switch is in the ON position.
∙ Never connect or disconnect the bat- tery or any transistorized component
while the ignition switch is in the ON
position.
This “Do-it-yourself ” section gives instruc-
tions regarding only those items which are
relatively easy for an owner to perform.
A Genuine NISSAN service manual is also
available. For additional information, refer
to “Owner’s Manual/Service Manual order
information” in the “Technical and con-
sumer information” section of this manual.
You should be aware that incomplete or
improper servicing may result in operating
difficulties or excessive emissions, and
could affect warranty coverage. If in doubt
about any servicing, it is recommended
that you have it done by a NISSAN dealer.
MAINTENANCE PRECAUTIONS
8-2Do-it-yourself
Page 458 of 559
KR20DDET engine
1. Engine coolant reservoir
2. Drive belt location
3. Engine oil filler cap
4. Brake fluid reservoir
5. Battery
6. Fuse/Fusible link box
7. Air cleaner
8. Radiator cap
9. Engine oil dipstick
10. Windshield-washer fluid reservoir
LDI3260
ENGINE COMPARTMENT CHECK
LOCATIONS
Do-it-yourself8-3
Page 459 of 559
PR25DD engine
1. Engine coolant reservoir
2. Drive belt location
3. Engine oil filler cap
4. Engine oil dipstick
5. Brake fluid reservoir
6. Battery
7. Fuse/Fusible link box
8. Air cleaner
9. Radiator cap
10. Windshield-washer fluid reservoir
LDI3261
8-4Do-it-yourself
Page 462 of 559
CHECKING ENGINE OIL LEVEL
1. Park the vehicle on a level surface andapply the parking brake.
2. Start the engine and let it idle until it reaches operating temperature.
3. Turn off the engine. Wait more than
10 minutes for the oil to drain back
into the oil pan.
4. Remove the dipstick and wipe it clean. Reinsert it all the way. 5. Remove the dipstick again and check
the oil level. It should be between the H
(High) and L (Low) marks�B. This is the
normal operating oil level range. If the
oil level is below the L (Low) mark
�A,
remove the oil filler cap and pour rec-
ommended oil through the opening.
Do not fill oil level above H (High)
mark
�C.
6. Recheck oil level with the dipstick.
It is normal to add some oil between oil
maintenance intervals or during the
break-in period, depending on the sever-
ity of operating conditions.
KR20DDET engine
LDI3263
PR25DD engine
LDI3264LDI0371
ENGINE OIL
Do-it-yourself8-7
Page 463 of 559

CAUTION
∙ Oil level should be checked regularly.Operating the engine with an insuffi-
cient amount of oil can damage the
engine, and such damage is not cov-
ered by warranty.
∙ It is normal to add some oil between oil maintenance intervals or during
the break-in period, depending on the
severity of operating conditions.
CHANGING ENGINE OIL AND OIL
FILTER
For additional information on engine oil
and oil filter change, refer to the instruc-
tions outlined in this section.
Vehicle set-up
1. Park the vehicle on a level surface and
apply the parking brake.
2. Run the engine until it reaches operat- ing temperature.
3. Turn the engine off and wait for 15 min- utes.
4. Raise and support the vehicle using a suitable floor jack and safety jack
stands. ∙ Place the safety jack stands under the
vehicle jack-up points.
∙ A suitable adapter should be attached to the jack stand saddle.
CAUTION
Make sure the correct lif ting and sup-
port points are used to avoid vehicle
damage.
�1Oil filler cap
LDI3369
8-8Do-it-yourself
Page 464 of 559
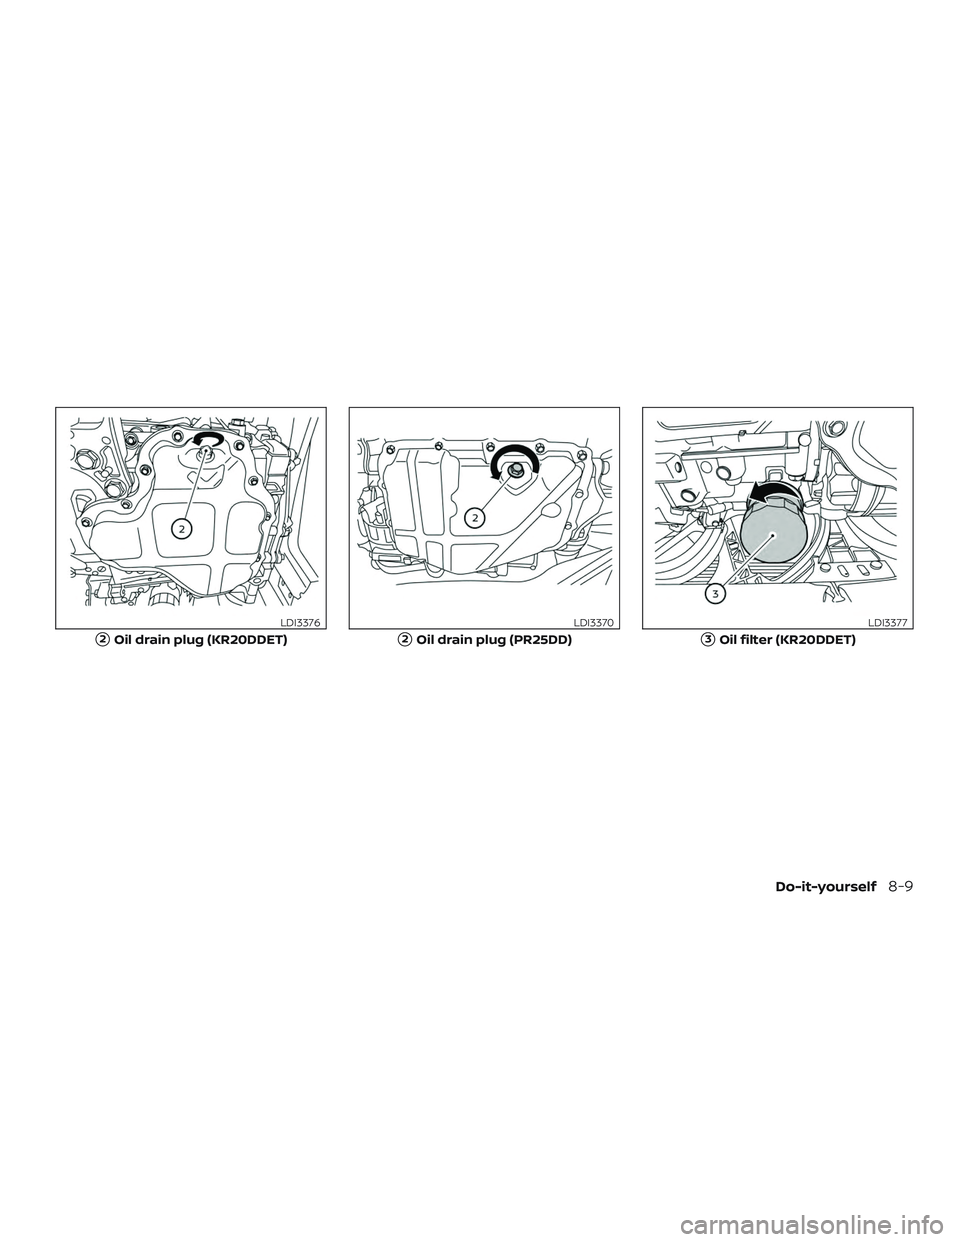
�2Oil drain plug (KR20DDET)
LDI3376
�2Oil drain plug (PR25DD)
LDI3370
�3Oil filter (KR20DDET)
LDI3377
Do-it-yourself8-9
Page 465 of 559
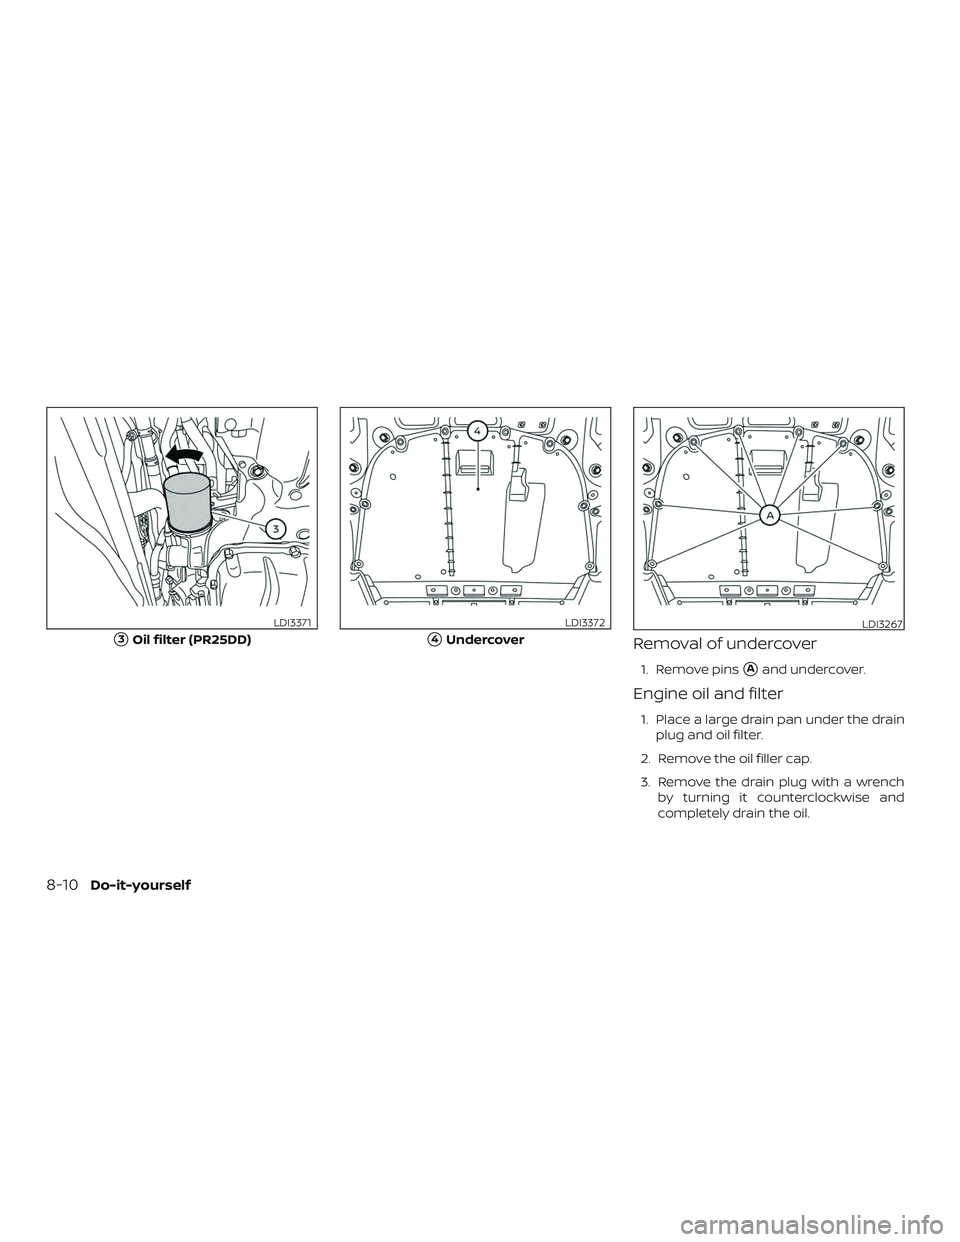
Removal of undercover
1. Remove pins�Aand undercover.
Engine oil and filter
1. Place a large drain pan under the drainplug and oil filter.
2. Remove the oil filler cap.
3. Remove the drain plug with a wrench by turning it counterclockwise and
completely drain the oil.
�3Oil filter (PR25DD)
LDI3371
�4Undercover
LDI3372LDI3267
8-10Do-it-yourself
Page 466 of 559

CAUTION
Be careful not to burn yourself, as the
engine oil is hot.
WARNING
∙ Prolonged and repeated contact withused engine oil may cause skin
cancer.
∙ Try to avoid direct skin contact with used oil. If skin contact is made, wash
thoroughly with soap or hand cleaner
as soon as possible.
∙ Keep used engine oil out of reach of children.
4. Loosen the oil filter with an oil filter wrench by turning it counterclockwise.
Remove the oil filter by turning it by
hand.
5. Wipe the engine oil filter mounting sur- face with a clean rag.
CAUTION
Be sure to remove any old gasket mate-
rial remaining on the sealing surface of
the engine. Failure to do so could lead to
an oil leak and engine damage. ∙ The dipstick must be inserted in place
to prevent oil spillage from the dip-
stick hole when filling the engine with
oil.
6. Coat the gasket on the new filter with clean engine oil.
7. Screw in the oil filter clockwise until a slight resistance is felt, then tighten ad-
ditionally more than 2/3 turn.
Oil filter tightening torque: 11 to 15 f t-lb (14.7 to 20.6 N·m)
8. Clean and re-install the drain plug with a new washer. Securely tighten the
drain plug with a wrench. Do not use
excessive force.
Drain plug tightening torque: 22 to 29 f t-lb (29.4 to 39.2 N·m)
9. Refill the engine with the recom- mended oil through the oil filler open-
ing, and install the oil filler cap securely.
For additional information about drain and
refill capacity, refer to “Recommended
fluids/lubricants and capacities” in the
“Technical and consumer information” sec-
tion of this manual. The drain and refill ca-
pacity depends on the oil temperature and
drain time. Use these specifications for ref- erence only. Always use the dipstick to de-
termine the proper amount of oil in the
engine.
10. Start the engine and check for leakage
around the drain plug and the oil filter.
Correct as required. Turn the engine off
and wait more than 15 minutes. Check
the oil level with the dipstick. Add en-
gine oil if necessary.
Af ter the operation
1. Reinstall undercover in reverse order ofremoval.
2. Lower the vehicle carefully to the ground.
3. Reset the oil control system (if so equipped) and oil and filter mainte-
nance reminder. For additional infor-
mation, refer to "Vehicle information
display" in the "Instruments and con-
trols" section of this manual.
∙ Dispose of waste oil and filter properly.
∙ Check your local regulations.
Do-it-yourself8-11